目录antdv Vue upload自定义上传结合表单提交表单内联多个文件上传组件Ant Design Vue自定义上传逻辑antdv vue upload自定义上传结合表单提交 表
使用antdv的upload组件时发现个怪异的问题,上传文件状态每次改变后都会触发change事件,所以上传成功、失败、删除都会触发,而怪异的就是删除后触发change,见下图
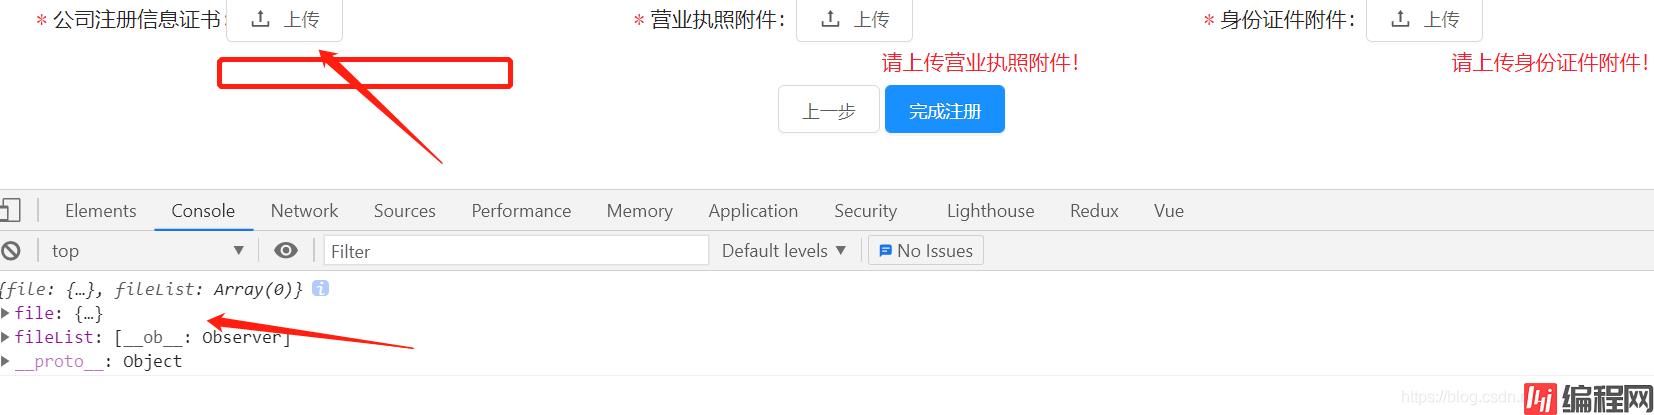
就算返回是空的,但只要出发了change,change都会默认返回如下结构的对象:
{
  file: {  },
  fileList: [  ]
}
也因为如此,每次表单提交的时候就算没有附件也不会去校验,所以放弃了upload组件的change事件,采用表单的options.getValueFromEvent(因为我这里有多个上传组件,所以多穿了一个key)
<a-upload
  name="file"
  v-decorator="[
    'reGISterCertificatePath',
    {
      rules: [
        { required: true, message: '请上传公司注册信息证书!' }
      ],
      getValueFromEvent: e =>
        handleChange(e, 'registerCertificatePath')
    }
  ]"
  :file-list="registerCertificatePathList"
  :customRequest="file => uploadFile(file, 'registerCertificate')"
>
  <a-button><a-icon type="upload" />上传</a-button>
</a-upload>
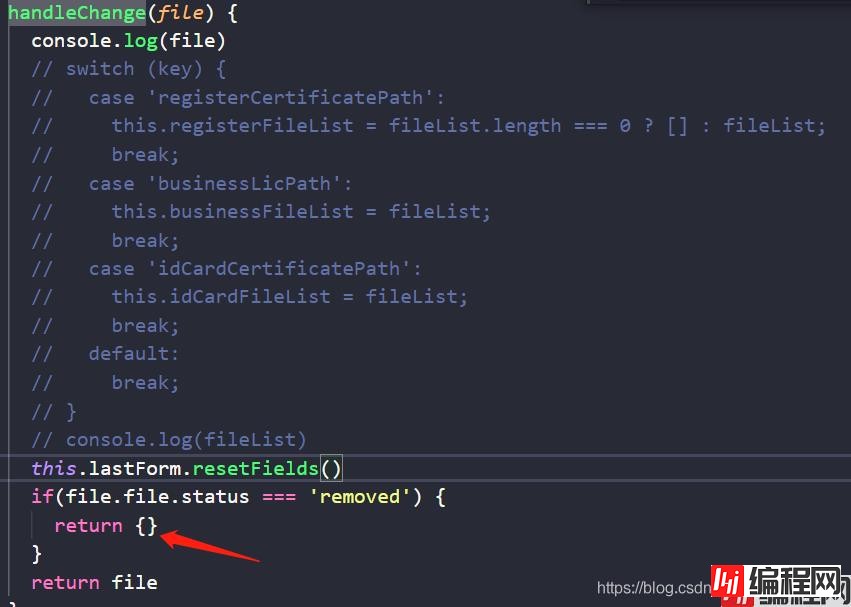
定义两个方法,重置表单组件setFileList和组件的change回调handleChange(注意这里不是upload的change)
setFileList(fileKey) {
  // 根据filekey值清空指定的上传文件列表
  this[`${fileKey}List`] = [];
  // 清除对应的表单组件值
  this.lastFORM.setFieldsValue({ [fileKey]: "" });
},
handleChange({ file, fileList }, key) {
  if (file.status === "removed" || file.status === "error") {
    // 当这两种状态时调用setFileList方法
    this.setFileList(key);
    return "";
  }
  // 给对应的上传组件文件列表赋值
  this[`${key}List`] = fileList;
  // 赋值给对应表单
  return file;
}
以下是上传的代码
uploadRequest(param)
 .then(({ success, message, data }) => {
   if (success) {
     const { fileName, filePath } = data;
     this.fileData[`${fileKey}Path`] = filePath;
     this.fileData[`${fileKey}Name`] = fileName;
     this.$message.success(message);
     // 上传成功将状态设置为 done
     file.onSuccess();
   } else {
     this.$message.warning(message);
     // 上传成功将状态设置为 error
     file.onError();
   }
 })
 .catch(error => {
   this.$message.error("上传失败!");
   console.log("上传失败:", error);
   // 上传成功将状态设置为 error
   file.onError();
 });
完整代码:
<template>
  <div class="last">
    <a-form
      :form="lastForm"
      :label-col="{ span: 10 }"
      :wrapper-col="{ span: 14 }"
      @submit="lastSubmit"
    >
      <a-row>
        <a-col :span="8">
          <a-form-item label="公司注册信息证书">
            <a-upload
              name="file"
              v-decorator="[
                'registerCertificatePath',
                {
                  rules: [
                    { required: true, message: '请上传公司注册信息证书!' }
                  ],
                  getValueFromEvent: e =>
                    handleChange(e, 'registerCertificatePath')
                }
              ]"
              :file-list="registerCertificatePathList"
              :customRequest="file => uploadFile(file, 'registerCertificate')"
            >
              <a-button><a-icon type="upload" />上传</a-button>
            </a-upload>
          </a-form-item>
        </a-col>
        <a-col :span="8">
          <a-form-item label="营业执照附件">
            <a-upload
              name="file"
              v-decorator="[
                'businessLicPath',
                {
                  rules: [{ required: true, message: '请上传营业执照附件!' }],
                  getValueFromEvent: e => handleChange(e, 'businessLicPath')
                }
              ]"
              :file-list="businessLicPathList"
              :customRequest="file => uploadFile(file, 'businessLic')"
            >
              <a-button><a-icon type="upload" />上传</a-button>
            </a-upload>
          </a-form-item>
        </a-col>
        <a-col :span="8">
          <a-form-item label="身份证件附件">
            <a-upload
              name="file"
              v-decorator="[
                'idCardCertificatePath',
                {
                  rules: [{ required: true, message: '请上传身份证件附件!' }],
                  getValueFromEvent: e =>
                    handleChange(e, 'idCardCertificatePath')
                }
              ]"
              :file-list="idCardCertificatePathList"
              :customRequest="file => uploadFile(file, 'idCardCertificate')"
            >
              <a-button><a-icon type="upload" />上传</a-button>
            </a-upload>
          </a-form-item>
        </a-col>
      </a-row>
      <div class="btn">
        <a-button @click="prev">
          上一步
        </a-button>
        <a-button type="primary" html-type="submit">
          完成注册
        </a-button>
      </div>
    </a-form>
  </div>
</template>
<script>
import { mapState } from "vuex";
import { uploadRequest } from "../../request/Http";
export default {
computed: {
...mapState(["oid", "billKey"])
},
data() {
return {
lastForm: this.$form.createForm(this, { name: "lastForm" }),
fileData: {
registerCertificateName: "", // 公司注册证书
registerCertificatePath: "", // 公司注册证书路径
businessLicName: "", // 营业执照附件
businessLicPath: "", // 营业执照附件路径
idCardCertificateName: "", // 身份证件附件
idCardCertificatePath: "" // 身份证件附件路径
},
registerCertificatePathList: [],
businessLicPathList: [],
idCardCertificatePathList: []
};
},
methods: {
lastSubmit(e) {
e.preventDefault();
this.lastForm.validateFields((err, values) => {
if (!err) {
values = this.fileData;
this.$emit("sub", values);
}
});
},
prev() {
this.$emit("prev");
},
setFileList(fileKey) {
this[`${fileKey}List`] = [];
this.lastForm.setFieldsValue({ [fileKey]: "" });
},
handleChange({ file, fileList }, key) {
if (file.status === "removed" || file.status === "error") {
this.setFileList(key);
return "";
}
this[`${key}List`] = fileList;
return file;
},
uploadFile(file, fileKey) {
const formData = new FormData();
formData.append("file", file.file);
const param = {
billKey: this.billKey,
billId: this.oid,
data: formData
};
uploadRequest(param)
.then(({ success, message, data }) => {
if (success) {
const { fileName, filePath } = data;
this.fileData[`${fileKey}Path`] = filePath;
this.fileData[`${fileKey}Name`] = fileName;
this.$message.success(message);
file.onSuccess();
} else {
this.$message.warning(message);
file.onError();
}
})
.catch(error => {
this.$message.error("上传失败!");
console.log("上传失败:", error);
file.onError();
});
}
}
};
</script><style lang="less">
.last {
.ant-upload {
width: 100%;
text-align: left;
.ant-btn{
width: 230px;
}
}
.ant-upload-list {
text-align: left;
}
}
</style>其实用antd自带的上传逻辑也行,用自定义的上传逻辑也行。因为我总感觉有些功能用自带的上传逻辑实现不了,或者实现起来比较麻烦,这里就记录一下自定义上传逻辑吧!
<a-upload
  :action="$rootUrl+'BillAudit/BillFile/UploadFile'"
  :multiple="true"
  :file-list="fileList"
  name="files"
  :customRequest="customRequest"
  :data="{type:3}"
  @change="handleChange"
>
  <a-button> <a-icon type="upload" /> 上传附件 </a-button>
</a-upload>
customRequest方法逻辑
customRequest(data) {
  const formData = new FormData()
  formData.append('files', data.file)
  formData.append('type', 3)
  // 这里的token根据自身情况修改
  // formData.append('token', 'dfjdgfdgskdfkaslfdskf')
  this.saveFile(formData)
},
saveFile(data) {
  axiOS({
    method: 'post',
    url: this.$rootUrl+'BillAudit/BillFile/UploadFile',
    data: data
  }).then(res=>{
    let fileList = JSON.parse(jsON.stringify(this.fileList))
    if(res.data.code == 1) {
      fileList.map(file=>{
        file.url = res.data.data
        file.status = 'done'
      })
      this.$message.success('上传成功')
    }else {
      fileList.map(file=>{
        file.status = 'error'
      })
      this.$message.error(res.data.message)
    }
    this.fileList = fileList
  }).catch(err=>{
    let fileList = JSON.parse(JSON.stringify(this.fileList))
    fileList.map(file=>{
        file.status = 'error'
      })
      this.fileList = fileList
    this.$message.error('服务器内部错误')
  })
},
效果:

以上为个人经验,希望能给大家一个参考,也希望大家多多支持编程网。
--结束END--
本文标题: antdvvueupload自定义上传结合表单提交方式
本文链接: https://www.lsjlt.com/news/169997.html(转载时请注明来源链接)
有问题或投稿请发送至: 邮箱/279061341@qq.com QQ/279061341
下载Word文档到电脑,方便收藏和打印~
2024-01-12
2023-05-20
2023-05-20
2023-05-20
2023-05-20
2023-05-20
2023-05-20
2023-05-20
2023-05-20
2023-05-20
回答
回答
回答
回答
回答
回答
回答
回答
回答
回答


官方手机版

微信公众号

商务合作


0