Python 官方文档:入门教程 => 点击学习
目录1. 逻辑上的 Bean 注册2. XML 注册 Bean 到自建的库中2.1 工厂方法2.2 使用工厂方法和实例化工厂注册 Bean3. XML 配合注解进行 Bean 注册4
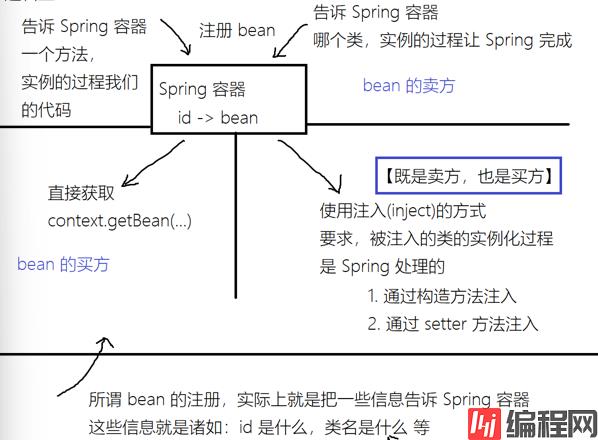
上篇文章结尾简单介绍了一下使用 XML 注册 Bean,这篇文章接着介绍一下 XML 注册 Bean 和使用注解注册、注入 Bean
上篇文章介绍了使用 XML 三种注册的三种方式 (直接注入、构造方法注入、set 方法注入),在这里继续介绍一下使用工厂方法 和 实例化工厂注册 Bean
工厂方法分为静态工厂方法和实例工厂方法
使用工厂方法注册就是调用静态工厂方法注册 Bean
实例化工厂注册就是调用实例工厂方法注册 Bean
首先还是使用 XML 自建库,在 Main 方法中对库进行操作(这里对库的操作主要是打印 Bean)
import org.springframework.context.support.FileSystemXmlApplicationContext;
public class Main {
    public static void main(String[] args) {
        FileSystemXmlApplicationContext context = new FileSystemXmlApplicationContext("spring-config.xml");
        String[] names = context.getBeanDefinitionNames();
        for (String name : names) {
            Object bean = context.getBean(name);
            String canonicalName = bean.getClass().getCanonicalName();
            System.out.println(name + "     " + canonicalName);
        }
        int count = context.getBeanDefinitionCount();
        System.out.println("一共有 " + count + "个");
    }
}
<?xml version="1.0" encoding="UTF-8"?>
<beans xmlns="Http://www.springframework.org/schema/beans"
xmlns:xsi="http://www.w3.org/2001/XMLSchema-instance"
xsi:schemaLocation="http://www.springframework.org/schema/beans
https://www.springframework.org/schema/beans/spring-beans.xsd">
<!-- 通过工厂注册,bean 的实例化由工厂方法完成-->
<bean id="工厂注册" class="com.hsq.ioc3.SomeClass" factory-method="createPerson"/>
<!-- 通过已经注册的 bean 的实例方法注册,bean 的实例化由我们自己完成-->
<bean id="工具bean" class="com.hsq.ioc3.SomeClass"/>
<bean id="通过实例化工厂注册" factory-bean="工具bean" factory-method="instantCreatePerson"/>
</beans>public class SomeClass {
// 静态方法(可以直接通过类名调用)
// 作用:返回一个对象
// 这类方法被称为工厂方法
public static Person createPerson() {
System.out.println("createPerson 被调用");
return new Person();
}
public Person instantCreatePerson() {
System.out.println("instantCreatePerson 被调用");
return new Person();
}
}public class Person {
public Person() {
System.out.println("Person 被调用");
}
}
通过打印可以清楚的看到两种方法都成功注册 Person 对象

自建 XML 库中的配置文件有所改变
用到的注解 @Component,此注解后边会讲到
<?xml version="1.0" encoding="UTF-8"?>
<beans xmlns="http://www.springframework.org/schema/beans"
       xmlns:xsi="http://www.w3.org/2001/XMLSchema-instance"
       xmlns:context="http://www.springframework.org/schema/context"
       xsi:schemaLocation="http://www.springframework.org/schema/beans
        https://www.springframework.org/schema/beans/spring-beans.xsd
        http://www.springframework.org/schema/context
        https://www.springframework.org/schema/context/spring-context.xsd">
<!--    扫描这个包下的所有类,如果没在这个包下,即使加了注解接不会被注入-->
    <context:component-scan base-package="com.hsq.ioc3"/>
</beans>
import org.springframework.stereotype.Component;
@Component
public class World {
public World() {
System.out.println("World 被调用");
}
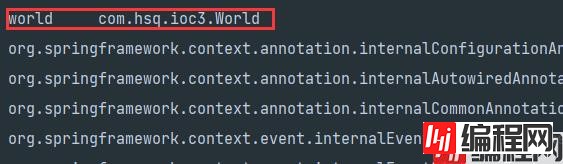
}通过打印可以清楚看到,World 对象被成功注册
使用注解注册简而言之就是使用某个注解修饰类或方法,对其进行注册
使用注解注册 Bean 是注册进 Spring 提供的库,就不需要自建库了
这几个注解在 IOC 场景下,没有区别,都是将类注册进 Spring 库,但在其他场景一般这样用
@Component:没有特殊作用时,都可以用
@Controller:springMVC中把此注解特殊化了,要求控制器类必须用此注解修饰
@Service:修饰中间数据整合的类
@Repository:修饰数据获取类
@Configuration:修饰配置类
import org.springframework.stereotype.Component;
@Component
public class World {
    public World() {
        System.out.println("World() 被调用");
    }
}@SpringBootApplication
public class IocAApplication {
public static void main(String[] args) {
ConfigurableApplicationContext context = SpringApplication.run(IocAApplication.class, args);
String[] names = context.getBeanDefinitionNames();
System.out.println("bean 陈列如下:");
for (String name : names) {
Object bean = context.getBean(name);
String canonicalName = bean.getClass().getCanonicalName();
System.out.println(name + " " + canonicalName);
}
int count = context.getBeanDefinitionCount();
System.out.println("一共 " + count + "个");
}
}通过打印清楚看到,对象被注册

使用 @Bean 修饰方法,@Configuration 修饰类
此方法注册就相当于 XML 中的工厂方法注册
@Configuration
public class AppConfig {
    // <bean id="hsq" factory-bean="appConfig" factory-method="hsq" />
    // 以工厂方法注册
    @Bean
    public String hsq() {
        return "hsq";
    }
    @Bean       // 这里的 World 由 Spring 注入
    // 因为 createHello 被 Spring 调用
    public Hello createHello(@Autowired World world) {
        System.out.println("createHello(), world = " + world);
        return new Hello(world);
    }
}
需要用到 World 类时
import org.springframework.stereotype.Component;
@Component
public class World {
    public World() {
        System.out.println("World() 被调用");
    }
}
构造方法注入
@Component
public class Hello {
    @Autowired      // 这个注解其实可以不写,但是建议写上,主要是让看代码的人知道我们的 World 对象是被注入的
                    // 如果有多个构造方法,告诉 Spring,实例化对象是,应该调用哪个
    public Hello(World world) {
        System.out.println("Hello(), world = " + world);
    }
}
set 方法注入
@Component
public class Hello2 {
    @Autowired          // 这里的此注解必须写上
    public void setWorld(World world) {
        System.out.println("setWorld(), World = " + world);
    }
}
属性直接注入
@Component
public class Hello3 {
    @Autowired
    public World world;     // world 属性的值会被 Spring 容器对象注入
    public void printWorld() {
        System.out.println("printWorld(), world = " + this.world);
    }
}
当使用以下方法注入时,会注入进 NULL 值,而非对象,原因已在下面代码的注释中写出
// 发生在 set 注入 / 属性直接注入上
@Component
public class 注入时的一个坑点 {
    @Autowired
    public World world;
    public 注入时的一个坑点() {
        // 构造方法先执行,然后再进行注入(属性注入 / set 注入)
        // 所以,构造方法执行的时候,注入还没有发生,所以还是 null
        // 所以一般建议使用构造方法注入
        System.out.println("注入时的一个坑点(), world = " + this.world);
    }
}ConfigurableApplicationContext context = SpringApplication.run(IocAApplication.class, args);
Object world1 = context.getBean("world"); // 根据 id 获取 bean
World world2 = context.getBean(World.class); // 根据类型获取 bean
World world = context.getBean("world", World.class); // 根据 id + 类型获取 bean到此这篇关于Spring Bean注册与注入实现方法详解的文章就介绍到这了,更多相关Spring Bean注册与注入内容请搜索编程网以前的文章或继续浏览下面的相关文章希望大家以后多多支持编程网!
--结束END--
本文标题: Spring Bean注册与注入实现方法详解
本文链接: https://www.lsjlt.com/news/170096.html(转载时请注明来源链接)
有问题或投稿请发送至: 邮箱/279061341@qq.com QQ/279061341
下载Word文档到电脑,方便收藏和打印~
2024-03-01
2024-03-01
2024-03-01
2024-02-29
2024-02-29
2024-02-29
2024-02-29
2024-02-29
2024-02-29
2024-02-29
回答
回答
回答
回答
回答
回答
回答
回答
回答
回答


官方手机版

微信公众号

商务合作


0