Python 官方文档:入门教程 => 点击学习
目录序言简单邮件多组件邮件(带附件,图片,超链接的邮件)发送带超链接的邮件发送带图片的邮件总结序言 发邮件对于咱们的Java来说是一个基本的功能,因此这里SpringBoot整合
发邮件对于咱们的Java来说是一个基本的功能,因此这里SpringBoot整合Javamail实际就是简化了javamail发邮件的过程。咱们先看三个基本概念,就是Javamail发送邮件所需要遵从的协议:
简而言之,SMTP就是发邮件必须遵从的标准,POP3就是接受邮件要遵从的标准,而IMAP则是对POP3协议的升级。日常使用中,我们主要使用的是发邮件操作,那么接下来,咱们接跟着风哥一起来看看springBoot整合Javamail发送邮件的步骤吧~。
1.老生常谈第一步,导入Javamail的Maven坐标。
<dependency>
    <groupId>org.springframework.boot</groupId>
    <artifactId>spring-boot-starter-mail</artifactId>
</dependency>
2.配置邮箱的登录信息
配置文件
javamail使用的邮件发送功能说到底还是由相应的供应商提供,所以要配置相应邮件供应商的信息。
host:配置发送邮件的主机协议
username:相应供应商的邮箱账号
passWord:由邮箱供应商提供的一个加密后的密码,接下来咱们来看获取步骤,此处以qq邮箱为例。
打开qq邮箱,进入设置,找到这个选项,点生成授权码,进行安全验证后,即可获得授权码


spring:
  mail:
    host: smtp.qq.com
    username: test@qq.com
    password: test
创建发送文件的接口类和方法实现类
public interface SendMailService {
    void SendMail() throws MessagingException;
}
把实现类交给Spring容器管理,目的是为了方便在测试方法里自动注入使用。
@Service
public class SendMailServiceImpl implements SendMailService {
    @Autowired
    private JavaMailSender javaMailSender;
    private String from = "test@qq.com";
    private String to = "test@qq.com";
    private String title = "test";
    private  String text = "hahahaha";
    @Override
    public void SendMail() {

        //创建SimpleMailMessage对象,用于邮件发送
        SimpleMailMessage mailMessage = new SimpleMailMessage();

        mailMessage.setFrom(from);
        mailMessage.setTo(to);
        mailMessage.setSubject(title);
        mailMessage.setText(text);

        javaMailSender.send(mailMessage);

    }
}
在测试类方法里进行测试

@SpringBootTest
class YsjApplicationTests {

    @Autowired
    private SendMailService2 sendMailService2;

    @Test
    void contextLoads() {
        for(int i=0; i<10; i++)
        sendMailService2.SendMail();

    }
}
总结:
正常生活中,我们肯定不止步使用简单的标题,正文这些只包含枯燥的文字的邮件,更多的是喜欢使用带有图片、视频、尤其是交作业给老师使用的附件功能,所以呢,在经过上面的基础学习后,接下来,朋友们跟着踏风一起来学习一下怎么实现用SpringBoot整合Javamail实现发送咱们更多使用的多组件邮件,Let‘s Go.
为了防止有的小伙伴在处理过程中出现差错,咱们这里还从最开始导坐标一步一步来。
1、导入Javamail的Maven坐标。
<dependency>
    <groupId>org.springframework.boot</groupId>
    <artifactId>spring-boot-starter-mail</artifactId>
</dependency>
2、配置配置文件,获取邮箱授权码的步骤请参考上边。
spring:
  mail:
    host: smtp.qq.com
    username: test@qq.com
    password: test
3、创建发送邮件的方法所在的接口,及接口的实现类。
public interface SendMailService2 {
    void SendMail();
}
@Service
public class SendMailServiceImpl2 implements SendMailService2 {

    @Autowired
    private JavaMailSender javaMailSender;

    private String from = "test@qq.com";

    private String to = "test@qq.com";

    private String title = "test";

    private  String text = "<a href='https://blog.csdn.net/qq_54217349?spm=1011.2415.3001.5343'>欢迎光临</a>";

    @Override
    public void SendMail(){

        try {

            //发送带超链接的邮件需要创建MimeMessage对象
            MimeMessage message = javaMailSender.createMimeMessage();

            MimeMessageHelper helper = new MimeMessageHelper(message);

            helper.setTo(to);
            helper.setFrom(from+"(踏风彡)");
            helper.setText(text,true);
            helper.setSubject(title);

            javaMailSender.send(message);

        } catch (MessagingException e) {
            e.printStackTrace();
        }
    }
}
在测试类测试
@SpringBootTest
class YsjApplicationTests {

    @Autowired
    private SendMailService2 sendMailService2;

    @Test
    void contextLoads() {

        sendMailService2.SendMail();

    }
}
前面几步都同于发送带超链接邮件的步骤,接下来咱们主要看怎么使用MimeMessageHelper类对象进行带附件邮件的发送,所以咱们主要看实现类方法就行了
下面,首先,咱们先做一件有意思的事情,咱们发送带附件的邮件同样是使用MimeMessageHelper对象,那是不是可以有一个大胆的想法,咱们直接创建文件并使用它进行发送,comn,来试一下。
下面的方法我已经帮大家创建好了,大家可直接复制粘贴食用。
@Service
public class SendMailServiceImpl2 implements SendMailService2 {

    @Autowired
    private JavaMailSender javaMailSender;

    private String from = "test@qq.com";

    private String to = "test@qq.com";

    private String title = "踏风彡";

    private  String text = "<a href='Https://blog.csdn.net/qq_54217349?spm=1011.2415.3001.5343'>欢迎光临</a>";

    @Override
    public void SendMail(){

        try {

            //发送带附件的邮件需要创建MimeMessage对象
            MimeMessage message = javaMailSender.createMimeMessage();
            //这个true表示要发送的邮件支持附件
            MimeMessageHelper helper = new MimeMessageHelper(message);

            helper.setTo(to);
            helper.setFrom(from+"(踏风彡)");
            helper.setText(text,true);  //设置正文支持html格式
            helper.setSubject(title);

           // File file = new File("G:\\Javamail.zip");
            File file1 = new File("C:\\Users\\10116\\Desktop\\1.jpg");

          //  helper.addAttachment(file.getName(),file);  //添加附件
            helper.addAttachment("皮卡丘丫~.jpg",file1);

            javaMailSender.send(message);

        } catch (MessagingException e) {
            e.printStackTrace();
        }
    }
}
看到这的小伙伴,看来都遇见了如下的报错。
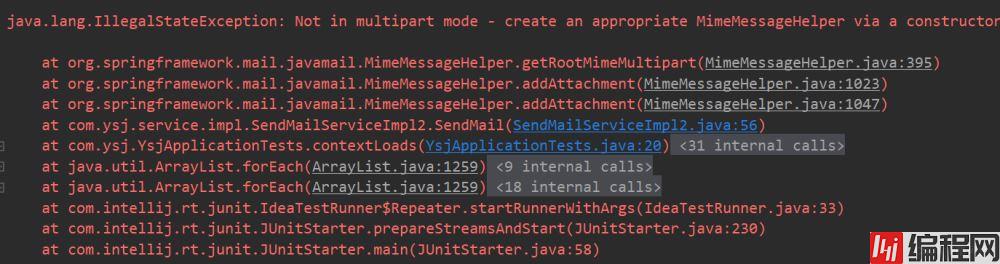
这是因为什么呢?这是因为咱们没有开启附件发送的功能啊,小伙伴们,那么,接下来,让咱们看看怎么开启吧。
很简单,如下,这个true即表示开启附件发送功能。

接下来,已经有思路的小伙伴,建议改完后,自己去实践一下,如果出错,可以再到文章底部看我的代码。
文末代码
@Service
public class SendMailServiceImpl2 implements SendMailService2 {

    @Autowired
    private JavaMailSender javaMailSender;

    private String from = "test@qq.com";

    private String to = "test@qq.com";

    private String title = "快看啊叼人";

    private  String text = "<a href='https://blog.csdn.net/qq_54217349?spm=1011.2415.3001.5343'>欢迎光临</a>";

    @Override
    public void SendMail(){

        try {

            //发送带附件的邮件需要创建MimeMessage对象
            MimeMessage message = javaMailSender.createMimeMessage();
            //这个true表示要发送的邮件支持附件
            MimeMessageHelper helper = new MimeMessageHelper(message, true);

            helper.setTo(to);
            helper.setFrom(from+"(踏风彡)");
            helper.setText(text,true);  //设置正文支持html格式
            helper.setSubject(title);

           // File file = new File("G:\\Javamail.zip");
            File file1 = new File("C:\\Users\\10116\\Desktop\\1.jpg");

          //  helper.addAttachment(file.getName(),file);  //添加附件
            helper.addAttachment("皮卡丘丫~.jpg",file1);

            javaMailSender.send(message);

        } catch (MessagingException e) {
            e.printStackTrace();
        }


    }
}
il.zip");
            File file1 = new File("C:\\Users\\10116\\Desktop\\1.jpg");

          //  helper.addAttachment(file.getName(),file);  //添加附件
            helper.addAttachment("皮卡丘丫~.jpg",file1);

            javaMailSender.send(message);

        } catch (MessagingException e) {
            e.printStackTrace();
        }
    }
}
到这里,SpringBoot整合Javamail实现邮件发送的流程风哥已经带大家做完了,大家觉得不错的,辛苦给博主个三连+关注,您的支持就是我创作的动力。
到此这篇关于SpringBoot整合Javamail实现邮件发送的文章就介绍到这了,更多相关SpringBoot整合Javamail邮件发送内容请搜索编程网以前的文章或继续浏览下面的相关文章希望大家以后多多支持编程网!
--结束END--
本文标题: SpringBoot整合Javamail实现邮件发送的详细过程
本文链接: https://www.lsjlt.com/news/170467.html(转载时请注明来源链接)
有问题或投稿请发送至: 邮箱/279061341@qq.com QQ/279061341
下载Word文档到电脑,方便收藏和打印~
2024-03-01
2024-03-01
2024-03-01
2024-02-29
2024-02-29
2024-02-29
2024-02-29
2024-02-29
2024-02-29
2024-02-29
回答
回答
回答
回答
回答
回答
回答
回答
回答
回答


官方手机版

微信公众号

商务合作


0