Python 官方文档:入门教程 => 点击学习
目录1.mybatis 是什么?2. MyBatis 的重要性3. MyBatis 查询3.1 创建数据库和表3.2 添加MyBatis框架⽀持3.2.1 新项目
MyBatis 是⼀款优秀的持久层框架,它⽀持⾃定义 SQL、存储过程以及⾼级映射。MyBatis 去除了很多JDBC 代码以及设置的参数和获取结果集的工作。MyBatis 可以通过简单的 XML 或注解来配置和映射原始类型、接⼝和 Java POJO (Plain Old Java Object。普通老式 Java对象)为数据库中的记录。
对于后端开发来说,程序是由两个重要部分组成的:
1.后端程序
2.数据库
⽽这两个重要的组成部分要通讯,就要依靠数据库连接⼯具
1.JDBC
2. MyBatis
JDBC 的操作流程:
1. 创建数据库连接池 DataSource
2. 通过 DataSource 获取数据库连接 Connection
3. 编写要执⾏带 ? 占位符的 SQL 语句
4. 通过 Connection 及 SQL 创建操作命令对象 Statement
5. 替换占位符:指定要替换的数据库字段类型,占位符索引及要替换的值
6. 使⽤ Statement 执⾏ SQL 语句
7. 查询操作:返回结果集 ResultSet,更新操作:返回更新的数量
8. 处理结果集
9. 释放资源
对于 JDBC 来说,整个操作⾮常的繁琐,我们不但要拼接每⼀个参数,⽽且还要按照模板代码的⽅式,⼀步步的操作数据库,并且在每次操作完,还要⼿动关闭连接等,⽽所有的这些操作步骤都需要在每个⽅法中重复书写。 对于 MyBatis ,它可以帮助我们更⽅便、更快速的操作数据库。
框架交互流程

MyBatis 也是⼀个 ORM 框架, ORM(Object Relational Mapping),即对象关系映射。在⾯向对 象编程语⾔中,将关系型数据库中的数据与对象建⽴起映射关系,进⽽⾃动的完成数据与对象的互相转换:
1. 将输⼊数据(即传⼊对象)+SQL 映射成原⽣ SQL
2. 将结果集映射为返回对象,即输出对象ORM 把数据库映射为对象:
数据库表(table)--> 类(class)
记录(record,⾏数据)--> 对象(object)
字段(field) --> 对象的属性(attribute)
⼀般的 ORM 框架,会将数据库模型的每张表都映射为⼀个 Java 类。 也就是说使⽤ MyBatis 可以像操作对象⼀样来操作数据库中的表,可以实现对象和数据库表之间的转换。
使⽤ MyBatis 的⽅式来读取⽤户表中的所有⽤户
创建用户表
drop table if exists  userinfo;
create table userinfo(
    id int primary key auto_increment,
    username varchar(100) not null,
    passWord varchar(32) not null,
    photo varchar(500) default '',
    createtime datetime default now(),
    updatetime datetime default now(),
    `state` int default 1
) default charset 'utf8mb4';
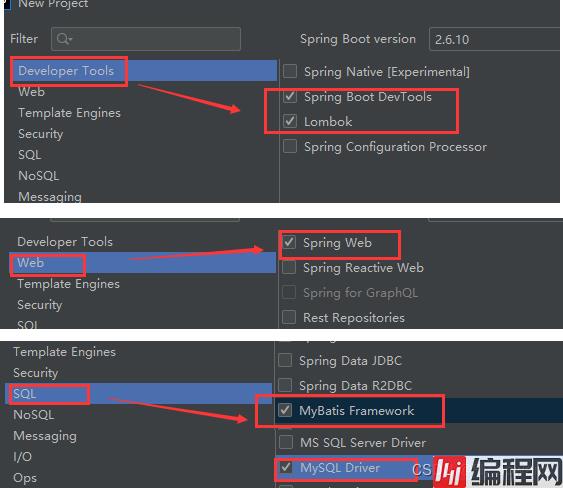
在创建新项目时,来到这一步,只需将下面的勾选即可

在 pom.xml 文件页面 鼠标右键进行下面操作


将当前运行环境选择开发环境的配置
application-dev.yml
#开发环境
#配置数据库连接
spring:
  datasource:
    url: jdbc:Mysql://127.0.0.1:3306/myblog?characterEncoding=utf8
    username: root
    password: 123456
    driver-class-name: com.mysql.cj.jdbc.Driver

# 开启 MyBatis SQL 打印
logging:
  level:
    com:
      example:
        demo: debug
mybatis:
  configuration:
    log-impl: org.apache.ibatis.logging.stdout.StdOutImpl
application.yml
选择开发环境
spring:
  profiles:
active: devMyBatis 的 XML 中保存是查询数据库的具体操作 SQL,配置在 application.yml 中
#配置mybatis xml 保存路径
mybatis:
  mapper-locations: classpsth:mybatis
@Data
public class UserInfo {
    private Integer id;
    private String name;
    private String password;
    private String photo;
    private String createtime;
    private String updatetime;
    private int state;
}数据持久层的接口定义:
@Mapper
public interface UserMapper {
    //查询用户 ID
    public UserInfo getUserById(@Param("id") Integer id);
}数据持久层的实现,mybatis 的固定 xml 格式
<?xml version="1.0" encoding="UTF-8"?>
<!DOCTYPE mapper PUBLIC "-//mybatis.org//DTD Mapper 3.0//EN" "Http://mybatis.org/dtd/mybatis-3-mapper.dtd">
<!-- namespace 要设置是实现接口的具体包名加类名 -->
<mapper namespace="com.example.demo.mapper.UserMapper">


</mapper>
UserMapper.xml 查询所有⽤户的具体实现 SQL:
<?xml version="1.0" encoding="UTF-8"?>
<!DOCTYPE mapper PUBLIC "-//mybatis.org//DTD Mapper 3.0//EN" "http://mybatis.org/dtd/mybatis-3-mapper.dtd">
<!-- namespace 要设置是实现接口的具体包名加类名 -->
<mapper namespace="com.example.demo.mapper.UserMapper">
    <resultMap id="BaseMap" type="com.example.demo.model.UserInfo">
    <!-- 主键映射 -->
    <id column="id" property="id"></id>
    <!-- 普通属性映射 -->
    <result column="username" property="name"></result>
    </resultMap>

    <!-- 根据 id 查询用户 -->
    <select id="getUserById" resultMap="BaseMap">
        select * from userinfo where id=${id}
    </select>

</mapper>
标签说明:
<mapper>标签:需要指定 namespace 属性,表示命名空间,值为 mapper 接⼝的全限定名,包括全包名.类名。
<select>查询标签:是⽤来执⾏数据库的查询操作的:

决定调用哪个mapper
@Service
public class UserService {

    @Resource
    private UserMapper userMapper;

    public UserInfo getUserById(Integer id) {
        return userMapper.getUserById(id);
    }

}@Controller
@ResponseBody
@RequestMapping("/user")
public class UserController {
@Autowired
private UserService userService;
@RequestMapping("/getuserbyid")
public UserInfo getUserById(Integer id) {
if (id == null) return null;
return userService.getUserById(id);
}
}以上代码写完,整个 MyBatis 的查询功能就实现完了

在 UserMapper 中增加修改的代码
    //修改方法根据 ID 修改名称
    public int update(@Param("id") Integer id,
                      @Param("name") String username);
UserMapper.xml 中增加接口的实现标签和具体的执行SQL
    <update id="update" >
        update userinfo set username=#{name} where id=#{id}
    </update>
通过单元测试,实现成功
   @Test
    void update() {
        int result = userMapper.update(2,"fei");
        Assertions.assertEquals(1,result);
    }
查询SQL语句可知,已经修改了

如果仅仅是为了测试功能是否实现,而不修改数据库中的内容,可以加入注解 @Transactional
    @Test
    @Transactional // 添加此注解后,执行完单元测试,不会修改数据库中的内容,即事务回滚
    void update() {
        int result = userMapper.update(2,"fei");
        Assertions.assertEquals(1,result);
}在 UserMapper 中增加删除的代码
    //删除方法
    public int del(@Param("id") Integer id);
UserMapper.xml 中增加接口的实现标签和具体的执行SQL
    <!--删除操作-->
    <delete id="del">
        delete from userinfo where id=#{id};
    </delete>
单元测试
    @Test
    @Transactional
    void del() {
        int result = userMapper.del(2);
        System.out.println("删除行数: " + result);
        Assertions.assertEquals(1,result);
    }
在 UserMapper 中添加增加的代码
    //增加用户方法
    // 传过来的是对象而不是某个成员变量
    public int add(UserInfo userInfo);
UserMapper.xml 中增加接口的实现标签和具体的执行SQL
    <!--增加操作,返回受影响的行数-->
    <insert id="add">
        insert into userinfo(username,password,photo)
        values(#{username}, #{password}, #{photo}); <!--和对象里面的属性一一对应-->
    </insert>
单元测试
    @Test
    //@Transactional
    void add() {
        UserInfo userInfo = new UserInfo();
        userInfo.setName("y");
        userInfo.setPassword("123");
        userInfo.setPhoto("");
        System.out.println("添加之前的 id: " + userInfo.getId());
        int result = userMapper.add(userInfo);
        System.out.println("添加之后的 id: " + userInfo.getId());
        System.out.println("添加的行数: " + result);
        Assertions.assertEquals(1,result);
    }
在 UserMapper 中添加增加的代码
     //添加用户,返回自增ID
    public int addGetId(UserInfo userInfo);
UserMapper.xml 中增加接口的实现标签和具体的执行SQL
    <!--增加操作,返回受影响的行数和自增ID-->
    <insert id="addGetId" useGeneratedKeys="true" keyProperty="id" keyColumn="id">
        insert into userinfo(username,password,photo)
        values(#{name}, #{password}, #{photo}); <!--和对象里面的属性一一对应-->
    </insert>
单元测试
    @Test
    //@Transactional
    void addGetId() {
        UserInfo userInfo = new UserInfo();
        userInfo.setName("yang");
        userInfo.setPassword("123");
        userInfo.setPhoto("");
        System.out.println("添加之前的 id: " + userInfo.getId());
        int result = userMapper.addGetId(userInfo);
        System.out.println("添加之后的 id: " + userInfo.getId());
        System.out.println("添加的行数: " + result);
        Assertions.assertEquals(1,result);
    }

#{}:预编译处理 。处理时,成一个 问号? ,赋值时会加上 单引号 ‘ ’
${}:字符直接替换
区别:
1.定义不同
预编译处理是指:MyBatis 在处理#{}时,会将 SQL 中的 #{} 替换为?号,使⽤ PreparedStatement 的set ⽅法来赋值。
直接替换:是MyBatis 在处理 ${} 时,就是把 ${} 替换成变量的值。
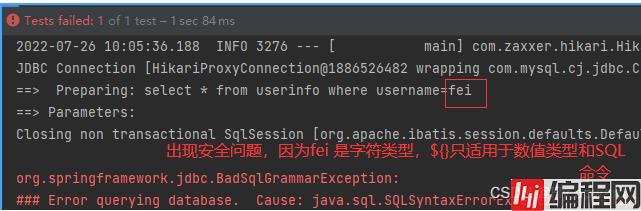
2.使用不同:#{} 适用于所有类型的参数匹配,但${} 只适用于数值类型
3.安全性不同:#{} 性能高,并且没有安全问题;但 ${} 存在SQL注入的安全问题
#{}:预编译处理 占位符,当成 value 值来使用, 即加上 ‘ ’
    <select id="gerUserFullById" resultType="com.example.demo.model.UserInfo">
        select * from userinfo where username=#{name}
    </select>
@Test
void gerUserFullById() {
UserInfo userInfo = userMapper.gerUserFullById("fei");
System.out.println("userInfo: " + userInfo);
}
${}:字符直接替换
不加任何符合,直接替换上去,连成一个SQL 命令
    <select id="gerUserFullById" resultType="com.example.demo.model.UserInfo">
        select * from userinfo where username=${name}
    </select>
单元测试结果
//对用户进行排序
    public List<UserInfo> getOrderList(@Param("order") String order);
此处使用的是 ${}, 如果使用 #{} 的话,会编译出错,因为它会把 desc 当成 ‘desc’ 一个value 值来使用,不构成一个 SQL命令语句
    <select id="getOrderList" resultType="com.example.demo.model.UserInfo">
        select * from userinfo order by createtime ${order}
    </select>
单元测试
    @Test
    void getOrderList() {
        List<UserInfo> list = userMapper.getOrderList("desc");
        log.info("列表: " + list);
    }

    //登录功能
    public UserInfo login(@Param("name") String username,
                          @Param("password") String password);
1) 在使用${} 时,需要加单引号,因为是直接替换
    <select id="login" resultType="com.example.demo.model.UserInfo">
        select * from userinfo where username='${name}' and password='${password}';
    </select>
单元测试
    @Test
    void login() {
        String username = "Fly";
        String password = "";
        UserInfo userInfo = userMapper.login(username,password);
        log.info("用户信息: " + userInfo);

    }
使用 " 'or 1=' 1" 时,SQL注入,密码会泄露,如下,因此在登录时应使用#{}
    @Test
    void login() {
        String username = "Fly";
        //String password = "";
        String password = "'or 1='1";
        UserInfo userInfo = userMapper.login(username,password);
        log.info("用户信息: " + userInfo);

    }
2)#{} 预编译处理,不会出现密码泄露
    <!--登录功能-->
    <select id="login" resultType="com.example.demo.model.UserInfo">
        <!--select * from userinfo where username='${name}' and password='${password}'; -->
        select * from userinfo where username=#{name} and password=#{password};
    </select>
    //like 模糊查询
    public List<UserInfo> getUserByName(@Param("name") String username);
1)直接使用 #{} 会报错
因为赋值时会加上单引号 ‘’
select * from userinfo where username like '%#{name}%'就相当于下面的语句,不符合查询条件
select * from userinfo where username like '%'name'%'2)使用${} 是不会报错,但在业务层的值不能穷举
3)#{} 在like中的正确用法,加上contat 拼接,演示如下

正确用法
因为#{} 在赋值的时候,会带上单引号‘’ ,所以下面的#{}不需要带单引号
    <!--like 模糊查询-->
    <select id="getUserByName" resultType="com.example.demo.model.UserInfo">
        <!-- select * from userinfo where username like '%#{name}%'-->
        select * from userinfo where username like concat('%',#{name},'%')
    </select>
单元测试
    @Test
    void getUserByName() {
        String username = "l";
        List<UserInfo> list= userMapper.getUserByName(username);
        log.info("用户列表: " + list);
    }
绝大数查询场景可以使用 resultType 进行返回,如下
    <!-- 根据 id 查询用户 -->
    <select id="getUserById" resultType="com.example.demo.model.UserInfo">
        select * from userinfo where id=${id}
    </select>
它的优点是使⽤⽅便,直接定义到某个实体类即可 6.2 返回字典映射:resultMap 使用场景:
字段名称和程序中的属性名不同的情况, 可使⽤ resultMap 配置映射; 一对一和一对多关系可以使用 resultMap 映射并查询数据
1)字段名程序中的属性名不一致

userMapper.xml 代码如下
    <!-- 根据 id 查询用户 -->
    <select id="getUserById" resultType="com.example.demo.model.UserInfo">
        select * from userinfo where id=${id}
    </select>
查询结果

这个时候就可以使⽤ resultMap 了,resultMap 的使⽤如下

userMapper.xml 代码如下
    <resultMap id="BaseMap" type="com.example.demo.model.UserInfo">
        <!--主键映射-->
        <id column="id" property="id"></id>
        <!--普通属性映射-->
        <result column="username" property="name"></result>
        <result column="password" property="password"></result>
        <result column="photo" property="photo"></result>
        <result column="createtime" property="createtime"></result>
        <result column="updatetime" property="updatetime"></result>

    </resultMap>

    <!-- 根据 id 查询用户 -->
    <select id="getUserById" resultMap="BaseMap">
        select * from userinfo where id=${id}
    </select>
单元测试
    @Test
    void getUserById() {
       UserInfo userInfo = userMapper.getUserById(1);
        //Assertions.assertNotNull(userInfo);
        log.info("查询行数:" + userInfo);
    }
查询结果

创建文章实体类 ArticleInfo
@Data
public class ArticleInfo {
    private int id;
    private String title;
    private String content;
    private String createtime;
    private String updatetime;
    private int uid;
    private int rcount;
    private int state;
    private UserInfo userInfo;
}
mapper 实现数据库映射 ArticleMapper
@Mapper
public interface ArticleMapper {
    //根据文章 id 获取文章
    public ArticleInfo getArticleById(@Param("id") Integer id); //文章id
}
数据库命令,数据持久层的实现, ArticleMapper.xml
<mapper namespace="com.example.demo.mapper.ArticleMapper">
    <resultMap id="BaseMap" type="com.example.demo.model.ArticleInfo">
        <!--主键映射-->
        <id column="id" property="id"></id>
        <!--普通属性映射-->
        <result column="title" property="title"></result>
        <result column="content" property="content"></result>
        <result column="createtime" property="createtime"></result>
        <result column="uid" property="uid"></result>
        <result column="rcount" property="rcount"></result>
        <result column="state" property="state"></result>
        <association property="userInfo"
                     resultMap="com.example.demo.mapper.UserMapper.BaseMap"
                     columnPrefix="u_"></association>
    </resultMap>

    <select id="getArticleById" resultMap="BaseMap">
       select a.*,u.* from articleinfo a left join userinfo u on a.uid=u.id
    </select>
</mapper>
以上使⽤ <association>标签,表示⼀对⼀的结果映射:
property 属性:指定 Article 中对应的属性,即⽤户。
resultMap 属性:指定关联的结果集映射,将基于该映射配置来组织⽤户数据。
columnPrefix 属性:绑定⼀对⼀对象时,因为对应的是用户表 ,所以是“u-”是通过 columnPrefix+association.resultMap.column 来映射结果集字段。 association.resultMap.column是指 <association>标签中 resultMap属性,对应的结果集映射中,column字段

单元测试
    //将类属性注入
    @Resource
    private ArticleMapper articleMapper;

    @Test
    void getArticleById() {
        ArticleInfo articleInfo = articleMapper.getArticleById(1);
        log.info("查询结果:" + articleInfo  );
    }
查询结果

一个用户对应多篇文章
实体类
@Data
public class UserInfo {
    private Integer id;
    //private String username;//用于resultType
    private String name; //用于 resultMap
    private String password;
    private String photo;
    private String createtime;
    private String updatetime;
    private int state;
    //一对多
    private List<ArticleInfo> artlist;
}
mapper
   //一对多,多表查询
    //根据用户 id 查询用户及用户发表的所有文章
    public UserInfo getUserAndarticleByUid(@Param("uid") Integer uid);
XML
<resultMap id="BaseMap" type="com.example.demo.model.UserInfo">
        <!--主键映射-->
        <id column="id" property="id"></id>
        <!--普通属性映射-->
        <result column="username" property="name"></result>
        <result column="password" property="password"></result>
        <result column="photo" property="photo"></result>
        <result column="createtime" property="createtime"></result>
        <result column="updatetime" property="updatetime"></result>
        <result column="state" property="state"></result>
        <!--多表查询-->
        <collection property="artlist"
                    resultMap="com.example.demo.mapper.ArticleMapper.BaseMap"
                    columnPrefix="a_">
        </collection>
    </resultMap>

    <!--多表查询-->
    <select id="getUserAndArticleByUid" resultMap="BaseMap">

        select u.*,a.id a_id,a.title a_title,a.content a_content,
        a.createtime a_createtime,
        a.updatetime a_updatetime from userinfo u left join articleinfo a
        on u.id=a.uid where u.id=#{uid}

    </select>
单元测试
   @Test
    void getUserAndArticleByUid() {
        UserInfo userInfo = userMapper.getUserAndArticleByUid(1);
        log.info("用户详情:" + userInfo);
}动态SQL是mybatis 的强大特性之一,能够完成不同条件的SQL拼接
在填写个人信息时,会经常遇到一些必填项,一些非必填项,如下

注册分为两种字段:必填字段和⾮必填字段,那如果在添加⽤户的时候有不确定的字段传⼊,程序应该如何实现呢? 这个时候就需要使⽤动态标签 <if> 来判断了:
判断一个参数是否有值,如果没值,就会隐藏 if 中的SQL

现在有一张用户表
在新增用户的时候,将 photo 设为非比传参数

1)传入photo 时
mapper
    //动态SQL,添加用户,photo为非必传参数
    public int add2(UserInfo userInfo);
UserMapper.xml
    <!--动态SQL,添加用户-->
    <insert id="add2">
        insert into userinfo(username,password
        <if test="photo !=null">
            ,photo
        </if>
        ) values(#{name}, #{password}
        <if test="photo !=null">
            , #{photo}
        </if>
        )
    </insert>
注意 test 中的 photo 和 #{},是传⼊对象中的属性,不是数据库字段
单元测试
    @Test
    void add2() {
        UserInfo userInfo = new UserInfo();
        userInfo.setName("杨通");
        userInfo.setPassword("123");
        userInfo.setPhoto("123.jpg");
        int result = userMapper.add2(userInfo);
        log.info("添加用户:" + result);

    }
添加结果


2)不传入 photo 时
不用像没使用动态SQL时,将 userInfo.setPhoto(""); 设为空,直接忽略不写就行了
    @Test
    void add2() {
        UserInfo userInfo = new UserInfo();
        userInfo.setName("黄空");
        userInfo.setPassword("123");
        //userInfo.setPhoto("123.jpg");
        int result = userMapper.add2(userInfo);
        log.info("添加用户:" + result);

    }
动态SQL直接忽略photo,添加成功


最主要的作用:去除SQL语句前后多余的某个字符
语法:
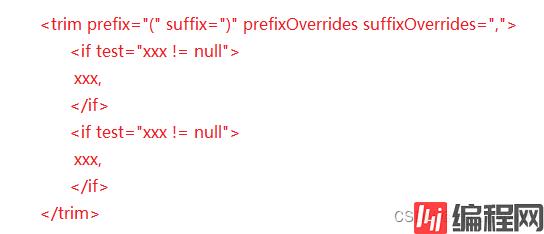
<trim>标签中有如下属性:
prefix: 表示这个语句快,以prefix的值作为前缀
suffix:表示整个语句块,以suffix的值作为后缀
prefixOverrides:表示整个语句块要去除掉的前缀
suffixOverrides:表示整个语句块要去除掉的后缀
UserMapper
    //动态SQL, <trim> 标签。添加用户,photo为非必传参数
    public int add3(UserInfo userInfo);
UserMapper.xml
    <!--动态SQL,<trim> 标签。添加用户-->
    <insert id="add3">
        insert into userinfo
        <trim prefix="(" suffix=")" suffixOverrides=",">
            <if test="name != null">
                <!--这里拼接的是数据库中的字段-->
                username,
            </if>
            <if test="password != null">
                password,
            </if>
            <if test="photo != null">
                photo
            </if>
        </trim>
        values
        <trim prefix="(" suffix=")" suffixOverrides=",">
            <if test="name != null">
                #{name},
            </if>
            <if test="password != null">
                #{password},
            </if>
            <if test="photo != null">
                #{photo}
            </if>
        </trim>
    </insert>
单元测试
这里不传photo,看拼接的字段前的一个逗号是否还在
    @Test
    void add3() {
        UserInfo userInfo = new UserInfo();
        userInfo.setName("黄小小");
        userInfo.setPassword("123");
        //userInfo.setPhoto("123.jpg"); 这里不传,看拼接的字段前的一个逗号是否还在
        int result = userMapper.add2(userInfo);
        log.info("添加用户:" + result);
    }

主要作用:实现查询中的 where SQL替换,它可以实现如果没有任何的查询条件,那么他可以因此查询中的 where SQL ,但如果存在查询中条件,那么会生成where的 SQL查询,并且使用 where 标签可以自动的去除最后一个 and字符。
1)SQL 替换
根据 id 查询用户:
    <!-- 根据 id 查询用户 -->
    <select id="getUserById" resultMap="BaseMap">
        select * from userinfo
        <where>
            <if test="id != null">
                id=#{id}
            </if>

        </where>
    </select>
当传入的 id 为 null 时
  @Test
    void getUserById() {
       UserInfo userInfo = userMapper.getUserById(null);
        //Assertions.assertNotNull(userInfo);
        log.info("查询行数:" + userInfo);
    }
2)去除 and

或者通过 id 或者 username 来查询时,如果username 为空就会去掉
作用:进行修改操作是,配合 if 来处理非必传字段,他的特点是主动去除最后一个英文逗号
语法:
update table_name
  <set>
    <if test="xxx">
        ...
    </if>
    ...
  </set>
  where ...
1)修改用户名
UserMapper
    //动态SQL, <set> 标签。修改用户
    public int update2(UserInfo userInfo);
UserMapper.xml
    <update id="update2">
        update userinfo
        <set>
            <if test="name != null">
                username=#{name},
            </if>
            <if test="password != null">
                password = #{password},
            </if>
            <if test="photo != null">
                photo = #{photo}
            </if>
        </set>
    </update>
单元测试
    @Test
    void update2() {
        UserInfo userInfo = new UserInfo();
        userInfo.setId(1); //查找 id 为 1 的用户
        userInfo.setName("fei"); // 将用户名修改为 fei
        int result = userMapper.update2(userInfo);
        log.info("修改结果: " + result);
    }

对集合进⾏遍历时可以使⽤该标签。<foreach>标签有如下属性:
collection: 绑定方法参数中的集合,如List 、Set、Map或数组对象
item: 遍历时的每一个对象
open:语句块开头的字符串
close:语句块结束的字符串
separator:每次遍历之间间隔的字符串
示例:根据用户 id 来对用户进行删除
UserMapper
    //动态SQL,<foreach>,删除多个用户
    public int delId(List<Integer> ids);
UserMapper.xml
    <!--动态SQL,删除多个用户-->
    <delete id="delId">
        delete from userinfo where id in
        <foreach collection="ids" open="(" close=")" item="id" separator=",">
            #{id}
        </foreach>
    </delete>
单元测试
    @Test
    void delId() {
        List<Integer> list = new ArrayList<>();
        list.add(2);
        list.add(3);
        list.add(4);
        int result = userMapper.delId(list);
        log.info("删除的行数:" + result);
    }
结果


到此这篇关于MyBatis后端对数据库进行增删改查等操作的文章就介绍到这了,更多相关MyBatis后端对数据库操作内容请搜索编程网以前的文章或继续浏览下面的相关文章希望大家以后多多支持编程网!
--结束END--
本文标题: MyBatis后端对数据库进行增删改查等操作实例
本文链接: https://www.lsjlt.com/news/171671.html(转载时请注明来源链接)
有问题或投稿请发送至: 邮箱/279061341@qq.com QQ/279061341
下载Word文档到电脑,方便收藏和打印~
2024-03-01
2024-03-01
2024-03-01
2024-02-29
2024-02-29
2024-02-29
2024-02-29
2024-02-29
2024-02-29
2024-02-29
回答
回答
回答
回答
回答
回答
回答
回答
回答
回答


官方手机版

微信公众号

商务合作


0