Python 官方文档:入门教程 => 点击学习
目录1. spring Security简介2. Jwt简介3. Spring Boot整合Spring Security4. 配置Spring Security使用JWT认证5.
Spring Security是Spring的一个核心项目,它是一个功能强大且高度可定制的认证和访问控制框架。它提供了认证和授权功能以及抵御常见的攻击,它已经成为保护基于spring的应用程序的事实标准。
Spring Boot提供了自动配置,引入starter依赖即可使用。
Spring Security特性总结:
JWT(JSON WEB token),是为了在网络应用环境间传递声明而执行的一种基于jsON的开放标准(RFC 7519).该token被设计为紧凑且安全的,特别适用于分布式站点的单点登录(SSO)场景。JWT的声明一般被用来在身份提供者和服务提供者间传递被认证的用户身份信息,以便于从资源服务器获取资源,也可以增加一些额外的其它业务逻辑所必须的声明信息(例如,权限信息)。一旦用户被授予token,用户即可通过该token访问服务器上的资源。
https://jwt.io/,该网站提供了一个debuggr,便于初学者学习理解JWT。
注意本篇文章演示使用jdk和Spring Boot的版本如下:
Spring Boot:2.7.2
JDK:11
不同的Spring Boot版本配置不同,但是原理相同。
在Spring Boot项目的pom.xml文件中加入下面的依赖:
<!-- Spring Security的Spring boot starter,引入后将自动启动Spring Security的自动配置 -->
<dependency>
    <groupId>org.springframework.boot</groupId>
    <artifactId>spring-boot-starter-security</artifactId>
</dependency>
<!-- 下面的依赖包含了OAuth2 JWT认证实现 -->
<dependency>
    <groupId>org.springframework.boot</groupId>
    <artifactId>spring-boot-starter-oauth2-resource-server</artifactId>
</dependency>
以上两个依赖即可。
注意: 不同的Spring Boot版本配置不同,但是原理相同,本文使用的是Spring Boot:2.7.2。
主要是配置HttpSecurity Bean生成SecurityFilterBean,配置如下:
import com.nimbusds.jose.jwk.JWK;
import com.nimbusds.jose.jwk.JWKSet;
import com.nimbusds.jose.jwk.RSAKey;
import com.nimbusds.jose.jwk.source.ImmutableJWKSet;
import com.nimbusds.jose.jwk.source.JWKSource;
import com.nimbusds.jose.proc.SecurityContext;
import org.springframework.beans.factory.annotation.Value;
import org.springframework.context.annotation.Bean;
import org.springframework.context.annotation.Configuration;
import org.springframework.security.config.annotation.method.configuration.EnableMethodSecurity;
import org.springframework.security.config.annotation.web.builders.HttpSecurity;
import org.springframework.security.config.http.SessionCreationPolicy;
import org.springframework.security.oauth2.jwt.JwtDecoder;
import org.springframework.security.oauth2.jwt.JwtEncoder;
import org.springframework.security.oauth2.jwt.NimbusJwtDecoder;
import org.springframework.security.oauth2.jwt.NimbusJwtEncoder;
import org.springframework.security.oauth2.server.resource.authentication.JwtAuthenticationConverter;
import org.springframework.security.oauth2.server.resource.authentication.JwtGrantedAuthoritiesConverter;
import org.springframework.security.oauth2.server.resource.web.BearerTokenAuthenticationEntryPoint;
import org.springframework.security.oauth2.server.resource.web.access.BearerTokenAccessDeniedHandler;
import org.springframework.security.web.SecurityFilterChain;

import java.security.interfaces.RSAPrivateKey;
import java.security.interfaces.RSAPublicKey;


@Configuration(proxyBeanMethods = false)
@EnableMethodSecurity
public class WebSecurityConfigurer {
    //使用RSA对JWT做签名,所以这里需要一对秘钥。
    //秘钥文件的路径在application.yml文件中做了配置(具体配置在下面)。
    @Value("${jwt.public.key}")
    private RSAPublicKey key;
    @Value("${jwt.private.key}")
    private RSAPrivateKey priv;


    @Bean
    SecurityFilterChain defaultSecurityFilterChain(HttpSecurity http) throws Exception {
        //"/login"是系统的登录接口,所以需要匿名可访问
        http.authorizeRequests().antMatchers("/login").anonymous();
        //其他请求都需认证后才能访问
        http.authorizeRequests().anyRequest().authenticated()
                .and()

                //采用JWT认证无需session保持,所以禁用掉session管理器
                .sessionManagement().sessionCreationPolicy(SessionCreationPolicy.STATELESS).and()
                //login接口可能来自其他站点,所以对login不做csrf防护
                .csrf((csrf) -> csrf.ignoringAntMatchers("/login"))
                //配置认证方式为JWT,并且配置了一个JWT认证装换器,用于去掉解析权限时的SCOOP_前缀
                .oauth2ResourceServer().jwt().jwtAuthenticationConverter(
                        JwtAuthenticationConverter()
                );
        //配置认证失败或者无权限时的处理器
        http.exceptionHandling((exceptions) -> exceptions
                .authenticationEntryPoint(new BearerTokenAuthenticationEntryPoint())
                .accessDeniedHandler(new BearerTokenAccessDeniedHandler())
        );
         //根据配置生成SecurityFilterChain对象
        return http.build();
    }


    @Bean
    JwtDecoder jwtDecoder() {
        return NimbusJwtDecoder.withPublicKey(this.key).build();
    }

    @Bean
    JwtEncoder jwtEncoder() {
        JWK jwk = new RSAKey.Builder(this.key).privateKey(this.priv).build();
        JWKSource<SecurityContext> jwks = new ImmutableJWKSet<>(new JWKSet(jwk));
        return new NimbusJwtEncoder(jwks);
    }


    @Bean
    JwtAuthenticationConverter JwtAuthenticationConverter() {
        final JwtGrantedAuthoritiesConverter jwtGrantedAuthoritiesConverter = new JwtGrantedAuthoritiesConverter();
        jwtGrantedAuthoritiesConverter.setAuthorityPrefix("");
        final JwtAuthenticationConverter jwtAuthenticationConverter = new JwtAuthenticationConverter();
        jwtAuthenticationConverter.setJwtGrantedAuthoritiesConverter(jwtGrantedAuthoritiesConverter);
        return jwtAuthenticationConverter;
    }
}
application.yml
jwt:
  private.key: classpath:app.key
  public.key: classpath:app.pub
上边的配置需要在Spring Boot项目的Resource目录下生成一对RSA秘钥。
可以使用下面的网站进行生成:http://tools.jb51.net/passWord/rsa_encode/,注意: 密钥格式使用 PKCS#8,私钥密码为空。
还有一点需要说明,我在代码中使用了Spring Boot的值注入:
@Value("${jwt.public.key}")
 private RSAPublicKey key;
@Value("${jwt.private.key}")
private RSAPrivateKey priv;
有没有很好奇Spring Boot是如何将yaml文件中的字符串对应的文件转换为RSAPublicKey和RSAPrivateKey ?
其实是Spring Security帮我们做了处理,在Spring Security中帮我们实现了一个转换器ResourceKeyConverterAdapter,具体可以阅读相关源码来更深入的了解。
至此我们的项目已经支持JWT认证了。
但是用户需要在请求头Authorization中携带合法的JWT才能通过认证,进而访问服务器资源,那么如何给用户颁发一个合法的JWT呢?
很简单,可以提供一个登录接口,让用户输入用户名和密码,匹配成功后颁发令牌即可。
其实并不是必须这样做,还有其他方式,比如我们调用第三方接口,我们经常的做法是先去第三方申请,申请通过后我们就可以得到一个令牌。这个过程和上面的登录通过后颁发一个令牌是一样的,都是通过合法的途径获得一个令牌!
登录接口只有一个目的,就是给合法用户颁发令牌!
登录api接口:
@RestController
public class SysLoginController {
    private final SysLoginService sysLoginService;

    public SysLoginController(SysLoginService sysLoginService) {
        this.sysLoginService = sysLoginService;
    }

    @PostMapping("/login")
    public String login(@RequestBody LoginInfo loginInfo) {
        return sysLoginService.login(loginInfo);
    }
}
登录逻辑实现:
@Service
public class SysLoginService {
    private final JwtEncoder jwtEncoder;
    private final SpringSecurityUserDetailsService springSecurityUserDetailsService;

    public SysLoginService(JwtEncoder jwtEncoder, SpringSecurityUserDetailsService springSecurityUserDetailsService) {
        this.jwtEncoder = jwtEncoder;
        this.springSecurityUserDetailsService = springSecurityUserDetailsService;
    }

    public String login(LoginInfo loginInfo) {
        //从用户信息存储库中获取用户信息
        final UserDetails userDetails = springSecurityUserDetailsService.loadUserByUsername(loginInfo.getUsername());
        final String password = userDetails.getPassword();
        //匹配密码,匹配成功生成JWT令牌
        if (password.equals(loginInfo.getPassword())) {
            return generateToken(userDetails);
        }
        //密码不匹配,抛出异常,Spring Security发现抛出该异常后会将http响应状态码设置为401 unauthorized
        throw new BadCredentialsException("密码错误!");
    }

    private String generateToken(UserDetails userDetails) {
        Instant now = Instant.now();
        //JWT过期时间为36000秒,也就是600分钟,10小时
        long expiry = 36000L;
        String scope = userDetails.getAuthorities().stream()
                .map(GrantedAuthority::getAuthority)
                .collect(Collectors.joining(" "));
         //将用户权限信息使用空格分割拼为字符串,放到JWT的payload的scope字段中,注意不要改变scope这个属性,这是Spring Security OAuth2 JWT默认处理方式,在JWT解码时需要读取该字段,转为用户的权限信息!
        JwtClaimsSet claims = JwtClaimsSet.builder()
                .issuer("self")
                .issuedAt(now)
                .expiresAt(now.plusSeconds(expiry))
                .subject(userDetails.getUsername())
                .claim("scope", scope)
                .build();
        return this.jwtEncoder.encode(JwtEncoderParameters.from(claims)).getTokenValue();
    }
}
其他非核心代码这里就不贴出来了,我将代码放到GitHub上了,具体可以转到https://github.com/cloudgyb/spring-security-study-jwt。
使用postman测试一下:
使用错误的密码,会返回401 Unauthorized的状态码,表示我们认证失败!

使用正确的用户名和密码:
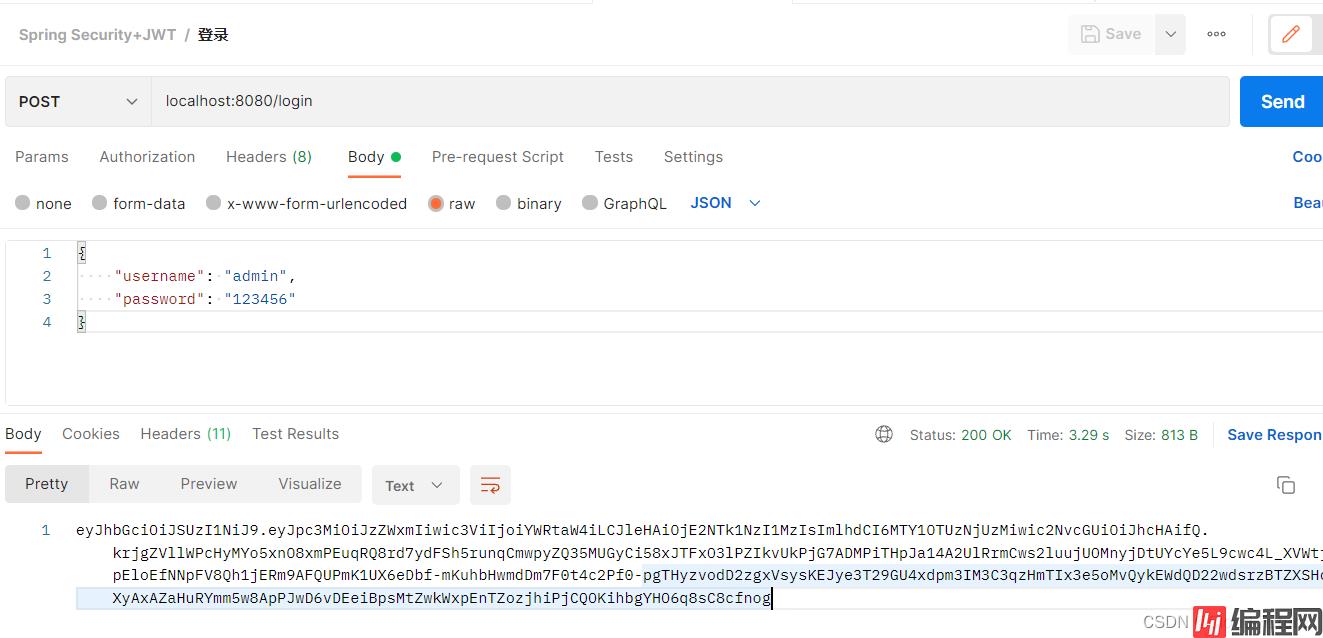
返回了JWT令牌。
此时客户端拿到了合法的令牌,接下来就可以访问服务器上有权访问的资源了。
我写了一个测试接口:
@RestController
public class HelloController {

    @GetMapping("/")
    @PreAuthorize("hasAuthority('test')")
    public String hello(Authentication authentication) {
        return "Hello, " + authentication.getName() + "!";
    }
}
该接口需要用户拥有"test"的权限,但是登录用户没有该权限(只有一个app的权限),此时调用该接口:
首先将上一步登录获得的令牌粘贴到token中:
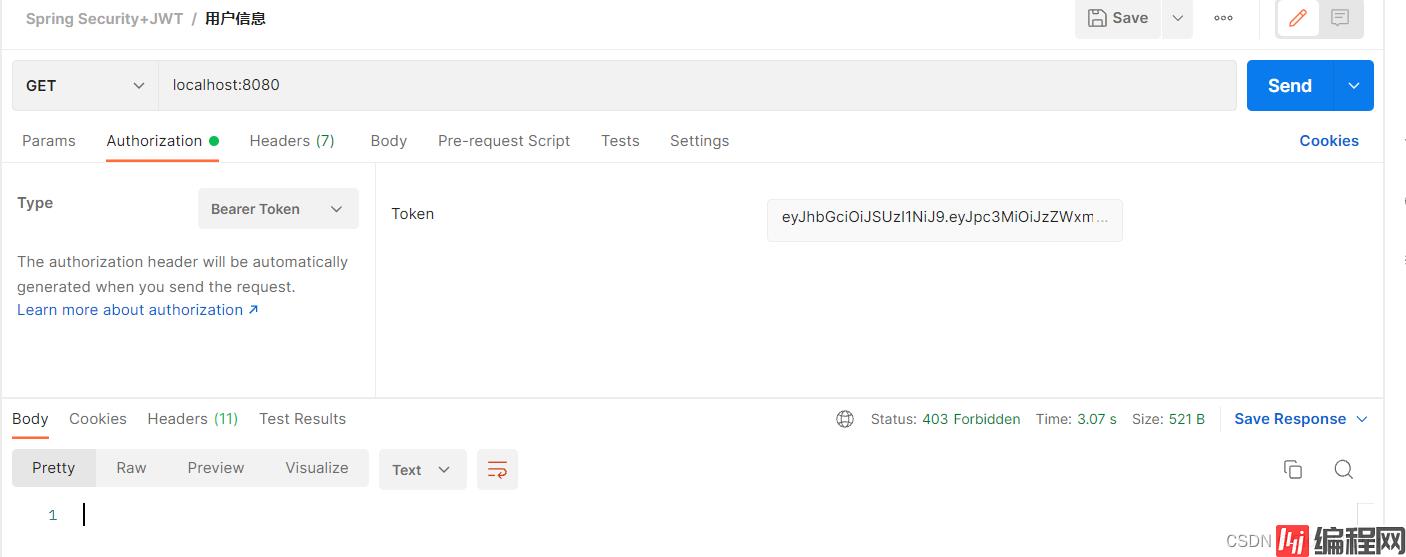
我们发送请求得到了403 Forbidden的响应,意思就是我们没有访问权限,此时我们将接口权限改为“app”:
@RestController
public class HelloController {

    @GetMapping("/")
    @PreAuthorize("hasAuthority('app')")
    public String hello(Authentication authentication) {
        return "Hello, " + authentication.getName() + "!";
    }
}
重启项目。再次发起请求:
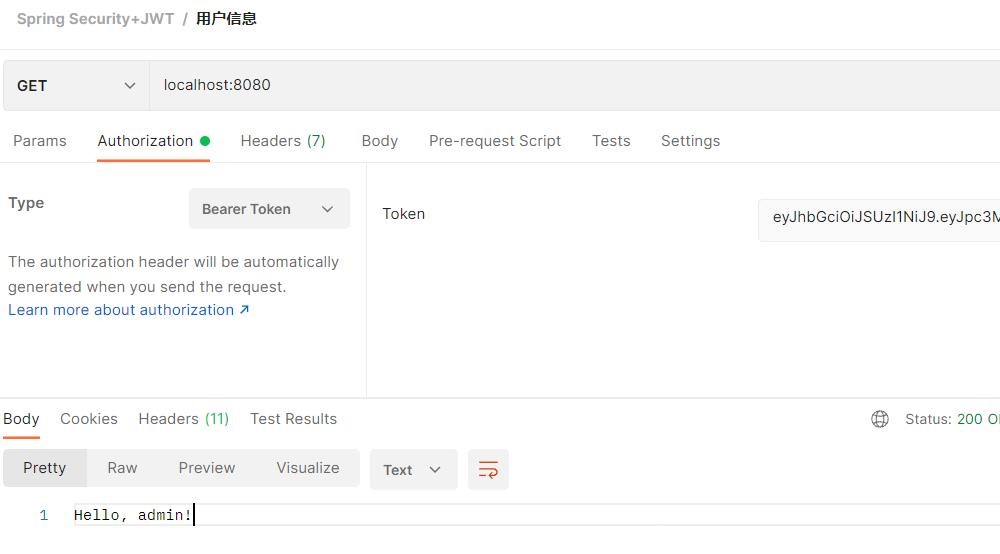
我们已经可以正常访问了!
Spring Security专业性很强,有些术语对于初学者可能有点难度,但是一旦掌握这些概念,你会喜欢上Spring Security的!
这儿有一个可直接运行的demo供参考:https://github.com/cloudgyb/spring-security-study-jwt。
到此这篇关于SpringBoot+SpringSecurity+JWT实现系统认证与授权示例的文章就介绍到这了,更多相关SpringBoot SpringSecurity JWT认证授权内容请搜索编程网以前的文章或继续浏览下面的相关文章希望大家以后多多支持编程网!
--结束END--
本文标题: SpringBoot+SpringSecurity+JWT实现系统认证与授权示例
本文链接: https://www.lsjlt.com/news/171980.html(转载时请注明来源链接)
有问题或投稿请发送至: 邮箱/279061341@qq.com QQ/279061341
下载Word文档到电脑,方便收藏和打印~
2024-03-01
2024-03-01
2024-03-01
2024-02-29
2024-02-29
2024-02-29
2024-02-29
2024-02-29
2024-02-29
2024-02-29
回答
回答
回答
回答
回答
回答
回答
回答
回答
回答


官方手机版

微信公众号

商务合作


0