目录搭建vue3环境Vue-router入门(宝宝模式)vue-router基础(青年模式)一。动态路由匹配1.带参数的动态路由匹配2.捕获所有路由或404 Not Found路由二
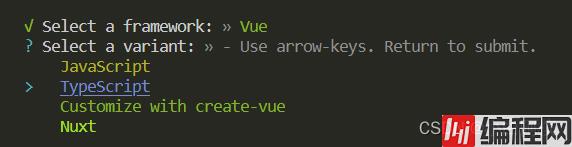
我们使用vite来搭建vue3环境(没有安装vite需要去安装vite)
npm create vite routerStudy
在命令行选择

cd routerStudy
npm i
npm run dev
环境搭建成功!!

下载vue-router
npm i vue-router@4
新建以下文件
src/components/File1.vue:
<template>
    <div>
        这是文件一
    </div>
</template>

<script setup lang="ts">

</script>

<style scoped>

</style>
src/components/File2.vue:
<template>
    <div>
        这是文件二
    </div>
</template>

<script setup lang="ts">

</script>

<style scoped>

</style>
在src下新建router文件夹
在router文件夹下新建router.ts:
import { createRouter,createWEBHistory,createWebHashHistory } from 'vue-router'
import File1 from '../components/File1.vue'
import File2 from '../components/File2.vue'

const routes = [
    {
        path: '/',
        component:File1
    },
    {
        path: '/file2',
        component:File2
    }
]

const router = createRouter({
    // history: createWebHistory(),
    history:createWebHashHistory(),
    routes,
})

export default router;修改src/main.ts
import { createApp } from 'vue'
import './style.CSS'
import App from './App.vue'
import router from './router/router'

createApp(App).use(router).mount('#app')
修改src/components/HelloWorld.vue:
<script setup lang="ts">

</script>

<template>
    <router-view/>
    <button><router-link to="/">去文件一</router-link></button>
    <button><router-link to="/file2">去文件二</router-link></button>
</template>

<style scoped>
</style>
点击按钮能够切换成功则使用成功

当我们需要对每个用户加载同一个组件,但用户id不同。我们就需要在vue-router种使用一个动态字段来实现,再通过$routr.params来获取值:

我们用具体实例来实现一下:
(1)修改src/router/router.ts:
import { createRouter,createWebHistory,createWebHashHistory } from 'vue-router'
import File1 from '../components/File1.vue'
import File2 from '../components/File2.vue'

const routes = [
    {
        path: '/',
        component:File1
    },
    {
        path: '/file2/:username/abc/:userid', //注意看这个
        component:File2
    }
]

const router = createRouter({
    history: createWebHistory(),
    // history:createWebHashHistory(),
    routes,
})

export default router;
(2)修改组件HelloWorld.vue:

(3) 修改组件File2.vue:
<template>
    <div>
        这是文件二
    </div>
</template>

<script setup lang="ts">
import {getCurrentInstance,onMounted } from 'vue'

const instance  = getCurrentInstance()
if (instance != null) {
    const _this = instance.appContext.config.globalProperties //vue3获取当前this

onMounted(() => {
    console.log(_this.$route.params)
  })
}
</script>

<style scoped>

</style>
(4)点击去文件二按钮

(5)查看控制台
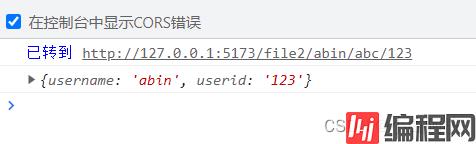
当用户在导航栏乱输一通后,路由表中没有对应的路由,这时候,就需要将用户转去404页面。那么
我们该如何处理呢?
(1)修改router/router.ts:
import { createRouter,createWebHistory,createWebHashHistory } from 'vue-router'
import File1 from '../components/File1.vue'
import File2 from '../components/File2.vue'
import NotFound from '../components/NotFound.vue'
import UserGeneric from '../components/UserGeneric.vue'
const routes = [
    {
        path: '/',
        component:File1
    },
    {
        path: '/file2/:username/abc/:userid',
        component:File2
    },
    // 将匹配所有内容并将其放在 `$route.params.pathMatch` 下
    {
        path: '/:pathMatch(.*)*', name: 'NotFound', component: NotFound
    },
    // 将匹配以 `/user-` 开头的所有内容,并将其放在 `$route.params.afterUser` 下
    {
        path: '/user-:afterUser(.*)', component: UserGeneric
    },
]

const router = createRouter({
    history: createWebHistory(),
    // history:createWebHashHistory(),
    routes,
})

export default router;
(2)新建组件NotFound.vue:
<template>
    <div>
        糟糕!页面没有找到。。。呜呜呜
    </div>
</template>

<script setup lang="ts">
import {getCurrentInstance,onMounted } from 'vue'

const instance  = getCurrentInstance()
if (instance != null) {
    const _this = instance.appContext.config.globalProperties //vue3获取当前this

onMounted(() => {
    console.log(_this.$route.params)
  })
}
</script>

<style scoped>

</style>
(3)修改HelloWorld.vue

(4)点击去404页面按钮(或者在地址栏乱写一通)


(5)出现404页面,说明运行成功!!!
路由是可以嵌套的。例如:

嵌套的理解挺简单的,我就不多叭叭了,直接上代码,看完就懂了。
(1)新建组件Children1.vue:
<template>
    <div>
        我是孩子1
    </div>
</template>

<script setup lang="ts">

</script>

<style scoped>

</style>
(2)新建组件Children2.vue:
<template>
    <div>
        我是孩子2
    </div>
</template>

<script setup lang="ts">

</script>

<style scoped>

</style>

<template>
    <div>
        我是孩子2
    </div>
</template>

<script setup lang="ts">

</script>

<style scoped>

</style>
(3)修改router/router.ts:
import { createRouter,createWebHistory,createWebHashHistory } from 'vue-router'
import File1 from '../components/File1.vue'
import File2 from '../components/File2.vue'
import NotFound from '../components/NotFound.vue'
import UserGeneric from '../components/UserGeneric.vue'
import Children1 from '../components/Children1.vue'
import Children2 from '../components/Children2.vue'


const routes = [
    {
        path: '/',
        component: File1,

    },
    {
        path: '/file2',
        component: File2,
        children: [  //使用嵌套路由
            {
                path: 'children1',
                component:Children1
            },
            {
                path: 'children2',
                component:Children2
            },
        ]
    },
    {
        path: '/:pathMatch(.*)*', name: 'NotFound', component: NotFound
    },
    {
        path: '/user-:afterUser(.*)', component: UserGeneric
    },
]

const router = createRouter({
    history: createWebHistory(),
    // history:createWebHashHistory(),
    routes,
})

export default router;
(4)修改组件HelloWorld.vue:

(5)修改组件File2.vue:
<template>
    <div>
        这是文件二
        <div>
            我是文件二里的内容
            <router-view/>
            <button><router-link to="/file2/children1">找孩子1</router-link></button>
            <button><router-link to="/file2/children2">找孩子2</router-link></button>
        </div>
    </div>
</template>

<script setup lang="ts">

</script>

<style scoped>

</style>
(6)先点去文件二,再点击找孩子1按钮,出现即成功!!

除了使用/< router-link/> 创建 a 标签来定义导航链接,我们还可以借助 router 的实例方法,通过编写代码来实现。
(1)修改组件NotFound.vue:
<template>
    <div>
        糟糕!页面没有找到。。。呜呜呜
    </div>
</template>

<script setup lang="ts">
import {getCurrentInstance,onMounted } from 'vue'

const instance  = getCurrentInstance()
if (instance != null) {
    const _this = instance.appContext.config.globalProperties //vue3获取当前this


    // 1.字符串路径
    _this.$router.push('/file2/children2')

    // 2.带有路径的对象
    // _this.$router.push({path:'/file2/children2'})

    // 3.命名的路由,并加上参数,让路由建立 url
    // _this.$router.push({name:'file2',params:{username:'children2'}})

    // 4.带查询参数,结果是 /reGISter?plan=private
    // _this.$router.push({ path: '/file2/children2', query: {userid:'123'} })


    onMounted(() => {
    console.log(_this.$route.params)
  })
}
</script>

<style scoped>

</style>
(2)再点“去404页面”,发现没有去404页面了,说明编程式导航成功!!

它的作用类似于 router.push,唯一不同的是,它在导航时不会向 history 添加新记录,正如它的名字所暗示的那样——它取代了当前的条目。
修改组件NotFound.vue:
<template>
    <div>
        糟糕!页面没有找到。。。呜呜呜
    </div>
</template>

<script setup lang="ts">
import {getCurrentInstance,onMounted } from 'vue'

const instance  = getCurrentInstance()
if (instance != null) {
    const _this = instance.appContext.config.globalProperties //vue3获取当前this

    // 一。router.push的使用:
    // 1.字符串路径
    // _this.$router.push('/file2/children2')

    // 2.带有路径的对象
    // _this.$router.push({path:'/file2/children2'})

    // 3.命名的路由,并加上参数,让路由建立 url
    // _this.$router.push({name:'file2',params:{username:'children2'}})

    // 4.带查询参数,结果是 /register?plan=private
    // _this.$router.push({ path: '/file2/children2', query: {userid:'123'} })

    // 二。router.replace的使用:
    _this.$router.replace('/file2/children1')


    onMounted(() => {
    console.log(_this.$route.params)
  })
}
</script>

<style scoped>

</style>
修改组件NotFound.vue:
<template>
    <div>
        糟糕!页面没有找到。。。呜呜呜
    </div>
</template>

<script setup lang="ts">
import {getCurrentInstance,onMounted } from 'vue'

const instance  = getCurrentInstance()
if (instance != null) {
    const _this = instance.appContext.config.globalProperties //vue3获取当前this

    // 一。router.push的使用:
    // 1.字符串路径
    // _this.$router.push('/file2/children2')

    // 2.带有路径的对象
    // _this.$router.push({path:'/file2/children2'})

    // 3.命名的路由,并加上参数,让路由建立 url
    // _this.$router.push({name:'file2',params:{username:'children2'}})

    // 4.带查询参数,结果是 /register?plan=private
    // _this.$router.push({ path: '/file2/children2', query: {userid:'123'} })

    // 二。router.replace的使用:
    // _this.$router.replace('/file2/children1')

    // 三。router.go的使用:
    _this.$router.go(-1)  //相当于点击回退一次

    onMounted(() => {
    console.log(_this.$route.params)
  })
}
</script>

<style scoped>

</style>
到此这篇关于Vue3的vue-router超详细使用的文章就介绍到这了,更多相关Vue3的vue-router使用内容请搜索编程网以前的文章或继续浏览下面的相关文章希望大家以后多多支持编程网!
--结束END--
本文标题: Vue3的vue-router超详细使用示例教程
本文链接: https://www.lsjlt.com/news/174948.html(转载时请注明来源链接)
有问题或投稿请发送至: 邮箱/279061341@qq.com QQ/279061341
下载Word文档到电脑,方便收藏和打印~
2024-01-12
2023-05-20
2023-05-20
2023-05-20
2023-05-20
2023-05-20
2023-05-20
2023-05-20
2023-05-20
2023-05-20
回答
回答
回答
回答
回答
回答
回答
回答
回答
回答


官方手机版

微信公众号

商务合作


0