目录ReactDom.rendersetState 与 forceUpdateexpirationTime的作用获取currentTime不同的expirationTime
React 的鲜活生命起源于 ReactDOM.render ,这个过程会为它的一生储备好很多必需品,我们顺着这个线索,一探婴儿般 React 应用诞生之初的悦然。
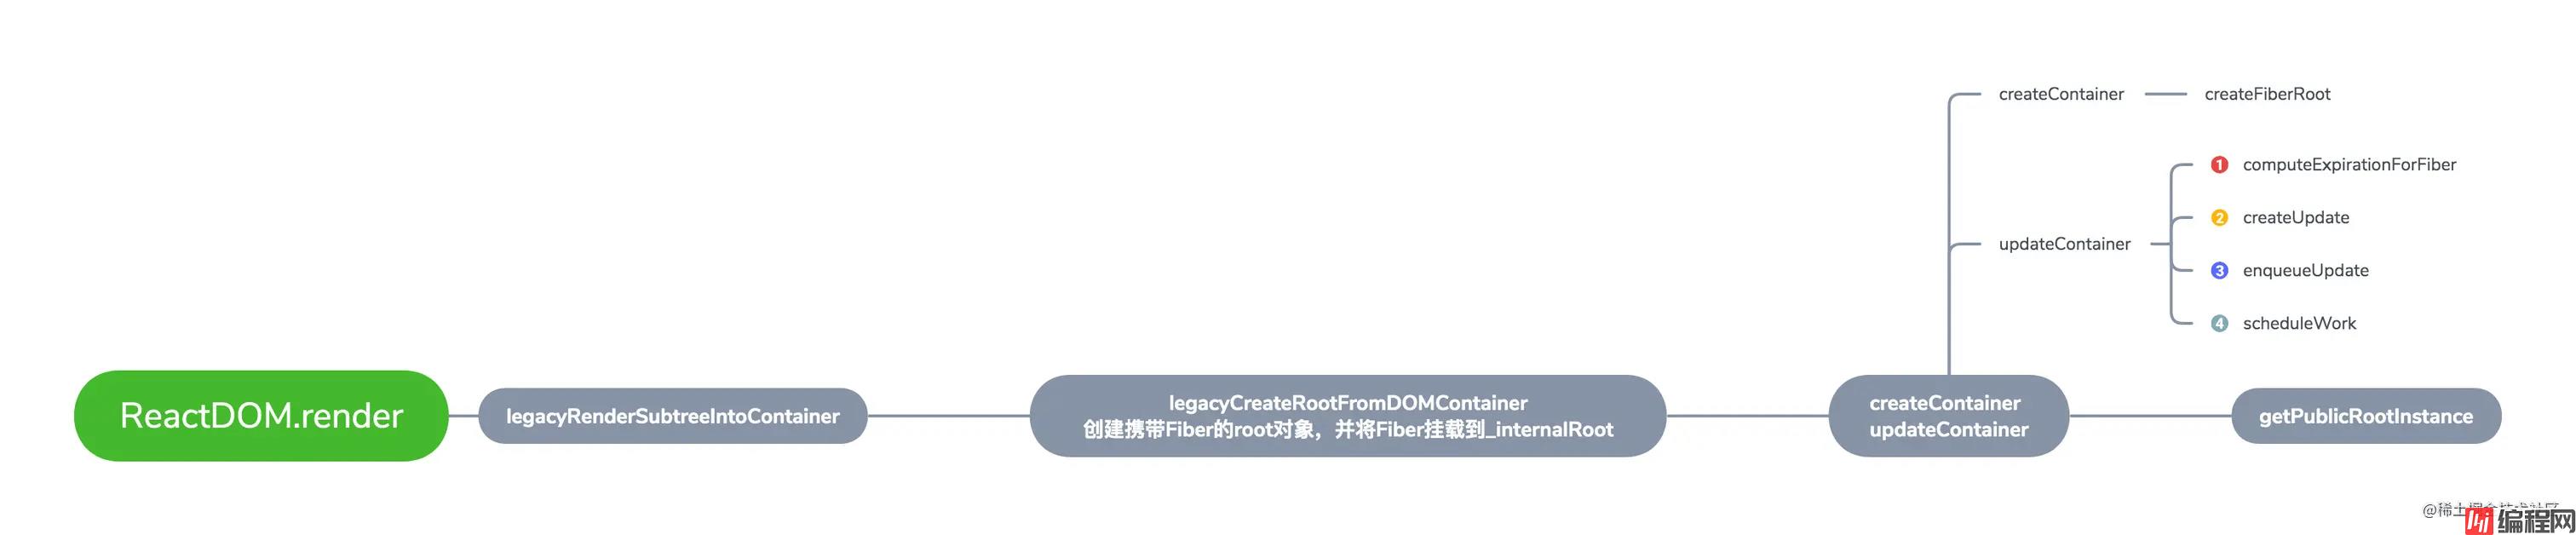
更新创建的操作我们总结为以下两种场景
串联该内容,一图以蔽之
首先看到 react-dom/client/ReactDOM 中对于 ReactDOM 的定义,其中包含我们熟知的方法、不稳定方法以及即将废弃方法。
const ReactDOM: Object = {createPortal,// LegacyfindDOMnode,hydrate,render,unstable_renderSubtreeIntoContainer,unmountComponentAtNode,// Temporary alias since we already shipped React 16 RC with it.// TODO: remove in React 17.unstable_createPortal(...args) {// ...return createPortal(...args);},unstable_batchedUpdates: batchedUpdates,flushSync: flushSync,__SECRET_INTERNALS_DO_NOT_USE_OR_YOU_WILL_BE_FIRED: {// ...},
};
此处方法均来自 ./ReactDOMLegacy ,render 方法定义很简单,正如我们常使用的那样,第一个参数是组件,第二个参数为组件所要挂载的DOM节点,第三个参数为回调函数。
export function render( element: React$Element<any>,container: DOMContainer,callback: ?Function, ) {// ...return legacyRenderSubtreeIntoContainer(null,element,container,false,callback,);
}
function legacyRenderSubtreeIntoContainer( parentComponent: ?React$Component<any, any>,children: ReactNodeList,container: DOMContainer,forceHydrate: boolean,callback: ?Function, ) {// TODO: Without `any` type, Flow says "Property cannot be accessed on any// member of intersection type." Whyyyyyy.let root: RootType = (container._reactRootContainer: any);let fiberRoot;if (!root) {// Initial mountroot = container._reactRootContainer = legacyCreateRootFromDOMContainer(container,forceHydrate,);fiberRoot = root._internalRoot;if (typeof callback === 'function') {const originalCallback = callback;callback = function() {const instance = getPublicRootInstance(fiberRoot);originalCallback.call(instance);};}// 初次渲染,不会将更新标记为batched.unbatchedUpdates(() => {updateContainer(children, fiberRoot, parentComponent, callback);});} else {fiberRoot = root._internalRoot;if (typeof callback === 'function') {const originalCallback = callback;callback = function() {const instance = getPublicRootInstance(fiberRoot);originalCallback.call(instance);};}// UpdateupdateContainer(children, fiberRoot, parentComponent, callback);}return getPublicRootInstance(fiberRoot);
}
这段代码我们不难发现,调用 ReactDOM.render 时,返回的 parentComponent 是 null,并且初次渲染,不会进行批量策略的更新,而是需要尽快的完成。(batchedUpdates批量更新后续介绍)
从这部分源码我们不难看出,render 和 createProtal 的用法的联系,通过DOM容器创建Root节点的形式
function legacyCreateRootFromDOMContainer( container: DOMContainer,forceHydrate: boolean, ): RootType {const shouldHydrate =forceHydrate || shouldHydrateDueToLegacyHeuristic(container);// First clear any existing content.if (!shouldHydrate) {let warned = false;let rootSibling;while ((rootSibling = container.lastChild)) {// ...container.removeChild(rootSibling);}}return createLegacyRoot(container,shouldHydrate? {hydrate: true,}: undefined,);
}
createLegacyRoot 定义于 ./ReactDOMRoot 中,指定了创建的DOM容器和一些option设置,最终会返回一个 ReactDOMBlockingRoot 。
export function createLegacyRoot( container: DOMContainer,options?: RootOptions, ): RootType {return new ReactDOMBlockingRoot(container, LegacyRoot, options);
}
function ReactDOMBlockingRoot( container: DOMContainer,tag: RootTag,options: void | RootOptions, ) {this._internalRoot = createRootImpl(container, tag, options);
}
function createRootImpl( container: DOMContainer,tag: RootTag,options: void | RootOptions, ) {// Tag is either LegacyRoot or Concurrent Root// ...const root = createContainer(container, tag, hydrate, hydrationCallbacks);// ...return root;
}
关键点在于,方法最终调用了 createContainer 来创建root,而该方法中会创建我们上一节所介绍的 FiberRoot ,该对象在后续的更新调度过程中起着非常重要的作用,到更新调度内容我们详细介绍。
在这部分我们看到了两个方法,分别是:createContainer、 updateContainer,均出自 react-reconciler/inline.dom , 最终定义在 ``react-reconciler/src/ReactFiberReconciler` 。创建方法很简单,如下
export function createContainer(containerInfo: Container,tag: RootTag,hydrate: boolean,hydrationCallbacks: null | SuspenseHydrationCallbacks,): OpaqueRoot {return createFiberRoot(containerInfo, tag, hydrate, hydrationCallbacks);
}
我们继续往下看,紧跟着能看到 updateContainer 方法,该方法定义了更新相关的操作,其中最重要的一个点就是 expirationTime ,直接译为中文是过期时间,我们想想,此处为何要过期时间,这个过期的含义是什么呢?这个过期时间是如何计算的呢?继续往下我们可以看到,computeExpirationForFiber 方法用于过期时间的计算,我们先将源码片段放在此处。
export function updateContainer( element: ReactNodeList,container: OpaqueRoot,parentComponent: ?React$Component<any, any>,callback: ?Function, ): ExpirationTime {const current = container.current;const currentTime = requestCurrentTimeForUpdate();// ...const suspenseConfig = requestCurrentSuspenseConfig();const expirationTime = computeExpirationForFiber(currentTime,current,suspenseConfig,);// ...const context = getContextForSubtree(parentComponent);if (container.context === null) {container.context = context;} else {container.pendinGContext = context;}// ...const update = createUpdate(expirationTime, suspenseConfig);// Caution: React DevTools currently depends on this property// being called "element".update.payload = {element};callback = callback === undefined ? null : callback;if (callback !== null) {warningWithoutStack(typeof callback === 'function','render(...): Expected the last optional `callback` argument to be a ' +'function. Instead received: %s.',callback,);update.callback = callback;}enqueueUpdate(current, update);scheduleWork(current, expirationTime);return expirationTime;
}
计算完更新超时时间,而后创建更新对象 createUpdate ,进而将element绑定到update对象上,如果存在回调函数,则将回调函数也绑定到update对象上。update对象创建完成,将update添加到UpdateQueue中,关于update和UpdateQueue数据结构见上一节讲解。至此,开始任务调度。
这两个方法绑定在我们当初定义React的文件中,具体定义在 react/src/ReactBaseClasses 中,如下
Component.prototype.setState = function(partialState, callback) {// ...this.updater.enqueueSetState(this, partialState, callback, 'setState');
};
Component.prototype.forceUpdate = function(callback) {this.updater.enqueueForceUpdate(this, callback, 'forceUpdate');
};
这就是为何React基础上拓展React-Native能轻松自如,因为React只是做了一些规范和结构设定,具体实现是在React-Dom或React-Native中,如此达到了平台适配性。
Class组件的更新使用 this.setState ,这个api我们早已烂熟于心,对于对象组件的更新创建,定义在 react-reconciler/src/ReactFiberClassComponent.js ,classComponentUpdater对象定义了 enqueueSetState 与 enqueueReplaceState 以及 enqueueForceUpdate 对象方法,观察这两个方法会发现,不同在于enqueueReplaceState 和 enqueueForceUpdate 会在创建的update对象绑定一个tag,用于标志更新的类型是 ReplaceState 还是 ForceUpdate ,具体实现我们一起来看代码片段。
const classComponentUpdater = {isMounted,enqueueSetState(inst, payload, callback) {const fiber = getInstance(inst);const currentTime = requestCurrentTimeForUpdate();const suspenseConfig = requestCurrentSuspenseConfig();const expirationTime = computeExpirationForFiber(currentTime,fiber,suspenseConfig,);const update = createUpdate(expirationTime, suspenseConfig);update.payload = payload;if (callback !== undefined && callback !== null) {// ...update.callback = callback;}enqueueUpdate(fiber, update);scheduleWork(fiber, expirationTime);},enqueueReplaceState(inst, payload, callback) {const fiber = getInstance(inst);const currentTime = requestCurrentTimeForUpdate();const suspenseConfig = requestCurrentSuspenseConfig();const expirationTime = computeExpirationForFiber(currentTime,fiber,suspenseConfig,);const update = createUpdate(expirationTime, suspenseConfig);update.tag = ReplaceState;update.payload = payload;if (callback !== undefined && callback !== null) {// ...update.callback = callback;}enqueueUpdate(fiber, update);scheduleWork(fiber, expirationTime);},enqueueForceUpdate(inst, callback) {const fiber = getInstance(inst);const currentTime = requestCurrentTimeForUpdate();const suspenseConfig = requestCurrentSuspenseConfig();const expirationTime = computeExpirationForFiber(currentTime,fiber,suspenseConfig,);const update = createUpdate(expirationTime, suspenseConfig);update.tag = ForceUpdate;if (callback !== undefined && callback !== null) {// ...update.callback = callback;}enqueueUpdate(fiber, update);scheduleWork(fiber, expirationTime);},
};
我们也能发现,其实通过setState更新的操作实现和ReactDOM.render基本一致。
1.更新过期时间
2.创建Update对象
3.为update对象绑定一些属性,比如 tag 、callback
4.创建的update对象入队 (enqueueUpdate)
5.进入调度过程
expirationTime用于React在调度和渲染过程,优先级判断,针对不同的操作,有不同响应优先级,这时我们通过 currentTime: ExpirationTime 变量与预定义的优先级EXPIRATION常量计算得出expirationTime。难道currentTime如我们平时糟糕代码中的 Date.now() ?错!如此操作会产生频繁计算导致性能降低,因此我们定义currentTime的计算规则。
export function requestCurrentTimeForUpdate() {if ((executionContext & (RenderContext | CommitContext)) !== NoContext) {// We're inside React, so it's fine to read the actual time.return msToExpirationTime(now());}// We're not inside React, so we may be in the middle of a browser event.if (currentEventTime !== NoWork) {// Use the same start time for all updates until we enter React again.return currentEventTime;}// This is the first update since React yielded. Compute a new start time.currentEventTime = msToExpirationTime(now());return currentEventTime;
}
该方法定义了如何去获得当前时间,now 方法由 ./SchedulerWithReactIntegration 提供,对于now方法的定义似乎不太好找,我们通过断点调试 Scheduler_now ,最终能够发现时间的获取是通过 window.perfORMance.now(), 紧接着找寻到 msToExpirationTime 定义在 ReactFiberExpirationTime.js ,定义了expirationTime相关处理逻辑。
阅读到 react-reconciler/src/ReactFilberExpirationTime ,对于expirationTime的计算有三个不同方法,分别为:computeAsyncExpiration 、computeSuspenseExpiration 、computeInteractiveExpiration 。这三个方法均接收三个参数,第一个参数均为以上获取的 currentTime ,第二个参数为约定的超时时间,第三个参数与批量更新的粒度有关。
export const Sync = MAX_SIGNED_31_BIT_INT;
export const Batched = Sync - 1;
const UNIT_SIZE = 10;
const MAGIC_NUMBER_OFFSET = Batched - 1;
// 1 unit of expiration time represents 10ms.
export function msToExpirationTime(ms: number): ExpirationTime {// Always add an offset so that we don't clash with the magic number for NoWork.return MAGIC_NUMBER_OFFSET - ((ms / UNIT_SIZE) | 0);
}
export function expirationTimeToMs(expirationTime: ExpirationTime): number {return (MAGIC_NUMBER_OFFSET - expirationTime) * UNIT_SIZE;
}
function ceiling(num: number, precision: number): number {return (((num / precision) | 0) + 1) * precision;
}
function computeExpirationBucket( currentTime,expirationInMs,bucketSizeMs, ): ExpirationTime {return (MAGIC_NUMBER_OFFSET -ceiling(MAGIC_NUMBER_OFFSET - currentTime + expirationInMs / UNIT_SIZE,bucketSizeMs / UNIT_SIZE,));
}
// TODO: This corresponds to Scheduler's NormalPriority, not LowPriority. Update
// the names to reflect.
export const LOW_PRIORITY_EXPIRATION = 5000;
export const LOW_PRIORITY_BATCH_SIZE = 250;
export function computeAsyncExpiration( currentTime: ExpirationTime, ): ExpirationTime {return computeExpirationBucket(currentTime,LOW_PRIORITY_EXPIRATION,LOW_PRIORITY_BATCH_SIZE,);
}
export function computeSuspenseExpiration( currentTime: ExpirationTime,timeoutMs: number, ): ExpirationTime {// TODO: Should we warn if timeoutMs is lower than the normal pri expiration time?return computeExpirationBucket(currentTime,timeoutMs,LOW_PRIORITY_BATCH_SIZE,);
}
export const HIGH_PRIORITY_EXPIRATION = __DEV__ ? 500 : 150;
export const HIGH_PRIORITY_BATCH_SIZE = 100;
export function computeInteractiveExpiration(currentTime: ExpirationTime) {return computeExpirationBucket(currentTime,HIGH_PRIORITY_EXPIRATION,HIGH_PRIORITY_BATCH_SIZE,);
}
重点在于 ceil 方法的定义,方法传递两个参数,需要求值的number和期望精度precision,不妨随意带入两个值观察该函数的作用,number = 100,precision = 10,那么函数返回值为 (((100 / 10) | 0) + 1) * 10,我们保持precision值不变,更改number会发现,当我们的值在100-110之间时,该函数返回的值相同。哦!此时恍然大悟,原来这个方法就是保证在同一个bucket中的更新获取到相同的过期时间 expirationTime ,就能够实现在较短时间间隔内的更新创建能够__合并处理__。
关于超时时间的处理是很复杂的,除了我们看到的 expirationTime ,还有 childExpirationTime 、root.firstPendingTime 、root.lastExpiredTime 、root.firstSuspendedTime 、root.lastSuspendedTime ,root下的相关属性标记了其下子节点fiber的expirationTime的次序,构成处理优先级的次序,childExpirationTime 则是在遍历子树时,更新其 childExpirationTime 值为子节点 expirationTime 。
以上是React创建更新的核心流程,任务调度我们下次再见。
到此这篇关于React深入分析更新的创建源码的文章就介绍到这了,更多相关React更新的创建内容请搜索编程网以前的文章或继续浏览下面的相关文章希望大家以后多多支持编程网!
--结束END--
本文标题: React深入分析更新的创建源码
本文链接: https://www.lsjlt.com/news/177708.html(转载时请注明来源链接)
有问题或投稿请发送至: 邮箱/279061341@qq.com QQ/279061341
下载Word文档到电脑,方便收藏和打印~
2024-01-12
2023-05-20
2023-05-20
2023-05-20
2023-05-20
2023-05-20
2023-05-20
2023-05-20
2023-05-20
2023-05-20
回答
回答
回答
回答
回答
回答
回答
回答
回答
回答


官方手机版

微信公众号

商务合作


0