本周作业内容:1、复制/etc/rc.d/rc.sysinit文件至/tmp目录,将/tmp/rc.sysinit文件中的以至少一个空白字符开头的行的行首加#;[root@localhost ~]# cp /etc/rc.d/rc.sysi
本周作业内容:
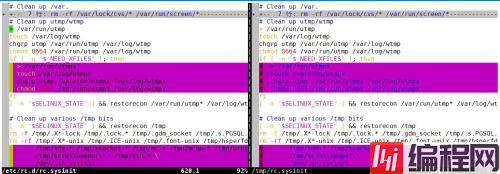
1、复制/etc/rc.d/rc.sysinit文件至/tmp目录,将/tmp/rc.sysinit文件中的以至少一个空白字符开头的行的行首加#;
[root@localhost ~]# cp /etc/rc.d/rc.sysinit /tmp/    #复制文件
[root@localhost ~]# vim /tmp/rc.sysinit          #编辑文件
:%s/^[[:space:]]/#&/                      #末行模式下查找替换
替换结果对比:

2、复制/boot/grub/grub.conf至/tmp目录中,删除/tmp/grub.conf文件中的行首的空白字符;
[root@localhost ~]# cp /boot/grub/grub.conf /tmp/    #复制文件
[root@localhost ~]# vim /tmp/grub.conf               #vim编辑文件
:%s/^[[:space:]]\+//                                 #末行模式查找替换,不指定替换内容即为删除
删除结果对比:

3、删除/tmp/rc.sysinit文件中的以#开头,且后面跟了至少一个空白字符的行行的#和空白字符
[root@localhost ~]# vim /tmp/rc.sysinit                         #vim 编辑文件
:%s/^#[[:space:]]\+//                                           #末行模式查找替换
删除结果对比:

4、为/tmp/grub.conf文件中前三行的行首加#号;
[root@localhost ~]# vim /tmp/grub.conf         #vim 编辑文件
:1,3s/^/#&/                                    #末行模式查找替换,1,3指定搜索范围,
:w /tmp/grub.conf.bak                          #另存为 /tmp/grub.conf.bak
[root@localhost ~]# vimdiff /tmp/grub.conf /tmp/grub.conf.bak     #vimdiff 对比两个文件
对比结果:

5、将/etc/yum.repos.d/Centos-Media.repo文件中所有的enabled=0或gpGCheck=0的最后的0修改为1;
[root@localhost ~]# cp /etc/yum.repos.d/CentOS-Media.repo /tmp/    #复制文件
[root@localhost ~]# vim /tmp/CentOS-Media.repo                     #vim 编辑文件
:%s/enabled=0/enabled=1/g                                          #全局查找替换
:%s/gpgcheck=0/gpgcheck=1/g
替换前后对比:

6、每4小时执行一次对/etc目录的备份,备份至/backup目录中,保存的目录名为形如etc-201608300202
[root@localhost ~]# mkdir /backup
[root@localhost ~]# crontab -e
0 */4  * * * /bin/cp /etc /backup/etc-`date +%Y%m%d%H%M`
7、每周2,4,6备份/var/log/messages文件至/backup/messages_logs/目录中,保存的文件名形如messages-20160830
[root@localhost ~]# crontab -e
0 0 * * 2,4,6 /bin/cp -a /var/log/messages /backup/messages_logs/messages-`date +%Y%m%d`
8、每天每两小时取当前系统/proc/meminfo文件中的所有以S开头的信息至/stats/memory.txt文件中
[root@localhost ~]# mkdir /stats
[root@localhost ~]# crontab -e
0 */2 * * * /bin/grep '^S' /proc/meminfo > /stats/memory.txt
9、工作日的工作时间内,每两小时执行一次echo "howdy"
[root@localhost ~]# crontab -e
0 8-17/2 * * 1,2,3,4,5 /bin/echo "howdy" #1-5为工作日,8-17为工作时间脚本编程练习
10、创建目录/tmp/testdir-当前日期时间;
[root@localhost ~]# vim /MK-testdir.sh
#!/bin/bash
mkdir /tmp/testdir-`date +%Y%m%d%H%M`

[root@localhost ~]# chmod +x /MK-testdir.sh
[root@localhost ~]# ll /MK-testdir.sh
-rwxr-xr-x. 1 root root 54 9月   9 10:41 /MK-testdir.sh
[root@localhost ~]# /MK-testdir.sh
[root@localhost ~]# ls /tmp/
3    CentOS-Media.repo  maxusers.txt  testdir-201609091042
3]   crontab.RT2uVE     mylinux       tfile-2016-08-12-17-01-01
a_c  etc.conf           mytest1       yum.log
a_d  etc.test           mytest2       yum_save_tx-2016-08-01-01-55m_XEdJ.yumtx
b_c  grub.conf          mytest3
b_d  grub.conf.bak      rc.sysinit
[root@localhost ~]#
11、在此目录创建100个空文件:file1-file100
[root@localhost tmp]# vim /MK-testdir.sh
#!/bin/bash
dir=/tmp/testdir-`date +%Y%m%d%H%M`
mkdir $dir
if [ $? -eq 0 ]; then      #判断之前目录是否创建成功,若创建成功则进入循环创建文件file1-file100
  for i in {1..100};do
    touch $dir/file$i
  done
  echo 'touch file1-file100 success.'
else
  echo 'touch file1-file100 failed.'
fi
[root@localhost /]# ./MK-testdir.sh
touch file1-file100 success.
[root@localhost /]# ll /tmp/testdir-201609091148
总用量 0
-rw-r--r--. 1 root root 0 9月   9 11:48 file1
-rw-r--r--. 1 root root 0 9月   9 11:48 file10
-rw-r--r--. 1 root root 0 9月   9 11:48 file100
-rw-r--r--. 1 root root 0 9月   9 11:48 file11
......
12、显示/etc/passwd文件中位于第偶数行的用户的用户名;
[root@localhost /]# vim test-6-12.sh
#!/bin/bash
cat -n /etc/passwd | sed -n 'n;p' | cut -d: -f1
[root@localhost /]# ./test-6-12.sh
     2    hadoop
     4    daemon
     6    lp
     8    shutdown
.........
13、创建10用户user10-user19;密码同用户名;
[root@localhost work]# vim test-6.13.sh
#!/bin/bash
#
for i in {10..19};do
  if id user$i &> /dev/null; then
    echo "user$i exists."
  else
    useradd user$i &> /dev/null
     if [ $? -eq 0 ]; then
        echo "user$i" | passwd --stdin user$i &> /dev/null
        echo "add user$i success."
     fi
  fi
done
[root@localhost work]# ./test-6.13.sh
Add user10 success.
Add user11 success.
Add user12 success.
Add user13 success.
Add user14 success.
Add user15 success.
Add user16 success.
Add user17 success.
Add user18 success.
Add user19 success.
14、在/tmp/创建10个空文件file10-file19;
[root@localhost work]#vim test-6.14.sh
#!/bin/bash

for i in {10..19};do
  touch /tmp/file$i
    if [ $? -eq 0 ];then
       echo "file$i touch success."
    fi
done
[root@localhost work]# ./test-6.14.sh
file10 touch success.
file11 touch success.
file12 touch success.
file13 touch success.
file14 touch success.
file15 touch success.
file16 touch success.
file17 touch success.
file18 touch success.
file19 touch success.
15、把file10的属主和属组改为user10,依次类推。
[root@localhost work]#vim test-6.15.sh
#!/bin/bash
#
for i in {10..19};do
    if [ -e /tmp/file$i ];then
       chown user$i:user$i /tmp/file$i &> /dev/null
    else
       echo "No Find The file."
    fi
done

[root@localhost work]# ./test-6.15.sh
[root@localhost work]# ll /tmp/ | grep user
-rw-r--r--.  1 user10 user10     0 9月   9 12:30 file10
-rw-r--r--.  1 user11 user11     0 9月   9 12:30 file11
-rw-r--r--.  1 user12 user12     0 9月   9 12:30 file12
-rw-r--r--.  1 user13 user13     0 9月   9 12:30 file13
-rw-r--r--.  1 user14 user14     0 9月   9 12:30 file14
-rw-r--r--.  1 user15 user15     0 9月   9 12:30 file15
-rw-r--r--.  1 user16 user16     0 9月   9 12:30 file16
-rw-r--r--.  1 user17 user17     0 9月   9 12:30 file17
-rw-r--r--.  1 user18 user18     0 9月   9 12:30 file18
-rw-r--r--.  1 user19 user19     0 9月   9 12:30 file19
-rw-r--r--.  1 root   root     854 8月  19 18:07 maxusers.txt
[root@localhost work]#--结束END--
本文标题: megeedu Linux+Python
本文链接: https://www.lsjlt.com/news/189495.html(转载时请注明来源链接)
有问题或投稿请发送至: 邮箱/279061341@qq.com QQ/279061341
下载Word文档到电脑,方便收藏和打印~
2024-03-01
2024-03-01
2024-03-01
2024-03-01
2024-03-01
2024-02-29
2024-02-29
2024-02-29
2024-02-29
2024-02-29
回答
回答
回答
回答
回答
回答
回答
回答
回答
回答
0