Python 官方文档:入门教程 => 点击学习
目录使用Java生成图片验证码完全解析注意事项如何加入噪点如何生成干扰线什么样的算法生成噪点比较好验证码如何避免被ocr识别如何斜放文本四位图形验证码调整噪点的透明度使用Java生成
在 Java 中开发图片验证码功能,您可以使用 Java 图形处理库,比如 Java Advanced Imaging (Jai) 或者 Java2D,来生成图片并将文本写入图片。具体实现方法如下:

下面是一个简单的示例代码,可以帮助您快速开始:
import java.awt.*;
import java.awt.image.*;
import java.io.*;
import javax.imageio.*;

public class Captcha {
  public static void main(String[] args) throws Exception {
    int width = 100;
    int height = 40;

    // 创建 BufferedImage 对象
    BufferedImage image = new BufferedImage(width, height, BufferedImage.TYPE_INT_RGB);

    // 获取图片的 Graphics2D 对象
    Graphics2D g = image.createGraphics();

    // 设置文本的颜色和字体
    g.setColor(Color.WHITE);
    g.setFont(new Font("Arial", Font.BOLD, 20));

    // 绘制文本
    g.drawString("Hello, World!", 10, 30);

    // 释放 Graphics2D 对象
    g.dispose();

    // 将图片输出到浏览器
    ImageIO.write(image, "jpeg", new File("captcha.jpeg"));
  }
}在您的应用中使用图片验证码功能时,需要注意以下几点:
在 Java 中加入噪点可以使用随机数生成噪点的位置和颜色,然后使用 Graphics2D 的 drawLine() 方法在图片上绘制噪点。

例如,下面的代码演示了如何在图片上随机绘制 100 个噪点:
import java.awt.*;
import java.awt.image.*;
import java.util.Random;

public class Captcha {
  public static void main(String[] args) throws Exception {
    int width = 100;
    int height = 40;

    // 创建 BufferedImage 对象
    BufferedImage image = new BufferedImage(width, height, BufferedImage.TYPE_INT_RGB);

    // 获取图片的 Graphics2D 对象
    Graphics2D g = image.createGraphics();

    // 设置文本的颜色和字体
    g.setColor(Color.WHITE);
    g.setFont(new Font("Arial", Font.BOLD, 20));

    // 绘制文本
    g.drawString("Hello, World!", 10, 30);

    // 创建随机数生成器
    Random rnd = new Random();

    // 绘制噪点
    for (int i = 0; i < 100; i++) {
      int x = rnd.nextInt(width);
      int y = rnd.nextInt(height);
      g.drawLine(x, y, x, y);
    }

    // 释放 Graphics2D 对象
    g.dispose();
  }
}
上面的代码中,我们使用了随机数生成噪点的位置和颜色,并使用 Graphics2D 的 drawLine() 方法在图片上绘制噪点。
在 Java 中生成干扰线可以使用随机数生成干扰线的起始点和结束点,然后使用 Graphics2D 的 drawLine() 方法在图片上绘制干扰线。

例如,下面的代码演示了如何在图片上随机绘制 10 条干扰线:
import java.awt.*;
import java.awt.image.*;
import java.util.Random;

public class Captcha {
  public static void main(String[] args) throws Exception {
    int width = 100;
    int height = 40;

    // 创建 BufferedImage 对象
    BufferedImage image = new BufferedImage(width, height, BufferedImage.TYPE_INT_RGB);

    // 获取图片的 Graphics2D 对象
    Graphics2D g = image.createGraphics();

    // 设置文本的颜色和字体
    g.setColor(Color.WHITE);
    g.setFont(new Font("Arial", Font.BOLD, 20));

    // 绘制文本
    g.drawString("Hello, World!", 10, 30);

    // 创建随机数生成器
    Random rnd = new Random();

    // 绘制干扰线
    for (int i = 0; i < 10; i++) {
      int x1 = rnd.nextInt(width);
      int y1 = rnd.nextInt(height);
      int x2 = rnd.nextInt(width);
      int y2 = rnd.nextInt(height);
      g.drawLine(x1, y1, x2, y2);
    }

    // 释放 Graphics2D 对象
    g.dispose();
  }
}
上面的代码中,我们使用了随机数生成干扰线的起始点和结束点,并使用 Graphics2D 的 drawLine() 方法在图片上绘制干扰线。到了这一步其实大多数OCR已经不能识别了。
在生成噪点时,最重要的是要保证噪点数量足够多,以增加图片验证码的难度。您可以使用以下算法来生成噪点:
最终选择哪种方法取决于您的需求和系统的性能。
在 Java 中使用图形生成算法生成噪点,可以使用 Java2D 库中的 Shape 接口和相关的实现类来生成各种图形。例如,使用 Ellipse2D 类可以生成椭圆形噪点,使用 Rectangle2D 类可以生成矩形噪点。

下面是一个简单的示例代码,演示了如何使用图形生成算法生成噪点:
import java.awt.*;
import java.awt.geom.*;
import java.awt.image.*;
import java.util.Random;

public class Captcha {
  public static void main(String[] args) throws Exception {
    int width = 100;
    int height = 40;

    // 创建 BufferedImage 对象
    BufferedImage image = new BufferedImage(width, height, BufferedImage.TYPE_INT_RGB);

    // 获取图片的 Graphics2D 对象
    Graphics2D g = image.createGraphics();

    // 设置文本的颜色和字体
    g.setColor(Color.WHITE);
    g.setFont(new Font("Arial", Font.BOLD, 20));

    // 绘制文本
    g.drawString("Hello, World!", 10, 30);

    // 创建随机数生成器
    Random rnd = new Random();

    // 绘制噪点
    for (int i = 0; i < 100; i++) {
      Shape shape = new Ellipse2D.Double(rnd.nextDouble() * width, rnd.nextDouble() * height, rnd.nextDouble() * 5 + 1, rnd.nextDouble() * 5 + 1);
      g.fill(shape);
    }

    // 释放 Graphics2D 对象
    g.dispose();
  }
}为了避免验证码被 OCR (Optical Character Recognition, 光学字符识别) 软件识别,可以使用以下几种方法:
单纯的斜放文本只能避免某一些OCR算法,最好是每个字符都倾斜不同的角度。并且保持不同的间距。
在 Java 中斜放文本可以使用 Graphics2D 的 rotate() 方法来旋转文本。例如,下面的代码演示了如何在图片上斜放文本:

import java.awt.*;
import java.awt.image.*;

public class Captcha {
  public static void main(String[] args) throws Exception {
    int width = 100;
    int height = 40;

    // 创建 BufferedImage 对象
    BufferedImage image = new BufferedImage(width, height, BufferedImage.TYPE_INT_RGB);

    // 获取图片的 Graphics2D 对象
    Graphics2D g = image.createGraphics();

    // 设置文本的颜色和字体
    g.setColor(Color.WHITE);
    g.setFont(new Font("Arial", Font.BOLD, 20));

    // 旋转文本
    g.rotate(Math.toRadians(30), width / 2, height / 2);

    // 绘制文本
    g.drawString("Hello, World!", 10, 30);

    // 释放 Graphics2D 对象
    g.dispose();
  }
}
上面的代码中,我们使用 Graphics2D 的 rotate() 方法将文本旋转了 30 度。注意,旋转角度使用的是弧度制,所以需要使用 Math.toRadians() 方法将角度转换为弧度。
实现一个支持图形干扰算法,斜放文本,使用特殊的字体,动态文本的颜色的四位图形验证码
import java.awt.*;
import java.awt.geom.*;
import java.awt.image.*;
import java.util.Random;
public class Captcha {
private static final char[] CHARS = {
'0', '1', '2', '3', '4', '5', '6', '7', '8', '9',
'A', 'B', 'C', 'D', 'E', 'F', 'G', 'H', 'I', 'J',
'K', 'L', 'M', 'N', 'O', 'P', 'Q', 'R', 'S', 'T',
'U', 'V', 'W', 'X', 'Y', 'Z',
'a', 'b', 'c', 'd', 'e', 'f', 'g', 'h', 'i', 'j',
'k', 'l', 'm', 'n', 'o', 'p', 'q', 'r', 's', 't',
'u', 'v', 'w', 'x', 'y', 'z'
};
private static Random rnd = new Random();
public static String generateText() {
StringBuilder sb = new StringBuilder();
for (int i = 0; i < 4; i++) {
sb.append(CHARS[rnd.nextInt(CHARS.length)]);
}
return sb.toString();
}
public static Color generateColor() {
return new Color(rnd.nextInt(256), rnd.nextInt(256), rnd.nextInt(256));
}
public static void main(String[] args) throws Exception {
int width = 120;
int height = 40;
// 创建 BufferedImage 对象
BufferedImage image = new BufferedImage(width, height, BufferedImage.TYPE_INT_RGB);
// 获取图片的 Graphics2D 对象
Graphics2D g = image.createGraphics();
// 绘制背景
g.setColor(Color.WHITE);
g.fillRect(0, 0, width, height);
// 绘制文本
String text = generateText();
g.setFont(new Font("Arial", Font.BOLD, 20));
g.setColor(generateColor());
g.rotate(Math.toRadians(30), width / 2, height / 2);
g.drawString(text, 10, 30);
// 绘制噪点
for (int i = 0; i < 100; i++) {
Shape shape = new Ellipse2D.Double(rnd.nextDouble() * width, rnd.nextDouble() * height, rnd.nextDouble() * 5 + 1, rnd.nextDouble() * 5 + 1);
g.setColor(generateColor());
g.fill(shape);
}
// 绘制干扰线
for (int i = 0; i < 5; i++) {
g.setColor(generateColor());
g.drawLine(rnd.nextInt(width), rnd.nextInt(height), rnd.nextInt(width), rnd.nextInt(height));
}
// 释放 Graphics2D 对象
g.dispose();
// 输出图片
ImageIO.write(image, "PNG", new File("captcha.png"));
}
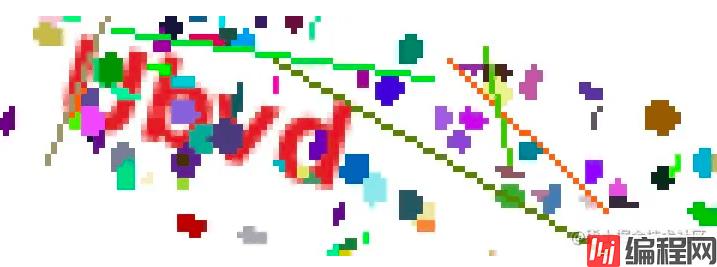
}上面的代码中,我们使用了 Ellipse2D 类生成椭圆形噪点,并使用随机数生成噪点的位置和大小。我们还使用了 drawLine() 方法生成干扰线,并使用随机数生成干扰线的位置和长度。
可以看到,虽然安全性提高了,但是辨识很困难。
在 Java 中调整噪点的透明度可以使用 AlphaComposite 类的静态方法 getInstance() 来创建 AlphaComposite 对象,然后使用 setComposite() 方法来设置透明度。例如,下面的代码演示了如何调整噪点的透明度:

import java.awt.*;
import java.awt.geom.*;
import java.awt.image.*;
import java.util.Random;

public class Captcha {
  private static final char[] CHARS = {
    '0', '1', '2', '3', '4', '5', '6', '7', '8', '9',
    'A', 'B', 'C', 'D', 'E', 'F', 'G', 'H', 'I', 'J',
    'K', 'L', 'M', 'N', 'O', 'P', 'Q', 'R', 'S', 'T',
    'U', 'V', 'W', 'X', 'Y', 'Z',
    'a', 'b', 'c', 'd', 'e', 'f', 'g', 'h', 'i', 'j',
    'k', 'l', 'm', 'n', 'o', 'p', 'q', 'r', 's', 't',
    'u', 'v', 'w', 'x', 'y', 'z'
  };

  private static Random rnd = new Random();

  public static String generateText() {
    StringBuilder sb = new StringBuilder();
    for (int i = 0; i < 4; i++) {
      sb.append(CHARS[rnd.nextInt(CHARS.length)]);
    }
    return sb.toString();
  }

  public static Color generateColor() {
    return new Color(rnd.nextInt(256), rnd.nextInt(256), rnd.nextInt(256));
  }

  public static void main(String[] args) throws Exception {
    int width = 120;
    int height = 40;

    // 创建 BufferedImage 对象
    BufferedImage image = new BufferedImage(width, height, BufferedImage.TYPE_INT_RGB);

    // 获取图片的 Graphics2D 对象
    Graphics2D g = image.createGraphics();

    // 绘制背景
    g.setColor(Color.WHITE);
    g.fillRect(0, 0, width, height);

    // 绘制文本
    String text = generateText();
    g.setFont(new Font("Arial", Font.BOLD, 20));
    g.setColor(generateColor());
    g.rotate(Math.toRadians(30), width / 2, height / 2);
    g.drawString(text, 10, 30);

    // 调整噪点的透明度
    g.setComposite(AlphaComposite.getInstance(AlphaComposite.SRC_OVER, 0.5f));

    // 绘制噪点
    for (int i = 0; i < 100; i++) {
      Shape shape = new Ellipse2D.Double(rnd.nextDouble() * width, rnd.nextDouble() * height, rnd.nextDouble() * 5 + 1, rnd.nextDouble() * 5 + 1);
      g.setColor(generateColor());
      g.fill(shape);
    }

    // 绘制干扰线
    for (int i = 0; i < 5; i++) {
      g.setColor(generateColor());
      g.drawLine(rnd.nextInt(width), rnd.nextInt(height), rnd.nextInt(width), rnd.nextInt(height));
    }

    // 释放 Graphics2D 对象
    g.dispose();

    // 输出图片
    ImageIO.write(image, "PNG", new File("captcha.png"));
  }
}到此这篇关于基于Java生成图片验证码的方法解析的文章就介绍到这了,更多相关Java图片验证码内容请搜索编程网以前的文章或继续浏览下面的相关文章希望大家以后多多支持编程网!
--结束END--
本文标题: 基于Java生成图片验证码的方法解析
本文链接: https://www.lsjlt.com/news/194376.html(转载时请注明来源链接)
有问题或投稿请发送至: 邮箱/279061341@qq.com QQ/279061341
下载Word文档到电脑,方便收藏和打印~
2024-03-01
2024-03-01
2024-03-01
2024-02-29
2024-02-29
2024-02-29
2024-02-29
2024-02-29
2024-02-29
2024-02-29
回答
回答
回答
回答
回答
回答
回答
回答
回答
回答


官方手机版

微信公众号

商务合作


0