目录WEBView2简介概述优势支持的运行时平台进程模型基本使用安装WebView2运行时安装WebView2Sdk打开一个网页导航事件打开一个网页的过程更改url的过程空url进阶
WebView2 全称 Microsoft Edge WebView2 控件,此控件的作用是在本机桌面应用中嵌入web技术(html,CSS,javascript),从名字就可以看出来WebView2使用了Edge内核渲染web内容。
通俗来说,WebView2控件是一个UI组件,允许在桌面应用中提供web能力的集成,即俗称的混合开发。
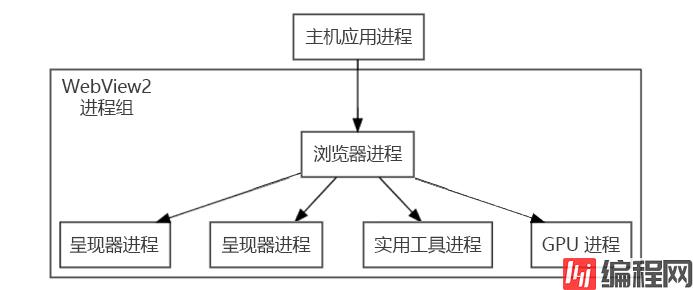
当在WPF程序中引入 WebView2 控件后,WPF程序和WebView2控件的进程模型如下:
本文代码基于 .NetFramework 4.8
开发之前需要先安装WebView2的运行时。
同理,当程序开发完毕,在客户机器上面部署WPF应用程序的时候也应该先安装WebView2运行时,此部分将放在部署环节详细讨论。
有三种方式安装WebView2运行时:
WebView2运行时下载:https://developer.microsoft.com/zh-cn/microsoft-edge/webview2/
通过 Nuget 安装
新建WPF应用程序,并通过如下代码在Window中添加WebView2 XAML 的命名空间。
xmlns:wv2="clr-namespace:Microsoft.Web.WebView2.Wpf;assembly=Microsoft.Web.WebView2.Wpf"引入WebView2控件,并设置 Source 属性为 Https://www.microsoft.com
  <Grid>
        <wv2:WebView2 Name="wv2"     Source="https://www.microsoft.com"   />
    </Grid>
运行程序,将可以看到WPF程序中打开了巨硬官网

通过代码控制打开的网页
private void Window_Loaded(object sender, RoutedEventArgs e)
 {
    this.wv2.Source = new Uri("http://baidu.com");
}导航事件是巨硬官方的一个叫法,通俗来说就是在WebView2中打开一个网址的步骤。

可通过委托的方式拦截各个事件:
private void Window_Loaded(object sender, RoutedEventArgs e)
{
    this.wv2.Source = new Uri("http://baidu.com");
    //this.wv2.Source = new Uri("about:blank");
    //导航开始
    this.wv2.NavigationStarting += wv2_NavigationStarting;
    //源已经更改
    this.wv2.SourceChanged += Wv2_SourceChanged;
    //内容加载中
    this.wv2.ContentLoading += Wv2_ContentLoading;
    //导航结束
    this.wv2.NavigationCompleted += Wv2_NavigationCompleted;
}
private void Wv2_NavigationCompleted(object sender, CoreWebView2NavigationCompletedEventArgs e)
{
    throw new NotImplementedException();
}
private void Wv2_ContentLoading(object sender, CoreWebView2ContentLoadingEventArgs e)
{
    throw new NotImplementedException();
}
private void Wv2_SourceChanged(object sender, CoreWebView2SourceChangedEventArgs e)
{
    throw new NotImplementedException();
}
private void wv2_NavigationStarting(object sender, CoreWebView2NavigationStartingEventArgs e)
{
    throw new NotImplementedException();
}
更改url的过程依然遵循上述步骤,只是稍微复杂了一些.

某些情况下,可能需要一个默认的页面,那么空url是一个很好的选择。
this.wv2.Source = new Uri("about:blank");当web页面中点击一个按钮需要通知WPF宿主程序,或者向WPF传递一些指令和数据的时候,需要用到 postMessage 和 WebMessageReceived 。
postMessage 是 js 方法,位于 window.chrome.webview.postMessage ,当需要向WPF程序发送数据的时候,只需要调用此方法,并传递参数就可以。此方法仅在WebView2控件内部有用,在Edge中调用将报异常(Cannot read properties of undefined 'postMessage')
WebMessageReceived 是 C# 事件,位于 Microsoft.Web.WebView2.Wpf.WebView2。可通过委托此事件来接收web网页中发送过来的消息。
Html代码示例
<!DOCTYPE html>
<html>
<head>
    <meta charset=utf-8 />
    <title>TestWebView2</title>
</head>
<body>
    </br></br></br></br></br>
    <button type="button" onclick="postMsg()">给WPF宿主程序发送msg</button>
    <script>
        window.onload = function () {
            //alert("onload-success");
        }
        function postMsg() {
            var args = "msg ,from webView2";
            window.chrome.webview.postMessage(args);
            alert("发送成功,内容:" + args);
        }
    </script>
</body>
</html>
C#代码示例
private void Window_Loaded(object sender, RoutedEventArgs e)
{
    //this.wv2.Source = new Uri("http://baidu.com");
    //this.wv2.Source = new Uri("about:blank");
    this.wv2.Source = new Uri("file:///E:/code/WPF/ramble-wpf/RambleWPF/html/PostMessage.html");
    this.wv2.WebMessageReceived += Wv2_WebMessageReceived;
}
private void Wv2_WebMessageReceived(object sender, CoreWebView2WebMessageReceivedEventArgs e)
{
    //接收到的字符串
    string msg = e.TryGetWebMessageAsString();
    //接收到的JSON
    string msgJson = e.WebMessageAsJson;
}如果将源代码放到C盘并在VS中调试或者将打包好的程序放到C盘启动,都会发生无法打开网页的问题。
此问题的原因是文件权限问题,WebView2在工作的时候需要指定一个文件夹来存放临时文件和数据,即UserDataFloder,需要此文件夹的读写权限。若不显示指定udf,将会在程序启动文件同级目录新建一个 RambleWPF.exe.WebView2 的文件夹存放临时文件,RambleWPF为WPF应用程序的名字。
解决办法有两个:
显示指定UDF
通过设置 WebView2控件的CreationProperties属性可以实现自定义UDF。
需要注意的是,必须在WebView2.CoreWebView2对象初始化之前设置UDF,那么CoreWebView2对象什么时候初始化呢?有以下方式:
示例代码如下:
public partial class WebView2Demo : Window
{
    public WebView2Demo()
    {
        InitializeComponent();
        InitializeAsync();
    }
    async void InitializeAsync()
    {
        wv2.CreationProperties = new Microsoft.Web.WebView2.Wpf.CoreWebView2CreationProperties
        {
            UserDataFolder = "D:\\A\\wvUDF"
        };
        await wv2.EnsureCoreWebView2Async();
    }
    private void Window_Loaded(object sender, RoutedEventArgs e)
    {
        this.wv2.Source = new Uri("http://baidu.com");
    }
}
提升默认UDF文件夹权限
在程序启动的时候提升默认UDF的读写权限
示例代码如下:
/// <summary>
/// 给 WebView2Bug.exe.WebView2 文件夹赋予写入权限
/// </summary>
private void InitWebView2DirAccess()
{
    try
    {
        string path = AppDomain.CurrentDomain.BaseDirectory;
        string webview2DataDir = path + "WebView2Bug.exe.WebView2";
        DirectoryInfo dir = new DirectoryInfo(webview2DataDir);
        System.Security.AccessControl.DirectorySecurity security = dir.GetAccessControl();
        //给文件夹追加 Everyone 的写入权限
        security.AddAccessRule(new System.Security.AccessControl.FileSysteMaccessRule("Everyone", System.Security.AccessControl.FileSystemRights.Write, AccessControlType.Allow));
        dir.SetAccessControl(security);
    }
    catch (Exception ex)
    {
        string  msg = ex.Message;
    }
}
上述代码有点偏激,仅作为参考,实际开发中,不应该为EveryOne 用户提升如此大的权限。
WebView2运行时下载:https://developer.microsoft.com/zh-cn/microsoft-edge/webview2/
官网教程:https://learn.microsoft.com/zh-cn/microsoft-edge/webview2/
C盘权限问题issues:https://GitHub.com/MicrosoftEdge/WebView2Feedback/issues/3087
到此这篇关于WPF中使用WebView2控件的文章就介绍到这了,更多相关WPF使用WebView2控件内容请搜索编程网以前的文章或继续浏览下面的相关文章希望大家以后多多支持编程网!
--结束END--
本文标题: WPF中使用WebView2控件的方法及常见问题
本文链接: https://www.lsjlt.com/news/195433.html(转载时请注明来源链接)
有问题或投稿请发送至: 邮箱/279061341@qq.com QQ/279061341
下载Word文档到电脑,方便收藏和打印~
2024-03-01
2024-03-01
2024-02-29
2024-02-29
2024-02-29
2024-02-29
2024-02-29
2024-02-29
2024-02-29
2024-02-29
回答
回答
回答
回答
回答
回答
回答
回答
回答
回答


官方手机版

微信公众号

商务合作


0