Python 官方文档:入门教程 => 点击学习
目录1 简介1.1 应用场景1.2 CommandLineRunner接口1.3 ApplicationRunner接口1.4 @Order注解1.5 CommandLineRunn
在应用服务启动时,需要在所有Bean生成之后,加载一些数据和执行一些应用的初始化。
例如:删除临时文件,清楚缓存信息,读取配置文件,数据库连接,这些工作类似开机自启动的概念,CommandLineRunner、ApplicationRunner 接口是在容器启动成功后的最后一步回调(类似开机自启动)。
CommandLineRunner源码实现如下:
package org.springframework.boot;

import org.springframework.core.Ordered;
import org.springframework.core.annotation.Order;


@FunctionalInterface
public interface CommandLineRunner {


   void run(String... args) throws Exception;

}
对该接口的注释可以看到如下的含义:
该接口用来指明:当一个bean包含在SpringApplication内,该bean就应当执行。可以在相同的应用上下文定义多个这样的bean。多个bean的先后执行顺序使用@Order注解确定。
ApplicationRunner接口源码定义如下:
package org.springframework.boot;

import org.springframework.core.Ordered;
import org.springframework.core.annotation.Order;


@FunctionalInterface
public interface ApplicationRunner {


   void run(ApplicationArguments args) throws Exception;

}
在对该接口的注释中,可以看到两个接口的应用场景,甚至注释都是完全一样的。
唯一的区别是接口中的函数run的参数,一个是与main函数同样的(String[] args),而另外一个是ApplicationArgumens类型。
在一般情况下,开发时是不需要添加命令行参数的,因此两个接口的区别对于这样的场景也就完全一样了。
但如果真的需要类型–foo=bar的option arguments,为了方便起见,可以使用ApplicationRunner来读取类似的参数。
Order注解的源码实现如下:
package org.springframework.core.annotation;

import java.lang.annotation.Documented;
import java.lang.annotation.ElementType;
import java.lang.annotation.Retention;
import java.lang.annotation.RetentionPolicy;
import java.lang.annotation.Target;

import org.springframework.core.Ordered;


@Retention(RetentionPolicy.RUNTIME)
@Target({ElementType.TYPE, ElementType.METHOD, ElementType.FIELD})
@Documented
public @interface Order {


   int value() default Ordered.LOWEST_PRECEDENCE;

}
可以看到该注解的作用主要是用来定义被注解的组件的排序顺序。
注意:Lower values have higher priority。值越小越先执行。
从上面的分析可以看出,CommandLineRunner和ApplicationRunner接口的作用是完全一致的,唯一不同的则是接口中待实现的run方法,其中CommandLineRunner的run方法参数类型与main一样是原生的String[] 类型,而ApplicationRunner的run方法参数类型为ApplicationArguments类型。
ApplicationArguments类型源码定义如下:
package org.springframework.boot;

import java.util.List;
import java.util.Set;


public interface ApplicationArguments {


   String[] getSourceArgs();


   Set<String> getOptionNames();


   boolean containsOption(String name);


   List<String> getOptionValues(String name);


   List<String> getNonOptionArgs();

}

ApplicaitonArguments类型之间的关系如下:

1.5.1 option-argument和non-option arguments
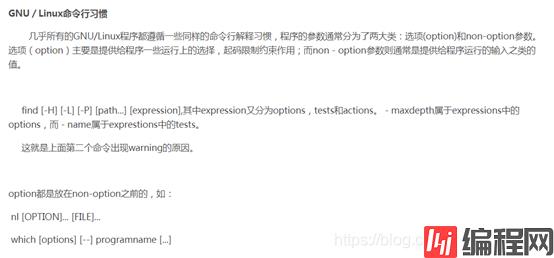
参见命令解释中option和non-option参数
1.5.2 SimpleCommandLineArgsParser
由于SimpleCommandLineArgsParser的功能是ApplicationArguments实现的的核心,简单看下该类实现的源码:
package org.springframework.core.env;


class SimpleCommandLineArgsParser {


   public CommandLineArgs parse(String... args) {
      CommandLineArgs commandLineArgs = new CommandLineArgs();
      for (String arg : args) {
         if (arg.startsWith("--")) {
            String optionText = arg.substring(2, arg.length());
            String optionName;
            String optionValue = null;
            if (optionText.contains("=")) {
               optionName = optionText.substring(0, optionText.indexOf('='));
               optionValue = optionText.substring(optionText.indexOf('=')+1, optionText.length());
            }
            else {
               optionName = optionText;
            }
            if (optionName.isEmpty() || (optionValue != null && optionValue.isEmpty())) {
               throw new IllegalArgumentException("Invalid argument syntax: " + arg);
            }
            commandLineArgs.addOptionArg(optionName, optionValue);
         }
         else {
            commandLineArgs.addNonOptionArg(arg);
         }
      }
      return commandLineArgs;
   }

}
在程序执行过程中,SimpleCommandLineArgsParser会把程序的参数分解成option arguments和nonoption arguments,然后放入CommandLineArgs,
CommandLineArgs类的实现如下:
package org.springframework.core.env;
import java.util.ArrayList;
import java.util.Collections;
import java.util.HashMap;
import java.util.List;
import java.util.Map;
import java.util.Set;
import org.springframework.lang.Nullable;
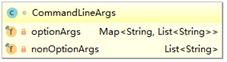
class CommandLineArgs {
private final Map<String, List<String>> optionArgs = new HashMap<>();
private final List<String> nonOptionArgs = new ArrayList<>();
public void addOptionArg(String optionName, @Nullable String optionValue) {
if (!this.optionArgs.containsKey(optionName)) {
this.optionArgs.put(optionName, new ArrayList<>());
}
if (optionValue != null) {
this.optionArgs.get(optionName).add(optionValue);
}
}
public Set<String> getOptionNames() {
return Collections.unmodifiableSet(this.optionArgs.keySet());
}
public boolean containsOption(String optionName) {
return this.optionArgs.containsKey(optionName);
}
@Nullable
public List<String> getOptionValues(String optionName) {
return this.optionArgs.get(optionName);
}
public void addNonOptionArg(String value) {
this.nonOptionArgs.add(value);
}
public List<String> getNonOptionArgs() {
return Collections.unmodifiableList(this.nonOptionArgs);
}
}
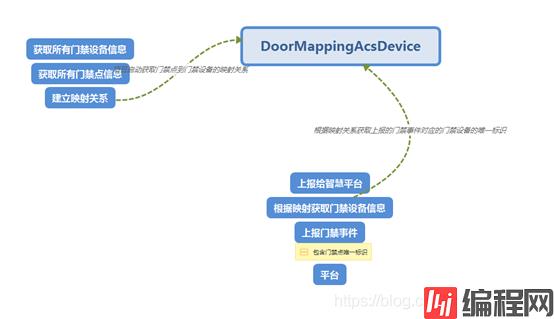
在项目运行的过程中,项目会事先订阅一些关注的事件,大的方向分为门禁事件和监控点事件,其中上报上来的门禁事件的基本信息为门禁点信息,而不是门禁设备的唯一标识,为了解析的方便,需要把上报上来的门禁点事件和门禁设备唯一标识、IP信息关联起来,这表示,在项目启动之后,当所有bean都完成了加载,需要在项目开始提供其他REST服务之前,把门禁点到门禁设备唯一标识、IP等信息关联起来。
而这个关联的获取,需要类似开机自启动的功能一样,需要项目一启动,就获取这个关联。
其中,获取所有门禁设备的基本信息可以通过AcsDeviceController获取,而所有门禁点信息的获取通过AcsDoorController获取。
调用获取所有门禁设备信息,可以获得形似如下的数据:
{
    "msg": "success",
    "code": "0",
    "data": {
        "list": [
            {
                "regionIndexCode": "a6745925-0415-4853-9815-bb9707e2ad8b",
                "acsDevTypeCode": "201933568",
                "createTime": "2019-04-11T20:10:16.184+08:00",
                "acsDevTypeDesc": "DS-K1T604MF",
                "acsDevName": "门禁一体机1",
                "acsDevIndexCode": "71a9ea67d58a43Db8c5dadfe2197a4db",
                "updateTime": "2019-04-11T20:18:01.683+08:00",
                "acsDevIp": "192.168.1.103",
                "acsDevPort": "8000",
                "treatyType": "hiksdk_net"
            },
            {
                "regionIndexCode": "a6745925-0415-4853-9815-bb9707e2ad8b",
                "acsDevTypeCode": "201933568",
                "createTime": "2019-04-11T20:12:06.137+08:00",
                "acsDevTypeDesc": "DS-K1T604MF",
                "acsDevName": "门禁一体机3",
                "acsDevIndexCode": "13891ae9f6454782a208504e72ba2ad8",
                "updateTime": "2019-04-11T20:12:07.876+08:00",
                "acsDevIp": "192.168.1.105",
                "acsDevPort": "8000",
                "treatyType": "hiksdk_net"
            }
        ]
    }
}
可以看到所有的门禁设备均包含设备的唯一标识acsDevIndexCode、acsDevName门禁设备名称、门禁设备IP地址acsDevIp,门禁设备端口acsDevPort。
而获取所有的门禁点接口可以获取如下的内容:
{
    "msg": "success",
    "code": "0",
    "data": {
        "list": [
            {
                "regionIndexCode": "a6745925-0415-4853-9815-bb9707e2ad8b",
                "channelNo": "1",
                "createTime": "2019-04-11T20:12:06.166+08:00",
                "doorName": "门禁一体机3_门1",
                "doorIndexCode": "a87022481f8242b29a4bf35a57edc004",
                "acsDevIndexCode": "13891ae9f6454782a208504e72ba2ad8",
                "channelType": "door",
                "updateTime": "2019-04-11T20:12:16.012+08:00",
                "doorNo": "1"
            },
            {
                "regionIndexCode": "a6745925-0415-4853-9815-bb9707e2ad8b",
                "channelNo": "1",
                "createTime": "2019-04-11T20:10:17.826+08:00",
                "doorName": "门禁一体机1_门1",
                "doorIndexCode": "139dcaecc5ba4b9fb97889c2f2234e79",
                "acsDevIndexCode": "71a9ea67d58a43db8c5dadfe2197a4db",
                "channelType": "door",
                "updateTime": "2019-04-11T20:12:16.012+08:00",
                "doorNo": "1"
            }
        ]
    }
}
可以看到获取到的门禁点信息,会同时包含门禁设备的唯一标识字段,因此可以根据该字段门禁点唯一标识获得门禁点到门禁设备基本信息的映射。
当系统订阅了相关的事件之后,可以收到的事件报文格式如下:
{
	"method": "OnEventNotify",
	"params": {
		"ability": "event_acs",
		"events": [{
			"data": {
				"ExtAccessChannel": 0,
				"ExtEventAlarmInID": 0,
				"ExtEventAlarmOutID": 0,
				"ExtEventCardNo": "1874193998",
				"ExtEventCaseID": 0,
				"ExtEventCode": 197634,
				"ExtEventCustomerNumInfo": {
					"AccessChannel": 0,
					"EntryTimes": 0,
					"ExitTimes": 0,
					"TotalTimes": 0
				},
				"ExtEventDoorID": 1,
				"ExtEventIDCardPictureURL": "",
				"ExtEventIdentityCardInfo": {
					"Address": "",
					"Birth": "",
					"EndDate": "",
					"IdNum": "",
					"IssuingAuthority": "",
					"Name": "",
					"Nation": 0,
					"Sex": 0,
					"StartDate": "",
					"TermOfValidity": 0
				},
				"ExtEventInOut": 1,
				"ExtEventLocalControllerID": 0,
				"ExtEventMainDevID": 1,
				"ExtEventPersonNo": "0",
				"ExtEventPictureURL": "/pic?=d2=i689z260ds986-125mfep=t9i2i*d1=*ipd1=*isd8=*dbec775bf-84fbc12-484868-82i167*e172ed5",
				"ExtEventReaderID": 1,
				"ExtEventReaderKind": 0,
				"ExtEventReportChannel": 0,
				"ExtEventRoleID": 0,
				"ExtEventSubDevID": 0,
				"ExtEventSwipNum": 0,
				"ExtEventType": 0,
				"ExtEventVerifyID": 0,
				"ExtEventWhiteListNo": 0,
				"ExtReceiveTime": "1548828922319128",
				"Seq": 0,
				"svrIndexCode": "b1cded2b-2fbc-4255-aa9d-45162bfa23dd"
			},
			"eventId": "6B15F0C9947949D5BF271327C66BD658",
			"eventType": 197634,
			"eventTypeName": "acs.acs.eventType.wrongNoSuchCard",
			"happenTime": "2019-01-30T12:44:59.000+08:00",
			"srcIndex": "92ca80c786b843058e764f7fda863ae1",
			"srcName": "10.13.65.181_门1",
			"srcParentIndex": "de948e1856f74253b65848f4bef3fb03",
			"srcType": "door",
			"status": 0,
			"timeout": 0
		}],
		"sendTime": "2019-01-30T14:15:22.000+08:00"
	}
}
关于门禁事件上报报文格式参见一卡通应用服务
在建立映射的过程中,只需要关注门禁设备的唯一标识,ip,端口,门禁设备名称。门禁点则只需要关注门禁点唯一标识。
2.4.1 Controller
2.4.1.1 AcsDeviceController
AcsDeviceController用来获取门禁设备的唯一标识。
package com.example.platfORM.controller;

import com.example.platform.constants.Artemis;
import com.example.platform.utils.HttpClientSSLUtil;
import org.slf4j.Logger;
import org.slf4j.LoggerFactory;
import org.springframework.beans.factory.annotation.Autowired;
import org.springframework.WEB.bind.annotation.GetMapping;
import org.springframework.web.bind.annotation.RequestMapping;
import org.springframework.web.bind.annotation.ResponseBody;
import org.springframework.web.bind.annotation.RestController;

import java.util.HashMap;
import java.util.Map;


@RestController
@RequestMapping("/api/resource")
public class AcsDeviceController {
    private static final Logger logger = LoggerFactory.getLogger(AcsDeviceController.class);
    @Autowired
    private HttpClientSSLUtil httpClientSSLUtil;

    private static Map<String, String> acsDeviceAccessingUrl = new HashMap<>();
     static {
        acsDeviceAccessingUrl.put("allAcsDevice", Artemis.ARTEMIS_PATH+"/api/resource/v1/acsDevice/acsDeviceList");
        acsDeviceAccessingUrl.put("acsDeviceList", Artemis.ARTEMIS_PATH+"/api/resource/v1/acsDevice/advance/acsDeviceList");
        acsDeviceAccessingUrl.put("aAcsDeviceInfo", Artemis.ARTEMIS_PATH+"/api/resource/v1/acsDevice/indexCode/acsDeviceInfo");
    }
    public String getAllAcsDeviceUrl() {
         return acsDeviceAccessingUrl.get("allAcsDevice");
    }


    @GetMapping("/acsDevice/allAcsDevices")
    @ResponseBody
    public String getAllAcsDevices() {
         logger.info("Enter getAllAcsDevices");
        return httpClientSSLUtil.extractFullResourceList(getAllAcsDeviceUrl());
    }
}
门禁设备信息参见门禁设备信息
2.4.1.2 AcsDoorController
package com.example.platform.controller;

import com.alibaba.fastJSON.jsONArray;
import com.alibaba.fastjson.JSONObject;
import com.example.platform.constants.Artemis;
import com.example.platform.service.CommonReturn;
import com.example.platform.utils.HttpClientSSLUtil;
import org.slf4j.Logger;
import org.slf4j.LoggerFactory;
import org.springframework.beans.factory.annotation.Autowired;
import org.springframework.http.MediaType;
import org.springframework.web.bind.annotation.*;

import java.util.*;


@RestController
@RequestMapping("/api")
public class AcsDoorController {
    private static final Logger LOGGER = LoggerFactory.getLogger(AcsDoorController.class);

    public static final int ALWAYS_OPEN = 0;
    public static final int CLOSE = 1;
    public static final int OPEN = 2;
    public static final int ALWAYS_CLOSE = 3;


    public static final int MAX_DOOR_INDEX_NUM = 10;
    @Autowired
    private HttpClientSSLUtil httpClientSSLUtil;
    private static Map<String, String> acsDoorUrl = new HashMap<>();

    static {
        acsDoorUrl.put("allDoor", Artemis.ARTEMIS_PATH+"/api/resource/v1/acsDoor/acsDoorList");
        acsDoorUrl.put("doorList", Artemis.ARTEMIS_PATH+"/api/resource/v1/acsDoor/advance/acsDoorList");
        acsDoorUrl.put("aDoorInfo", Artemis.ARTEMIS_PATH+"/api/resource/v1/acsDoor/indexCode/acsDoorInfo");
        acsDoorUrl.put("doorControl", Artemis.ARTEMIS_PATH+"/api/acs/v1/door/doControl");
    }

    public String getAllDoorUrl() {
        return acsDoorUrl.get("allDoor");
    }

    public String getDoorControlUrl() {
        return acsDoorUrl.get("doorControl");
    }
    @GetMapping("/resource/acsDoor/allAcsDoors")
    public String getAllDoors() {
        LOGGER.info("Enter getAllDoors");
        return httpClientSSLUtil.extractFullResourceList(getAllDoorUrl());
    }

    @PostMapping(value = "/acs/door/doControl", produces = MediaType.APPLICATION_JSON_UTF8_VALUE)
    public String controlDoor(@RequestBody JSONObject controlInfo) {
        if (hasValidControlInfo(controlInfo)) {
            LOGGER.debug("Enter controlDoor");
            return CommonReturn.httpReturnFailure("输入的反控信息不正确");
        }
        httpClientSSLUtil.sethttpsUrl(getDoorControlUrl());
        return httpClientSSLUtil.doPostString(controlInfo.toJSONString());
    }

    private boolean hasValidControlInfo(JSONObject controlInfo) {
        if (!controlInfo.containsKey("doorIndexCodes") || !controlInfo.containsKey("controlType")) {
            return false;
        }
        JSONArray doorIndexCodes = controlInfo.getJSONArray("doorIndexCodes");
        if (doorIndexCodes.size()>MAX_DOOR_INDEX_NUM) {
            LOGGER.info("doorIndexCodes.size()>MAX_DOOR_INDEX_NUM");
            return false;
        }
        int controlType = controlInfo.getIntValue("controlType");
        Set<Integer> doorControlType = new HashSet<>();
        Collections.addAll(doorControlType, ALWAYS_OPEN, CLOSE, OPEN, ALWAYS_CLOSE);
        if (doorControlType.contains(controlType)) {
            LOGGER.debug("unsupported controlType: "+controlType);
            return false;
        }
        return true;
    }
}
2.4.2 Model
为了编程的方便,在代码中为门禁点和门禁设备建模为类型,方便获取某个特别属性。比如说设备唯一标识,门禁点唯一标识。
2.4.2.1 AcsDevice
package com.example.platform.domain.dto;

import com.alibaba.fastjson.JSONObject;


public class AcsDevice {

    private String acsDevIndexCode;
    private String acsDevName;
    private String acsDevTypeDesc;
    private String acsDevTypeCode;
    private String acsDevTypeName;

    private String acsDevIp;
    private String acsDevPort;
    private String acsDevCode;
    private String regionIndexCode;
    private String treatyType;
    private String createTime;
    private String updateTme;


    public AcsDevice(JSONObject devInfo) {
        this.acsDevIndexCode = devInfo.getString("acsDevIndexCode");
        this.acsDevIp = devInfo.getString("acsDevIp");
        this.acsDevPort = devInfo.getString("acsDevPort");
    }

    public String getAcsDevIndexCode() {
        return acsDevIndexCode;
    }

    public String getAcsDevIp() {
        return acsDevIp;
    }

    public String getAcsDevPort() {
        return acsDevPort;
    }
}
2.4.2.2 AcsDoor
门禁点,在为了建立映射的过程中,只需要关注门禁点唯一标识和门禁设备唯一标识,这样在建立映射关系时,可以根据门禁设备唯一标识获取该设备的基本信息。
package com.example.platform.domain.dto;

import com.alibaba.fastjson.JSONObject;


public class AcsDoor {

    private String doorIndexCode;

    private String acsDevIndexCode;

    public AcsDoor(JSONObject doorInfo) {
        this.doorIndexCode = doorInfo.getString("doorIndexCode");
        this.acsDevIndexCode = doorInfo.getString("acsDevIndexCode");
    }

    public String getDoorIndexCode() {
        return doorIndexCode;
    }

    public void setDoorIndexCode(String doorIndexCode) {
        this.doorIndexCode = doorIndexCode;
    }

    public String getAcsDevIndexCode() {
        return acsDevIndexCode;
    }

    public void setAcsDevIndexCode(String acsDevIndexCode) {
        this.acsDevIndexCode = acsDevIndexCode;
    }
}
2.4.2.3 DoorMappingAcsDevice
DoorMappingAcsDevice类对应的bean的静态成员doorMapDevs负责保存映射关系。
package com.example.platform.constants;

import com.example.platform.domain.dto.AcsDevice;
import org.springframework.stereotype.Component;

import java.util.Collections;
import java.util.HashMap;
import java.util.Map;


@Component
public class DoorMappingAcsDevice {

    private static Map<String, AcsDevice> doorMapDevs = new HashMap<>();
    public AcsDevice getAcsDevice(String doorIndexCode) {
        return doorMapDevs.get(doorIndexCode);
    }

    public void addAcsDevice(String doorIndexCode, AcsDevice device) {
        doorMapDevs.put(doorIndexCode, device);
    }

    public static Map<String, AcsDevice> getDoorMapDevs() {
        return Collections.unmodifiableMap(doorMapDevs);
    }
}
2.4.3 CommandLiner
该接口负责调用所有的Controller从服务器里获取所有门禁点信息,所有门禁设备信息,进而构建DoorMappingAvsDevice的运行时实例,即从门禁点唯一标识到门禁设备信息的映射。
package com.example.platform.service;

import com.alibaba.fastjson.JSONArray;
import com.alibaba.fastjson.JSONObject;
import com.example.platform.constants.DoorMappingAcsDevice;
import com.example.platform.controller.AcsDeviceController;
import com.example.platform.controller.AcsDoorController;
import com.example.platform.domain.dto.AcsDevice;
import com.example.platform.domain.dto.AcsDoor;
import com.example.platform.utils.ReturnResult;
import org.slf4j.Logger;
import org.slf4j.LoggerFactory;
import org.springframework.beans.factory.annotation.Autowired;
import org.springframework.boot.CommandLineRunner;
import org.springframework.boot.autoconfigure.web.Reactive.WebFluxAutoConfiguration;
import org.springframework.stereotype.Component;

import java.util.HashMap;
import java.util.Map;


@Component
public class InitializeResource implements CommandLineRunner {
    private final Logger logger = LoggerFactory.getLogger(this.getClass());

    //获取所有门禁设备
    @Autowired
    private AcsDeviceController acsDeviceController;

    //获取所有门禁点
    @Autowired
    private AcsDoorController acsDoorController;

    @Autowired
    private DoorMappingAcsDevice doorMappingAcsDevice;

    @Override
    public void run(String... args) throws Exception {
        logger.debug("Enter run");
        Map<String, AcsDevice> devMap = new HashMap<>();
        ReturnResult resDevs = new ReturnResult(acsDeviceController.getAllAcsDevices());
        if (!resDevs.isRequestSuccessful()) {
            logger.debug("acsDeviceController.getAllAcsDevices() fails");
            throw new Exception("acsDeviceController.getAllAcsDevices() fails");
        }
        JSONArray allDevs = resDevs.getResourceList();
        for (int i = 0; i < allDevs.size(); i++) {
            AcsDevice device = new AcsDevice(allDevs.getJSONObject(i));
            devMap.put(device.getAcsDevIndexCode(), device);
        }
        ReturnResult resDoors = new ReturnResult(acsDoorController.getAllDoors());
        if (!resDevs.isRequestSuccessful()) {
            logger.debug("acsDoorController.getAllDoors() fails");
            throw new Exception("acsDoorController.getAllDoors() fails");
        }
        JSONArray allDoors = resDoors.getResourceList();

        for (int i = 0; i < allDoors.size(); i++) {
            JSONObject doorInfo = allDoors.getJSONObject(i);
            AcsDoor door = new AcsDoor(allDoors.getJSONObject(i));

            String doorAcsDevIndexCode = door.getAcsDevIndexCode();
            if (!devMap.containsKey(doorAcsDevIndexCode)) {
                logger.debug("Impossible situation");
            } else {
                AcsDevice device = devMap.get(doorAcsDevIndexCode);
                doorMappingAcsDevice.addAcsDevice(door.getDoorIndexCode(), device);
            }
        }
        System.out.println("The Runner start to initialize");
    }
}
在此简要的介绍依赖注入的概念。所谓依赖注入指的是容器负责创建对象和维护对象之间的关系,而不是通过对象本身负责自己的创建和解决自己的依赖。依赖注入的主要目的是为了解耦。体现了一种”组合”的理念。
Spring ioc容器(Application Context)负责创建Bean,并通过容器将功能类Bean注入到你需要的Bean中,Spring提供使用XML,注解,Java配置、groovy配置实现Bean的创建和注入。
通过上述InitializeResource可以看到,我们可以为一个Bean类注入Controller实例,并且调用Controller的REST接口以获取数据,然后把这些获取的数据放入了DoorMappingAcsDevice的静态变量中。
文档主要介绍了CommandLineRunner接口的应用场景、并根据一个实例演示了使用CommandLineRunner来进行项目启动之后的资源初始化,并通过在@Component注入@Controller领会Spring依赖注入的基本思想。
希望能够通过此文档帮助使用Spring Boot开发的程序员可以灵活的使用CommandLineRunner来完成项目自启动,资源初始化类似的工作需求。
以上为个人经验,希望能给大家一个参考,也希望大家多多支持编程网。
--结束END--
本文标题: SpringBoot使用CommandLineRunner接口完成资源初始化方式
本文链接: https://www.lsjlt.com/news/195814.html(转载时请注明来源链接)
有问题或投稿请发送至: 邮箱/279061341@qq.com QQ/279061341
下载Word文档到电脑,方便收藏和打印~
2024-03-01
2024-03-01
2024-03-01
2024-02-29
2024-02-29
2024-02-29
2024-02-29
2024-02-29
2024-02-29
2024-02-29
回答
回答
回答
回答
回答
回答
回答
回答
回答
回答


官方手机版

微信公众号

商务合作


0