Python 官方文档:入门教程 => 点击学习
目录Spring Boot端第一步,引入依赖第二步,创建websocket配置类第三步,创建WEBSocket服务第四步,创建Controller进行发送测试Vue端第一步,创建连接
首先我们需要引入WebSocket所需的依赖,以及处理输出格式的依赖
<!--格式转换-->
<!-- https://mvnrepository.com/artifact/com.alibaba/fastJSON -->
<dependency>
   <groupId>com.alibaba</groupId>
   <artifactId>fastjson</artifactId>
   <version>1.2.73</version>
</dependency>
<!--WebSocket依赖-->
<dependency>
    <groupId>org.springframework.boot</groupId>
    <artifactId>spring-boot-starter-websocket</artifactId>
</dependency>import org.springframework.context.annotation.Bean;
import org.springframework.context.annotation.Configuration;
import org.springframework.web.socket.server.standard.ServerEndpointExporter;
@Configuration
public class WebSocketConfig {
@Bean
public ServerEndpointExporter serverEndpointExporter() {
return new ServerEndpointExporter();
}
}这一步我们通过userId作为标识符,区分系统中对应的用户,后续也可基于此,进行其他的操作步骤。
import com.alibaba.fastjson.JSON;
import com.alibaba.fastjson.JSONObject;
import com.alibaba.excel.util.StringUtils;
import lombok.extern.slf4j.Slf4j;
import org.springframework.stereotype.Component;

import javax.websocket.*;
import javax.websocket.server.PathParam;
import javax.websocket.server.ServerEndpoint;
import java.io.IOException;
import java.util.HashMap;
import java.util.Iterator;
import java.util.concurrent.ConcurrentHashMap;


@ServerEndpoint("/websocket/{userId}")
@Slf4j
@Component
public class WebSocketServer {

    private static int onlineCount = 0;

    private static ConcurrentHashMap<String, WebSocketServer> webSocketMap = new ConcurrentHashMap<>();

    private Session session;

    private String userId = "";


    @OnOpen
    public void onOpen(Session session, @PathParam("userId") String userId) {
        this.session = session;
        this.userId = userId;
        if (webSocketMap.containsKey(userId)) {
            webSocketMap.remove(userId);
            //加入set中
        } else {
            webSocketMap.put(userId, this);
            //加入set中
            addOnlineCount();
            //在线数加1
        }

        log.info("用户连接:" + userId + ",当前在线人数为:" + getOnlineCount());

        try {
            HashMap<Object, Object> map = new HashMap<>();
            map.put("key", "连接成功");
            sendMessage(JSON.toJSONString(map));
        } catch (IOException e) {
            log.error("用户:" + userId + ",网络异常!!!!!!");
        }
    }


    @OnClose
    public void onClose() {
        if (webSocketMap.containsKey(userId)) {
            webSocketMap.remove(userId);
            //从set中删除
            subOnlineCount();
        }
        log.info("用户退出:" + userId + ",当前在线人数为:" + getOnlineCount());
    }


    @OnMessage
    public void onMessage(String message, Session session) {
        log.info("用户消息:" + userId + ",报文:" + message);
        //可以群发消息
        //消息保存到数据库、Redis
        if (StringUtils.isNotBlank(message)) {
            try {
                //解析发送的报文
                JSONObject jsonObject = JSONObject.parseObject(message);
                //追加发送人(防止串改)
                jsonObject.put("fromUserId", this.userId);
                String fromUserId = jsonObject.getString("fromUserId");
                //传送给对应toUserId用户的websocket
                if (StringUtils.isNotBlank(fromUserId) && webSocketMap.containsKey(fromUserId)) {
                    webSocketMap.get(fromUserId).sendMessage(jsonObject.toJSONString());
                    //自定义-业务处理

//                    DeviceLocalThread.paramData.put(jsonObject.getString("group"),jsonObject.toJSONString());
                } else {
                    log.error("请求的userId:" + fromUserId + "不在该服务器上");
                    //否则不在这个服务器上,发送到Mysql或者redis
                }
            } catch (Exception e) {
                e.printStackTrace();
            }
        }
    }


    @OnError
    public void onError(Session session, Throwable error) {
        log.error("用户错误:" + this.userId + ",原因:" + error.getMessage());
        error.printStackTrace();
    }


    public void sendMessage(String message) throws IOException {
        //加入线程锁
        synchronized (session) {
            try {
                //同步发送信息
                this.session.getBasicRemote().sendText(message);
            } catch (IOException e) {
                log.error("服务器推送失败:" + e.getMessage());
            }
        }
    }


    public static void sendInfo(String message, String toUserId) throws IOException {
        //如果userId为空,向所有群体发送
        if (StringUtils.isEmpty(toUserId)) {
            //向所有用户发送信息
            Iterator<String> itera = webSocketMap.keySet().iterator();
            while (itera.hasNext()) {
                String keys = itera.next();
                WebSocketServer item = webSocketMap.get(keys);
                item.sendMessage(message);
            }
        }
        //如果不为空,则发送指定用户信息
        else if (webSocketMap.containsKey(toUserId)) {
            WebSocketServer item = webSocketMap.get(toUserId);
            item.sendMessage(message);
        } else {
            log.error("请求的userId:" + toUserId + "不在该服务器上");
        }
    }

    public static synchronized int getOnlineCount() {
        return onlineCount;
    }

    public static synchronized void addOnlineCount() {
        WebSocketServer.onlineCount++;
    }

    public static synchronized void subOnlineCount() {
        WebSocketServer.onlineCount--;
    }

    public static synchronized ConcurrentHashMap<String, WebSocketServer> getWebSocketMap() {
        return WebSocketServer.webSocketMap;
    }

}获取当前在线人数
import com.......WebSocketServer;

@apiOperation(value = "获取当前在线人数")
@GetMapping("/getOnlineCount")
public Integer getOnlineCount() {
    return WebSocketServer.getOnlineCount();
}通过接口,向前端用户推送消息
import com.......WebSocketServer;
import org.springframework.web.bind.annotation.GetMapping;
import org.springframework.web.bind.annotation.RequestMapping;
import org.springframework.web.bind.annotation.RestController;
import java.io.IOException;
@RestController
@RequestMapping("/news")
public class NewsController {
@GetMapping("/send")
public String send() {
try {
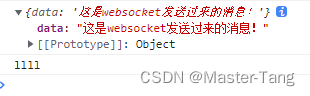
WebSocketServer.sendInfo("这是websocket发送过来的消息!", "需要推送的用户的编号");
} catch (IOException e) {
throw new RuntimeException(e);
}
return "发送消息成功";
}
}创建工具类websocket.js,这里的userId就是用来作为标识符的userId
export class WebSocketClient {
  constructor(userId) {
    this.userId = userId;
    this.websocket = null;
    this.timeout = 10000; // 心跳超时时间,单位ms
    this.timeoutObj = null; // 心跳定时器
    this.serverTimeoutObj = null; // 服务器超时定时器
    this.lockReconnect = false; // 避免重复连接
    this.timeoutnum = null; // 重连延迟定时器
  }

  // 初始化WebSocket连接
  initWebSocket() {
    let wsUrl = `ws://127.0.0.1:8080/websocket/${this.userId}`;
    this.websocket = new WebSocket(wsUrl);
    this.websocket.onopen = this.websocketonopen.bind(this);
    this.websocket.onerror = this.websocketonerror.bind(this);
    this.websocket.onmessage = this.setOnmessageMessage.bind(this);
    this.websocket.onclose = this.websocketclose.bind(this);
    // 监听窗口关闭事件,当窗口关闭时,主动去关闭websocket连接,防止连接还没断开就关闭窗口,server端会抛异常。
    window.onbeforeunload = this.websocketclose.bind(this);
  }

  // 启动心跳
  start() {
    console.log('start');
    // 清除延时器
    this.timeoutObj && clearTimeout(this.timeoutObj);
    this.serverTimeoutObj && clearTimeout(this.serverTimeoutObj);

  }

  // 重置心跳
  reset() {
    // 清除时间
    clearTimeout(this.timeoutObj);
    clearTimeout(this.serverTimeoutObj);
    // 重启心跳
    this.start();
  }

  // 重新连接
  reconnect() {
    if (this.lockReconnect) return;
    this.lockReconnect = true;
    // 没连接上会一直重连,设置延迟避免请求过多
    this.timeoutnum && clearTimeout(this.timeoutnum);
    this.timeoutnum = setTimeout(() => {
      this.initWebSocket();
      this.lockReconnect = false;
    }, 5000)
  }

  // 处理收到的消息
  async setOnmessageMessage(event) {
    console.log(event.data, '获得消息');
    // 重置心跳
    // this.reset();
    // 自定义全局监听事件
    window.dispatchEvent(new CustomEvent('onmessageWS', {
      detail: {
        data: event.data
      }
    }))
    // //发现消息进入    开始处理前端触发逻辑
    // if (event.data === 'success' || event.data === 'heartBath') return
  }

  // WebSocket连接成功回调
  websocketonopen() {
    // 开启心跳
    this.start();
    console.log("WebSocket连接成功!!!" + new Date() + "----" + this.websocket.readyState);
    clearInterval(this.otimer);//停止
  }

  // WebSocket连接错误回调
  websocketonerror(e) {
    console.log("WebSocket连接发生错误" + e);
  }

  // WebSocket连接关闭回调
  websocketclose(e) {
    this.websocket.close();
    clearTimeout(this.timeoutObj);
    clearTimeout(this.serverTimeoutObj);
    console.log("websocketcloe关闭连接")
  }

  // 关闭WebSocket连接
  closeWebSocket() {
    this.websocket.close();
    console.log("closeWebSocket关闭连接")
  }

  // 监听窗口关闭事件
  onbeforeunload() {
    this.closeWebSocket();
  }
}在任意你想建立连接的页面中建立Socket连接
比如,在用户点击登录按钮之后
在这里可以使用原型,创建连接对象,并启动连接
<script>
import Vue from "vue";
import {WebSocketClient} from "@/utils/websocket";
......
......
methods:{

 handleLogin() {
      this.$refs.loginFORM.validate(valid => {
        if (valid) {
          this.loading = true
          this.$store.dispatch('user/login', this.loginForm).then(() => {
            this.$router.push({path: this.redirect || '/'})
            this.loading = false

            Vue.prototype.$WebSocketClientInstance = new WebSocketClient('t');
            Vue.prototype.$WebSocketClientInstance.initWebSocket()

          }).catch(() => {
            this.loading = false
          })
        } else {
          this.$message({message: '请填写正确格式的用户名或密码', type: 'error'})
          return false
        }
      })
    }
}

.....
.....
</script>

在你想监听的页面,使用监听器进行监听
<script>
....
....
mounted() {
    // 添加socket通知监听
    window.addEventListener('onmessageWS', this.getSocketData)
},
methods: {
    // 收到消息处理
    getSocketData(res) {
      console.log(res.detail)
      console.log("llll")
    },
}

....
....
</script>这个时候,你就可以通过后端的接口进行发送了
搞个测试

搞个按钮
<template>
  <div>
    <button @click="closeConnect">关闭连接</button>
  </div>
</template>

<script>
import {WebSocketClient} from "@/utils/websocket";
import Vue from "vue";

export default {
  methods: {
    closeConnect() {
      console.dir(Vue.prototype)
      Vue.prototype.$WebSocketClientInstance.closeWebSocket();
    },
  }
}
</script>
到此这篇关于Spring Boot+Vue实现Socket通知推送的文章就介绍到这了,更多相关SpringBoot Vue实现Socket通知推送内容请搜索编程网以前的文章或继续浏览下面的相关文章希望大家以后多多支持编程网!
--结束END--
本文标题: Spring Boot+Vue实现Socket通知推送的完整步骤
本文链接: https://www.lsjlt.com/news/203104.html(转载时请注明来源链接)
有问题或投稿请发送至: 邮箱/279061341@qq.com QQ/279061341
下载Word文档到电脑,方便收藏和打印~
2024-03-01
2024-03-01
2024-03-01
2024-02-29
2024-02-29
2024-02-29
2024-02-29
2024-02-29
2024-02-29
2024-02-29
回答
回答
回答
回答
回答
回答
回答
回答
回答
回答


官方手机版

微信公众号

商务合作


0