目录ActiveMQ使用(二):在javascript中使用mQtt.js1. 环境准备 Jquery-1.102. 相关代码3. 结果展示3.1 连接3.2 订阅3.3 发送消息3
下载地址:https://www.jsdelivr.com/package/npm/jquery-1.10.2?tab=filesmqtt.js 4.3.7:下载地址:Https://www.jsdelivr.com/package/npm/mqtt

<!DOCTYPE html>
<html lang="en">
<head>
    <meta charset="UTF-8">
    <meta http-equiv="X-UA-Compatible" content="IE=edge">
    <meta name="viewport" content="width=device-width, initial-scale=1.0">
    <title>Document</title>
</head>
<body>
    <div class="connect-input-box">
        <label for="host">host:</label>
        <input type="text" name="host" placeholder="input host" value="127.0.0.1"><br>
        <label for="port">port:</label>
        <input type="text" name="port" placeholder="input port" value="61614"><br>
        <label for="clientId">client id:</label>
        <input type="text" name="clientId" placeholder="input client id"><br>
        <label for="userId">user id:</label>
        <input type="text" name="userId" placeholder="input user id" value="user"><br>
        <label for="passWord">password:</label>
        <input type="text" name="password" placeholder="input password" value="pass"><br>
        <label for="destination">destination:</label>
        <input type="text" name="destination" placeholder="input destination" value="world"><br>
        <button id="connect" type="submit">connect</button>
        <button id="disconnect" type="submit">disconnect</button>
    </div>
    <div class="log-box">
        <p id="log-show"></p>
    </div>
    <div class="send-message-box">
        <label for="topic">topic:</label>
        <input type="text" name="topic"><br>
        <label for="queue">queue:</label>
        <input type="text" name="queue"><br>
        <input type="text" name="message"><br>
        <button id="send">send</button>
    </div>
    <div class="subscribe-box">
        <label for="subscribe-topic">subscribe-topic:</label>
        <input type="text" name="subscribe-topic">
        <button id="subscribe">subscribe</button>
    </div>
    <div class="unsubscribe-box">
        <label for="unsubscribe-topic"></label>
        <input type="text" name="unsubscribe-topic">
        <button id="unsubscribe">unsubscribe</button>
    </div>

    <script src="plugins/jquery-1.10.1.js"></script>
    <script src="plugins/mqtt.min.js"></script>
    <script type="module">

        $(() => {
            console.log('mqtt: ', mqtt)
            $('input[name="clientId"]').val("example-" + Math.floor(Math.random() * 10000))

            if (!window.websocket) {
                console.log('不支持WEBSocket')
            } else {

            }
        })

        var client, destination

        $('#connect').click(() => {
            var host = $('input[name="host"]').val()
            var port = $('input[name="port"]').val()
            var clientId = $('input[name="clientId"]').val()
            var user = $('input[name="userId"]').val()
            var password = $('input[name="password"]').val()

            destination = $('input[name="destination"]').val()
            console.log(host)
            console.log(mqtt)

            // 创建一个client 实例
            let url = 'ws://' + host + ':' + port + '/mqtt'
            client = mqtt.connect(url)
            console.log(client)
            client.on('connect', onConnect)

            // 断开连接以后触发
            client.on('close', () => {
                console.log('disconnected')
            })

            // 收到断开连接的报文后触发
            client.on('disconnect', packet => {
                console.log(packet)
            })

            // 客户端下线时触发
            client.on('offline', () => {
                console.log('offline')
            })

            // 接收消息
            client.on('message', (topic, payload, packet) => {
                // message is buffer
                console.log(`Topic: ${topic}, Message: ${payload.toString()}, QoS: ${packet.qos}`)
            })
        })

        // 当client连接时调用
        function onConnect() {
            // 订阅主题
            client.subscribe('world', err => {
                if (!err) {
                    // 发布消息
                    client.publish('world', 'hello mqtt')
                }
            })
        }

        // 断开连接
        $('#disconnect').click(() => {
            console.log('disconnect');
            client.end()
        })

        // 发送消息
        $('#send').click(() => {
            console.log('send')
            let topic = $('input[name="topic"]').val()
            let payload = $('input[name="message"]').val()
            let options = {
                qos: 0,
                retain: false,
                properties: {
                    payloadFORMatIndicator: true
                }
            }
            client.publish(topic.toString(), payload, options, (err) => {
                if (err) {
                    console.log(err)
                } else {
                    console.log('published')
                }
            })
        })

        // 订阅主题
        $('#subscribe').click(() => {
            console.log('subscribe')
            let topic = $('input[name="subscribe-topic"]').val()
            client.subscribe(topic, {qos: 0}, (error, granted) => {
                if (error) {
                    console.log(error)
                } else {
                    console.log(`${granted[0].topic} was subscribed`)
                }
            })
        })

        // 取消订阅主题
        $('#unsubscribe').click(() => {
            console.log('unsubscribe')
            let topic = $('input[name="unsubscribe-topic"]').val()
            client.unsubscribe(topic, err => {
                if (err) {
                    console.log(err)
                } else {
                    console.log('unscribed')
                }
            })
        })
    </script>
</body>
</html>
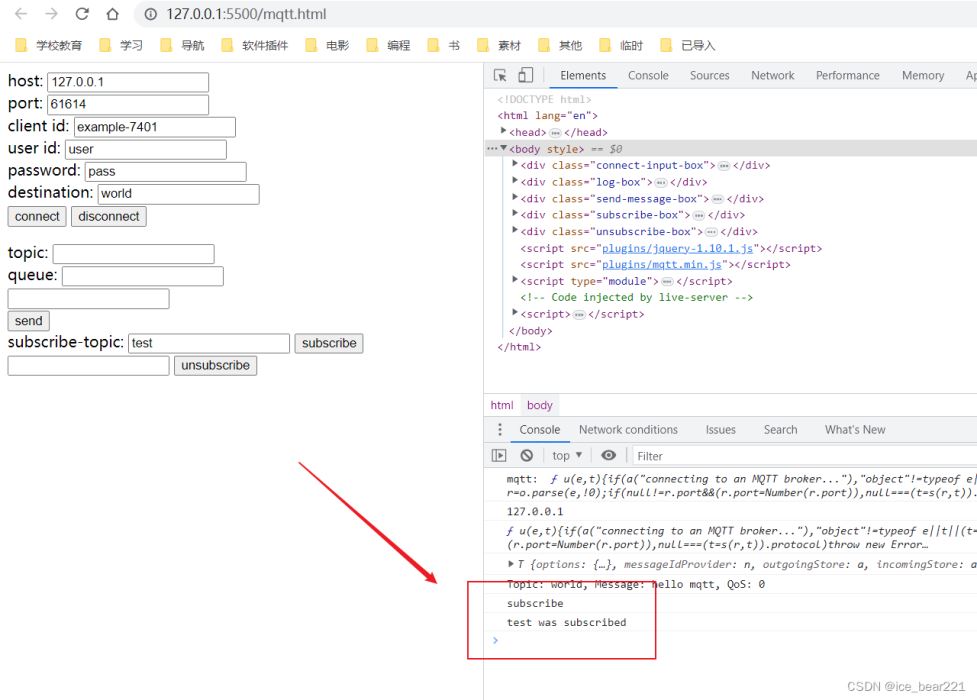
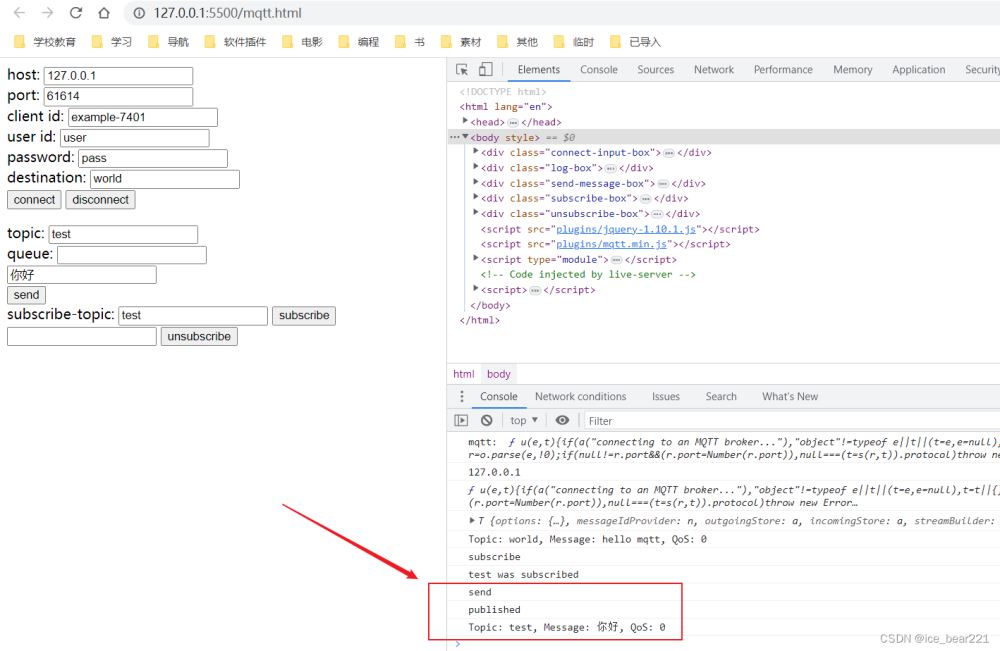
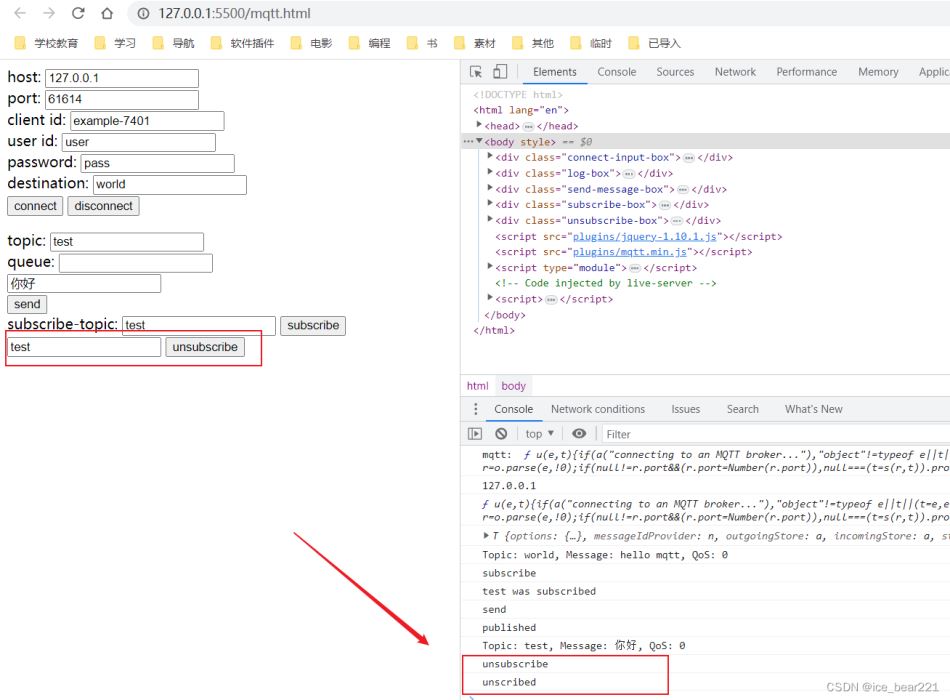
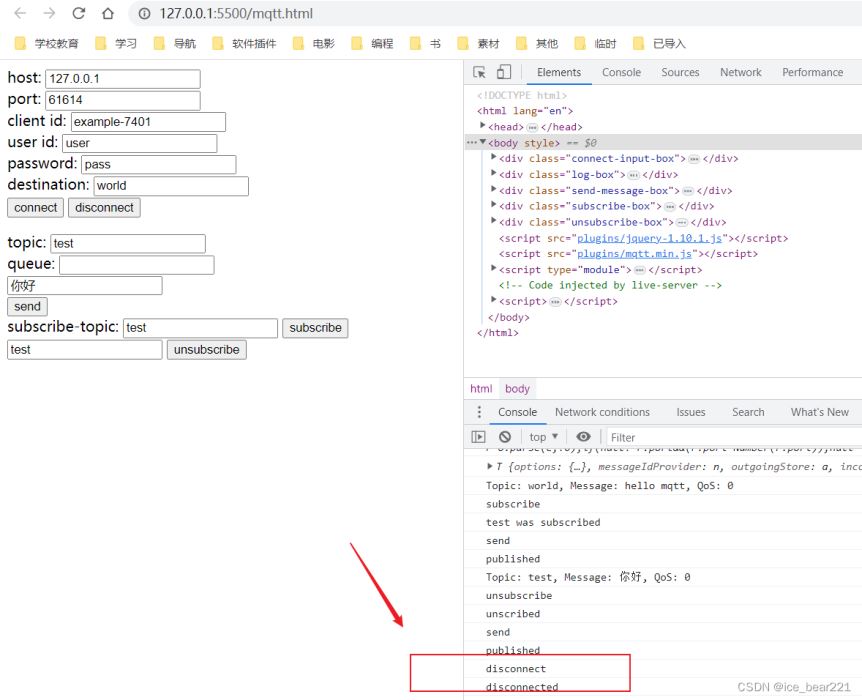
JS HTML Web端使用MQTT通讯测试
https://www.jsdelivr.com/package/npm/mqtt
在
SprintBoot项目中集成ActiveMQ后,接收到的数据为字节数组
一种解决方式为:
@JmsListener(destination = "test_producer", containerFactory = "topicListenerContainer")
    public void receiveTestProducer(Message message) throws JMSException {
        String msg = StringUtils.activeMQMessageParse(message);
        System.out.println("收到测试生产者的消息: " + msg);
    }


public class StringUtils {


    public static byte[] stringToBytes(String str, String split) {
        String[] strArr = str.split(split);
        byte[] byteArr = new byte[strArr.length];
        for (int i = 0; i < strArr.length; i++) {
            byteArr[i] = (byte) Integer.parseInt(strArr[i]);
        }
        return byteArr;
    }


    public static String bytesToString(byte[] byteArr, Charset charset) {
        return new String(byteArr, charset);
    }


    public static String stringToString(String str, String split, Charset charset) {
        return bytesToString(stringToBytes(str, split), charset);
    }


    public static String activeMQMessageParse(Message message) {
        String str = null;
        if (message instanceof ActiveMQTextMessage) {
            ActiveMQTextMessage textMessage = (ActiveMQTextMessage) message;
            try {
                str = textMessage.getText().toString();
            } catch (JMSException e) {
                e.printStackTrace();
            }
//            System.out.println("text : " + textMessage.getText());
        } else if (message instanceof ActiveMQBytesMessage) {
            ActiveMQBytesMessage bytesMessage = (ActiveMQBytesMessage) message;
            byte[] byteArr = new byte[0];
            try {
                byteArr = new byte[(int) bytesMessage.getBodyLength()];
                int flag = bytesMessage.readBytes(byteArr);
                str = bytesToString(byteArr, StandardCharsets.UTF_8);
//                System.out.println("bytes : " + flag + " : " + str);
            } catch (JMSException e) {
                e.printStackTrace();
            }
        }
        return str;
    }
}
到此这篇关于在JavaScript中使用mqtt.js的文章就介绍到这了,更多相关js使用mqtt.js内容请搜索编程网以前的文章或继续浏览下面的相关文章希望大家以后多多支持编程网!
--结束END--
本文标题: 在JavaScript中使用mqtt.js的详细过程
本文链接: https://www.lsjlt.com/news/209657.html(转载时请注明来源链接)
有问题或投稿请发送至: 邮箱/279061341@qq.com QQ/279061341
下载Word文档到电脑,方便收藏和打印~
2024-01-12
2023-05-20
2023-05-20
2023-05-20
2023-05-20
2023-05-20
2023-05-20
2023-05-20
2023-05-20
2023-05-20
回答
回答
回答
回答
回答
回答
回答
回答
回答
回答


官方手机版

微信公众号

商务合作


0