Python 官方文档:入门教程 => 点击学习
目录1.@ComponentScan注解作用2. @ComponentScan注解属性3. @ComponentScan过滤规则说明4. 自定义扫描过滤规则5. @Component
@ComponentScan用于类或接口上主要是指定扫描路径,spring会把指定路径下带有指定注解的类自动装配到bean容器里。会被自动装配的注解包括@Controller、@Service、@Component、@Repository等等。与ComponentScan注解相对应的XML配置就是<context:component-scan/>, 根据指定的配置自动扫描package,将符合条件的组件加入到ioc容器中;
XML的配置方式如下:
	<context:component-scan
		base-package="com.example.test" use-default-filters="false">
		<context:exclude-filter type="custom"
		expression="com.example.test.filter.MtyTypeFilter" />
	</context:component-scan>
@ComponentScan有如下常用属性:
在过滤规则Filter中:
FilterType:指定过滤规则,支持的过滤规则有:
value和classes:指定在该规则下过滤的表达式;
@ComponentScan的常见的配置如下:
@ComponentScan(
    excludeFilters = {@Filter(
    type = FilterType.CUSTOM,
    classes = {TypeExcludeFilter.class}
), @Filter(
    type = FilterType.CUSTOM,
    classes = {AutoConfigurationExcludeFilter.class}
)}
)
规则表达式说明
 1. 扫描指定类文件
   @ComponentScan(basePackageClasses = Person.class)
 2. 扫描指定包,使用默认扫描规则,即被@Component, @Repository, @Service, @Controller或者已经声明过@Component自定义注解标记的组件;
   @ComponentScan(value = "com.example")
 3. 扫描指定包,加载被@Component注解标记的组件和默认规则的扫描(因为useDefaultFilters默认为true)
   @ComponentScan(value = "com.example", includeFilters = { @Filter(type = FilterType.ANNOTATION, value = Component.class) })
 4. 扫描指定包,只加载Person类型的组件
   @ComponentScan(value = "com.example", includeFilters = { @Filter(type = FilterType.ASSIGNABLE_TYPE, value = Person.class) }, useDefaultFilters = false)
 5. 扫描指定包,过滤掉被@Component标记的组件
   @ComponentScan(value = "com.example", excludeFilters = { @Filter(type = FilterType.ANNOTATION, value = Component.class) })
 6. 扫描指定包,自定义过滤规则
   @ComponentScan(value = "com.example", includeFilters = { @Filter(type = FilterType.CUSTOM, value = MtyTypeFilter.class) }, useDefaultFilters = true)
用户自定义扫描过滤规则,需要实现org.springframework.core.type.filter.TypeFilter接口。
//1.自定义类实现TypeFilter接口并重写match()方法
public class MtyTypeFilter implements TypeFilter {

    @Override
    public boolean match(MetadataReader metadataReader, MetadataReaderFactory metadataReaderFactory) throws IOException {
        System.out.println("========MtyTypeFilter===========");
        //获取当前类的注解的信息
        AnnotationMetadata annotationMetadata = metadataReader.getAnnotationMetadata();
        System.out.println("annotationMetadata: "+annotationMetadata);
        //输出结果:annotationMetadata: com.example.test.bean.Color

        //获取当前正在扫描的类的类信息
        ClaSSMetadata classMetadata = metadataReader.getClassMetadata();
        System.out.println("classMetadata: "+classMetadata);
        //输出结果: classMetadata: com.example.test.bean.Color

        //获取当前类资源(类的路径)
        Resource resource = metadataReader.getResource();
        System.out.println("resource: "+resource);
        //输出结果:resource: file [D:\idea\demo-02\target\classes\com\example\test\bean\Color.class]


        //获取类名
        String className = classMetadata.getClassName();
        System.out.println("className: "+className);
        //输出结果:className: com.example.test.bean.Color
        Class<?> forName = null;
        try {
            forName = Class.forName(className);
            if (Color.class.isAssignableFrom(forName)) {
                // 如果是Color的子类,就加载到IOC容器
                return true;
            }
        } catch (ClassNotFoundException e) {
            e.printStackTrace();
        }

        System.out.println("========MtyTypeFilter===========");
        return false;
    }
}
可以一次声明多个@ComponentScan
@Retention(RetentionPolicy.RUNTIME)
@Target(ElementType.TYPE)
@Documented
@Repeatable(ComponentScans.class)  //指定ComponentScan可以被ComponentScans作为数组使用
public @interface ComponentScan {
}


@Retention(RetentionPolicy.RUNTIME)
@Target(ElementType.TYPE)
@Documented
public @interface ComponentScans {

	ComponentScan[] value();

}
@ComponentScans(value = { @ComponentScan(value = "com.example.test"),
		@ComponentScan(value = "com.example.test", includeFilters = {
				@Filter(type = FilterType.CUSTOM, value = MtyTypeFilter.class) }) })
public class MainConfig {

	@Bean(name = "pers", initMethod = "init", destroyMethod = "destory")
	public Person person() {
		return new Person();
	}

}
spring创建bean对象的基本流程是先创建对应的BeanDefinition对象,然后在基于BeanDefinition对象来创建Bean对象,SpringBoot也是如此,只不过通过注解创建BeanDefinition对象的时机和解析方式不同而已。SpringBoot是通过ConfigurationClassPostProcessor这个BeanFactoryPostProcessor类来处理。
本演示的demo涉及到4个演示类,分别是:
本文的最后会贴出所有代码。 先从启动类为入口,SpringBoot启动类如下:
@SpringBootApplication
public class Demo02Application {

    public static void main(String[] args) {
        //1、返回我们IOC容器
        ConfigurableApplicationContext run = SpringApplication.run(Demo02Application.class, args);
	}
}
从SpringApplication.run(Demo02Application.class, args);一路断点到核心方法SpringApplication.ConfigurableApplicationContext run(String... args)方法
run方法干了两件事:
 public ConfigurableApplicationContext run(String... args) {
        long startTime = System.nanoTime();
        DefaultBootstrapContext bootstrapContext = this.createBootstrapContext();
        ConfigurableApplicationContext context = null;
        this.configureHeadlessProperty();
        //初始化监听器
        SpringApplicationRunListeners listeners = this.getRunListeners(args);
        //发布ApplicationStartingEven
        listeners.starting(bootstrapContext, this.mainApplicationClass);

        try {
        	 //装配参数和环境
            ApplicationArguments applicationArguments = new DefaultApplicationArguments(args);
            //发布ApplicationEnvironmentPreparedEvent
            ConfigurableEnvironment environment = this.prepareEnvironment(listeners, bootstrapContext, applicationArguments);
            this.configureIgnoreBeanInfo(environment);
            Banner printedBanner = this.printBanner(environment);
            //创建ApplicationContext,并装配
            context = this.createApplicationContext();
            context.setApplicationStartup(this.applicationStartup);
            //发布ApplicationPreparedEvent
            this.prepareContext(bootstrapContext, context, environment, listeners, applicationArguments, printedBanner);
            this.refreshContext(context);
            this.afterRefresh(context, applicationArguments);
            Duration timeTakenToStartup = Duration.ofNanos(System.nanoTime() - startTime);
            if (this.logStartupInfo) {
                (new StartupInfoLogger(this.mainApplicationClass)).logStarted(this.getApplicationLog(), timeTakenToStartup);
            }
			//发布ApplicationStartedEven
            listeners.started(context, timeTakenToStartup);
            //执行Spring中@Bean下的一些操作,如静态方法
            this.callRunners(context, applicationArguments);
        } catch (Throwable var12) {
            this.handleRunFailure(context, var12, listeners);
            throw new IllegalStateException(var12);
        }

        try {
            Duration timeTakenToReady = Duration.ofNanos(System.nanoTime() - startTime);
            listeners.ready(context, timeTakenToReady);
            return context;
        } catch (Throwable var11) {
            this.handleRunFailure(context, var11, (SpringApplicationRunListeners)null);
            throw new IllegalStateException(var11);
        }
    }
重点方法一:本方法法实现的重点功能: 本demo是WEB工程,springboot通过反射创建上下文context:AnnotationConfigServletWebServerApplicationContext 类在构建context的无参构造方法中构建成员变量reader=new AnnotatedBeanDefinitionReader(this),在AnnotatedBeanDefinitionReader的无参构造方法中会beanFactory对象,并向beanFactory中注册5个BeanDefinition对象,重点关注ConfigurationClassPostProcessor。
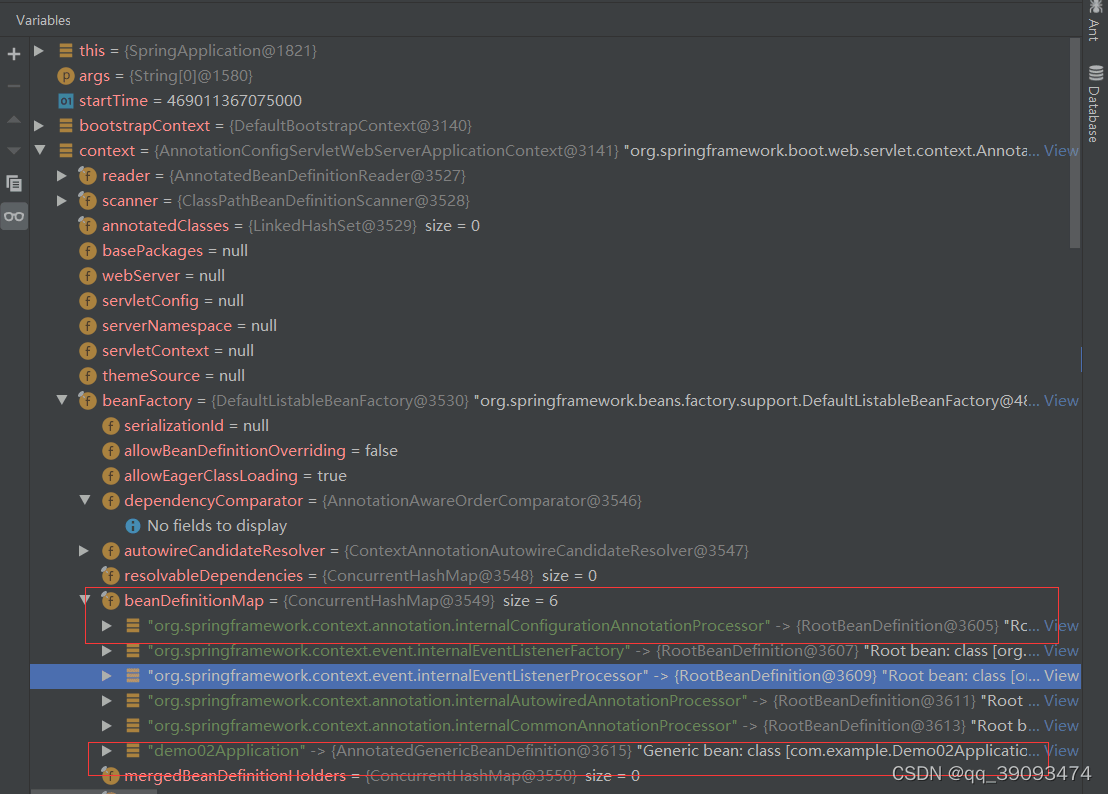
context = this.createApplicationContext();重点方法二:本方法实现的重点功能
本方法会构建启动类Demo02Application对应的BeanDefinition对象,并注册到beanFactory中,此时的context对象可见下图
this.prepareContext(context, environment, listeners, applicationArguments, printedBanner);重点方法三:本方法实现的重点功能
该方法实际调用applicationContext的refresh方法,代码分析详见我的另一篇博客,本文后面只会分析ConfigurationClassPostProcessor对象的创建和postProcessBeanDefinitionReGIStry方法的执行
    this.refreshContext(context);
    this.afterRefresh(context, applicationArguments);
this.prepareContext(context, environment, listeners, applicationArguments, printedBanner);代码执行后的截图如下:
ConfigurationClassPostProcessor实现BeanFactoryPostProcessor,关于BeanFactoryPostProcessor扩展接口的作用在《spring初始化源码浅析之关键类和扩展接口》一文中有详细介绍。
ConfigurationClassPostProcessor对象的创建和方法执行的断点如下:
this.refreshContext(context);–> AbstractApplicationContext.refresh() --> invokeBeanFactoryPostProcessors() -->PostProcessorRegistrationDelegate.invokeBeanFactoryPostProcessors()->invokeBeanDefinitionRegistryPostProcessors()
下面重点看ConfigurationClassPostProcessor类的postProcessBeanDefinitionRegistry()方法如何处理@ComponentScan注解:

同过源代码发现最终是由ConfigurationClassParser的解析类来处理,继续查看ConfigurationClassParser.doProcessConfigurationClass
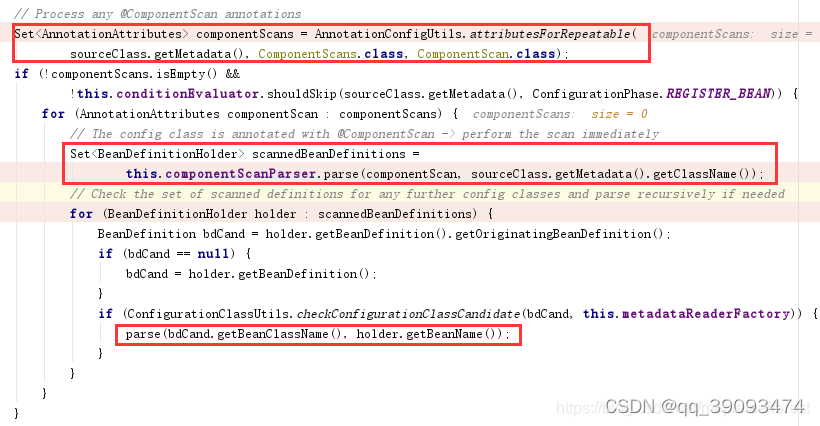
原来在这里对@ComponentScan注解做了判断,上面一段代码做了核心的几件事:
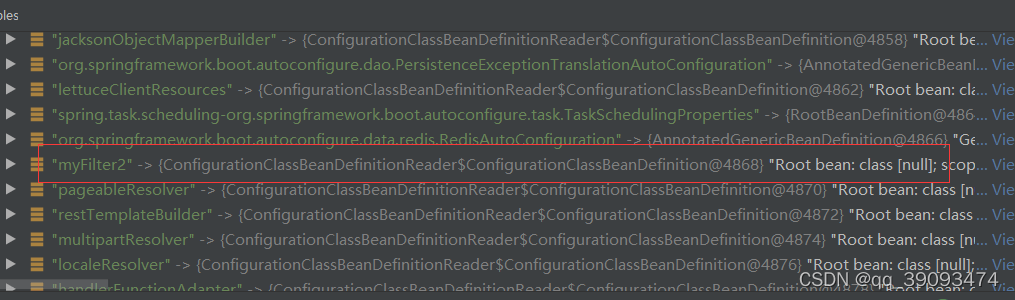
到此为止MyFilter2对应的BeanDefinition已创建完毕,如下图:
到此这篇关于spring boot自动装配之@ComponentScan注解用法详解的文章就介绍到这了,更多相关@ComponentScan注解用法内容请搜索编程网以前的文章或继续浏览下面的相关文章希望大家以后多多支持编程网!
--结束END--
本文标题: spring boot自动装配之@ComponentScan注解用法详解
本文链接: https://www.lsjlt.com/news/211786.html(转载时请注明来源链接)
有问题或投稿请发送至: 邮箱/279061341@qq.com QQ/279061341
下载Word文档到电脑,方便收藏和打印~
2024-03-01
2024-03-01
2024-03-01
2024-02-29
2024-02-29
2024-02-29
2024-02-29
2024-02-29
2024-02-29
2024-02-29
回答
回答
回答
回答
回答
回答
回答
回答
回答
回答


官方手机版

微信公众号

商务合作


0