Python 官方文档:入门教程 => 点击学习
目录1.延迟队列基本介绍2.延迟队列使用场景3.Spring Boot集成RabbitMQ3.1创建项目,引入依赖3.2application.properties配置文件3.3 队
一般队列中的元素总是希望能够早点被取出来进行处理,但是延迟队列中的元素则是希望可以在指定时间内被取出和处理,延迟队列中的元素都是带有时间属性的。延迟队列就是用来存放需要在指定时间被处理的元素的队列
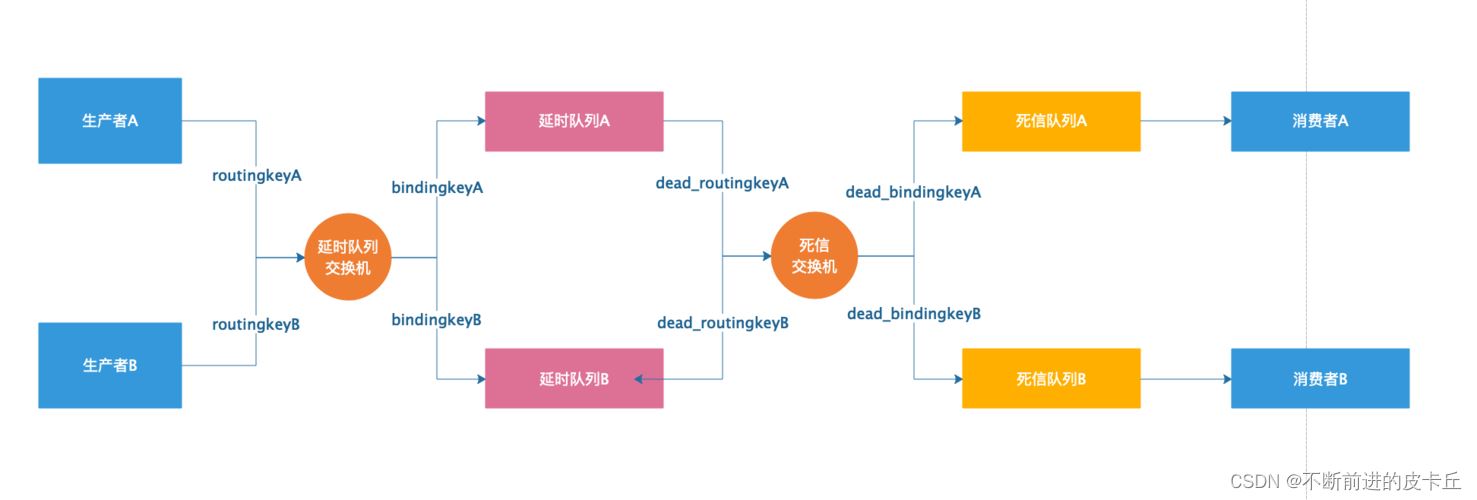
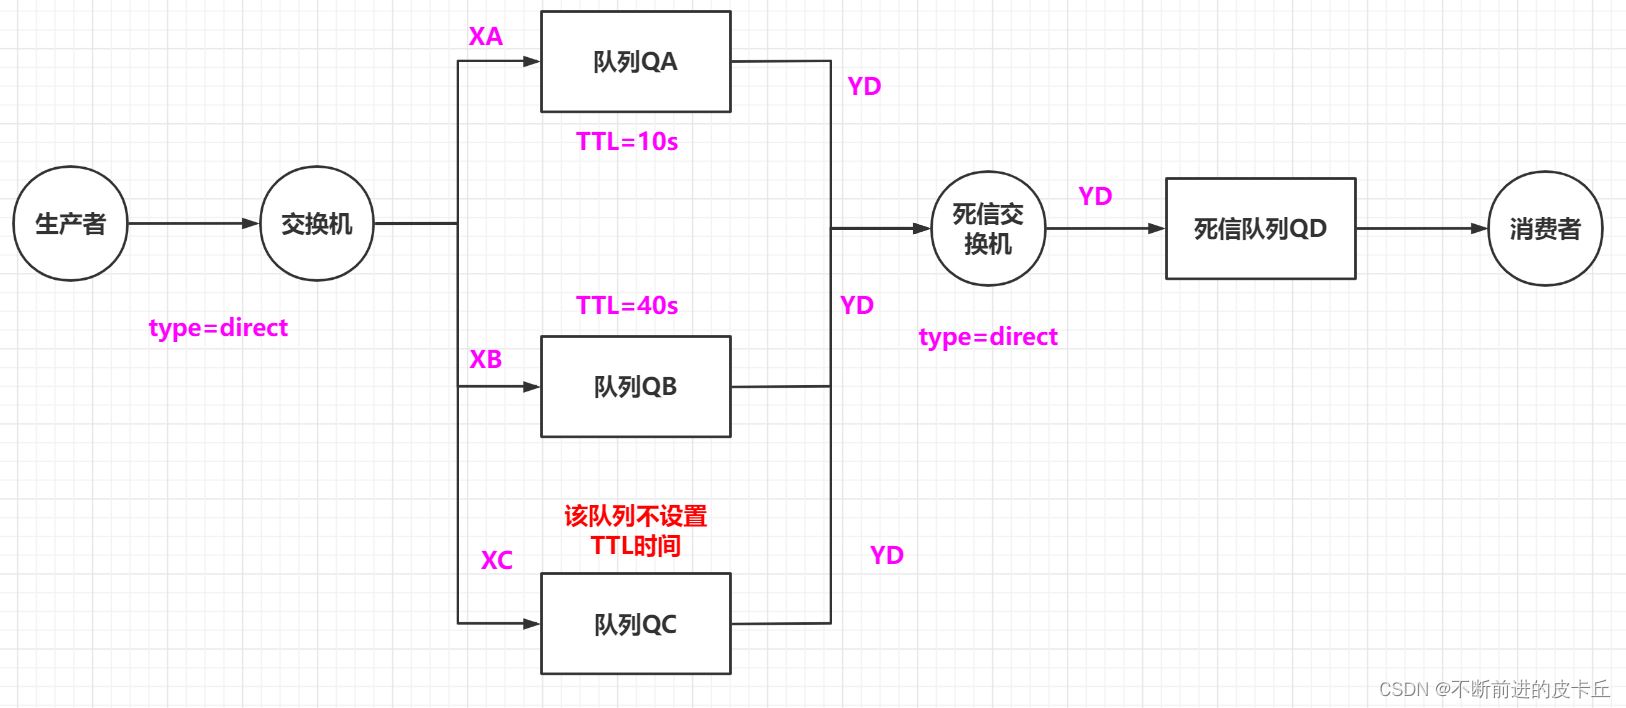
延迟队列就是想要消息延迟一段时间后被处理,TTL可以让消息在延迟一段时间后变成死信。变成死信的消息都会被投递到死信队列中,这样的话,只要消费者一直消费死信队列里面的消息就可以了,因为里面的消息都是希望被马上处理的消息 生产者生产一条延时消息,根据需要延时时间的不同,通过不同的routing key把消息路由到不同的延迟队列,每一个队列都设置了不同的TTL属性,并且绑定在同一个死信交换机中,消息过期了以后,根据routing key的不同,又会被路由到不同的死信队列中,消费者只需要监听对应的死信队列进行处理就可以了。注意:不要造成重复消费
下面的场景需要使用延迟队列
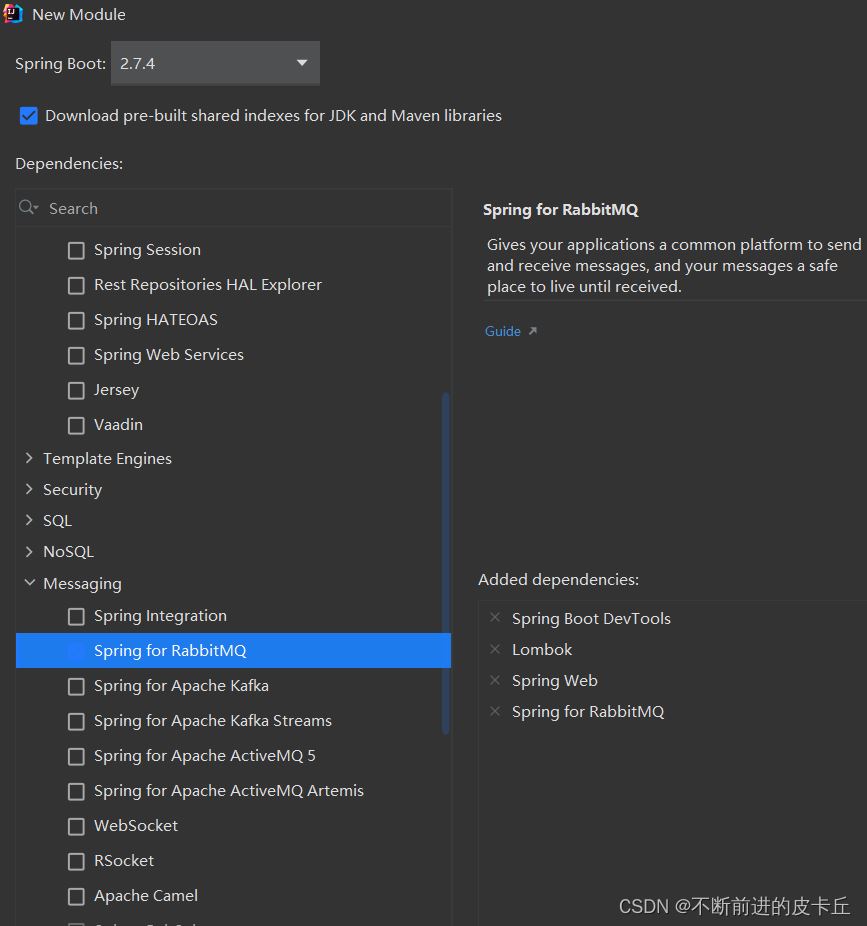
相关依赖
 <dependencies>
        <dependency>
            <groupId>org.springframework.boot</groupId>
            <artifactId>spring-boot-starter-amqp</artifactId>
        </dependency>
        <dependency>
            <groupId>org.springframework.boot</groupId>
            <artifactId>spring-boot-starter-WEB</artifactId>
        </dependency>
        <dependency>
            <groupId>org.springframework.boot</groupId>
            <artifactId>spring-boot-devtools</artifactId>
            <scope>runtime</scope>
            <optional>true</optional>
        </dependency>
        <dependency>
            <groupId>org.projectlombok</groupId>
            <artifactId>lombok</artifactId>
            <optional>true</optional>
        </dependency>
        <dependency>
            <groupId>org.springframework.boot</groupId>
            <artifactId>spring-boot-starter-test</artifactId>
            <scope>test</scope>
        </dependency>
        <dependency>
            <groupId>org.springframework.amqp</groupId>
            <artifactId>spring-rabbit-test</artifactId>
            <scope>test</scope>
        </dependency>
</dependencies># RabbitMQ/配置
#服务器地址
spring.rabbitmq.host=服务器地址
#服务端口号
spring.rabbitmq.port=5672
#虚拟主机名称
spring.rabbitmq.virtual-host=/myhost
#用户名
spring.rabbitmq.username=admin
#密码
spring.rabbitmq.passWord=123456
package com.zyh.config;
import org.springframework.amqp.core.*;
import org.springframework.beans.factory.annotation.Qualifier;
import org.springframework.context.annotation.Bean;
import org.springframework.context.annotation.Configuration;
import java.util.HashMap;
import java.util.Map;
@Configuration
public class TtlQueueConfiguration {
//普通交换机
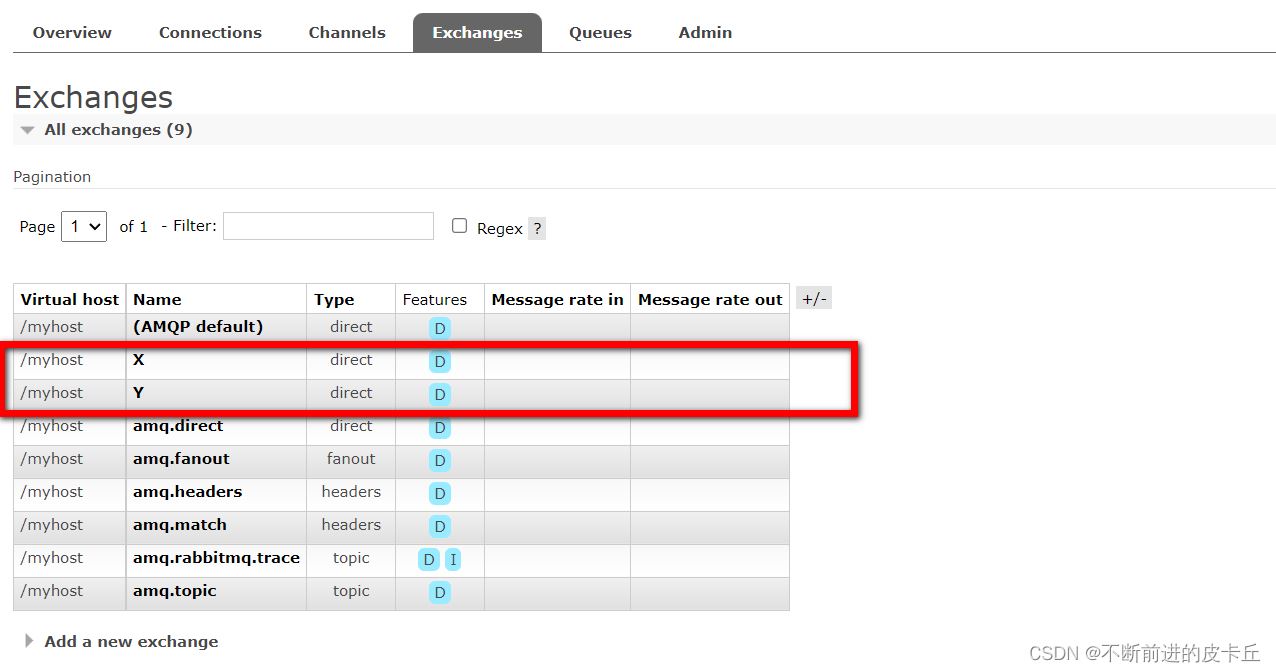
public static final String X_EXCHANGE = "X";
//普通队列
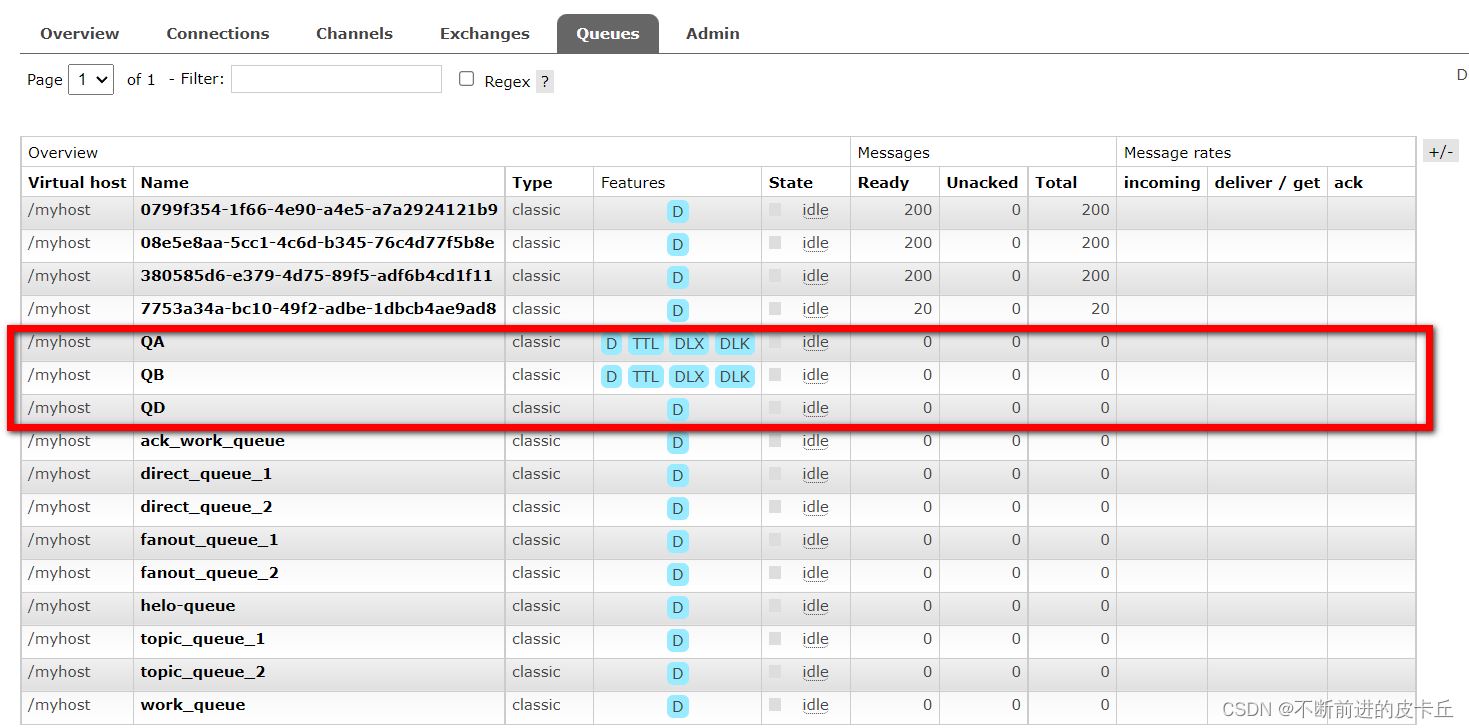
public static final String QUEUE_A = "QA";
public static final String QUEUE_B = "QB";
//死信交换机
public static final String Y_DEAD_LETTER_EXCHANGE = "Y";
//死信队列QD
public static final String QUEUE_D = "QD";
@Bean
public DirectExchange xExchange() {
return new DirectExchange(X_EXCHANGE);
}
@Bean
public Queue queueA() {
//创建集合保存队列属性
Map<String, Object> map = new HashMap<>();
//设置该队列绑定的死信交换机名称
map.put("x-dead-letter-exchange", Y_DEAD_LETTER_EXCHANGE);
//设置routing key
map.put("x-dead-letter-routing-key", "YD");
//设置队列延迟时间 10秒
map.put("x-message-ttl", 10000);
//创建队列
return QueueBuilder.durable(QUEUE_A).withArguments(map).build();
}
@Bean
public Binding queueA_BindingX(@Qualifier("queueA") Queue queue, @Qualifier("xExchange") DirectExchange exchange) {
return BindingBuilder.bind(queue).to(exchange).with("XA");
}
@Bean
public Queue queueB() {
//创建集合保存队列属性
Map<String, Object> map = new HashMap<>();
//设置该队列绑定的死信交换机名称
map.put("x-dead-letter-exchange", Y_DEAD_LETTER_EXCHANGE);
//设置routing key
map.put("x-dead-letter-routing-key", "YD");
//设置队列延迟时间 10秒
map.put("x-message-ttl", 40000);
//创建队列
return QueueBuilder.durable(QUEUE_A).withArguments(map).build();
}
@Bean
public Binding queueB_BindingX(@Qualifier("queueB") Queue queue, @Qualifier("xExchange") DirectExchange exchange) {
return BindingBuilder.bind(queue).to(exchange).with("XB");
}
@Bean
public DirectExchange yExchange() {
return new DirectExchange(Y_DEAD_LETTER_EXCHANGE);
}
@Bean
public Queue queueD() {
return new Queue(QUEUE_D);
}
@Bean
public Binding deadLetterBindingQD(@Qualifier("queueD") Queue queue, @Qualifier("yExchange") DirectExchange exchange) {
return BindingBuilder.bind(queue).to(exchange).with("YD");
}
}@Slf4j
@RestController
@RequestMapping("/ttl")
public class SendMessageController {
@Resource
private RabbitTemplate rabbitTemplate;
@GetMapping("/sendMessage/{message}")
public void sendMessage(@PathVariable String message){
//记录日志
log.info("当前时间:{},发送一条信息给两个TTL队列:{}",new Date(),message);
//给QA队列发送消息
rabbitTemplate.convertSendAndReceive("X","XA", "消息来自TTL为10秒的队列:"+message);
rabbitTemplate.convertSendAndReceive("X","XB", "消息来自TTL为40秒的队列:"+message);
}
}@Slf4j
@Component
public class DeadLetterQueueConsumer {
@RabbitListener(queues = TtlQueueConfiguration.QUEUE_D)
public void receiveQD(Message message, Channel channel){
//获取消息
String msg=new String(message.getBody());
log.info("当前时间:{},收到死信队列消息:{}",new Date(),msg);
}
}
启动boot项目,在浏览器输入localhost:8080/ttl/sendMessage/Hello

但是这种方式有一种缺点,现在我们只有TTL为10s和40s的延迟队列,如果我们需要其他延时时间的队列的话,那么我们又得新增其他队列,这样其实并不方便,我们想要的是能够动态设置TTL,这样就不需要为每个TTL设置新的延迟队列了。
在之前写的代码基础上新增一个配置类
package com.zyh.config;
import org.springframework.amqp.core.*;
import org.springframework.beans.factory.annotation.Qualifier;
import org.springframework.context.annotation.Bean;
import org.springframework.context.annotation.Configuration;
import java.util.HashMap;
import java.util.Map;

@Configuration
public class MessageTtlQueueConfiguration {
    //死信交换机
    public static final String Y_DEAD_LETTER_EXCHANGE = "Y";
    //普通队列
    public static final String QUEUE_C = "QC";

    @Bean
    public Queue queueC(){
        //创建集合保存队列属性
        Map<String, Object> map = new HashMap<>();
        //设置该队列绑定的死信交换机名称
        map.put("x-dead-letter-exchange", Y_DEAD_LETTER_EXCHANGE);
        //设置routing key
        map.put("x-dead-letter-routing-key", "YD");
        //设置队列延迟时间 10秒
        map.put("x-message-ttl", 10000);
        return QueueBuilder.durable(QUEUE_C).withArguments(map).build();
    }

    @Bean
    public Binding queueC_BindingX(@Qualifier("queueC") Queue queue, @Qualifier("xExchange") DirectExchange exchange) {
        return BindingBuilder.bind(queue).to(exchange).with("XC");
    }
}package com.zyh.controller;
import lombok.Data;
import lombok.extern.slf4j.Slf4j;
import org.springframework.amqp.AmqpException;
import org.springframework.amqp.core.Message;
import org.springframework.amqp.core.MessagePostProcessor;
import org.springframework.amqp.rabbit.core.RabbitTemplate;
import org.springframework.beans.factory.annotation.Autowired;
import org.springframework.web.bind.annotation.GetMapping;
import org.springframework.web.bind.annotation.PathVariable;
import org.springframework.web.bind.annotation.RequestMapping;
import org.springframework.web.bind.annotation.RestController;
import javax.annotation.Resource;
import javax.annotation.Resources;
import java.util.Date;
@Slf4j
@RestController
@RequestMapping("/ttl")
public class SendMessageController {
@Resource
private RabbitTemplate rabbitTemplate;
@GetMapping("/sendMessage/{message}")
public void sendMessage(@PathVariable String message) {
//记录日志
log.info("当前时间:{},发送一条信息给两个TTL队列:{}", new Date(), message);
//给QA队列发送消息
rabbitTemplate.convertSendAndReceive("X", "XA", "消息来自TTL为10秒的队列:" + message);
rabbitTemplate.convertSendAndReceive("X", "XB", "消息来自TTL为40秒的队列:" + message);
}
@GetMapping("/sendMessage/{message}/{ttlTime}")
public void sendMessage(@PathVariable String message, @PathVariable String ttlTime) {
MessagePostProcessor messagePostProcessor = new MessagePostProcessor() {
@Override
public Message postProceSSMessage(Message message) throws AmqpException {
//设置消息有效期
message.getMessageProperties().setExpiration(ttlTime);
return message;
}
};
//记录日志
log.info("当前时间:{},发送一条时长{}毫秒信息给队列QC:{}", new Date(),ttlTime, message);
//给QC队列发送消息
rabbitTemplate.convertAndSend("X", "XC", message, messagePostProcessor);
}
}@Slf4j
@Component
public class DeadLetterQueueConsumer {
@RabbitListener(queues = TtlQueueConfiguration.QUEUE_D)
public void receiveQD(Message message, Channel channel){
//获取消息
String msg=new String(message.getBody());
log.info("当前时间:{},收到死信队列消息:{}",new Date(),msg);
}
}启动boot项目

在浏览器输入
Http://localhost:8080/ttl/sendMessage/Hello/20000
http://localhost:8080/ttl/sendMessage/你好/2000

如果在消息属性上设置TTL的方式,那么消息可能不会按时死亡,因为RabbitMQ只会检查第一个消息是否过期,如果过期则丢到死信队列,如果第一个消息的延时时长很长,而第二个消息的延时时长很短,第二个消息并不会优先得到执行
到此这篇关于详解RabbitMQ延迟队列的基本使用和优化的文章就介绍到这了,更多相关RabbitMQ延迟队列内容请搜索编程网以前的文章或继续浏览下面的相关文章希望大家以后多多支持编程网!
--结束END--
本文标题: 详解RabbitMQ延迟队列的基本使用和优化
本文链接: https://www.lsjlt.com/news/212857.html(转载时请注明来源链接)
有问题或投稿请发送至: 邮箱/279061341@qq.com QQ/279061341
下载Word文档到电脑,方便收藏和打印~
2024-03-01
2024-03-01
2024-03-01
2024-02-29
2024-02-29
2024-02-29
2024-02-29
2024-02-29
2024-02-29
2024-02-29
回答
回答
回答
回答
回答
回答
回答
回答
回答
回答


官方手机版

微信公众号

商务合作


0