这篇文章将为大家详细讲解有关在Android开发中使用View制作一个引导动画,文章内容质量较高,因此小编分享给大家做个参考,希望大家阅读完这篇文章后对相关知识有一定的了解。一、实现效果图关于贝塞尔曲线 二、实现代码自定义viewpacka
这篇文章将为大家详细讲解有关在Android开发中使用View制作一个引导动画,文章内容质量较高,因此小编分享给大家做个参考,希望大家阅读完这篇文章后对相关知识有一定的了解。
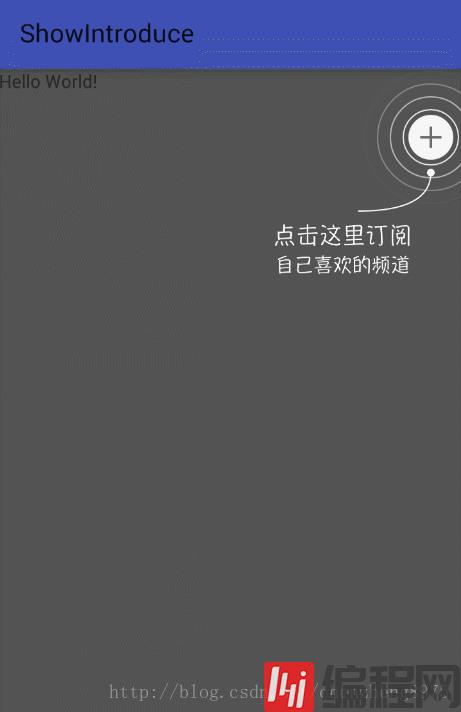
一、实现效果图
关于贝塞尔曲线

二、实现代码
自定义view
package com.czhappy.showintroduce.view;import android.content.Context;import android.graphics.Bitmap;import android.graphics.canvas;import android.graphics.Color;import android.graphics.Paint;import android.graphics.Path;import android.util.AttributeSet;import android.view.View;import android.widget.RelativeLayout;public class RippleIntroView extends RelativeLayout implements Runnable { private int mMaxRadius = 70; private int mInterval = 20; private int count = 0; private Bitmap mCacheBitmap; private Paint mRipplePaint; private Paint mCirclePaint; private Path mArcPath; public RippleIntroView(Context context) { this(context, null); } public RippleIntroView(Context context, AttributeSet attrs) { this(context, attrs, 0); } public RippleIntroView(Context context, AttributeSet attrs, int defStyleAttr) { super(context, attrs, defStyleAttr); init(); } private void init() { mRipplePaint = new Paint(); mRipplePaint.setAntiAlias(true); mRipplePaint.setStyle(Paint.Style.STROKE); mRipplePaint.setColor(Color.WHITE); mRipplePaint.setStrokeWidth(2.f); mCirclePaint = new Paint(); mCirclePaint.setAntiAlias(true); mCirclePaint.setStyle(Paint.Style.FILL); mCirclePaint.setColor(Color.WHITE); mArcPath = new Path(); } @Override protected void onSizeChanged(int w, int h, int oldw, int oldh) { super.onSizeChanged(w, h, oldw, oldh); if (mCacheBitmap != null) { mCacheBitmap.recycle(); mCacheBitmap = null; } } @Override protected void onDraw(Canvas canvas) { //获取加号图片view View mPlusChild = getChildAt(0); //获取提示图片view View mRefsChild = getChildAt(1); if (mPlusChild == null || mRefsChild == null) return; //获取加号图片大小 final int pw = mPlusChild.getWidth(); final int ph = mPlusChild.getHeight(); //获取提示图片大小 final int fw = mRefsChild.getWidth(); final int fh = mRefsChild.getHeight(); if (pw == 0 || ph == 0) return; //加号图片中心点坐标 final float px = mPlusChild.getX() + pw / 2; final float py = mPlusChild.getY() + ph / 2; //提示图片左上角坐标 final float fx = mRefsChild.getX(); final float fy = mRefsChild.getY(); final int rw = pw / 2; final int rh = ph / 2; if (mCacheBitmap == null) { mCacheBitmap = Bitmap.createBitmap(getWidth(), getHeight(), Bitmap.Config.ARGB_8888); Canvas cv = new Canvas(mCacheBitmap); super.onDraw(cv); //清空所有已经画过的path至原始状态 mArcPath.reset(); //起始轮廓点移至x,y坐标点,即加号图片正下方再往下20位置 mArcPath.moveTo(px, py + rh + mInterval); //设置二次贝塞尔,实现平滑曲线,前两个参数为操作点坐标,后两个参数为结束点坐标 mArcPath.quadTo(px, fy - mInterval, fx + fw * 0.618f, fy - mInterval); //0~255,数值越小越透明 mRipplePaint.setAlpha(255); cv.drawPath(mArcPath, mRipplePaint); //绘制半径为6的实心圆点 cv.drawCircle(px, py + rh + mInterval, 6, mCirclePaint); } //绘制背景图片 canvas.drawBitmap(mCacheBitmap, 0, 0, mCirclePaint); //保存画布当前的状态 int save = canvas.save(); for (int step = count; step <= mMaxRadius; step += mInterval) { //step越大越靠外就越透明 mRipplePaint.setAlpha(255 * (mMaxRadius - step) / mMaxRadius); canvas.drawCircle(px, py, (float) (rw + step), mRipplePaint); } //恢复Canvas的状态 canvas.restoreToCount(save); //延迟80毫秒后开始运行 postDelayed(this, 80); } @Override public void run() { //把run对象的引用从队列里拿出来,这样,他就不会执行了,但 run 没有销毁 removeCallbacks(this); count += 2; count %= mInterval; invalidate();//重绘 } @Override protected void onDetachedFromWindow() { super.onDetachedFromWindow(); if (mCacheBitmap != null) { mCacheBitmap.recycle(); mCacheBitmap = null; } }}--结束END--
本文标题: 在Android开发中使用View制作一个引导动画
本文链接: https://www.lsjlt.com/news/225965.html(转载时请注明来源链接)
有问题或投稿请发送至: 邮箱/279061341@qq.com QQ/279061341
下载Word文档到电脑,方便收藏和打印~
2024-05-13
2024-05-13
2024-05-13
2024-05-13
2024-05-13
2024-05-13
2024-05-13
2024-05-13
2024-05-13
2024-05-13
回答
回答
回答
回答
回答
回答
回答
回答
回答
回答


官方手机版

微信公众号

商务合作


0