实现原理 首先就是自定义个WaveView 继承View,然后再WaveView 内部实现代码逻辑: ① 水波就波
实现原理
首先就是自定义个WaveView 继承View,然后再WaveView 内部实现代码逻辑:
① 水波就波嘛? sin函数? 贝塞尔曲线? 都行,这里就用二阶贝塞 尔曲线去画吧
② 波要动嘛,怎么动呢?线程? 好吧 这里用了个Handler。
③绘制波首先要找点,那么在
onMeasure()onDraw()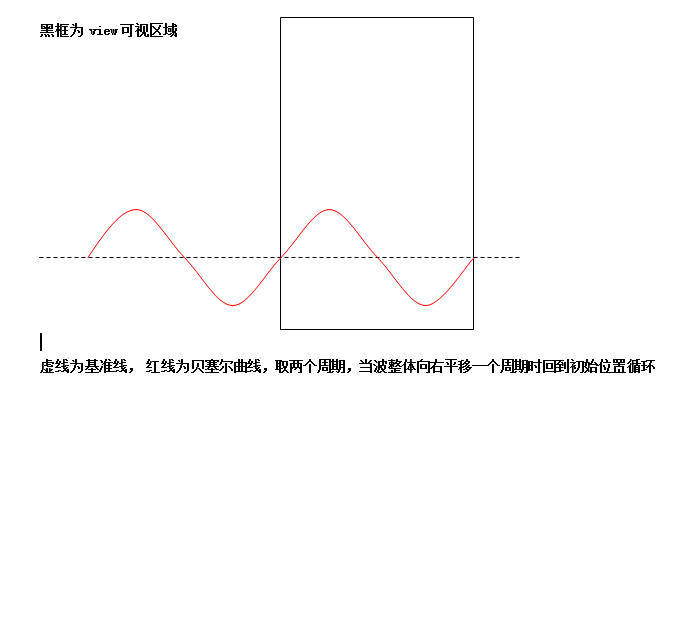
意思就是波平移一个波长之后回到初始位置继续平移循环。
好吧,有人说了,这么简单的逻辑你要啰嗦那么多???
好吧,我承认,我有唐僧的潜质。。。
闲话就不说了,先上
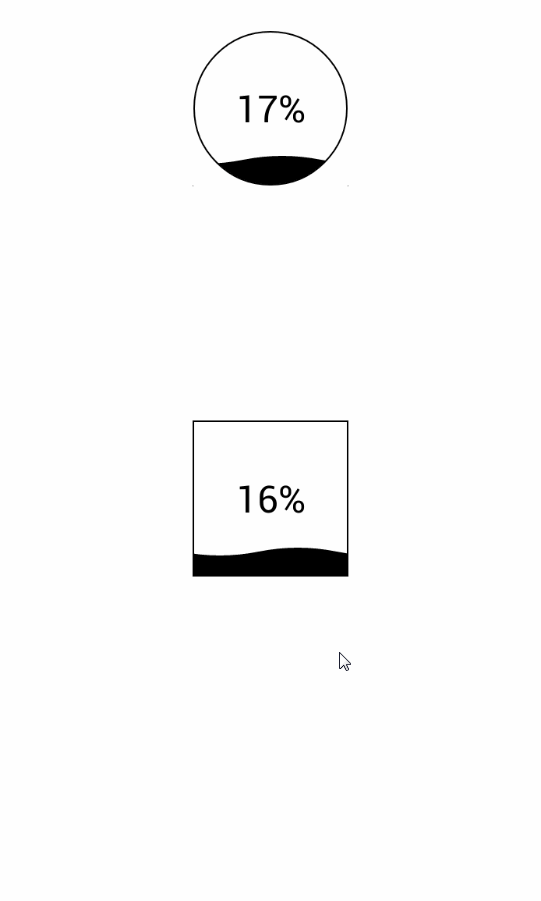
效果图
示例代码如下
调用的Activity
 * Created by LiuDong on 2016/12/22.
 * Email:15002102128@126.com
 */
public class WaveActivity extends Activity {
 LD_WaveView waveView;//方形
 LD_WaveView waveCircleView;//圆形
 private int progrees=0;//进度
 private Handler mHandler=new Handler(){
  @Override
  public void handleMessage(Message msg) {
   if (progrees==100) progrees=0;
   Log.i("progress",progrees+"");
   waveView.setmProgress(progrees++);
   waveCircleView.setmProgress(progrees++);
   mHandler.sendEmptyMessageDelayed(0,100);
  }
 };
 @Override
 protected void onCreate(Bundle savedInstanceState) {
  super.onCreate(savedInstanceState);
  setContentView(R.layout.activity_wave);
  waveView= (LD_WaveView) findViewById(R.id.waveView);
  waveCircleView= (LD_WaveView) findViewById(R.id.waveViewCircle);
  mHandler.sendEmptyMessageDelayed(0,10);
 }
}
xml布局
<?xml version="1.0" encoding="utf-8"?>
<RelativeLayout xmlns:Android="Http://schemas.android.com/apk/res/android"
 xmlns:app="http://schemas.android.com/apk/res-auto"
 android:orientation="vertical" android:layout_width="match_parent"
 android:background="@color/ld_White"
 android:layout_height="match_parent">
 <com.dadong.ld_tools.widget.LD_WaveView
  android:id="@+id/waveViewCircle"
  android:layout_marginTop="20dp"
  android:layout_width="100dp"
  android:layout_centerHorizontal="true"
  android:layout_height="100dp"
  app:wave_color="@color/ld_Black"
  app:wave_circle="true"
  />
 <com.dadong.ld_tools.widget.LD_WaveView
  android:id="@+id/waveView"
  android:layout_width="100dp"
  android:layout_height="100dp"
  app:wave_color="@color/ld_Black"
  app:wave_circle="false"
  android:layout_centerInParent="true" />
</RelativeLayout>
自定义WaveView
public class LD_WaveView extends View {
 private int mProgress;//进度
 private int mTimeStep = 10;//时间间隔
 private int mSpeed = 5;//波单次移动的距离
 private int mViewHeight;//视图宽高
 private int mViewWidth;//视图宽度
 private int mLevelLine;// 基准线
 private int mWaveLength;//波长 暂定view宽度为一个波长
 private int mStrokeWidth;//园的线宽
 private RectF rectF;//圆环区域
 private int mWaveHeight;//波峰高度
 private int mLeftWaveMoveLength;//波平移的距离,用来控制波的起点位置
 private int mWaveColor;//波的颜色
 private Paint mPaint;//画笔
 private Paint mCirclePaint;//圆环画笔
 private Paint mBorderPaint;//边界画笔
 private int mBorderWidth=4;//边界宽度
 private Paint mTextPaint;//文字画笔
 private Path mPath;//绘画线
 private List<Point> mPoints;//点的集合
 private boolean isMeasure = false;//是否已测量过
 private boolean isCircle=false;//是否圆形默认false,可属性代码设置
 //处理消息
 private Handler handler = new Handler() {
  @Override
  public void handleMessage(Message msg) {
   initWaveMove();
  }
 };

 private void initWaveMove(){
  mLeftWaveMoveLength+=mSpeed;//波向右移动距离增加mSpeed;
  if (mLeftWaveMoveLength>=mWaveLength){//当增加到一个波长时回复到0
   mLeftWaveMoveLength=0;
  }
  invalidate();
 }
 public LD_WaveView(Context context) {
  this(context, null);
 }
 public LD_WaveView(Context context, AttributeSet attrs) {
  this(context, attrs, 0);
 }
 public LD_WaveView(Context context, AttributeSet attrs, int defStyleAttr) {
  super(context, attrs, defStyleAttr);
  getAttr(context, attrs, defStyleAttr);
  init();
 }

 private void init() {
  mPoints = new ArrayList<Point>();
  //波浪轨迹画笔
  mPaint = new Paint();
  mPaint.setAntiAlias(true);
  mPaint.setColor(mWaveColor);
  mPaint.setStyle(Paint.Style.FILL_AND_STROKE);
  mPath = new Path();
  //文字画笔
  mTextPaint=new Paint();
  mTextPaint.setColor(Color.RED);
  mTextPaint.setTextAlign(Paint.Align.CENTER);
  mTextPaint.setTextSize(48);
  //圆环画笔
  mCirclePaint=new Paint();
  mCirclePaint.setAntiAlias(true);
  mCirclePaint.setColor(Color.WHITE);
  mCirclePaint.setStyle(Paint.Style.STROKE);
  //边界线画笔
  mBorderPaint=new Paint();
  mBorderPaint.setAntiAlias(true);
  mBorderPaint.setColor(mWaveColor);
  mBorderPaint.setStrokeWidth(mBorderWidth);
  mBorderPaint.setStyle(Paint.Style.STROKE);
 }

 private void getAttr(Context context, AttributeSet attrs, int defStyle) {
  TypedArray a = context.obtainStyledAttributes(attrs, R.styleable.LD_WaveView, defStyle, 0);
  mWaveColor = a.getColor(R.styleable.LD_WaveView_wave_color, Color.RED);
  isCircle=a.getBoolean(R.styleable.LD_WaveView_wave_circle,false);
  a.recycle();
 }

 @Override
 protected void onMeasure(int widthMeasureSpec, int heightMeasureSpec) {
  super.onMeasure(widthMeasureSpec, heightMeasureSpec);
  if (!isMeasure&&Math.abs(getMeasuredHeight()-getMeasuredWidth())<50) {//只计算一次就够了 ,relativelayout的时候要绘制两次 加个宽高判断
   mViewHeight = getMeasuredHeight();
   mViewWidth = getMeasuredWidth();
   mLevelLine = mViewHeight; //初始化波的准位线  起始位视图最底部
   {
    mLevelLine = mViewHeight * (100-mProgress) / 100;
    if (mLevelLine < 0) mLevelLine = 0;
   }
   //计算波峰值
   mWaveHeight = mViewHeight / 20;//波峰暂定为view高度的1/20,如果需要设置 可设置set方法赋值;
   mWaveLength = getMeasuredWidth();
   //计算所有的点 这里取宽度为整个波长 往左再延伸一个波长 两个波长则需要9个点
   for (int i = 0; i < 9; i++) {
    int y = 0;
    switch (i % 4) {
     case 0:
      y = mViewHeight;
      break;
     case 1:
      y =mViewHeight+ mWaveHeight;
      break;
     case 2:
      y = mViewHeight;
      break;
     case 3:
      y = mViewHeight-mWaveHeight;
      break;
    }
    Point point = new Point(-mWaveLength + i * mWaveLength / 4, y);
    mPoints.add(point);
   }

   int mIncircleRadius=mViewHeight<mViewWidth?mViewHeight/2:mViewWidth/2;//内切圆半径
   int mcircumcircleRadius= (int) (Math.sqrt((float)(Math.pow(mViewHeight/2,2)+Math.pow(mViewWidth/2,2)))+0.5);//外接圆半径
   int radius=mcircumcircleRadius/2+mIncircleRadius/2;
   rectF=new RectF(mViewWidth/2-radius,mViewHeight/2-radius,mViewWidth/2+radius,mViewHeight/2+radius);
   mStrokeWidth=mcircumcircleRadius-mIncircleRadius;
   mCirclePaint.setStrokeWidth(mStrokeWidth);//线是有宽度的 采用了这种方式画圆环
   isMeasure = true;
  }
 }
 @Override
 protected void onDraw(canvas canvas) {
  super.onDraw(canvas);

  mPath.reset();
  int i = 0;
  mPath.moveTo(mPoints.get(0).getX()+mLeftWaveMoveLength, mPoints.get(0).getY()-mViewHeight*mProgress/100);
  for (; i < mPoints.size() - 2; i += 2) {
   mPath.quadTo(mPoints.get(i + 1).getX()+mLeftWaveMoveLength, mPoints.get(i + 1).getY()-mViewHeight*mProgress/100, mPoints.get(i + 2).getX()+mLeftWaveMoveLength, mPoints.get(i + 2).getY()-mViewHeight*mProgress/100);
  }
  mPath.lineTo(mPoints.get(i).getX()+mLeftWaveMoveLength, mViewHeight);
  mPath.lineTo(mPoints.get(0).getX()+mLeftWaveMoveLength, mViewHeight);
  mPath.close();

  canvas.drawPath(mPath,mPaint);
  Rect rect = new Rect();
  String progress=String.fORMat("%d%%",mProgress);
  mTextPaint.getTextBounds(progress,0,progress.length(), rect);
  int textHeight = rect.height();
  if (mProgress>=50)//如果进度达到50 颜色变为白色,没办法啊,进度在中间 不变颜色看不到
   mTextPaint.setColor(Color.WHITE);
  else
  mTextPaint.setColor(mWaveColor);
  canvas.drawText(progress,0,progress.length(),mViewWidth/2,mViewHeight/2+textHeight/2,mTextPaint);
  if (isCircle) {

   canvas.drawArc(rectF, 0, 360, true, mCirclePaint);
   Paint circlePaint = new Paint();
   circlePaint.setStrokeWidth(5);
   circlePaint.setColor(Color.WHITE);
   circlePaint.setAntiAlias(true);
   circlePaint.setStyle(Paint.Style.STROKE);
   canvas.drawCircle(mViewWidth / 2, mViewHeight / 2, mViewHeight / 2, circlePaint);

   mBorderPaint.setStrokeWidth(mBorderWidth/2);
  canvas.drawCircle(mViewWidth/2,mViewHeight/2,mViewHeight/2-mBorderWidth/2,mBorderPaint);
  }else {

   canvas.drawRect(0,0,mViewWidth,mViewHeight,mBorderPaint);
  }
  //
  handler.sendEmptyMessageDelayed(0,mTimeStep);
 }

 public void setmProgress(int mProgress) {
  this.mProgress = mProgress;
  mLevelLine=(100-mProgress)*mViewHeight/100;
 }

 public void setCircle(boolean circle) {
  isCircle = circle;
 }
}
自定义属性
<?xml version="1.0" encoding="utf-8"?>
<resources>
 <declare-styleable name="LD_WaveView">
  <attr name="wave_color" format="color"></attr>
  <attr name="wave_circle" format="boolean"></attr>
 </declare-styleable>
</resources>
总结
好了,以上就是这篇文章的全部内容了,代码里备注应该还算比较清楚了,希望能对一些人有一些帮助,瑕疵不足之处欢迎指正,或者有好的建议。也可以留言交流。
您可能感兴趣的文章:Android中实现WEBview顶部带进度条的方法android自定义进度条渐变色View的实例代码android ListView和ProgressBar(进度条控件)的使用方法Android自定义View实现带数字的进度条实例代码Android Webview添加网页加载进度条实例详解Android 自定义view和属性动画实现充电进度条效果Android view自定义实现动态进度条Android自定义View基础开发之图片加载进度条Android自定义view实现水波纹进度球效果Android自定义View实现圆弧进度效果
--结束END--
本文标题: Android自定义WaveView实现波浪进度效果
本文链接: https://www.lsjlt.com/news/22693.html(转载时请注明来源链接)
有问题或投稿请发送至: 邮箱/279061341@qq.com QQ/279061341
下载Word文档到电脑,方便收藏和打印~
2024-01-21
2023-10-28
2023-10-28
2023-10-27
2023-10-27
2023-10-27
2023-10-27
回答
回答
回答
回答
回答
回答
回答
回答
回答
回答


官方手机版

微信公众号

商务合作


0