这是在了解下拉刷新功能原理下的产物,下拉刷新可以说是国产APP里面必有的功能,连Google都为此出了SwipeRefreshLayout,一种MD风格的下拉刷新。 不过,M
这是在了解下拉刷新功能原理下的产物,下拉刷新可以说是国产APP里面必有的功能,连Google都为此出了SwipeRefreshLayout,一种MD风格的下拉刷新。
不过,MD风格在国内似乎很是艰难,不单单是国内系统主流仍是4.4的原因,也有用户习惯的问题,扯的有点多了,在看了许多博客之后,我突然想写一个能仿照 SwipeRefreshLayout 的兼容所有控件的下拉刷新,不单单只是 ListView,希望它也可以包容普通的View和ScrollView,经过两天的奋斗,终于搞定了,因为我的目的只是想要下拉刷新,所以功能很少,不过,如果能把下拉刷新搞定了,其它的功能,就可以慢慢堆砌起来了。
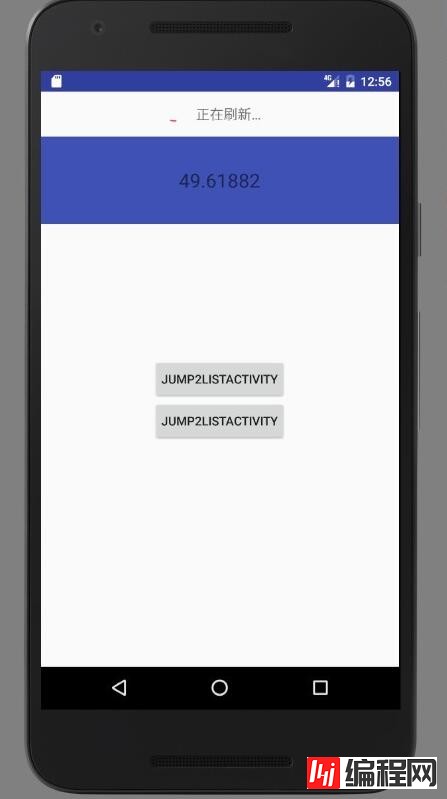
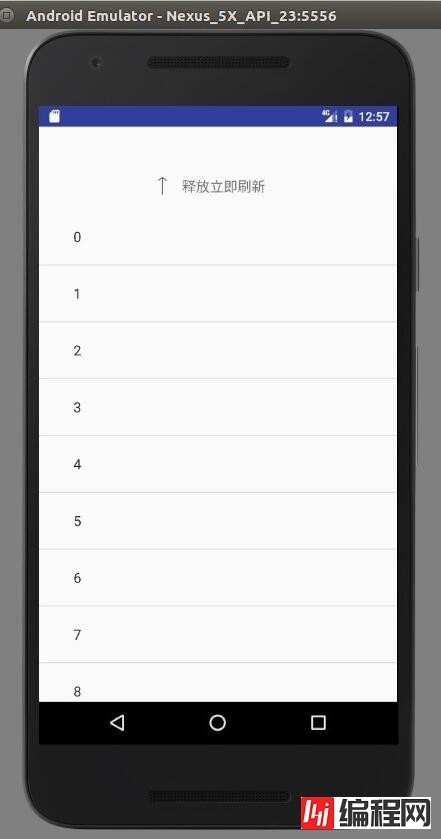
新系统的原因,无法给出合适的gif,只能截图了:
第一张图片展示的是TextView:
第二章图片展示的是ListView:

第三章图片展示的是ScrollView:
基本上这就是我测试的成功的控件,兼容普通的View是最简单的,复杂一点的就是ListView和ScrollView。
思路:我的思路和大部分博客都是一样的,自定义一个ViewGroup,然后将包含的要拖拽的控件的Touch事件交给 RefreshableView 处理,动态改变 headView 的 marginTop 的值,以上。当然,这其中会有一些细节要注意,比如 onTouch 方法的返回值的处理,还有子 View 的 MarginTop 值的处理。
先是headView的布局文件:
<?xml version="1.0" encoding="utf-8"?>
<LinearLayout xmlns:Android="Http://schemas.android.com/apk/res/android"
 android:layout_width="match_parent"
 android:layout_height="wrap_content"
 android:gravity="center"
 android:orientation="horizontal">
 <ImageView
 android:id="@+id/imageView_down"
 android:layout_width="14dp"
 android:layout_height="24dp"
 android:padding="2dp"
 android:src="@drawable/svg_down" />
 <ProgressBar
 android:visibility="gone"
 android:id="@+id/progressBar"
 style="?android:attr/progressBarStyle"
 android:layout_width="20dp"
 android:layout_height="20dp"
 android:progressDrawable="@drawable/progressBar" />
 <TextView
 android:padding="15dp"
 android:id="@+id/textView"
 android:layout_width="wrap_content"
 android:layout_height="wrap_content"
 android:text="@string/pull_to_refresh"
 android:textSize="16sp" />
</LinearLayout>
接下来就是至关重要的类 RefreshableView:
package com.pull2refresh;
import android.animation.ObjectAnimator;
import android.animation.ValueAnimator;
import android.annotation.Targetapi;
import android.content.Context;
import android.os.Build;
import android.util.AttributeSet;
import android.util.Log;
import android.view.LayoutInflater;
import android.view.MotionEvent;
import android.view.View;
import android.view.ViewConfiguration;
import android.view.ViewGroup;
import android.view.animation.RotateAnimation;
import android.widget.ImageView;
import android.widget.LinearLayout;
import android.widget.ProgressBar;
import android.widget.TextView;
import shike.xianrou.com.pull2refresh.R;

public class RefreshableView extends LinearLayout implements View.OnTouchListener {
 private static final String TAG = "RefreshableView";
 private static final int REFRESHING = 0;//正在刷新
 private static final int ORIGINAL = REFRESHING + 1;//初始状态
 private static final int RELEASE_TO_REFRESHING = ORIGINAL + 1;//释放即将刷新的状态
 private int current_status = ORIGINAL;//当前最新状态
 private LinearLayout headView;//刷新layout
 private TextView textView;//刷新layout中的文字提示
 private ImageView imageView;//刷新layout中的箭头
 private ProgressBar progressBar;//刷新layout中的进度条
 private View view;//手指控制的下拉的View
 private int hideHeight;//刷新layout要隐藏的高度
 private boolean isablePull;//是否可以下拉,例如当 current_status = REFRESHIING 时是不可以下拉拖拽的
 private float yDown;//手指按下的坐标
 private int touchSlop = ViewConfiguration.get(getContext()).getScaledTouchSlop();//界限值,防止手指误触,过于灵敏
 private boolean firstLayout = true;//第一次调用onLayout的时候置为false
 private int maxMarginTop;//刷新Layout能拉下的最大距离
 private MarginLayoutParams marginLayoutParams;//刷新layout的MarginLayoutParams
 private String pull_to_refresh = "下拉可以刷新";
 private String release_to_refresh = "释放立即刷新";
 private String refreshing = "正在刷新…";
 private int original_margin = 0;//针对下拉的View存在MarginTop这中特殊值的处理
 public interface PullToRefreshListener {
 void onRefresh();
 }
 private PullToRefreshListener pullToRefreshListener;
 public void addPullToRefreshListener(PullToRefreshListener pullToRefreshListener) {
 this.pullToRefreshListener = pullToRefreshListener;
 }
 public RefreshableView(Context context) {
 super(context);
 init();
 }
 public RefreshableView(Context context, AttributeSet attrs) {
 super(context, attrs);
 init();
 }
 public RefreshableView(Context context, AttributeSet attrs, int defStyleAttr) {
 super(context, attrs, defStyleAttr);
 init();
 }
 @TargetApi(Build.VERSION_CODES.LOLLIPOP)
 public RefreshableView(Context context, AttributeSet attrs, int defStyleAttr, int defStyleRes) {
 super(context, attrs, defStyleAttr, defStyleRes);
 init();
 }
 private void init() {
 headView = (LinearLayout) LayoutInflater.from(getContext()).inflate(R.layout.refresh_layout, null, true);
 imageView = (ImageView) headView.findViewById(R.id.imageView_down);
 progressBar = (ProgressBar) headView.findViewById(R.id.progressBar);
 textView = (TextView) headView.findViewById(R.id.textView);
 progressBar.setVisibility(View.GONE);
 setOrientation(VERTICAL);
 addView(headView, 0);
 }
 @Override
 protected void onLayout(boolean changed, int l, int t, int r, int b) {
 super.onLayout(changed, l, t, r, b);
 Log.d(TAG, "onlayout");
 if (changed && firstLayout) {
  //将View的Touch时间的处理交给RefreshableView去处理
  view = getChildAt(1);
  view.setOnTouchListener(this);
  //刷新layout的 marginTop 的最大值设为刷新头的高度
  maxMarginTop = headView.getHeight();
  //要将控件完全隐藏起来,那么隐藏的高度就设置为控件的高度
  hideHeight = -headView.getHeight();
  marginLayoutParams = (MarginLayoutParams) headView.getLayoutParams();
  marginLayoutParams.topMargin = hideHeight;
  headView.setLayoutParams(marginLayoutParams);
  //这里必须将firstLayout设置为false,否则在处理Touch是件的过程中,headView在怎么调用setLayoutParams都会被置为初始的隐藏状态
  firstLayout = false;
  //如果子View是一个ViewGroup 那么就需要计算出子View的MarginTop的值,因为如果MarginTop不为0,那么子View的Y轴坐标和父View的坐标是不一样的
  if (view instanceof ViewGroup) {
  int[] childLocations = new int[2];
  int[] viewLocations = new int[2];
  view.getLocationOnScreen(viewLocations);
  ((ViewGroup) view).getChildAt(0).getLocationOnScreen(childLocations);
  original_margin = childLocations[1] - viewLocations[1];
  Log.d(TAG, "onLayout viewLocations[1] " + viewLocations[1]);
  Log.d(TAG, "onLayout locations[1] " + childLocations[1]);
  Log.d(TAG, "onLayout original_margin " + original_margin);
  }
 }
 }
 @Override
 public boolean onTouch(View view, MotionEvent motionEvent) {
 if (pullToRefreshListener != null) {
  isAblePull();
  if (isablePull) {
  switch (motionEvent.getAction()) {
   case MotionEvent.ACTION_DOWN:
   yDown = motionEvent.getRawY();
   break;
   case MotionEvent.ACTION_MOVE:
   float yMove = motionEvent.getRawY();
   float distance = yMove - yDown;
   //如果手势是向上的,并且手势在Y轴的移动距离小于界限值,那么就不处理
   if (distance < 0 || Math.abs(distance) < touchSlop)
    return false;
   //MarginTop的距离是手势距离的1/2,形成费力延迟的效果
   marginLayoutParams.topMargin = (int) (distance / 2 + hideHeight);
   Log.d(TAG, "topMargin " + marginLayoutParams.topMargin);
   //如果大于最大的MarginTop的值的时候,就将值置为 maxMarginTop
   if (marginLayoutParams.topMargin >= maxMarginTop)
    marginLayoutParams.topMargin = maxMarginTop;
   if (marginLayoutParams.topMargin >= 0) {
    //当刷新头完全显示的时候,改变状态,置为 释放刷新的状态
    if (current_status != RELEASE_TO_REFRESHING) {
    rotate(0, 180);
    textView.setText(release_to_refresh);
    }
    current_status = RELEASE_TO_REFRESHING;
   } else {
    //否则就置为初始状态
    if (current_status != ORIGINAL) {
    rotate(180, 360);
    textView.setText(pull_to_refresh);
    }
    current_status = ORIGINAL;
   }
   headView.setLayoutParams(marginLayoutParams);
   break;
   case MotionEvent.ACTION_CANCEL:
   case MotionEvent.ACTION_UP:
   float yUp = motionEvent.getRawY();
   float dis = yUp - yDown;
   if (dis > 0 && Math.abs(dis) > touchSlop)
    switch (current_status) {
    //释放刷新
    case RELEASE_TO_REFRESHING:
     animateMarginTop(marginLayoutParams.topMargin, 0);
     imageView.clearAnimation();
     imageView.setVisibility(View.GONE);
     progressBar.setVisibility(View.VISIBLE);
     textView.setText(refreshing);
     pullToRefreshListener.onRefresh();
     break;
    //初始化
    case ORIGINAL:
     reset();
     //从当前的MarginTop的值,转变到隐藏所需的 MarginTop
     animateMarginTop(marginLayoutParams.topMargin, hideHeight);
     break;
    }
   else
    return false;
   break;
  }
  return true;
  }
 }
 return false;
 }

 public boolean isAblePull() {
 //统一判断,其实主要是对于view是普通View的判断
 if (current_status != REFRESHING)
  isablePull = true;
 else
  isablePull = false;
 if (view instanceof ViewGroup) {
  isablePull = false;
  View childView = ((ViewGroup) view).getChildAt(0);
  int[] viewLocations = new int[2];
  int[] childViewLocations = new int[2];
  view.getLocationOnScreen(viewLocations);
  childView.getLocationOnScreen(childViewLocations);
  //这一步中的 original_margin 至关重要,就是用来兼容 子View 有MarginTop属性的值,当childView 的Y轴坐标 和 计算出了 Margin 值后的父View坐标相等时,说明此时处于可下拉的状态
  if (viewLocations[1] + original_margin == childViewLocations[1])
  isablePull = true;
  else
  isablePull = false;
 }
 return isablePull;
 }
 private void rotate(int from, int to) {
 RotateAnimation rotateAnimation = new RotateAnimation(from, to, imageView.getWidth() / 2, imageView.getHeight() / 2);
 rotateAnimation.setDuration(100);
 rotateAnimation.setFillAfter(true);
 imageView.startAnimation(rotateAnimation);
 }
 private void animateMarginTop(int from, int to) {
 ObjectAnimator objectAnimator = ObjectAnimator.ofInt(headView, "cjh", from, to);
 objectAnimator.setDuration(300);
 objectAnimator.addUpdateListener(new ValueAnimator.AnimatorUpdateListener() {
  @Override
  public void onAnimationUpdate(ValueAnimator valueAnimator) {
  int margin = (int) valueAnimator.getAnimatedValue();
  marginLayoutParams.topMargin = margin;
  headView.setLayoutParams(marginLayoutParams);
  }
 });
 objectAnimator.start();
 }
 public void complete() {
 animateMarginTop(0, hideHeight);
 reset();
 }
 private void reset() {
 rotate(180, 360);
 textView.setText(pull_to_refresh);
 imageView.setVisibility(View.VISIBLE);
 progressBar.setVisibility(View.GONE);
 }
}
使用:
 <com.pull2refresh.RefreshableView
 android:id="@+id/refreshableView"
 android:layout_width="match_parent"
 android:layout_height="wrap_content"
 android:gravity="center">
 <com.pull2refresh.MTextView
  android:id="@+id/mTextView"
  android:layout_width="match_parent"
  android:layout_height="100dp"
  android:background="@color/colorPrimary"
  android:gravity="center"
  android:text="Hello World!"
  android:textSize="22sp" />
 </com.pull2refresh.RefreshableView>
...
 refreshableView.addPullToRefreshListener(new RefreshableView.PullToRefreshListener() {
  @Override
  public void onRefresh() {
  setData();
  }
 });
...
 private void setData() {
 ObjectAnimator objectAnimator = ObjectAnimator.ofFloat(textView, "text", 1f, 100f);
 objectAnimator.setDuration(3000);
 objectAnimator.addUpdateListener(new ValueAnimator.AnimatorUpdateListener() {
  @Override
  public void onAnimationUpdate(ValueAnimator valueAnimator) {
  textView.setText((Float) valueAnimator.getAnimatedValue());
  }
 });
 objectAnimator.addListener(new Animator.AnimatorListener() {
  @Override
  public void onAnimationStart(Animator animator) {
  }
  @Override
  public void onAnimationEnd(Animator animator) {
  refreshableView.complete();
  }
  @Override
  public void onAnimationCancel(Animator animator) {
  }
  @Override
  public void onAnimationRepeat(Animator animator) {
  }
 });
 objectAnimator.start();
 }
在我自定义的 RefreshableView 中,如果不设置下拉的监听,就没有下拉的效果,也就是不支持下拉
源码下载:Android下拉刷新控件
您可能感兴趣的文章:Android控件RefreshableView实现下拉刷新Android官方下拉刷新控件SwipeRefreshLayout使用详解Android UI设计系列之自定义ListView仿QQ空间阻尼下拉刷新和渐变菜单栏效果(8)Android自定义下拉刷新上拉加载Android RecyclerView实现下拉刷新和上拉加载Android下拉刷新上拉加载控件(适用于所有View)Android PullToRefreshLayout下拉刷新控件的终结者Android仿微信滑动弹出编辑、删除菜单效果、增加下拉刷新功能android开发教程之实现listview下拉刷新和上拉刷新效果Android下拉刷新完全解析,教你如何一分钟实现下拉刷新功能(附源码)
--结束END--
本文标题: Android自定义下拉刷新控件RefreshableView
本文链接: https://www.lsjlt.com/news/23311.html(转载时请注明来源链接)
有问题或投稿请发送至: 邮箱/279061341@qq.com QQ/279061341
下载Word文档到电脑,方便收藏和打印~
2024-01-21
2023-10-28
2023-10-28
2023-10-27
2023-10-27
2023-10-27
2023-10-27
回答
回答
回答
回答
回答
回答
回答
回答
回答
回答


官方手机版

微信公众号

商务合作


0