先看看效果图: 中间的圆形头像和光环波形讲解请看://www.jb51.net/article/96508.htm 周围的气泡布局,因为布局RatioLayout是继承自V
先看看效果图:

中间的圆形头像和光环波形讲解请看://www.jb51.net/article/96508.htm
周围的气泡布局,因为布局RatioLayout是继承自ViewGroup,所以布局layout就可以根据自己的需求来布局其子view,view.layout(int l,int t,int r,int b);用于布局子view在父ViewGroup中的位置(相对于父容器),所以在RatioLayout中计算所有子view的left,top,right,bottom。那么头像的周围的气泡view是如何计算它的left,top,right,bottom的呢,这些气泡view是坐落在头像外围的圆环上,只要知道这个圆环的半径,然后再根据气泡的个数,计算每个气泡之间的角度,半径加角度就可以计算每个气泡坐落的位置。
 private void calculateRatioFrame(List<BubbleView> textViews){
 if(textViews.size() == 0) return;
 mRatioFrameList.clear();
 double angle = 0;//记录每个气泡的角度,正上方的为0°
 double grad = Math.PI * 2 / textViews.size();//梯度,每个TextView之间的角度 (Math.PI 是数学中的90°)
 double rightAngle = Math.PI / 2;//一圈为360°,一共四个方向,每个方向90°,我们按照小于等于90°来计算,然后再放到相应的方向上
 //cx,cy是容器的中心点,也是圆形头像的中心点,计算气泡的位置就是已cx,cy为基准来计算的
 int cx = mWidth / 2;//容器中心x坐标
 int cy = mHeight / 2;//容器中心y坐标
 int radius = mMinSize / 2 / 2 / 2 + mMinSize / 2 / 2 ;//动态气泡的组成圆的半径
 int left = 0;
 int top = 0;
 int right = 0;
 int bottom = 0;
 int a = 0,b = 0;//a是基于cx的偏移量,b是基于cy的偏移量,
 //int r = mMinSize / 6 / 2;//气泡半径
 for (int i = 0; i < textViews.size(); i++) {
 int r = textViews.get(i).getMeasuredWidth() / 2;//计算得来//固定死的mMinSize / 6 / 2;//气泡半径
 if(angle >= 0 && angle < rightAngle){ //0 - 90度是计算偏移量
 //保持角度在 0 - 90
 a = (int)(radius * Math.sin(Math.abs(angle % rightAngle)));
 b = (int)(radius * Math.cos(Math.abs(angle % rightAngle)));
 left = cx + a - r;//cx + a为气泡的中心点,要想得到left,还需减去半径r
 top = cy - b - r;
 right = left + 2 * r;
 bottom = top + 2 * r;
 }else if(angle >= rightAngle && angle < rightAngle * 2){ // 90 - 180
 a = (int)(radius * Math.sin(Math.abs(angle % rightAngle)));
 b = (int)(radius * Math.cos(Math.abs(angle % rightAngle)));
 left = cx + b - r;
 top = cy + a - r;
 right = left + 2 * r;
 bottom = top + 2 * r;
 }else if(angle >= rightAngle * 2 && angle < rightAngle * 3){ // 180 - 270
 a = (int)(radius * Math.sin(Math.abs(angle % rightAngle)));
 b = (int)(radius * Math.cos(Math.abs(angle % rightAngle)));
 left = cx - a - r;
 top = cy + b - r;
 right = left + 2 * r;
 bottom = top + 2 * r;
 }else if(angle >= rightAngle * 3 && angle < rightAngle * 4){ //270 - 360
 a = (int)(radius * Math.sin(Math.abs(angle % rightAngle)));
 b = (int)(radius * Math.cos(Math.abs(angle % rightAngle)));
 left = cx - b - r;
 top = cy - a - r;
 right = left + 2 * r;
 bottom = top + 2 * r;
 }
 //将计算好的left, top, right,bottom,angle保存起来
 mRatioFrameList.add(new RatioFrame(left, top, right,bottom,angle));
 //角度再加一个梯度值
 angle += grad;
 }
 }
计算好气泡的布局left, top, right,bottom,下面就开始布局这起气泡,布局中的代码就简单的多了
@Override
 protected void onLayout(boolean changed, int l, int t, int r, int b) {
 if(mImageView == null) return;
 int width = mImageView.getMeasuredWidth();//计算圆形头像的宽
 int height = mImageView.getMeasuredHeight();//计算圆形头像的高
 //计算圆形头像的left, top, right,bottom
 int left = mWidth / 2 - width / 2;
 int top = mHeight / 2 - height / 2;
 int right = mWidth / 2 + width / 2;
 int bottom = mHeight / 2 + height / 2;
 //开始布局
 mImageView.layout(left,top,right,bottom);
 //布局爱心动画
 for (int i = 0; i < mLoveXinList.size(); i++) {
 ImageView imageView = mLoveXinList.get(i);
 left = mWidth / 2 + width / 4 - imageView.getMeasuredWidth() / 2;
 bottom = mHeight / 2 + height / 3;
 top = bottom - imageView.getMeasuredHeight();
 right = left + imageView.getMeasuredWidth();
 imageView.layout(left,top,right,bottom);
 }
 //布局所有气泡
 for (int i = 0; i < mTextViews.size(); i++) {
 TextView textView = mTextViews.get(i);
 //RatioFrame ratioFrame = mRatioFrameList.get(i);//无动画时使用
 //有动画的时候,执行期间left, top, right,bottom都在变
 if(mCurrentRatioFrameList != null){
 //ValueAnimator执行动画是所产生的所有气泡left, top, right,bottom
 RatioFrame ratioFrame = mCurrentRatioFrameList.get(i);
 textView.layout(ratioFrame.mLeft,ratioFrame.mTop,ratioFrame.mRight,ratioFrame.mBottom);
 }
 }
 }
好了,静态的气泡排版到这里就好了,下面的问题是,展开时如何使气泡从中心点,以弧形的路径展开,并且气泡的大小也是由小到大变化。这里就用到的动画类ValueAnimator和ScaleAnimation,详解请参考://www.jb51.net/article/96509.htm
向外展开的效果我们可以使用view.layout()不断的重新布局气泡view,让其产生一个平移的效果,下面的一个问题就是如何计算平移轨道上面的left, top, right,bottom,然后重新请求布局就可以了,那么下面就解决如何计算这个轨迹,分析
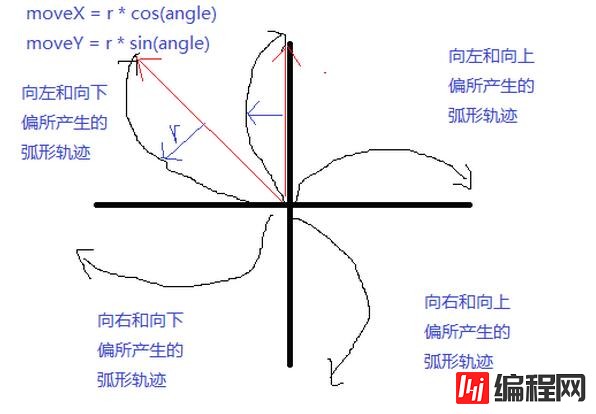
弧形轨迹计算,其实就是在直线轨迹的基础上加上偏移量(moveX和moveY),就形成了弧形轨迹,直线轨迹很好计算,关键的就是这个偏移量,因为在首位的偏移量小,而在中间的偏移量大,且在不同的方向上,moveX和moveY的值的正负也不一样。偏移的距离因为是由小到大再由大到小,所以我们用二次函数( -2 * Math.pow(fraction,2) + 2 * fraction)来计算距离,用此二次函数得到的值乘以一个设定的最大值,这个最大值的就会是由小到大再由大到小的变化,然后再用不同的角度来计算它的正负
if(endRatioFrame.mAngle >0 && endRatioFrame.mAngle <= rightAngle){//(0 < angle <= 90)上移,左移
 moveX = (int)(temp * Math.abs(Math.cos(endRatioFrame.mAngle)));//上移就应该在原本的轨迹上减去moveX
 moveY = (int)(temp * Math.abs(Math.sin(endRatioFrame.mAngle)));
 }else if(endRatioFrame.mAngle > rightAngle && endRatioFrame.mAngle <= rightAngle * 2){//(90 < angle <= 180)右移,上移
 moveX = (int)(-temp * Math.abs(Math.cos(endRatioFrame.mAngle)));
 moveY = (int)(temp * Math.abs(Math.sin(endRatioFrame.mAngle)));
 }else if(endRatioFrame.mAngle > rightAngle * 2 && endRatioFrame.mAngle <= rightAngle * 3){//(180 < angle <= 2700)下移,右移
 moveX = (int)(-temp * Math.abs(Math.cos(endRatioFrame.mAngle)));
 moveY = (int)(-temp * Math.abs(Math.sin(endRatioFrame.mAngle)));
 }else if(endRatioFrame.mAngle > rightAngle * 3 && endRatioFrame.mAngle <= rightAngle * 4 || endRatioFrame.mAngle == 0){//(270 < angle <= 360 或者 angle == 0) 左移,下移
 moveX = (int)(temp * Math.abs(Math.cos(endRatioFrame.mAngle)));
 moveY = (int)(-temp * Math.abs(Math.sin(endRatioFrame.mAngle)));
 }
根据三角函数的变化值,上面的代码可以简化为
moveX = (int)(temp * Math.cos(endRatioFrame.mAngle));
moveY = (int)(temp * Math.sin(endRatioFrame.mAngle));
通过上面的计算公式逻辑,就可以得到气泡展开时的类型估算器的实现类,退出气泡就将逻辑反一下就可以了
package com.cj.dynamicavatarview.ratio;
import Android.animation.TypeEvaluator;
import android.content.Context;
import android.util.TypedValue;
import java.util.ArrayList;
import java.util.List;

public class EnterRatioFrameEvaluator implements TypeEvaluator {
 public static final int OFFSET_DISTANCE = 80;
 private Context mContext;
 private int mOffsetDistance;
 public EnterRatioFrameEvaluator(Context context){
 this.mContext = context;
 mOffsetDistance = (int)TypedValue.applyDimension(TypedValue.COMPLEX_UNIT_DIP,OFFSET_DISTANCE,mContext.getResources().getDisplayMetrics());
 }
 @Override
 public Object evaluate(float fraction, Object startValue, Object endValue) {
 List<RatioFrame> startRatioFrameList = (List<RatioFrame>) startValue;//开始值
 List<RatioFrame> endRatioFrameList = (List<RatioFrame>) endValue;//结束值
 List<RatioFrame> ratioFrameList = new ArrayList<>();//产生的新值
 for (int i = 0; i < endRatioFrameList.size(); i++) {
 RatioFrame endRatioFrame = endRatioFrameList.get(i);
 RatioFrame startRatioFrame = startRatioFrameList.get(i);
 //计算left,top,right,bottom
 double t = ( -2 * Math.pow(fraction,2) + 2 * fraction);//倾斜变化率
 int temp = (int)((mOffsetDistance) * t);
 double rightAngle = Math.PI / 2;
 int moveX = 0,moveY = 0;
 //让气泡上、下、左、右平移,形成弧度的平移路线
 moveX = (int)(temp * Math.cos(endRatioFrame.mAngle));
 moveY = (int)(temp * Math.sin(endRatioFrame.mAngle));
 //重新得到left ,top,right,bottom
 int left = (int)(startRatioFrame.mLeft + ((endRatioFrame.mLeft - startRatioFrame.mLeft) * fraction) - moveX);
 int top = (int)(startRatioFrame.mTop + ((endRatioFrame.mTop - startRatioFrame.mTop) * fraction) - moveY) ;
 int right = (int)(startRatioFrame.mRight + ((endRatioFrame.mRight - startRatioFrame.mRight) * fraction) - moveX);
 int bottom = (int)(startRatioFrame.mBottom + ((endRatioFrame.mBottom - startRatioFrame.mBottom) * fraction) - moveY) ;
 ratioFrameList.add(new RatioFrame(left,top,right,bottom));
 }
 return ratioFrameList;
 }
}
下面就可以用ValueAnimator来实现弧形平移轨迹了
ValueAnimator mAnimatorEnetr = ValueAnimator.ofObject(new EnterRatioFrameEvaluator(getContext()), getRatioFrameCenterList(mRatioFrameCenter,mRatioFrameList),mRatioFrameList);
 mAnimatorEnetr.addUpdateListener(new ValueAnimator.AnimatorUpdateListener() {
 @Override
 public void onAnimationUpdate(ValueAnimator animation) {
 //获取新的布局值
 mCurrentRatioFrameList = (List<RatioFrame>) animation.getAnimatedValue();
 //请求重新布局
 requestLayout();
 }
 });
 mAnimatorEnetr.setDuration(OPEN_BUBBLE_TIME);
 mAnimatorEnetr.start();
好了,从中心点向外展开的弧形动画到这就实现了,然后再加上缩放的动画就可以了,缩放的动画使用View动画就可以实现。
 private void scaleSmallToLarge(List<BubbleView> textViews){
 // 以view中心为缩放点,由初始状态缩小到看不间
 ScaleAnimation animation = new ScaleAnimation(
 0.0f, 1.0f,//一点点变小知道看不见为止
 0.0f, 1.0f,
 Animation.RELATIVE_TO_SELF, 0.5f, Animation.RELATIVE_TO_SELF, 0.5f//中间缩放
 );
 animation.setDuration(OPEN_BUBBLE_TIME);//要和平移的时间一致
 for (int i = 0; i < textViews.size(); i++) {
 //再执行动画
 textViews.get(i).startAnimation(animation);
 }
 }
下面解决的就是展开后,气泡开始浮动,点击气泡后停止浮动,滑动手指的之后气泡跟着手指移动,松开手指后气泡返回到原来的位置,返回时的动画效果和气泡展开的动画效果非常的类似,气泡跟着手指移动也很好实现,只需要将气泡view设置onTouch事件,再onTouch中计算滑动的距离,然后重新view.layout()就可以了,所以这里我们解决浮动问题就可以了。浮动是不规则的,并且浮动的距离和速度也是不一样的,我用View动画实现的效果不是很好,然后就改用了属性动画来实现。只需要将view平移x轴和y轴,让其平移的距离和时间都不同,看上去就像无规则的移动,让其反复的做这样的平移就可以实现浮动的效果。
 private AnimatorSet setAnimFloat(View view ){
 List<Animator> animators = new ArrayList<>();
 //getRandomDp()得到一个随机的值
 ObjectAnimator translationXAnim = ObjectAnimator.ofFloat(view, "translationX", 0f,getRandomDp(),getRandomDp() , 0);
 translationXAnim.setDuration(getRandomTime());
 translationXAnim.setRepeatCount(ValueAnimator.INFINITE);//无限循环
 translationXAnim.setRepeatMode(ValueAnimator.INFINITE);//
 translationXAnim.setInterpolator(new LinearInterpolator());
 translationXAnim.start();
 animators.add(translationXAnim);
 //
 ObjectAnimator translationYAnim = ObjectAnimator.ofFloat(view, "translationY", 0f,getRandomDp(),getRandomDp() , 0);
 translationYAnim.setDuration(getRandomTime());
 translationYAnim.setRepeatCount(ValueAnimator.INFINITE);
 translationYAnim.setRepeatMode(ValueAnimator.INFINITE);
 translationXAnim.setInterpolator(new LinearInterpolator());
 translationYAnim.start();
 animators.add(translationYAnim);
 AnimatorSet animatorSet = new AnimatorSet();
 animatorSet.playTogether(animators);
 //animatorSet.setStartDelay(delay);
 animatorSet.start();
 return animatorSet;
 }
按住停止浮动,松开的时候先归位,然后再次的浮动,如果animator.end()方法,归位后开始浮动的时候会出现闪动的现象,因为属性动画,虽然可以改变view的位置,但是不会改变view的left,top,right,bottom,所以重新开始浮动的时候会出现闪烁的现象,因为x = mLeft + translationX,当重新开始的时候,属性动画是重新创建的,translationX是从0开始的,因此会出现闪烁的现象。
final AnimatorSet animatorSet = mAnimatorSetList.get(position);
 for (Animator animator : animatorSet.getChildAnimations()) {
 //执行到动画最后,恢复到初始位置,不然重新开始浮动的时候,会有一个闪烁的bug
 if(animator.isRunning()) {
 animator.end();//执行到动画最后
 animator.cancel();//取消动画
 }
 }
到这里流程已经差不多了,但是当气泡移动到圆形头像的里面的时候松开,气泡应当有一个缩放的效果后归位,然后应有一个接口回调,告诉调用者,我到中间了松开了,你可以做一些相应的处理。现在我们看一下如何计算气泡已经移动到头像里了,其实通过圆形头像中心点和气泡的中心点构成一个直接三角形,然后通过勾股定理,计算直角边的长度和圆形头像的半径做比较,如果小于圆形头像的半径,就说明已经到头像里面了。
 private boolean isInPictureCenter(int position,View view,RatioFrame current,RatioFrame endRatioFrame){
 RatioPoint centerPoint = new RatioPoint(mWidth/2,mHeight/2);
 RatioPoint currentPoint = new RatioPoint(current.mLeft + ((current.mRight - current.mLeft) / 2),current.mTop + ((current.mBottom - current.mTop) / 2));
 int x = Math.abs(centerPoint.x - currentPoint.x);
 int y = Math.abs(centerPoint.y - currentPoint.y);
 //通过勾股定理计算两点之间的距离
 int edge = (int)Math.sqrt(Math.pow(x,2) + Math.pow(y,2));
 int pictureRadius = mImageView.getPictureRadius();
 //然后和内部图片的半斤比较,小于pictureRadius,就说明在内部
 if(pictureRadius > edge){//进入到内部
 if(mInnerCenterListener != null){
 mInnerCenterListener.innerCenter(position,((TextView)view).getText().toString());
 }
 //说明到中心了,执行气泡缩放
 reveseScaleView(position ,view,current,endRatioFrame);
 return true;
 }
 return false;
 }
气泡执行缩放
 public void reveseScaleView(final int position , final View view, final RatioFrame current, final Object endRatioFrame) {
 // 以view中心为缩放点,由初始状态缩小到看不间
 ScaleAnimation animation = new ScaleAnimation(
 1.0f, 0.0f,//一点点变小知道看不见为止
 1.0f, 0.0f,
 Animation.RELATIVE_TO_SELF, 0.5f, Animation.RELATIVE_TO_SELF, 0.5f//中间缩放
 );
 animation.setDuration(BUBBLE_ENTER_CENTER_SCALE_TIME);
 animation.setRepeatMode(Animation.REVERSE);
 animation.setRepeatCount(1);
 animation.setAnimationListener(new Animation.AnimationListener() {
 @Override
 public void onAnimationStart(Animation animation) {
 }
 @Override
 public void onAnimationEnd(Animation animation) {
 //执行完缩放后,让气泡归位,归位结束后,执行接口回调
 homingBubbleView(true,position,view, current, endRatioFrame);
 }
 @Override
 public void onAnimationRepeat(Animation animation) {
 }
 });
 view.startAnimation(animation);
 }
气泡进入中心的接口回调定义
public interface InnerCenterListener{
 //进入中心,松开归位后调用
 void innerCenterHominged(int position, String text);
 //进入中心,松开时调用
 void innerCenter(int position, String text);
 }
下面就剩执行加1操作和播放爱心的动画,这两个动画就是执行两个View动画,这里就不贴出来了,到这里高仿QQ个性名片就讲解结束了,如果讲的不好或有问题欢迎留言
源码下载:GitHub
下载2
--结束END--
本文标题: Android仿QQ圆形头像个性名片
本文链接: https://www.lsjlt.com/news/23415.html(转载时请注明来源链接)
有问题或投稿请发送至: 邮箱/279061341@qq.com QQ/279061341
下载Word文档到电脑,方便收藏和打印~
2024-01-21
2023-10-28
2023-10-28
2023-10-27
2023-10-27
2023-10-27
2023-10-27
回答
回答
回答
回答
回答
回答
回答
回答
回答
回答


官方手机版

微信公众号

商务合作


0