实验环境 系统:Centos7.7.1908 Mysql:mysql-8.0.18-el7-x86_64.tar.gz 一键安装脚本如下(可直接复制粘贴为shell脚本,与Mysql安装包放到同一目录;如果没有下载安装包就取消第26
实验环境
系统:Centos7.7.1908
Mysql:mysql-8.0.18-el7-x86_64.tar.gz
一键安装脚本如下(可直接复制粘贴为shell脚本,与Mysql安装包放到同一目录;如果没有下载安装包就取消第26行的注释会自动下载MySQL安装包)
*************************************************************************START************************************************************************
#!/bin/bash
#auto install mysql8.0
#by 网络小虾米 2019-11-19
olddb=`rpm -qa|grep mariadb` &&rpm -e --nodeps $olddb ;
useradd -M -s /sbin/nologin mysql &&
mkdir -p /usr/local/mysql &&
mkdir -p /usr/local/mysql/data &&
mkdir -p /usr/local/mysql/log &&
mkdir -p /usr/local/mysql/log/binlog &&
mkdir -p /usr/local/mysql/log/tmp &&
touch /usr/local/mysql/log/mysqld.log &&
chmod -R 777 /usr/local/mysql/log/ &&
chmod -R 777 /usr/local/mysql/data &&
chown -R mysql:mysql /usr/local/mysql/
if [ $? -eq 0 ];then
echo -e "33[32mMysql environment Great SueeCSSfully!33[0m"
else
echo -e "33[32mMysql environment Great Failed,Please check it.33[0m"
exit
fi
#wget -c https://cdn.mysql.com//Downloads/MySQL-8.0/mysql-8.0.18-el7-x86_64.tar.gz ;
tar -xzvf mysql-8.0.18-el7-x86_64.tar.gz &&
mv mysql-8.0.18-el7-x86_64/* /usr/local/mysql/ ;
cd /usr/local/mysql &&/usr/local/mysql/bin/mysqld --initialize --user=mysql --basedir=/usr/local/mysql/ --datadir=/usr/local/mysql/data/ --log-error=/usr/local/mysql/log/mysqld.log ;
if [ $? -eq 0 ];then
echo -e "33[32mMysql8.0 install complete!33[0m"
else
echo -e "33[32mMysql8.0 install Failed.please check it.33[0m"
exit
fi
touch /etc/my.cnf ;
echo "
[client]
port=3306
default-character-set=utf8
[mysqld]
port=3306
basedir=/usr/local/mysql
datadir=/usr/local/mysql/data
user=mysql
default-storage-engine=INNODB
character-set-server=utf8
bind-address=0.0.0.0
[mysqld_safe]
log-error=/usr/local/mysql/log/mysqld.log" >> /etc/my.cnf ;
chmod 644 /etc/my.cnf &&chown -R mysql:mysql /etc/my.cnf ;
cp /usr/local/mysql/support-files/mysql.server /etc/init.d/mysqld ;
sed -i "46s/basedir=/basedir=/usr/local/mysql/g" /etc/init.d/mysqld &&sed -i "47s/datadir=/datadir=/usr/local/mysql/g" /etc/init.d/mysqld ;
chmod +x /etc/init.d/mysqld &&service mysqld start
if [ $? -eq 0 ];then
echo -e "33[32mMysql 8.0 auto install successfully!33[0m"
else
echo -e "33[32mMysql8.0 auto install Failed,Please check it.33[0m"
exit
fi
echo "export PATH=$PATH:/usr/local/mysql/bin" >>/etc/profile &&source /etc/profile ;
chkconfig --add mysqld &&chkconfig mysqld on
exit
**************************************************************************END*************************************************************************
脚本运行完成后,MySql安装完成并启动,然后修改默认密码
#cat /usr/local/mysql/log/mysqld.log
一般在日志的第二行,找到[Server] A temporary passWord is generated for root@localhost: d5iGg/rg0oGC //冒号后面的是默认密码
#mysql -uroot -p
#Enter password:d5iGg/rg0ogC 根据实际密码进行输入
#alter user "root"@"localhost" identified by "qwe123!@#";
#flush privileges;
设置远程访问
>use mysql;
>select host, user, plugin from user;
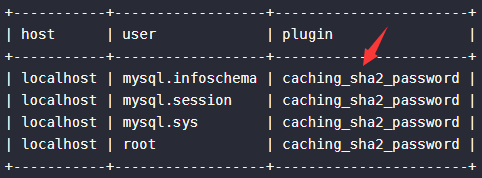
>alter user "root"@"localhost" identified with mysql_native_password by "qwe123!@#";
>update user set host="%" where user="root";
>flush privileges;
>grant all privileges on *.* to "root"@"%" with grant option;
>flush privileges;
>select host, user, authentication_string, plugin from user;

>exit;
排错
### /usr/local/mysql/bin/mysqld safe--defaults-file=/etc/my.cnf --user=mysql###安全模式启动mysql
--结束END--
本文标题: Shell学习成果之一键自动安装Mysql8.0
本文链接: https://www.lsjlt.com/news/2479.html(转载时请注明来源链接)
有问题或投稿请发送至: 邮箱/279061341@qq.com QQ/279061341
下载Word文档到电脑,方便收藏和打印~
2024-04-30
2024-04-30
2024-04-30
2024-04-30
2024-04-30
2024-04-30
2024-04-30
2024-04-30
2024-04-30
2024-04-30
回答
回答
回答
回答
回答
回答
回答
回答
回答
回答


官方手机版

微信公众号

商务合作


0