最近研究了一下Contacts源码,仿照上面自己写了一个TabHostTest程序,现整理如下: main.xml布局文件: <?xml version="
最近研究了一下Contacts源码,仿照上面自己写了一个TabHostTest程序,现整理如下:
main.xml布局文件:
<?xml version="1.0" encoding="utf-8"?>
<TabHost xmlns:Android="Http://schemas.android.com/apk/res/android"
 android:id="@android:id/tabhost"
 android:layout_width="match_parent"
 android:layout_height="match_parent">
 <LinearLayout
  android:orientation="vertical"
  android:layout_width="match_parent"
  android:layout_height="match_parent">
  <TabWidget android:id="@android:id/tabs"
   android:layout_width="match_parent"
   android:layout_height="wrap_content"
  />
  <FrameLayout android:id="@android:id/tabcontent"
   android:layout_width="match_parent"
   android:layout_height="0dip"
   android:layout_weight="1"
  />
 </LinearLayout>
</TabHost>
inner.xml文件:
<?xml version="1.0" encoding="utf-8"?>
<TabHost xmlns:android="http://schemas.android.com/apk/res/android"
 android:id="@android:id/tabhost"
 android:layout_width="match_parent"
 android:layout_height="match_parent">
 <LinearLayout
  android:orientation="vertical"
  android:layout_width="match_parent"
  android:layout_height="match_parent">
  <FrameLayout android:id="@android:id/tabcontent"
   android:layout_width="fill_parent"
   android:layout_height="0dip"
   android:layout_weight="1"
  />
  <TabWidget android:id="@android:id/tabs"
   android:layout_width="fill_parent"
   android:layout_height="wrap_content"
  />
 </LinearLayout>
</TabHost>
Main.java (主Activity类):
package com.android.test;
import android.app.Activity;
import android.app.TabActivity;
import android.content.Intent;
import android.os.Bundle;
import android.provider.CallLog.Calls;
import android.provider.Contacts.Intents.UI;
import android.view.Window;
import android.widget.TabHost;
public class Main extends TabActivity implements TabHost.OnTabChangeListener {
 private static final int TAB_INDEX_DIALER = 0;
 private static final int TAB_INDEX_CALL_LOG = 1;
 private static final int TAB_INDEX_CONTACTS = 2;
 private static final int TAB_INDEX_FAVORITES = 3;
 private TabHost mTabHost;
 @Override
 public void onCreate(Bundle savedInstanceState) {
  super.onCreate(savedInstanceState);
  final Intent intent = getIntent();
  requestWindowFeature(Window.FEATURE_NO_TITLE);
  setContentView(R.layout.main);
  mTabHost = getTabHost();
  mTabHost.setOnTabChangedListener(this);
  // Setup the tabs
  setupDialerTab();
  setupCallLogTab();
  setupContactsTab();
  setupFavoritesTab();
  setCurrentTab(intent);
 }
 public void onTabChanged(String tabId) {
   Activity activity = getLocalActivityManager().getActivity(tabId);
   if (activity != null) {
    activity.onWindowFocusChanged(true);
   }
 }
  private void setupCallLogTab() {
   // Force the class since overriding tab entries doesn't work
   Intent intent = new Intent("com.android.phone.action.RECENT_CALLS");
   intent.setClass(this, Inner.class);
   mTabHost.addTab(mTabHost.newTabSpec("call_log")
     .setIndicator("通话记录",
       getResources().getDrawable(R.drawable.ic_tab_unselected_recent))
     .setContent(intent));
  }
 private void setupDialerTab() {
  Intent intent = new Intent("com.android.phone.action.TOUCH_DIALER");
  intent.setClass(this, Inner.class);
  mTabHost.addTab(mTabHost.newTabSpec("dialer")
    .setIndicator("拨号",
      getResources().getDrawable(R.drawable.ic_tab_unselected_dialer))
    .setContent(intent));
 }
 private void setupContactsTab() {
  Intent intent = new Intent(UI.LIST_DEFAULT);
  intent.setClass(this, Main.class);
  mTabHost.addTab(mTabHost.newTabSpec("contacts")
    .setIndicator("通讯录",
      getResources().getDrawable(R.drawable.ic_tab_unselected_contacts))
    .setContent(intent));
 }
 private void setupFavoritesTab() {
  Intent intent = new Intent(UI.LIST_STREQUENT_ACTION);
  intent.setClass(this, Inner.class);
  mTabHost.addTab(mTabHost.newTabSpec("favorites")
    .setIndicator("收藏",
      getResources().getDrawable(R.drawable.ic_tab_unselected_starred))
    .setContent(intent));
 }

 private void setCurrentTab(Intent intent) {
  // Dismiss menu provided by any children activities
  Activity activity = getLocalActivityManager().
    getActivity(mTabHost.getCurrentTabTag());
  if (activity != null) {
   activity.closeOptionsMenu();
  }
  // Tell the children activities that they should ignore any possible saved
  // state and instead reload their state from the parent's intent
  intent.putExtra("", true);
  // Choose the tab based on the inbound intent
  String componentName = intent.getComponent().getClassName();
  if (getClass().getName().equals(componentName)) {
   if (false) {
    //in a call, show the dialer tab(which allows Going back to the call)
    mTabHost.setCurrentTab(TAB_INDEX_DIALER);
   } else if ((intent.getFlags() & Intent.FLAG_ACTIVITY_LAUNCHED_FROM_HISTORY) != 0) {
    // launched from history (long-press home) --> nothing to change
   } else if (true) {
    // The dialer was explicitly requested
    mTabHost.setCurrentTab(TAB_INDEX_DIALER);
   }
  }
 }
}
Inner.java类:
package com.android.test;
import android.app.TabActivity;
import android.content.Intent;
import android.os.Bundle;
import android.view.Window;
import android.widget.TabHost;
import android.widget.TabWidget;
import android.widget.TextView;
public class Inner extends TabActivity implements TabHost.OnTabChangeListener {
 private static final int TAB_INDEX_ALL = 0;
 private static final int TAB_INDEX_MISSED = 1;
 private static final int TAB_INDEX_OUTGOING = 2;
 private static final int TAB_INDEX_RECEIVED = 3;
 private TabHost mTabHost;
 private TabWidget mTabWidget;
 @Override
 public void onCreate(Bundle savedInstanceState) {
  super.onCreate(savedInstanceState);
  requestWindowFeature(Window.FEATURE_NO_TITLE);
  setContentView(R.layout.inner);
  mTabHost = getTabHost();
  mTabHost.setOnTabChangedListener(this);
  setupTabs();
  mTabWidget = mTabHost.getTabWidget();
  mTabWidget.setStripEnabled(false);
  for (int i = 0; i < mTabWidget.getChildCount(); i++) {
   TextView tv = (TextView) mTabWidget.getChildAt(i).findViewById(
     android.R.id.title);
   tv.setTextColor(this.getResources().getColorStateList(
     android.R.color.white));
   tv.setPadding(0, 0, 0,(int) tv.getTextSize());
   tv.setText("Tab" + i);
   mTabWidget.getChildAt(i).getLayoutParams().height =(int ) (3* tv.getTextSize());
   mTabWidget.getChildAt(i).setBackgroundResource(R.drawable.tab_bg);
  }
 }
 public void onTabChanged(String tabId) {
 }
 private void setupTabs() {
  mTabHost.addTab(mTabHost.newTabSpec("all").setIndicator(
    getString(R.string.inner)).setContent(
    new Intent(this, Other.class)));
  mTabHost.addTab(mTabHost.newTabSpec("Missed").setIndicator(
    getString(R.string.inner)).setContent(
    new Intent(this, Other.class)));
  mTabHost.addTab(mTabHost.newTabSpec("Outgoing").setIndicator(
    getString(R.string.inner)).setContent(
    new Intent(this, Other.class)));
  mTabHost.addTab(mTabHost.newTabSpec("Received").setIndicator(
    getString(R.string.inner)).setContent(
    new Intent(this, Other.class)));
 }
}
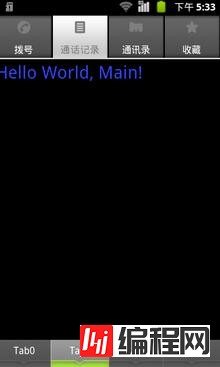
效果图如下:
--结束END--
本文标题: Android TabHost组件使用方法详解
本文链接: https://www.lsjlt.com/news/24958.html(转载时请注明来源链接)
有问题或投稿请发送至: 邮箱/279061341@qq.com QQ/279061341
下载Word文档到电脑,方便收藏和打印~
2024-01-21
2023-10-28
2023-10-28
2023-10-27
2023-10-27
2023-10-27
2023-10-27
回答
回答
回答
回答
回答
回答
回答
回答
回答
回答


官方手机版

微信公众号

商务合作


0