在Android应用开发中会经常碰到一个叫divider的东西,就是两个View之间的分割线。最近工作中注意到这个divider并分析了一下,竟然发现内有乾坤,惊为天人… Li
在Android应用开发中会经常碰到一个叫divider的东西,就是两个View之间的分割线。最近工作中注意到这个divider并分析了一下,竟然发现内有乾坤,惊为天人…
ListView的divider
1. 定制divider的边距
ListView的divider默认是左右两头到底的,如何简单的设置一个边距呢?
利用inset或者layer-list都可以简单的实现,代码如下:
<!-- 方法一 -->
<?xml version="1.0" encoding="utf-8"?>
<inset xmlns:android="Http://schemas.android.com/apk/res/android"
android:insetLeft="16dp" >
<shape android:shape="rectangle" >
<solid android:color="#f00" />
</shape>
</inset>
<!-- 方法二 -->
<?xml version="1.0" encoding="utf-8"?>
<layer-list xmlns:android="http://schemas.android.com/apk/res/android">
<item android:left="16dp">
<shape android:shape="rectangle">
<solid android:color="#f00" />
</shape>
</item>
</layer-list>
其中inset除了左边距insetLeft, 还有insetTop、insetRight、insetBottom, 效果图:

2. 最后一项的divider
很多同学可能发现了,ListView最后一项的divider有时候有,有时候又没有。
我画个图大家就都能理解了:
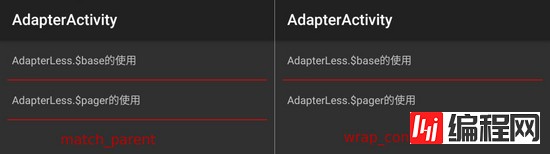
上面是数据不足的显示效果,如果数据满屏的话,都是看不多最后的divider的。
真相是,当ListView高度是不算最后一项divider的,所以只有在match_parent的情况下,ListView的高度是有余的,才能画出最后的那个divider。
ps:网上很多资料,把最后一项的divider和footerDividersEnabled混在一起了,这个是不对的,两个从逻辑上是独立的,类似的还有一个headerDividersEnabled,headerDividersEnabled和footerDividersEnabled不会影响到默认情况下最后的divider的绘制,他们是给header和footer专用的,特此说明。
RecyclerView的Divider
RecyclerView的Divider叫做ItemDecoration,RecyclerView.ItemDecoration本身是一个抽象类,官方没有提供默认实现。
官方的Support7Demos例子中有个DividerItemDecoration, 我们可以直接参考一下,位置在sdk的这里:
extras/android/support/samples/Support7Demos/src/…/…/decorator/DividerItemDecoration.java
但是这个DividerItemDecoration有三个问题:
只支持系统默认样式,不支持自定义Drawable类型的divider
里面的算法对于无高宽的Drawable(比如上面用到的InsetDrawable)是画不出东西的水平列表的Divider绘制方法drawHorizontal()的right计算有误,导致垂直Divider会绘制不出来,应该改为:final int right = left + mDivider.getIntrinsicWidth();;
针对这几个问题,我修复并增强了一下:
import android.content.Context;
import android.content.res.TypedArray;
import android.graphics.canvas;
import android.graphics.Rect;
import android.graphics.drawable.Drawable;
import android.support.v4.view.ViewCompat;
import android.support.v7.widget.LinearLayoutManager;
import android.support.v7.widget.RecyclerView;
import android.view.View;

public class DividerItemDecoration extends RecyclerView.ItemDecoration {
private static final int[] ATTRS = new int[]{
android.R.attr.listDivider
};
public static final int HORIZONTAL_LIST = LinearLayoutManager.HORIZONTAL;
public static final int VERTICAL_LIST = LinearLayoutManager.VERTICAL;
private Drawable mDivider;
private int mWidth;
private int mHeight;
private int mOrientation;
public DividerItemDecoration(Context context, int orientation) {
final TypedArray a = context.obtainStyledAttributes(ATTRS);
mDivider = a.getDrawable(0);
a.recycle();
setOrientation(orientation);
}

public DividerItemDecoration(Context context, int orientation, Drawable dividerDrawable) {
mDivider = dividerDrawable;
setOrientation(orientation);
}
public void setOrientation(int orientation) {
if (orientation != HORIZONTAL_LIST && orientation != VERTICAL_LIST) {
throw new IllegalArgumentException("invalid orientation");
}
mOrientation = orientation;
}

public void setWidth(int width) {
this.mWidth = width;
}

public void setHeight(int height) {
this.mHeight = height;
}
@Override
public void onDraw(Canvas c, RecyclerView parent) {
if (mOrientation == VERTICAL_LIST) {
drawVertical(c, parent);
} else {
drawHorizontal(c, parent);
}
}
public void drawVertical(Canvas c, RecyclerView parent) {
final int left = parent.getPaddingLeft();
final int right = parent.getWidth() - parent.getPaddingRight();
final int childCount = parent.getChildCount();
for (int i = 0; i < childCount; i++) {
final View child = parent.getChildAt(i);
final RecyclerView.LayoutParams params = (RecyclerView.LayoutParams) child
.getLayoutParams();
final int top = child.getBottom() + params.bottomMargin +
Math.round(ViewCompat.getTranslationY(child));
final int bottom = top + getDividerHeight();
mDivider.setBounds(left, top, right, bottom);
mDivider.draw(c);
}
}
public void drawHorizontal(Canvas c, RecyclerView parent) {
final int top = parent.getPaddingTop();
final int bottom = parent.getHeight() - parent.getPaddingBottom();
final int childCount = parent.getChildCount();
for (int i = 0; i < childCount; i++) {
final View child = parent.getChildAt(i);
final RecyclerView.LayoutParams params = (RecyclerView.LayoutParams) child
.getLayoutParams();
final int left = child.getRight() + params.rightMargin +
Math.round(ViewCompat.getTranslationX(child));
final int right = left + getDividerWidth();
mDivider.setBounds(left, top, right, bottom);
mDivider.draw(c);
}
}
@Override
public void getItemOffsets(Rect outRect, int itemPosition, RecyclerView parent) {
if (mOrientation == VERTICAL_LIST) {
outRect.set(0, 0, 0, getDividerHeight());
} else {
outRect.set(0, 0, getDividerWidth(), 0);
}
}
private int getDividerWidth() {
return mWidth > 0 ? mWidth : mDivider.getIntrinsicWidth();
}
private int getDividerHeight() {
return mHeight > 0 ? mHeight : mDivider.getIntrinsicHeight();
}
}
使用如下:
// 默认系统的divider
dividerItemDecoration = new DividerItemDecoration(this, DividerItemDecoration.VERTICAL_LIST);
// 自定义图片drawable分的divider
dividerItemDecoration = new DividerItemDecoration(this, DividerItemDecoration.VERTICAL_LIST, getResources().getDrawable(R.drawable.ic_launcher));
// 自定义无高宽的drawable的divider - 垂直列表
dividerItemDecoration = new DividerItemDecoration(this, DividerItemDecoration.VERTICAL_LIST, new ColorDrawable(Color.parseColor("#ff00ff")));
dividerItemDecoration.setHeight(1);
// 自定义无高宽的drawable的divider - 水平列表
dividerItemDecoration = new DividerItemDecoration(this, DividerItemDecoration.HORIZONTAL_LIST, new ColorDrawable(Color.parseColor("#ff00ff")));
dividerItemDecoration.setWidth(1);
// 自定义带边距且无高宽的drawable的divider(以上面InsetDrawable为例子)
// 这个地方也可以在drawable的xml文件设置size指定宽高,效果一样
dividerItemDecoration = new DividerItemDecoration(this, DividerItemDecoration.HORIZONTAL_LIST, getResources().getDrawable(R.drawable.list_divider));
dividerItemDecoration.setWidth(DisplayLess.$dp2px(16) + 1);
手动的Divider
有的时候没有系统控件的原生支持,只能手动在两个view加一个divider,比如,设置界面每项之间的divider,水平平均分隔的几个view之间加一个竖的divider等等。
无论横的竖的,都非常简单,定一个View,设置一个background就可以了,正常情况下没什么好说的。
下面我们来考虑一种常见设置界面,这种设置界面的分割线是有左边距的,比如微信的设置界面,我相信绝大部分人的布局代码都是这样实现的:
<RelativeLayout xmlns:android="http://schemas.android.com/apk/res/android"
android:layout_width="match_parent"
android:layout_height="match_parent">
<!--这个group_container的background一定要设置,
而且要和list_item_bg的list_item_nORMal一致,
否则效果会不正确。 -->
<LinearLayout
android:id="@+id/group_container"
android:layout_width="wrap_content"
android:layout_height="wrap_content"
android:layout_alignParentTop="true"
android:layout_marginTop="48dp"
android:background="#fff"
android:orientation="vertical">
<RelativeLayout
android:id="@+id/account_container"
android:layout_width="match_parent"
android:layout_height="wrap_content"
android:background="@drawable/list_item_bg"
android:clickable="true">
<TextView
android:id="@+id/account_title"
android:layout_width="wrap_content"
android:layout_height="wrap_content"
android:layout_alignParentLeft="true"
android:layout_centerVertical="true"
android:layout_margin="16dp"
android:text="First Item"
android:textColor="#f00"
android:textSize="16sp" />
</RelativeLayout>
<View
android:layout_width="match_parent"
android:layout_height="1px"
android:layout_marginLeft="16dp"
android:background="#f00" />
<RelativeLayout
android:id="@+id/phone_container"
android:layout_width="match_parent"
android:layout_height="wrap_content"
android:background="@drawable/list_item_bg"
android:clickable="true">
<TextView
android:id="@+id/phone_title"
android:layout_width="wrap_content"
android:layout_height="wrap_content"
android:layout_alignParentLeft="true"
android:layout_centerVertical="true"
android:layout_margin="16dp"
android:text="Second Item"
android:textColor="#f00"
android:textSize="16sp" />
</RelativeLayout>
</LinearLayout>
</RelativeLayout>
效果图如下,顺便我们也看看它的Overdraw状态:
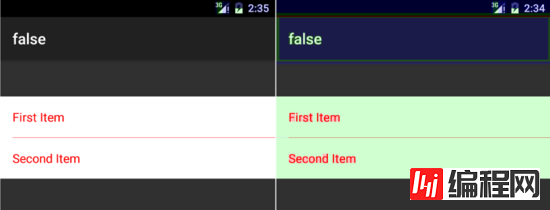
通过分析Overdraw的层次,我们发现为了一个小小的边距,设置了整个groud_container的背景,从而导致了一次Overdraw。
能不能优化掉这个Overdraw?答案是肯定的。
背景肯定要去掉,但是这个左边距的View就不能这么简单的写了,需要自定义一个View,它要支持能把左边距的空出的16dp的线用list_item_normal的颜色值绘制一遍,这样才能看的出左边距。
这个View具体代码如下:
import android.content.Context;
import android.content.res.TypedArray;
import android.graphics.Canvas;
import android.graphics.Color;
import android.graphics.Paint;
import android.util.AttributeSet;
import android.util.TypedValue;
import android.view.View;
import com.jayfeng.lesscode.core.R;
public class SpaceDividerView extends View {
private int mSpaceLeft = 0;
private int mSpaceTop = 0;
private int mSpaceRight = 0;
private int mSpaceBottom = 0;
private int mSpaceColor = Color.TRANSPARENT;
private Paint mPaint = new Paint();
public SpaceDividerView(Context context) {
this(context, null);
}
public SpaceDividerView(Context context, AttributeSet attrs) {
this(context, attrs, 0);
}
public SpaceDividerView(Context context, AttributeSet attrs, int defStyleAttr) {
super(context, attrs, defStyleAttr);
TypedArray a = context.obtainStyledAttributes(attrs, R.styleable.SpaceDividerView, defStyleAttr, 0);
mSpaceLeft = a.getDimensionPixelSize(R.styleable.SpaceDividerView_spaceLeft,
(int) TypedValue.applyDimension(TypedValue.COMPLEX_UNIT_DIP, 0, getResources().getDisplayMetrics()));
mSpaceTop = a.getDimensionPixelSize(R.styleable.SpaceDividerView_spaceTop,
(int) TypedValue.applyDimension(TypedValue.COMPLEX_UNIT_DIP, 0, getResources().getDisplayMetrics()));
mSpaceRight = a.getDimensionPixelSize(R.styleable.SpaceDividerView_spaceRight,
(int) TypedValue.applyDimension(TypedValue.COMPLEX_UNIT_DIP, 0, getResources().getDisplayMetrics()));
mSpaceBottom = a.getDimensionPixelSize(R.styleable.SpaceDividerView_spaceBottom,
(int) TypedValue.applyDimension(TypedValue.COMPLEX_UNIT_DIP, 0, getResources().getDisplayMetrics()));
mSpaceColor = a.getColor(R.styleable.SpaceDividerView_spaceColor, Color.TRANSPARENT);
a.recycle();
mPaint.setColor(mSpaceColor);
}
@Override
protected void onDraw(Canvas canvas) {
super.onDraw(canvas);
if (mSpaceLeft > 0) {
canvas.drawRect(0, 0, mSpaceLeft, getMeasuredHeight(), mPaint);
}
if (mSpaceTop > 0) {
canvas.drawRect(0, 0, getMeasuredWidth(), mSpaceTop, mPaint);
}
if (mSpaceRight > 0) {
canvas.drawRect(getMeasuredWidth() - mSpaceRight, 0, getMeasuredWidth(), getMeasuredHeight(), mPaint);
}
if (mSpaceBottom > 0) {
canvas.drawRect(0, getMeasuredHeight() - mSpaceBottom, getMeasuredWidth(), getMeasuredHeight(), mPaint);
}
}
}
用这个SpaceDividerView我们重写一下上面的布局代码:
<RelativeLayout xmlns:android="http://schemas.android.com/apk/res/android"
android:layout_width="match_parent"
android:layout_height="match_parent"
xmlns:app="http://schemas.android.com/apk/res-auto">
<LinearLayout
android:id="@+id/group_container"
android:layout_width="wrap_content"
android:layout_height="wrap_content"
android:layout_alignParentTop="true"
android:layout_marginTop="48dp"
android:orientation="vertical">
<RelativeLayout
android:id="@+id/account_container"
android:layout_width="match_parent"
android:layout_height="wrap_content"
android:background="@drawable/list_item_bg"
android:clickable="true">
<TextView
android:id="@+id/account_title"
android:layout_width="wrap_content"
android:layout_height="wrap_content"
android:layout_alignParentLeft="true"
android:layout_centerVertical="true"
android:layout_margin="16dp"
android:text="First Item"
android:textColor="#f00"
android:textSize="16sp" />
</RelativeLayout>
<com.jayfeng.lesscode.core.other.SpaceDividerView
android:layout_width="match_parent"
android:layout_height="1px"
android:background="#f00"
app:spaceLeft="16dp"
app:spaceColor="@color/list_item_normal"/>
<RelativeLayout
android:id="@+id/phone_container"
android:layout_width="match_parent"
android:layout_height="wrap_content"
android:background="@drawable/list_item_bg"
android:clickable="true">
<TextView
android:id="@+id/phone_title"
android:layout_width="wrap_content"
android:layout_height="wrap_content"
android:layout_alignParentLeft="true"
android:layout_centerVertical="true"
android:layout_margin="16dp"
android:text="Second Item"
android:textColor="#f00"
android:textSize="16sp" />
</RelativeLayout>
</LinearLayout>
</RelativeLayout>
效果图和Overdraw状态如下:

界面中group_container那块由之前的绿色变成了蓝色,说明减少了一次Overdraw。
上述情况下,SpaceDividerView解耦了背景色,优化了Overdraw,而且这个SpaceDividerView也是支持4个方向的,使用起来特别方便。
阴影divider
阴影分割线的特点是重叠在下面的view之上的,它的目的是一种分割线的立体效果。

使用RelativeLayout并控制上边距离可以实现:
<RelativeLayout xmlns:android="http://schemas.android.com/apk/res/android"
android:layout_width="match_parent"
android:layout_height="match_parent">
<!-- layout_marginTop的值应该就是不包括阴影高度的header高度-->
<LinearLayout
android:layout_width="match_parent"
android:layout_height="match_parent"
android:layout_alignParentTop="true"
android:layout_marginTop="@dimen/header_height"
android:orientation="vertical">
</LinearLayout>
<!-- 这个要放在最后,才能显示在最上层,这个header里面包括一个阴影View-->
<include
android:id="@+id/header"
layout="@layout/include_header" />
</RelativeLayout>
虽然再简单不过了,还是稍微分析一下,header包括内容48dp和阴影8dp,那么marginTop就是48dp了。
下面给大家介绍Android给ListView设置分割线Divider样式
给ListView设置分割线,只需设置如下两个属性:
android:divider="#000" //设置分割线显示颜色
android:dividerHeight="1px" //此处非0,否则无效
<ListView android:id="@+id/listView"
 android:layout_width="fill_parent"
 android:layout_height="fill_parent"
 android:divider="#FFF"
 android:dividerHeight="1px"
 android:layout_margin="10dip"/>
以上内容给大家简单介绍了Android中的Divider,希望对大家有所帮助!
您可能感兴趣的文章:Android编程实现Listview点击展开和隐藏的方法Android使用ListView批量删除item的方法去掉ListView底部的ListDivider的方法
--结束END--
本文标题: 谈谈Android中的Divider是个什么东东
本文链接: https://www.lsjlt.com/news/25531.html(转载时请注明来源链接)
有问题或投稿请发送至: 邮箱/279061341@qq.com QQ/279061341
下载Word文档到电脑,方便收藏和打印~
2024-01-21
2023-10-28
2023-10-28
2023-10-27
2023-10-27
2023-10-27
2023-10-27
回答
回答
回答
回答
回答
回答
回答
回答
回答
回答


官方手机版

微信公众号

商务合作


0