本文将向大家展示如何拍照截图。 先看看效果图: 拍照截图有点儿特殊,要知道,现在的Android智能手机的摄像头都是几百万的像素,拍出来的图片都是非常大的。因此,我们不能像对
本文将向大家展示如何拍照截图。
先看看效果图:
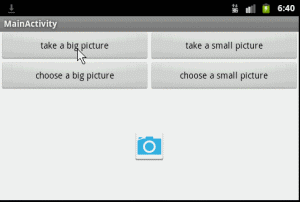
拍照截图有点儿特殊,要知道,现在的Android智能手机的摄像头都是几百万的像素,拍出来的图片都是非常大的。因此,我们不能像对待相册截图一样使用Bitmap小图,无论大图小图都统一使用Uri进行操作。
一、首先准备好需要使用到的Uri:
private
static
final
String IMAGE_FILE_LOCATioN = "file:///sdcard/temp.jpg";//temp
 file
Uri
 imageUri = Uri.parse(IMAGE_FILE_LOCATION);//The
 Uri to store the big bitmap
二、使用MediaStore.ACTION_IMAGE_CAPTURE可以轻松调用Camera程序进行拍照:
Intent
 intent = new
Intent(MediaStore.ACTION_IMAGE_CAPTURE);//action
 is capture
intent.putExtra(MediaStore.EXTRA_OUTPUT,
 imageUri);
startActivityForResult(intent,
 TAKE_BIG_PICTURE);//or
 TAKE_SMALL_PICTURE
三、接下来就可以在 onActivityResult中拿到返回的数据(Uri),并将Uri传递给截图的程序。
switch
(requestCode) {
case
TAKE_BIG_PICTURE:
  Log.d(TAG,
"TAKE_BIG_PICTURE:
 data = "
+ data);//it
 seems to be null
  //TODO
 sent to crop
  cropImageUri(imageUri,
800,
400,
 CROP_BIG_PICTURE);
  break;
case
TAKE_SMALL_PICTURE:
  Log.i(TAG,
"TAKE_SMALL_PICTURE:
 data = "
+ data);
  //TODO
 sent to crop
  cropImageUri(imageUri,
300,
150,
 CROP_SMALL_PICTURE);
  break;
default:
  break;
}
可以看到,无论是拍大图片还是小图片,都是使用的Uri,只是尺寸不同而已。我们将这个操作封装在一个方法里面
private
void
cropImageUri(Uri uri, int
outputX, int
outputY, int
requestCode){
  Intent
 intent = new
Intent("com.android.camera.action.CROP");
  intent.setDataAndType(uri,
"image/*");
  intent.putExtra("crop",
"true");
  intent.putExtra("aspectX",
2);
  intent.putExtra("aspectY",
1);
  intent.putExtra("outputX",
 outputX);
  intent.putExtra("outputY",
 outputY);
  intent.putExtra("scale",
true);
  intent.putExtra(MediaStore.EXTRA_OUTPUT,
 uri);
  intent.putExtra("return-data",
false);
  intent.putExtra("outputFORMat",
 Bitmap.CompressFormat.JPEG.toString());
  intent.putExtra("noFaceDetection",
true);
//
 no face detection
  startActivityForResult(intent,
 requestCode);
}
四、最后一步,我们已经将数据传入裁剪图片程序,接下来要做的就是处理返回的数据了:
switch
(requestCode) {
case
CROP_BIG_PICTURE://from
 crop_big_picture
  Log.d(TAG,
"CROP_BIG_PICTURE:
 data = "
+ data);//it
 seems to be null
  if(imageUri
 != null){
    Bitmap
 bitmap = decodeUriAsBitmap(imageUri);
    imageView.setImageBitmap(bitmap);
  }
  break;
case
CROP_SMALL_PICTURE:
  if(imageUri
 != null){
    Bitmap
 bitmap = decodeUriAsBitmap(imageUri);
    imageView.setImageBitmap(bitmap);
  }else{
    Log.e(TAG,
"CROP_SMALL_PICTURE:
 data = "
+ data);
  }
  break;
default:
  break;
}
以上就是Android实现拍照截图功能的方法,希望对大家的学习有所帮助。
您可能感兴趣的文章:Android实现全屏截图或长截屏功能Android给scrollView截图超过屏幕大小形成长图Android 后台生成长图并分享示例(非长截图)Android中如何获取视频文件的截图、缩略图详解有关Android截图与录屏功能的学习Android实现截图和分享功能的代码Android截屏截图的几种方法总结Android实现长图文截图功能实例代码
--结束END--
本文标题: Android实现拍照截图功能
本文链接: https://www.lsjlt.com/news/25844.html(转载时请注明来源链接)
有问题或投稿请发送至: 邮箱/279061341@qq.com QQ/279061341
下载Word文档到电脑,方便收藏和打印~
2024-01-21
2023-10-28
2023-10-28
2023-10-27
2023-10-27
2023-10-27
2023-10-27
回答
回答
回答
回答
回答
回答
回答
回答
回答
回答


官方手机版

微信公众号

商务合作


0