在消息通知的时候,我们经常用到两个控件Notification和Toast。特别是重要的和需要长时间显示的信息,用
在消息通知的时候,我们经常用到两个控件Notification和Toast。特别是重要的和需要长时间显示的信息,用Notification最合适不过了。他可以在顶部显示一个图标以标示有了新的通知,当我们拉下通知栏的时候,可以看到详细的通知内容。
最典型的应用就是未看短信和未接来电的显示,还有QQ微信,我们一看就知道有一个未接来电或者未看短信,收到QQ离线信息。同样,我们也可以自定义一个Notification来定义我们自己的程序想要传达的信息。
Notification我把他分为两种,一种是默认的显示方式,另一种是自定义的,今天为大家讲述默认的显示方式:
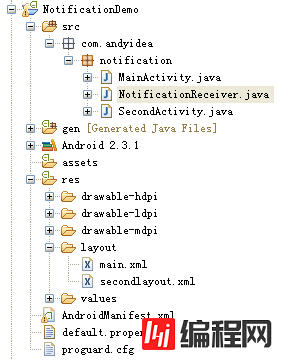
1、程序框架结构图如下
<?xml version="1.0" encoding="utf-8"?>
<LinearLayout xmlns:Android="Http://schemas.android.com/apk/res/android"
 android:orientation="vertical"
 android:layout_width="fill_parent"
 android:layout_height="fill_parent"
 >
<TextView
 android:layout_width="fill_parent"
 android:layout_height="wrap_content"
 android:gravity="center"
 android:textColor="#EEE"
 android:textStyle="bold"
 android:textSize="25sp"
 android:text="NotificationDemo实例" />
<Button
 android:id="@+id/btnSend"
 android:text="send notification"
 android:layout_width="wrap_content"
 android:layout_height="wrap_content"
 android:layout_gravity="center"/>
</LinearLayout>
3、MainActivity.java源码如下:
package com.andyidea.notification;
import android.app.Activity;
import android.content.Intent;
import android.os.Bundle;
import android.view.View;
import android.widget.Button;
public class MainActivity extends Activity {
 private Button btnSend;
 //定义BroadcastReceiver的action
 private static final String NotificationDemo_Action = "com.andyidea.notification.NotificationDemo_Action";

 @Override
 public void onCreate(Bundle savedInstanceState) {
  super.onCreate(savedInstanceState);
  setContentView(R.layout.main);
  btnSend = (Button)findViewById(R.id.btnSend);
  btnSend.setOnClickListener(new View.OnClickListener() {
   @Override
   public void onClick(View v) {
    Intent intent = new Intent();
    intent.setAction(NotificationDemo_Action);
    sendBroadcast(intent);
   }
  });
 }
}
4、布局文件 secondlayou.xml 源码如下:
<?xml version="1.0" encoding="utf-8"?>
<LinearLayout
 xmlns:android="http://schemas.android.com/apk/res/android"
 android:orientation="vertical"
 android:layout_width="fill_parent"
 android:layout_height="fill_parent">
 <TextView
 android:layout_width="fill_parent"
 android:layout_height="wrap_content"
 android:gravity="center"
 android:textColor="#EEE"
 android:textStyle="bold"
 android:textSize="25sp"
 android:text="显示通知界面" />
<Button
 android:id="@+id/btnCancel"
 android:text="cancel notification"
 android:layout_width="wrap_content"
 android:layout_height="wrap_content"
 android:layout_gravity="center" />
</LinearLayout>
5、SecondActivity.java源码如下:
package com.andyidea.notification;
import android.app.Activity;
import android.app.Notification;
import android.app.NotificationManager;
import android.app.PendingIntent;
import android.content.Intent;
import android.os.Bundle;
import android.view.View;
import android.widget.Button;
public class SecondActivity extends Activity {
 private Button btnCancel;
 //声明Notification
 private Notification notification;
 //声明NotificationManager
 private NotificationManager mNotification;
 //标识Notification的ID
 private static final int ID = 1;
 @Override
 protected void onCreate(Bundle savedInstanceState) {
  super.onCreate(savedInstanceState);
  setContentView(R.layout.secondlayout);
  btnCancel = (Button)findViewById(R.id.btnCancel);
  //怎样获得NotificationManager的实例?
  String service = NOTIFICATION_SERVICE;
  mNotification = (NotificationManager)getSystemService(service);
  //获得Notification的实例
  notification = new Notification();
  //设置该图标 会在状态栏显示
  int icon = notification.icon = android.R.drawable.stat_sys_phone_call;
  //设置提示信息
  String tickerText = "Test Notification";
  //设置显示时间
  long when = System.currentTimeMillis();
  notification.icon = icon;
  notification.tickerText = tickerText;
  notification.when = when;
  Intent intent = new Intent(this, MainActivity.class);
  PendingIntent pi = PendingIntent.getActivity(this, 0, intent, 0);
  notification.setLatestEventInfo(this, "消息", "SMS Android", pi);
  mNotification.notify(ID, notification);
  btnCancel.setOnClickListener(new View.OnClickListener() {
   @Override
   public void onClick(View v) {
    mNotification.cancel(ID); //--->取消通知
   }
  });
 }
}
6、NotificationReceiver.java源码如下:
package com.andyidea.notification;
import com.andyidea.notification.SecondActivity;
import android.content.BroadcastReceiver;
import android.content.Context;
import android.content.Intent;
public class NotificationReceiver extends BroadcastReceiver {
 @Override
 public void onReceive(Context context, Intent intent) {
  //实例化Intent
  Intent i = new Intent();
  //在新任务中启动Activity
  i.setFlags(Intent.FLAG_ACTIVITY_NEW_TASK);
  //设置Intent启动的组件名称
  i.setClass(context, SecondActivity.class);
  //启动Activity,显示通知
  context.startActivity(i);
 }
}
7、程序运行效果如下:
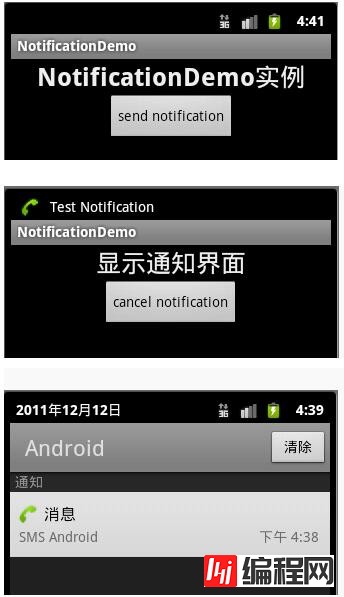
以上就是针对Android中Notification使用方法进行的详细介绍,希望对大家的学习有所启发,帮助大家更好地学习Android软件编程。
您可能感兴趣的文章:android notification 的总结分析Android界面 NotificationManager使用Bitmap做图标Android中通知Notification使用实例(振动、灯光、声音)Android中通过Notification&NotificationManager实现消息通知android中创建通知栏Notification代码实例Android编程实现拦截短信并屏蔽系统Notification的方法Android开发 -- 状态栏通知Notification、NotificationManager详解Android中关于Notification及NotificationManger的详解详解Android中Notification通知提醒Android中Notification 提示对话框Android中Notification用法实例总结android 通知Notification详解及实例代码
--结束END--
本文标题: 详解Android中Notification的使用方法
本文链接: https://www.lsjlt.com/news/26113.html(转载时请注明来源链接)
有问题或投稿请发送至: 邮箱/279061341@qq.com QQ/279061341
下载Word文档到电脑,方便收藏和打印~
2024-01-21
2023-10-28
2023-10-28
2023-10-27
2023-10-27
2023-10-27
2023-10-27
回答
回答
回答
回答
回答
回答
回答
回答
回答
回答


官方手机版

微信公众号

商务合作


0