这篇文章主要介绍一下如何实现View的
3D旋转效果,实现的主要原理就是围绕Y轴旋转,同时在Z轴方面上有一个深入的缩放。
演示的demo主要有以下几个重点: 1,自定义旋转动画
2,动画做完后,重置ImageView
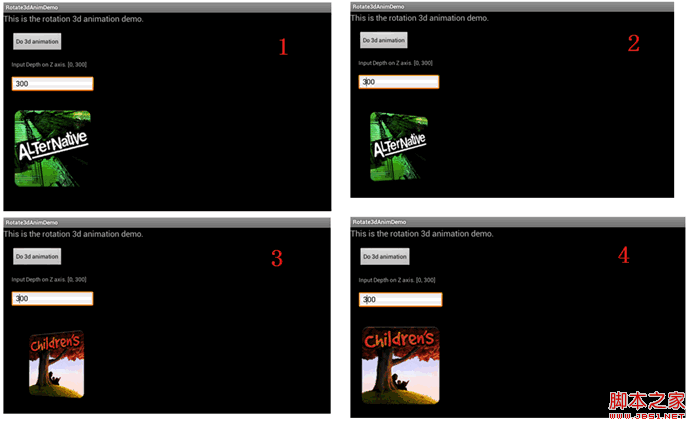
先看一下程序的运行效果:
1,自定义动画类
这里实现了一个Rotate3dAnimat
ion的类,它扩展了Animation类,重写applyTransf
ORMation()方法,提供指定时间的矩阵变换,我们在这个方法里,就可以利用Camera类得得到一个围绕Y轴旋转的matrix,把这个matrix设置到Transformation对象中。 具体的实现代码如下:
代码如下:
@Override
protected void applyTransformation(float interpolatedTime, Transformation t)
{
final float fromDegrees = mFromDegrees;
float degrees = fromDegrees + ((mToDegrees - fromDegrees) * interpolatedTime);
final float centerX = mCenterX;
final float centerY = mCenterY;
final Camera camera = mCamera;
final Matrix matrix = t.getMatrix();
camera.save();
if (mReverse) {
camera.translate(0.0f, 0.0f, mDepthZ * interpolatedTime);
} else {
camera.translate(0.0f, 0.0f, mDepthZ * (1.0f - interpolatedTime));
}
camera.rotateY(degrees);
camera.getMatrix(matrix);
camera.restore();
matrix.preTranslate(-centerX, -centerY);
matrix.postTranslate(centerX, centerY);
}
2,如何使用这个动画类
在Activity中,我们有两个大小一样的ImageView,它们都放在FrameLayout中,这样他们位置是重叠的,对最上面的ImageView做动画(旋转角度从0到90),当动画做完后,再对后面的ImageView做动画(旋转角度从90到180),在这里,要控制相应的ImageView隐藏或显示。
动画的listener实现如下:
代码如下:
private final class DisplayNextView implements Animation.AnimationListener {
public void onAnimationStart(Animation animation) {
}
public void onAnimationEnd(Animation animation) {
mCont
ainer.post(new SwapViews());
}
public void onAnimationRepeat(Animation animation) {
}
}
动画做完后,执行的代码如下:
代码如下:
private final class SwapViews implements Runnable
{
@Override
public void run()
{
mImageView1.setVisibility(View.
GoNE);
mImageView2.setVisibility(View.GONE);
mIndex++;
if (0 == mIndex % 2)
{
mStartAnimView = mImageView1;
}
else
{
mStartAnimView = mImageView2;
}
mStartAnimView.setVisibility(View.VISIBLE);
mStartAnimView.requestFocus();
Rotate3dAnimation rotation = new Rotate3dAnimation(
-90,
0,
mCenterX,
mCenterY, mDepthZ, false);
rotation.setDuration(mDuration);
rotation.setFillAfter(true);
rotation.setInterpolator(new DecelerateInterpolator());
mStartAnimView.startAnimation(rotation);
}
}
点击Button的事件处理实现:
代码如下:
@Override
public void onClick(View v)
{
mCenterX = mContainer.getWidth() / 2;
mCenterY = mContainer.getHeight() / 2;
getDepthZ();
applyRotation(mStartAnimView, 0, 90);
}
applyRotation的实现如下:
代码如下:
private void applyRotation(View animView, float startAngle, float toAngle)
{
float centerX = mCenterX;
float centerY = mCenterY;
Rotate3dAnimation rotation = new Rotate3dAnimation(
startAngle, toAngle, centerX, centerY, mDepthZ, true);
rotation.setDuration(mDuration);
rotation.setFillAfter(true);
rotation.setInterpolator(new AccelerateInterpolator());
rotation.setAnimationListener(new DisplayNextView());
animView.startAnimation(rotation);
}
3,完整代码如下
Rotate3dAni
Mactivity.java
代码如下:
public class Rotate3dAnimActivity extends
Activity
{
ImageView mImageView1 = null;
ImageView mImageView2 = null;
ImageView mStartAnimView = null;
View mContainer = null;
int mDuration = 500;
float mCenterX = 0.0f;
float mCenterY = 0.0f;
float mDepthZ = 0.0f;
int mIndex = 0;
@Override
public void onCreate(Bundle savedInstanceState)
{
super.onCreate(savedInstanceState);
setContentView(R.layout.rotate_anim);
mImageView1 = (ImageView) findViewById(R.id.imageView1);
mImageView2 = (ImageView) findViewById(R.id.imageView2);
mContainer = findViewById(R.id.container);
mStartAnimView = mImageView1;
findViewById(R.id.button1).setOnClickListener(new View.OnClickListener()
{
@Override
public void onClick(View v)
{
mCenterX = mContainer.getWidth() / 2;
mCenterY = mContainer.getHeight() / 2;
getDepthZ();
applyRotation(mStartAnimView, 0, 90);
}
});
InputMethodManager imm = (InputMethodManager)getSystemService(INPUT_METHOD_SERVICE);
imm.hideSoftInputFromWindow(getWindow().getDecorView().getWindowToken(), InputMethodManager.HIDE_NOT_ALWAYS);
}
private void getDepthZ()
{
EditText editText = (EditText) findViewById(R.id.edit_depthz);
String string = editText.getText().toString();
try
{
mDepthZ = (float)Integer.parseInt(string);
//mDepthZ = Math.min(mDepthZ, 300.0f);
}
catch (Exception e)
{
e.printStackTrace();
}
}
private void applyRotation(View animView, float startAngle, float toAngle)
{
float centerX = mCenterX;
float centerY = mCenterY;
Rotate3dAnimation rotation = new Rotate3dAnimation(
startAngle, toAngle, centerX, centerY, mDepthZ, true);
rotation.setDuration(mDuration);
rotation.setFillAfter(true);
rotation.setInterpolator(new AccelerateInterpolator());
rotation.setAnimationListener(new DisplayNextView());
animView.startAnimation(rotation);
}
private final class DisplayNextView implements Animation.AnimationListener {
public void onAnimationStart(Animation animation) {
}
public void onAnimationEnd(Animation animation) {
mContainer.post(new SwapViews());
}
public void onAnimationRepeat(Animation animation) {
}
}
private final class SwapViews implements Runnable
{
@Override
public void run()
{
mImageView1.setVisibility(View.GONE);
mImageView2.setVisibility(View.GONE);
mIndex++;
if (0 == mIndex % 2)
{
mStartAnimView = mImageView1;
}
else
{
mStartAnimView = mImageView2;
}
mStartAnimView.setVisibility(View.VISIBLE);
mStartAnimView.requestFocus();
Rotate3dAnimation rotation = new Rotate3dAnimation(
-90,
0,
mCenterX,
mCenterY, mDepthZ, false);
rotation.setDuration(mDuration);
rotation.setFillAfter(true);
rotation.setInterpolator(new DecelerateInterpolator());
mStartAnimView.startAnimation(rotation);
}
}
}
rotate_anim.xml
代码如下:
<?xml version="1.0" en
coding="utf-8"?>
<LinearLayout xmlns:
Android="
Http://schemas.android.com/apk/res/android"
android:layout_width="fill_parent"
android:layout_height="fill_parent"
android:orientation="vertical" >
<Button
android:id="@+id/button1"
android:layout_width="wrap_content"
android:layout_height="wrap_content"
android:layout_margin="20dp"
android:text="Do 3d animation" />
<TextView
android:layout_width="wrap_content"
android:layout_height="wrap_content"
android:layout_marginLeft="20px"
android:text="Input Depth on Z axis. [0, 300]"
/>
<EditText
android:id="@+id/edit_depthz"
android:layout_width="200dp"
android:layout_height="wrap_content"
android:layout_margin="20dp"
android:text="0"/>
<FrameLayout
android:id="@+id/container"
android:layout_width="wrap_content"
android:layout_height="wrap_content">
<ImageView
android:id="@+id/imageView1"
android:layout_width="200dp"
android:layout_height="200dp"
android:layout_margin="20dp"
android:src="@drawable/f" />
<ImageView
android:id="@+id/imageView2"
android:layout_width="200dp"
android:layout_height="200dp"
android:layout_margin="20dp"
android:src="@drawable/s"
android:visibility="gone"/>
</FrameLayout>
</LinearLayout>
Rotate3dAnimation.java
代码如下:
package com.nj1s.lib.anim;
import android.graphics.Camera;
import android.graphics.Matrix;
import android.view.animation.Animation;
import android.view.animation.Transformation;
public class Rotate3dAnimation extends Animation {
private final float mFromDegrees;
private final float mToDegrees;
private final float mCenterX;
private final float mCenterY;
private final float mDepthZ;
private final boolean mReverse;
private Camera mCamera;
public Rotate3dAnimation(float fromDegrees, float toDegrees,
float centerX, float centerY, float depthZ, boolean reverse) {
mFromDegrees = fromDegrees;
mToDegrees = toDegrees;
mCenterX = centerX;
mCenterY = centerY;
mDepthZ = depthZ;
mReverse = reverse;
}
@Override
public void initialize(int width, int height, int parentWidth, int parentHeight) {
super.initialize(width, height, parentWidth, parentHeight);
mCamera = new Camera();
}
@Override
protected void applyTransformation(float interpolatedTime, Transformation t) {
final float fromDegrees = mFromDegrees;
float degrees = fromDegrees + ((mToDegrees - fromDegrees) * interpolatedTime);
final float centerX = mCenterX;
final float centerY = mCenterY;
final Camera camera = mCamera;
final Matrix matrix = t.getMatrix();
camera.save();
if (mReverse) {
camera.translate(0.0f, 0.0f, mDepthZ * interpolatedTime);
} else {
camera.translate(0.0f, 0.0f, mDepthZ * (1.0f - interpolatedTime));
}
camera.rotateY(degrees);
camera.getMatrix(matrix);
camera.restore();
matrix.preTranslate(-centerX, -centerY);
matrix.postTranslate(centerX, centerY);
}
}
各位,请想一想,为实现applyTransformation方法时,最后的为什么要有这两句话:
matrix.preTranslate(-centerX, -centerY);
matrix.postTranslate(centerX, centerY);
您可能感兴趣的文章:Android实现屏幕旋转方法
总结Android Tween动画之RotateAnimation实现图片不停旋转效果实例介绍Android
开发 旋转屏幕导致Activity重建解决方法Android中利用matrix 控制图片的旋转、缩放、移动Android
编程中调用Camera时预览画面有旋转问题的解决方法Android实现图片反转、翻转、旋转、放大和缩小Android 图片缩放与旋转的实现详解Android开发之图形图像与动画(二)Animation实现图像的渐变/缩放/位移/旋转Android UI之ImageView实现图片旋转和缩放
Flutter RotationTransition实现旋转动画


0