Python 官方文档:入门教程 => 点击学习
这篇文章主要介绍了python如何使用pywinauto驱动微信客户端实现公众号爬虫,具有一定借鉴价值,感兴趣的朋友可以参考下,希望大家阅读完这篇文章之后大有收获,下面让小编带着大家一起了解一下。pywinauto简介pywinauto是一
这篇文章主要介绍了python如何使用pywinauto驱动微信客户端实现公众号爬虫,具有一定借鉴价值,感兴趣的朋友可以参考下,希望大家阅读完这篇文章之后大有收获,下面让小编带着大家一起了解一下。
pywinauto是一个Python的工具,可以用于控制windows的GUI程序。详细的文档可以参考这里。
自动化微信的代码封装在了类WechatAutomator里,完整的代码可以参考这里。这里简要的介绍一下其中的主要方法:
这个方法完成类的初始化,它的代码为:
def init_window(self, exe_path=r"C:\Program Files (x86)\Tencent\WeChat\WeChat.exe", turn_page_interval=3, click_url_interval=1, win_width=1000, win_height=600): app = Application(backend="uia").connect(path=exe_path) self.main_win = app.window(title=u"微信", class_name="WeChatMainWndForpc") self.main_win.set_focus() self.app = app self.visible_top = 70 self.turn_page_interval = turn_page_interval self.click_url_interval = click_url_interval self.browser = None self.win_width = win_width self.win_height = win_height # 为了让移动窗口,同时使用非uia的backend,这是pywinauto的uia的一个bug self.app2 = Application().connect(path=exe_path) self.move_window()我们首先来看函数的参数:
exe_path
微信程序的地址
turn_page_interval
抓取翻页时的时间间隔,默认3s
click_url_interval
在抓取一页的url时的间隔,默认1s
win_width
设置窗口的宽度
win_height
设置窗口的高度,如果显示器的分辨率较大,可以设置的更加高一些,从而一页包含的文章数更多一些,从而翻页少一点。注意:一定要保证窗口完全可见,也就是说win_height不能大于实际分辨率的高度!
这个函数的主要功能是构建Application对象从而通过pywinauto实现控制,这里使用的是uia的backend,然后设置窗口的大小并且把窗口移到最左上角。因为根据so文章,pywinauto 0.6.8存在bug,只能通过win32的backend来移到窗口,所以构造了self.app2然后调用move_window()函数把窗口移到最左上角。
这个函数实现了某个公众号的文章抓取。它的基本控制逻辑如下:
首先通过搜索框根据名字搜索公众号并且点击它。
对于当前页点击所有的链接并且下载其内容。
使用PAGE_DOWN键往下翻页
需要判断是否继续抓取
第一个是通过locate_user函数实现,后面会介绍。第二个是通过process_page函数实现,后面也会介绍。判断是否继续抓取的逻辑为:
如果翻页超过max_pages,则停止抓取
如果碰到某个url曾经抓取过,那说明之前的文章都已经抓取过了,则停止抓取
如果lastest_date不是None并且一篇文章的发布日期早于它,则停止抓取
所以我们通常会在第一次抓取的时候把max_pages设置的很大(比如100),然后通过latest_date来抓到指定的日期。而之后的抓取则设置max_pages为较小的值(比如默认的6),这样只要爬虫在两次抓取之间公众号的更新不超过6页,那么就不会漏掉文章。具体的逻辑可以参考main.py,它会把抓取的文章通过Http请求发给Server,并且每次抓取的时候从Server查询抓取过的文章存放到states这个list里states[i][“url”]就存储了第i篇文章的url。
def crawl_gongzhonghao(self, account_name, articles, states, detail, max_pages=6, latest_date=None, no_item_retry=3): logger.debug(account_name) if not self.locate_user(account_name): return False last_visited_titles = set() visited_urls = set() self.turn_page_up(min(20, max_pages * 2)) pagedown_retry = 0 last_visited_titles = [] for page in range(0, max_pages): items = [] last_visited_titles = self.process_page(account_name, items, last_visited_titles, states, visited_urls, detail) articles.extend(items) if len(items) == 0: pagedown_retry += 1 if pagedown_retry >= no_item_retry: s = "break because of retry {}".fORMat(pagedown_retry) logger.debug(s) WechatAutomator.add_to_detail(s, detail) break else: pagedown_retry = 0 if len(items) > 0 and latest_date is not None: html = items[-1][-1] pub_date = WechatAutomator.get_pubdate(html) if pub_date and pub_date < latest_date: s = "stop because {} < {}".format(pub_date, latest_date) logger.debug(s) WechatAutomator.add_to_detail(s, detail) break url_exist = False for item in items: if WechatAutomator.url_in_states(item[0], states): s = "stop because url exist {}".format(item[0]) logger.debug(s) WechatAutomator.add_to_detail(s, detail) url_exist = True break if url_exist: break self.click_right() self.main_win.type_keys("{PGDN}") time.sleep(self.turn_page_interval) self.turn_page_up(page * 2) return Truelocate_user函数的控制流程为:
找到左上角的搜索框并且点击它获得焦点
使用ctrl+a选中可能有的文字(之前的bug?)并且使用后退键删除它们
输入公众号名称
在弹出的list里点击这个公众号名称从而进入公众号
def locate_user(self, user, retry=5): if not self.main_win: raise RuntimeError("you should call init_window first") search_btn = self.main_win.child_window(title="搜索", control_type="Edit") self.click_center(search_btn) self.main_win.type_keys("^a") self.main_win.type_keys("{BACKSPACE}") self.main_win.type_keys(user) for i in range(retry): time.sleep(1) try: search_list = self.main_win.child_window(title="搜索结果") match_result = search_list.child_window(title=user, control_type="ListItem") self.click_center(match_result) return True except: pass return False这里主要就是通过child_window函数进行定位,关于它的用法这里不介绍。关于怎么定位元素的方法可以使用Inspect.exe或者print_control_identifiers函数,具体参考这里。
这个函数是最主要的抓取代码,它处理当前一页的内容,它的控制流程如下:
构建当前页的tree
使用recursive_get函数遍历这颗树并且找到每篇文章对应的element
遍历每一篇文章
如果文章的名字在上一页出现过,则跳过
获得这篇文章的坐标信息
如果文章不可见(rect.top >= win_rect.bottom or rect.bottom <= self.visible_top)则跳过
计算点击的坐标
点击文章打开新的窗口
在新的窗口中点击【复制链接】按钮
从剪贴板复制链接url
通过url下载文章内容并且parse发布日期
逻辑比较简单,但是有一些很trick的地方:
微信翻页的实现
微信客户端的翻页和浏览器不同,它的内容是累加的,比如第一页3篇文章,往下翻一页可能变成6篇文章,再翻可能变成9篇。这个时候这9篇文章都是在tree中的,只不过最后3篇的坐标(top和bottom)是空间的。
能否点击 一篇文章对应的框(图)可能是部分可见的,甚至它的top非常接近屏幕的最下方,这个时候可能点不了。如下图所示:
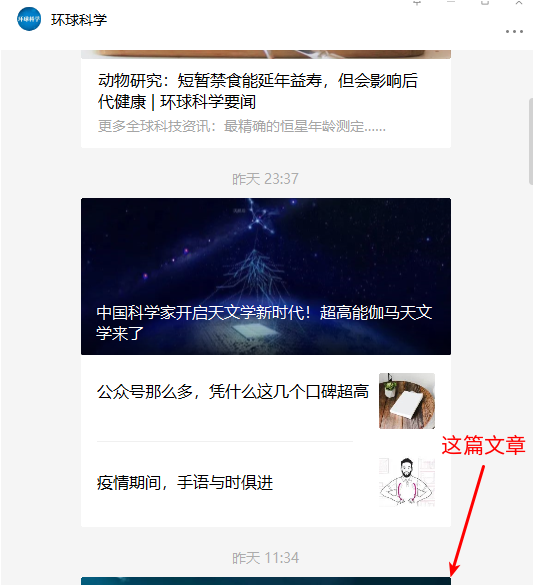
与此类似的是右上角的黑色头部(不能滚到并且会遮挡)也有一定空间,如下图所示:

点击的位置
因为这个框可能很窄(bottom-top很小)并且可能在很靠上或者靠下的位置。所以有如下代码:
# 计算可见的高度 visible_height = min(rect.bottom, win_rect.bottom) - max(rect.top, win_rect.top+self.visible_top) # 太窄的不点击,希望下次翻页后能显示更多像素从而可以点击, # 但是如果微信的某个文章的框的高度小于10个像素,那么这篇文章就无法被点击 # 不过作者目前为发现这么窄的文章 if visible_height < 10: continue # 如果某个文章的框太大,则抛出异常,目前为止为发现这样的问题。 if rect.bottom - rect.top >= win_rect.bottom - self.visible_top: raise RuntimeError("{}-{}>={}-{}".format(rect.bottom, rect.top, win_rect.bottom, self.visible_top)) # 如果下部部分可见,那么点击上方是比较”安全“的 if rect.bottom >= win_rect.bottom: click_up = True # 如果下部完全可见,则点击下方是”安全“的 else: click_up = False完整代码如下:
def process_page(self, account_name, items, lastpage_clicked_titles, states, visited_urls, detail): clicked_titles = set() text = self.main_win.child_window(title=account_name, control_type="Text", found_index=0) parent = text while parent: parent = parent.parent() if '会话列表' == parent.element_info.name: break paths = [0, 2, 0, 0, 0, 1, 0] for idx in paths: parent = parent.children()[idx] elems = [] self.recursive_get(parent, elems) win_rect = self.main_win.rectangle() for elem in elems: rect = elem.rectangle() if elem.element_info.name in lastpage_clicked_titles: continue if rect.top >= win_rect.bottom or rect.bottom <= self.visible_top: continue visible_height = min(rect.bottom, win_rect.bottom) - max(rect.top, win_rect.top+self.visible_top) if visible_height < 10: continue if rect.bottom - rect.top >= win_rect.bottom - self.visible_top: raise RuntimeError("{}-{}>={}-{}".format(rect.bottom, rect.top, win_rect.bottom, self.visible_top)) if rect.bottom >= win_rect.bottom: click_up = True else: click_up = False if self.is_bad_elem(elem): s = "not good elem {}".format(elem.element_info.name[0:10]) logger.debug(s) WechatAutomator.add_to_detail(s, detail) continue try: self.click_url(rect, win_rect, click_up) copy_btn = self.browser.child_window(title="复制链接地址") self.click_center(copy_btn, click_main=False) url = clipboard.GetData() if elem.element_info.name != '图片': clicked_titles.add(elem.element_info.name) if url and not url in visited_urls: visited_urls.add(url) html = None try: html = requests.get(url).text except: s = "fail get {}".format(url) logger.debug(s) WechatAutomator.add_to_detail(s, detail) items.append((url, rect, elem.element_info.name, html)) except: traceback.print_exc() pass finally: if self.browser: try: self.browser.close() except: pass self.browser = None time.sleep(self.click_url_interval) return clicked_titlesPython主要应用于:1、web开发;2、数据科学研究;3、网络爬虫;4、嵌入式应用开发;5、游戏开发;6、桌面应用开发。
感谢你能够认真阅读完这篇文章,希望小编分享的“python如何使用pywinauto驱动微信客户端实现公众号爬虫”这篇文章对大家有帮助,同时也希望大家多多支持编程网,关注编程网Python频道,更多相关知识等着你来学习!
--结束END--
本文标题: python如何使用pywinauto驱动微信客户端实现公众号爬虫
本文链接: https://www.lsjlt.com/news/277319.html(转载时请注明来源链接)
有问题或投稿请发送至: 邮箱/279061341@qq.com QQ/279061341
下载Word文档到电脑,方便收藏和打印~
2024-03-01
2024-03-01
2024-03-01
2024-02-29
2024-02-29
2024-02-29
2024-02-29
2024-02-29
2024-02-29
2024-02-29
回答
回答
回答
回答
回答
回答
回答
回答
回答
回答


官方手机版

微信公众号

商务合作


0