Python 官方文档:入门教程 => 点击学习
今天就跟大家聊聊有关python中怎么实现实时目标检测,可能很多人都不太了解,为了让大家更加了解,小编给大家总结了以下内容,希望大家根据这篇文章可以有所收获。1. 设置要求:Tensorflow版本在1.15.0或以上执行pip insta
今天就跟大家聊聊有关python中怎么实现实时目标检测,可能很多人都不太了解,为了让大家更加了解,小编给大家总结了以下内容,希望大家根据这篇文章可以有所收获。
1. 设置要求:
Tensorflow版本在1.15.0或以上
执行pip install TensorFlow安装最新版本
一切就绪,现在开始吧!
2. 设置环境
从GitHub上下载或复制TensorFlow目标检测的代码到本地计算机
在终端运行如下命令:
git clonehttps://github.com/tensorflow/models.git安装依赖项
下一步是确定计算机上配备了运行目标检测器所需的库和组件。
下面列举了本项目所依赖的库。(大部分依赖都是TensorFlow自带的)
Cython
contextlib2
pillow
lxml
matplotlib
若有遗漏的组件,在运行环境中执行pip install即可。
安装Protobuf编译器
谷歌的Protobuf,又称Protocol buffers,是一种语言无关、平台无关、可扩展的序列化结构数据的机制。Protobuf帮助程序员定义数据结构,轻松地在各种数据流中使用各种语言进行编写和读取结构数据。
Protobuf也是本项目的依赖之一。点击这里了解更多关于Protobufs的知识。接下来把Protobuf安装到计算机上。
打开终端或者打开命令提示符,将地址改为复制的代码仓库,在终端执行如下命令:
cd models/research wget -Oprotobuf.zip Https://github.com/protocolbuffers/protobuf/releases/download/v3.9.1/protoc-3.9.1-osx-x86_64.zip unzipprotobuf.zip注意:请务必在models/research目录解压protobuf.zip文件。

来源:Pexels
编辑Protobuf编译器
从research/ directory目录中执行如下命令编辑Protobuf编译器:
./bin/protoc object_detection/protos/*.proto--Python_out=.用Python实现目标检测
现在所有的依赖项都已经安装完毕,可以用Python实现目标检测了。
在下载的代码仓库中,将目录更改为:
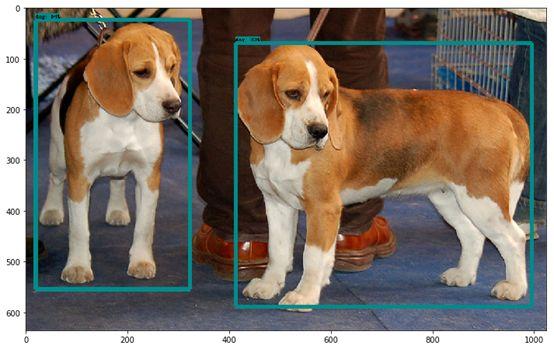
models/research/object_detection这个目录下有一个叫object_detection_tutorial.ipynb的ipython notebook。该文件是演示目标检测算法的demo,在执行时会用到指定的模型:
ssd_mobilenet_v1_coco_2017_11_17这一测试会识别代码库中提供的两张测试图片。下面是测试结果之一:
要检测直播视频中的目标还需要一些微调。在同一文件夹中新建一个Jupyter notebook,按照下面的代码操作:
[1]:
import numpy as np import os import six.moves.urllib as urllib import sys import tarfile import tensorflow as tf import zipfile from distutils.version import StrictVersion from collections import defaultdict from io import StringIO from matplotlib import pyplot as plt from PIL import Image # This isneeded since the notebook is stored in the object_detection folder. sys.path.append("..") from utils import ops as utils_ops if StrictVersion(tf.__version__) < StrictVersion( 1.12.0 ): raise ImportError( Please upgrade your TensorFlow installation to v1.12.*. )[2]:
# This isneeded to display the images. get_ipython().run_line_magic( matplotlib , inline )[3]:
# Objectdetection imports # Here arethe imports from the object detection module. from utils import label_map_util from utils import visualization_utils as vis_util[4]:
# Modelpreparation # Anymodel exported using the `export_inference_graph.py` tool can be loaded heresimply by changing `PATH_TO_FROZEN_GRAPH` to point to a new .pb file. # Bydefault we use an "SSD with Mobilenet" model here. #See https://github.com/tensorflow/models/blob/master/research/object_detection/g3Doc/detection_model_zoo.md #for alist of other models that can be run out-of-the-box with varying speeds andaccuracies. # Whatmodel to download. MODEL_NAME= ssd_mobilenet_v1_coco_2017_11_17 MODEL_FILE= MODEL_NAME + .tar.gz DOWNLOAD_BASE= http://download.tensorflow.org/models/object_detection/ # Path tofrozen detection graph. This is the actual model that is used for the objectdetection. PATH_TO_FROZEN_GRAPH= MODEL_NAME + /frozen_inference_graph.pb # List ofthe strings that is used to add correct label for each box. PATH_TO_LABELS= os.path.join( data , mscoco_label_map.pbtxt )[5]:
#DownloadModel opener =urllib.request.URLopener() opener.retrieve(DOWNLOAD_BASE+ MODEL_FILE, MODEL_FILE) tar_file =tarfile.open(MODEL_FILE) for file in tar_file.getmembers(): file_name= os.path.basename(file.name) if frozen_inference_graph.pb in file_name: tar_file.extract(file,os.getcwd())[6]:
# Load a(frozen) Tensorflow model into memory. detection_graph= tf.Graph() with detection_graph.as_default(): od_graph_def= tf.GraphDef() withtf.gfile.GFile(PATH_TO_FROZEN_GRAPH, rb ) as fid: serialized_graph= fid.read() od_graph_def.ParseFromString(serialized_graph) tf.import_graph_def(od_graph_def,name= )[7]:
# Loadinglabel map # Labelmaps map indices to cateGory names, so that when our convolution networkpredicts `5`, #we knowthat this corresponds to `airplane`. Here we use internal utilityfunctions, #butanything that returns a dictionary mapping integers to appropriate stringlabels would be fine category_index= label_map_util.create_category_index_from_labelmap(PATH_TO_LABELS,use_display_name=True)[8]:
defrun_inference_for_single_image(image, graph): with graph.as_default(): with tf.Session() as sess: # Get handles to input and output tensors ops= tf.get_default_graph().get_operations() all_tensor_names= {output.name for op in ops for output in op.outputs} tensor_dict= {} for key in [ num_detections , detection_boxes , detection_scores , detection_classes , detection_masks ]: tensor_name= key + :0 if tensor_name in all_tensor_names: tensor_dict[key]= tf.get_default_graph().get_tensor_by_name(tensor_name) if detection_masks in tensor_dict: # The following processing is only for single image detection_boxes= tf.squeeze(tensor_dict[ detection_boxes ], [0]) detection_masks= tf.squeeze(tensor_dict[ detection_masks ], [0]) # Reframe is required to translate mask from boxcoordinates to image coordinates and fit the image size. real_num_detection= tf.cast(tensor_dict[ num_detections ][0], tf.int32) detection_boxes= tf.slice(detection_boxes, [0, 0], [real_num_detection, -1]) detection_masks= tf.slice(detection_masks, [0, 0, 0], [real_num_detection, -1, -1]) detection_masks_reframed= utils_ops.reframe_box_masks_to_image_masks( detection_masks,detection_boxes, image.shape[1],image.shape[2]) detection_masks_reframed= tf.cast( tf.greater(detection_masks_reframed,0.5),tf.uint8) # Follow the convention by adding back the batchdimension tensor_dict[ detection_masks ] =tf.expand_dims( detection_masks_reframed,0) image_tensor= tf.get_default_graph().get_tensor_by_name( image_tensor:0 ) # Run inference output_dict= sess.run(tensor_dict, feed_dict={image_tensor: image}) # all outputs are float32 numpy arrays, so convert typesas appropriate output_dict[ num_detections ] =int(output_dict[ num_detections ][0]) output_dict[ detection_classes ] =output_dict[ detection_classes ][0].astype(np.int64) output_dict[ detection_boxes ] =output_dict[ detection_boxes ][0] output_dict[ detection_scores ] =output_dict[ detection_scores ][0] if detection_masks in output_dict: output_dict[ detection_masks ] =output_dict[ detection_masks ][0] return output_dict[9]:
import cv2 cam =cv2.cv2.VideoCapture(0) rolling = True while (rolling): ret,image_np = cam.read() image_np_expanded= np.expand_dims(image_np, axis=0) # Actual detection. output_dict= run_inference_for_single_image(image_np_expanded, detection_graph) # Visualization of the results of a detection. vis_util.visualize_boxes_and_labels_on_image_array( image_np, output_dict[ detection_boxes ], output_dict[ detection_classes ], output_dict[ detection_scores ], category_index, instance_masks=output_dict.get( detection_masks ), use_nORMalized_coordinates=True, line_thickness=8) cv2.imshow( image , cv2.resize(image_np,(1000,800))) if cv2.waiTKEy(25) & 0xFF == ord( q ): break cv2.destroyAllwindows() cam.release()看完上述内容,你们对Python中怎么实现实时目标检测有进一步的了解吗?如果还想了解更多知识或者相关内容,请关注编程网Python频道,感谢大家的支持。
--结束END--
本文标题: Python中怎么实现实时目标检测
本文链接: https://www.lsjlt.com/news/283943.html(转载时请注明来源链接)
有问题或投稿请发送至: 邮箱/279061341@qq.com QQ/279061341
下载Word文档到电脑,方便收藏和打印~
2024-03-01
2024-03-01
2024-03-01
2024-02-29
2024-02-29
2024-02-29
2024-02-29
2024-02-29
2024-02-29
2024-02-29
回答
回答
回答
回答
回答
回答
回答
回答
回答
回答


官方手机版

微信公众号

商务合作


0