文章目录背景多渠道是什么为什么要做多渠道打包多渠道打包原理怎么实现渠道信息的统计打包实现清单配置文件添加 meta-data 标签密钥生成签名配置创建风味维度与 Product 风味风味配置项的一些优化使用 gradle 的build ta
学习多渠道打包用的 demo 来做一个简单的演示。
渠道就是指不同的安装包发布平台:有应用宝、百度、小米、360、豌豆荚等应用发布平台。你打包后的 app 就可以发布在这些平台上供用户自行下载体验。
方便后台统计 app 在各个平台上的下载次数。
一般我们在清单配置文件中声明一个 meta-data 标签里面设置对应的 name 和 value 属性我们可以在代码中根据 name 获取到对应的 value这个 value 就是我们需要的渠道信息。
这里简单说一下实现:例如用户从豌豆荚市场下载了 app ;安装后并打开使用。这个时候我们在代码中就能获取到 wandoujia 这个渠道信息然后把这个信息通过调用接口统计到后台。
不过目前有很多开发者平台都提供了对应的 sdk 供我们集成使用比如 友盟 这个大家族集成友盟统计的功能我会在下期文章中提供。通过集成友盟的统计功能我们可以很方便的在友盟开发者平台上看到我们发布后的 app 的一个下载使用情况很实用的一个功能。
<meta-data Android:value="${MY_CHANNEL_VALUE}" android:name="MY_CHANNEL"/>如下:
<?xml version="1.0" encoding="utf-8"?><manifest xmlns:android="Http://schemas.android.com/apk/res/android"
    package="com.example.fragmentdemo">

    <uses-permission android:name="android.permission.ACCESS_NETWORK_STATE"/>
    <uses-permission android:name="android.permission.ACCESS_WIFI_STATE"/>
    <uses-permission android:name="android.permission.READ_PHONE_STATE"/>
    <uses-permission android:name="android.permission.INTERNET"/>

    <application
        android:name=".application.MyApplication"
        android:allowBackup="true"
        android:icon="@mipmap/ic_launcher"
        android:label="@string/app_name"
        android:roundIcon="@mipmap/ic_launcher_round"
        android:supportsRtl="true"
        android:theme="@style/AppTheme">

        <meta-data android:value="${MY_CHANNEL_VALUE}" android:name="MY_CHANNEL"/>

        <activity android:name=".activity.MainActivity"
            android:confiGChanges="orientation|screenSize|keyboardHidden">
            <intent-filter>
                <action android:name="android.intent.action.MAIN" />

                <cateGory android:name="android.intent.category.LAUNCHER" />
            </intent-filter>
        </activity>
</application></manifest>这里简单说明一下:value 值用了占位符来表示;方便一次性打多个渠道包。
使用签名密钥来生成 release 版 apk这才是正式生产使用的安装包。所以我们需要先来生产签名密钥。
密钥生成我在上一篇文章 Warning:JKS 密钥库使用专用格式。建议使用 “keytool -importkeystore -srckeystore…pkcs12” 迁移到行业标准格式 PKCS12 中有详细的介绍;供同学们参考。
我们有了签名密钥可以用来配置一个 release 版的签名方便打包如下:
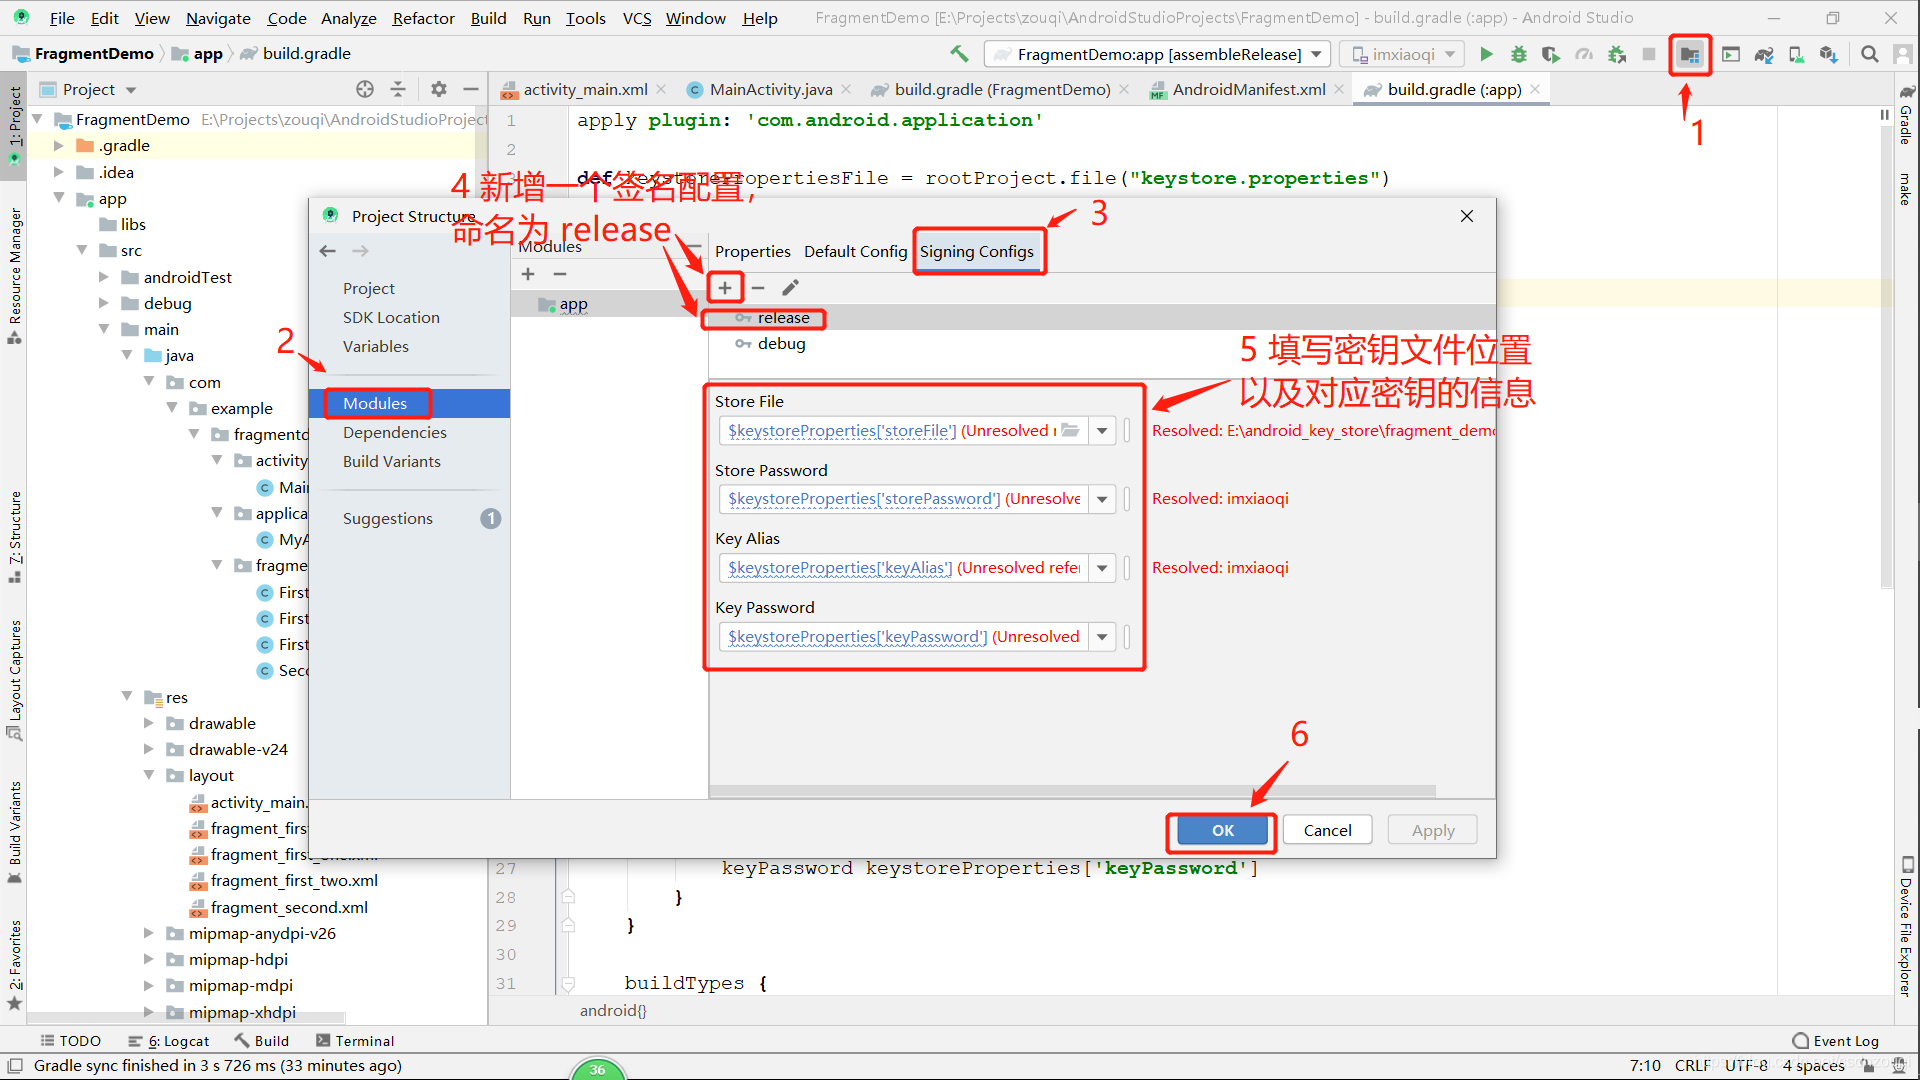
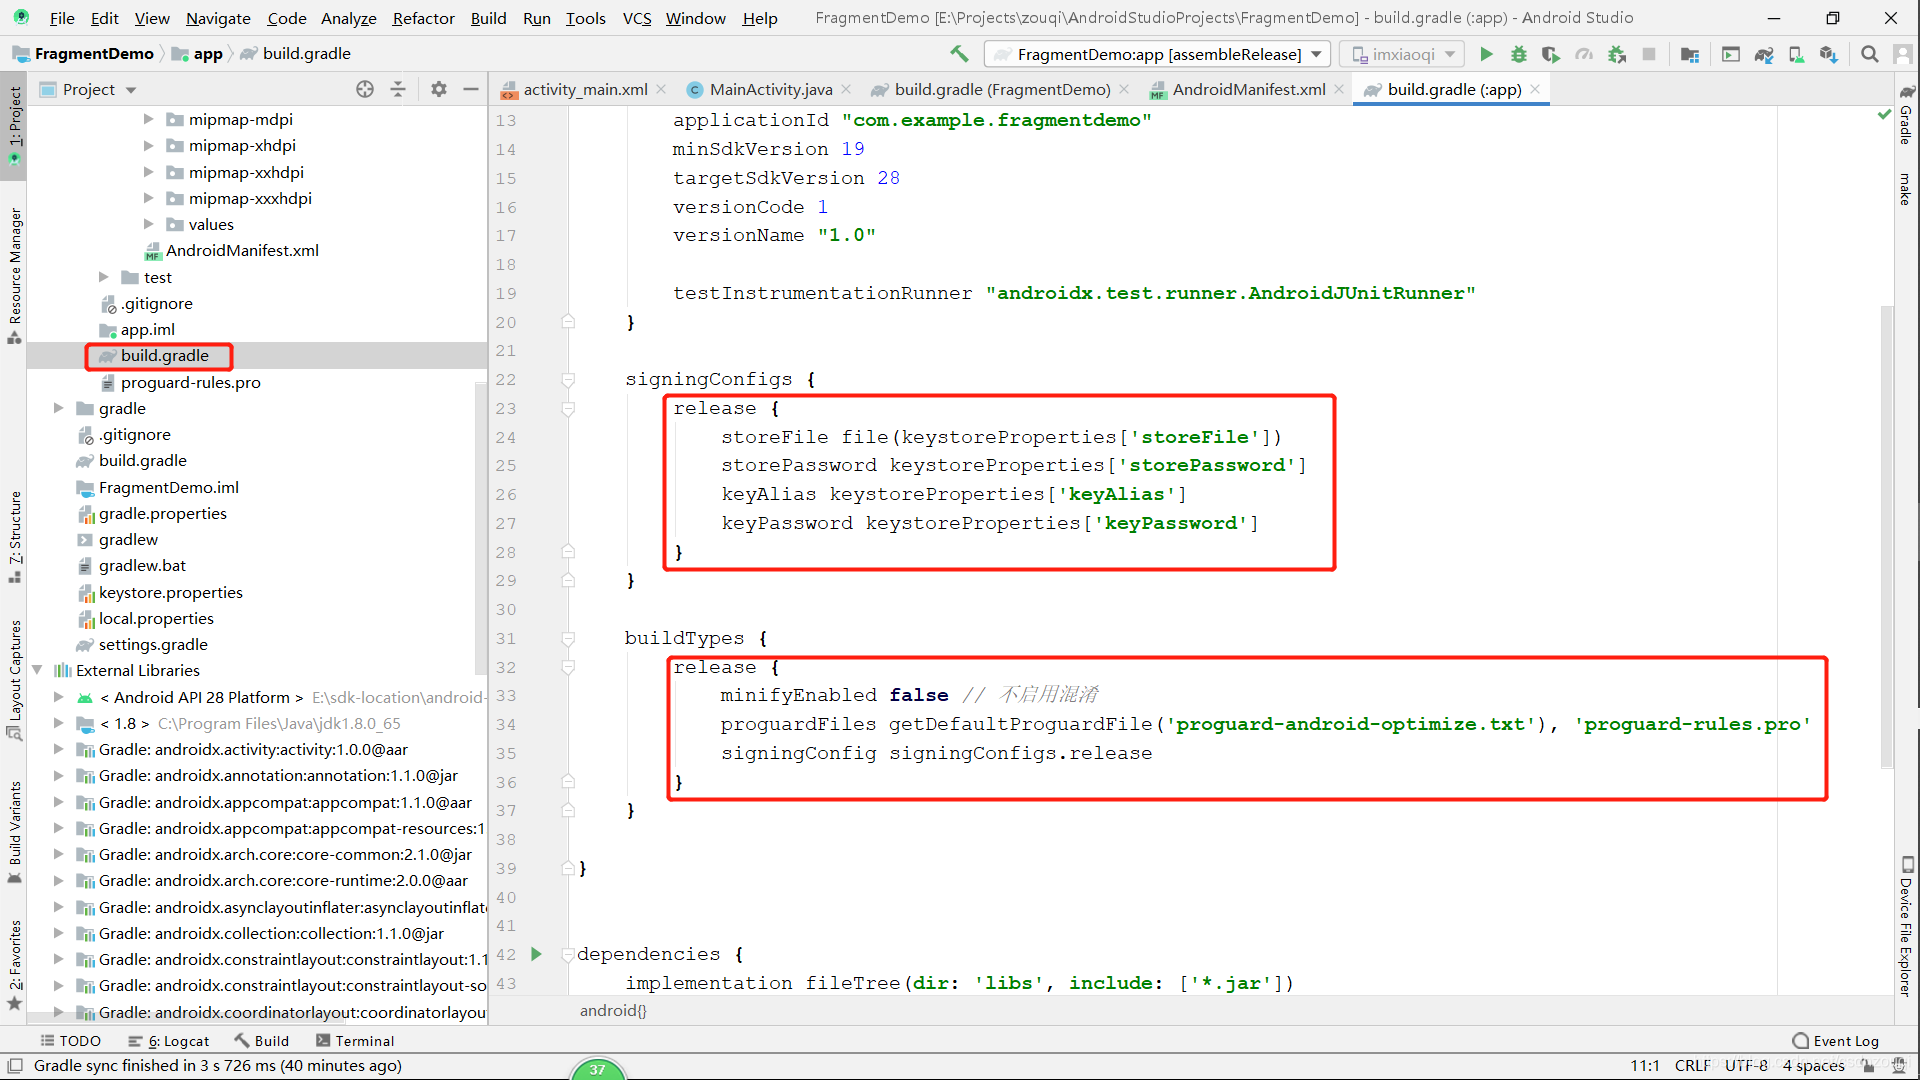
配置好后app 模块下的 build.gradle 文件会多出签名信息配置如下图:
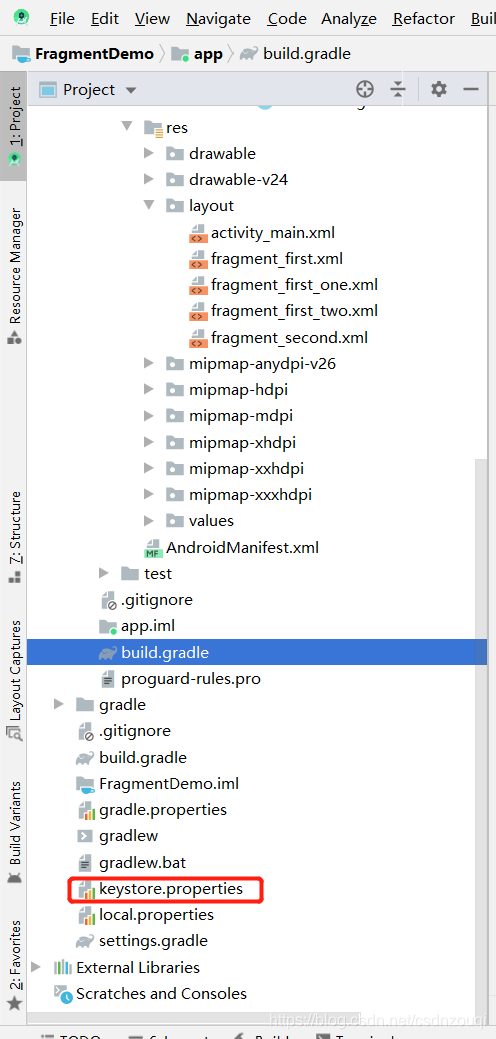
我这里还用到了一个 keystore.properties 文件如下图示:
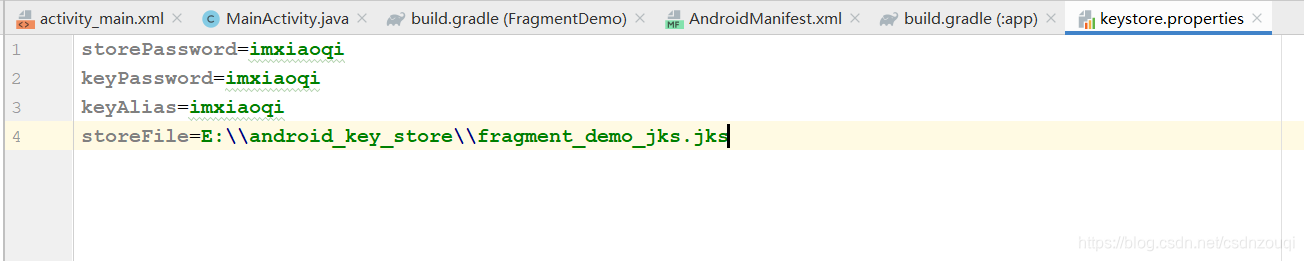
内容如下图示:
app 模块下 build.gradle 文件完整内容如下:
apply plugin: 'com.android.application'def keystorePropertiesFile = rootProject.file("keystore.properties")def keystoreProperties = new Properties()keystoreProperties.load(new FileInputStream(keystorePropertiesFile))android {

    compileSdkVersion 28
    buildToolsVersion "29.0.3"

    defaultConfig {
        applicationId "com.example.fragmentdemo"
        minSdkVersion 19
        targetSdkVersion 28
        versionCode 1
        versionName "1.0"

        testInstrumentationRunner "androidx.test.runner.AndroidJUnitRunner"
    }

    signingConfigs {
        release {
            storeFile file(keystoreProperties['storeFile'])
            storePassWord keystoreProperties['storePassword']
            keyAlias keystoreProperties['keyAlias']
            keyPassword keystoreProperties['keyPassword']
        }
    }

    buildTypes {
        release {
            minifyEnabled false // 不启用混淆
            proguardFiles getDefaultProguardFile('proguard-android-optimize.txt'), 'proguard-rules.pro'
            signingConfig signingConfigs.release        }
    }}dependencies {
    implementation fileTree(dir: 'libs', include: ['*.jar'])

    implementation 'androidx.appcompat:appcompat:1.1.0'
    implementation 'androidx.constraintlayout:constraintlayout:1.1.3'
    implementation 'androidx.legacy:legacy-support-v4:1.0.0'
    testImplementation 'junit:junit:4.12'
    androidTestImplementation 'androidx.test.ext:junit:1.1.1'
androidTestImplementation 'androidx.test.espresso:espresso-core:3.2.0'}什么是风味维度这里暂不作说明同学们可参考文章 Android Studio3.0 flavorDimensions多维度理解(版本差异化打包) 自行了解。
打开 风味维度 创建窗口如下图示:
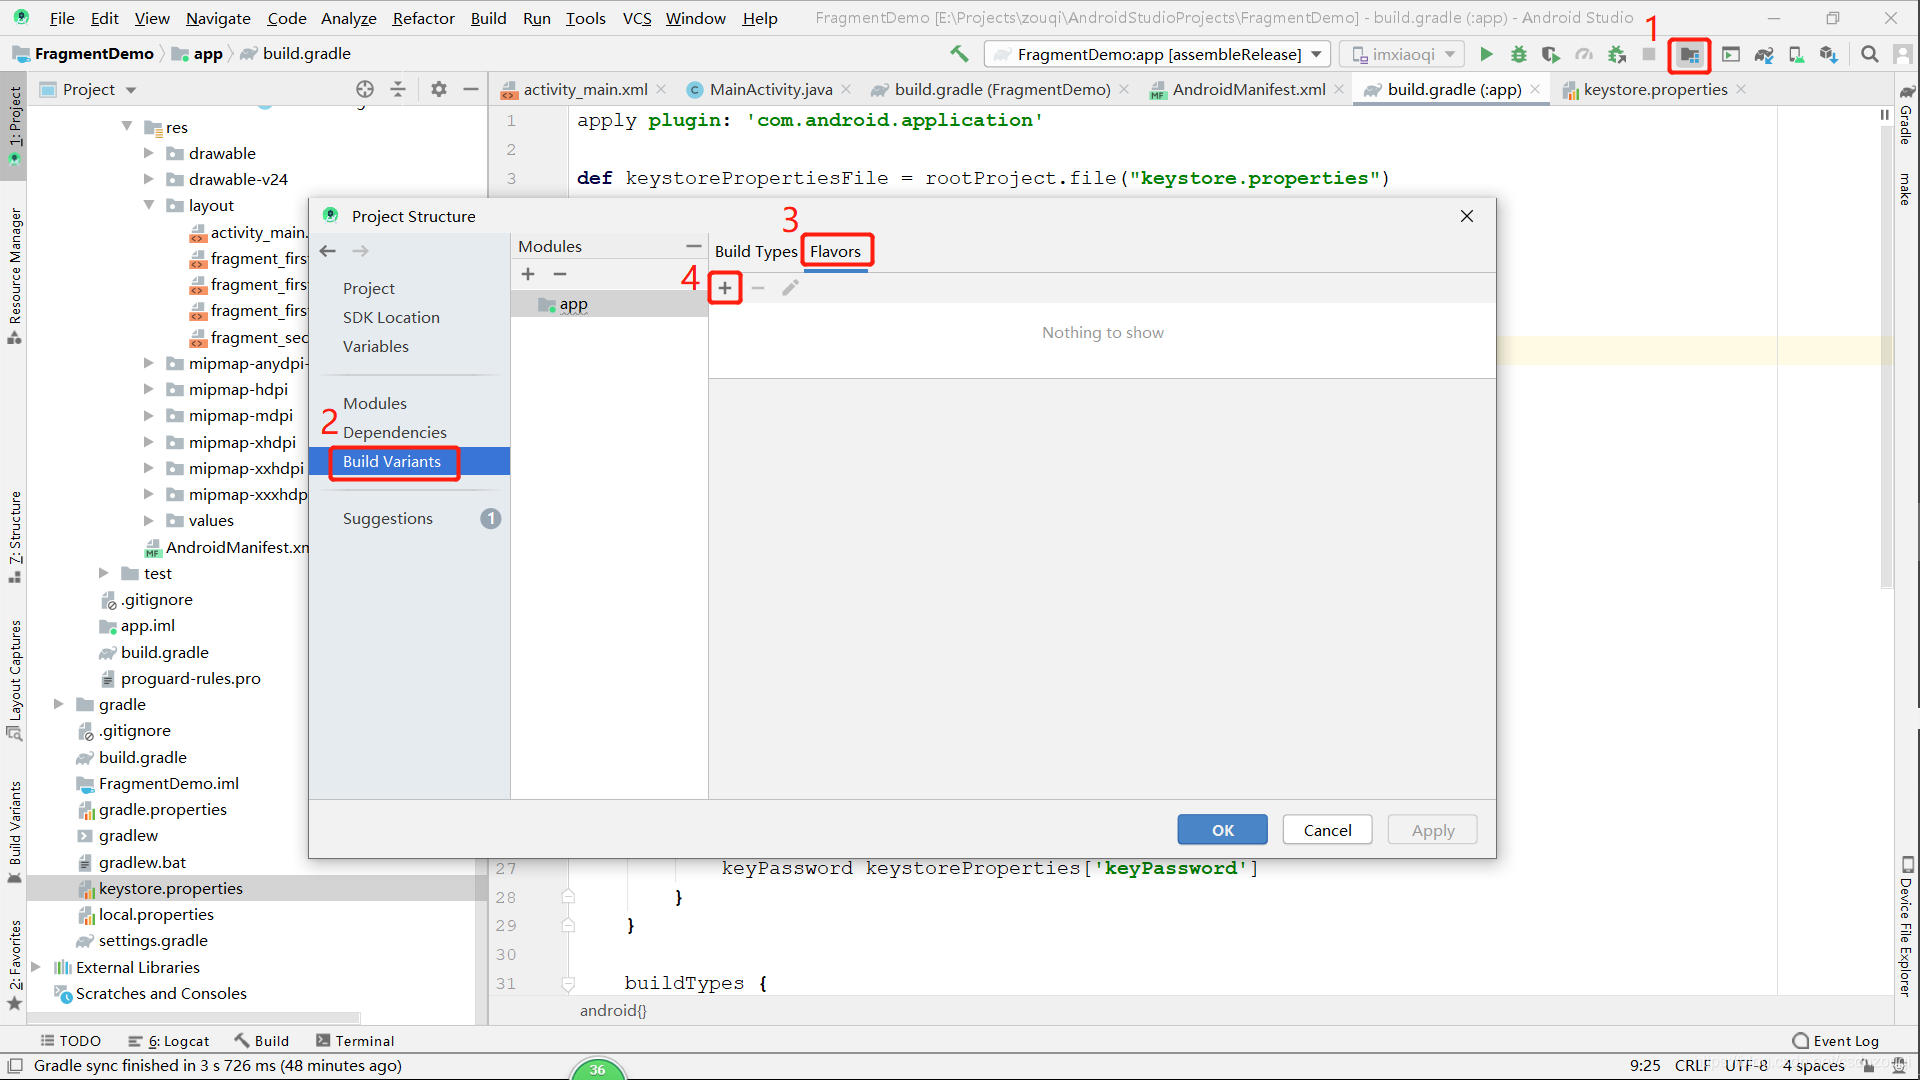
首先添加一个 风味维度如下图示:
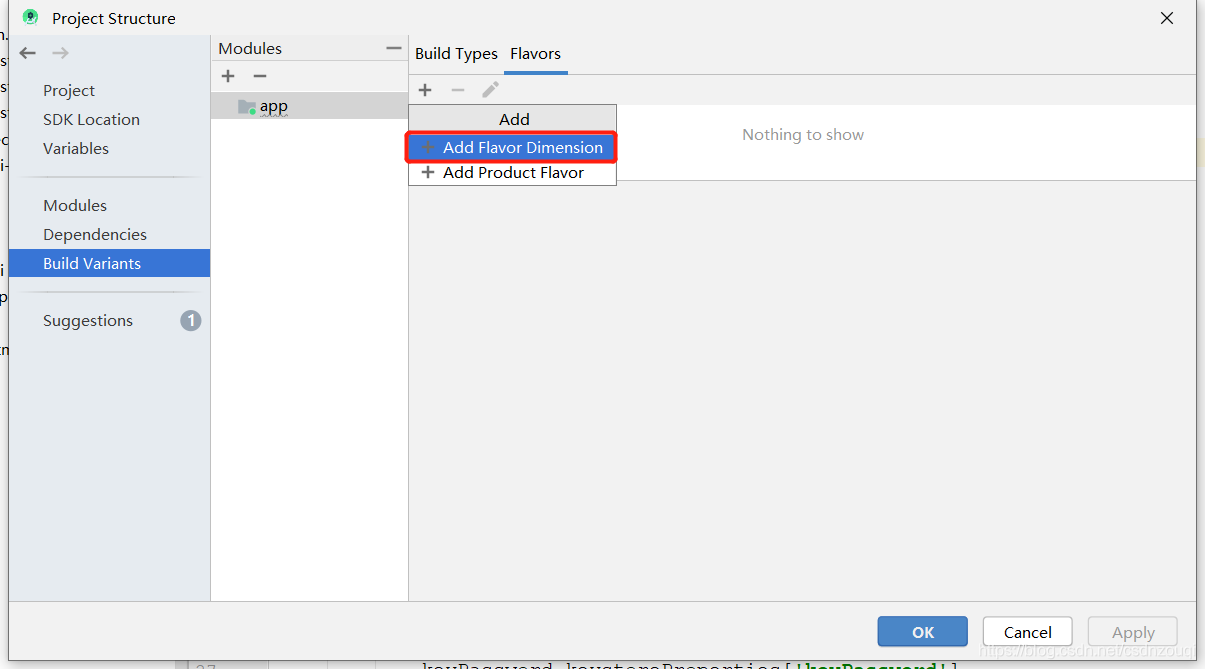
输入 风味维度 名称如下图示:

风味维度 创建完成后如下图示:

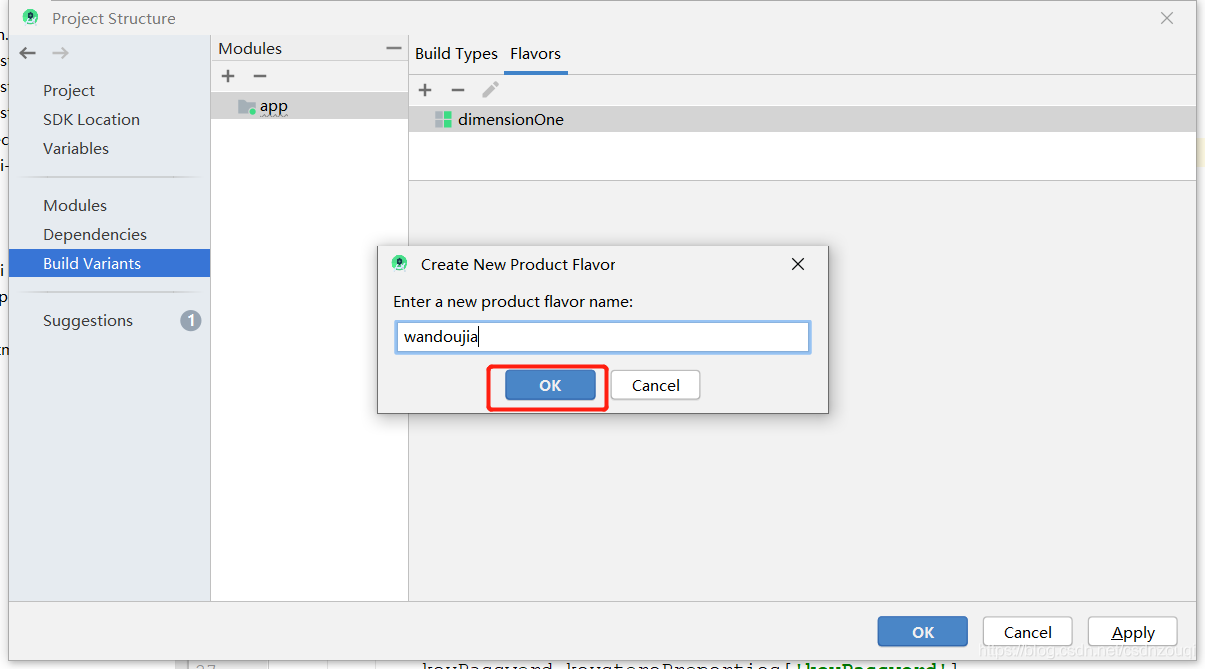
Add Product Flavor

输入 product flavor 名称如下图示:
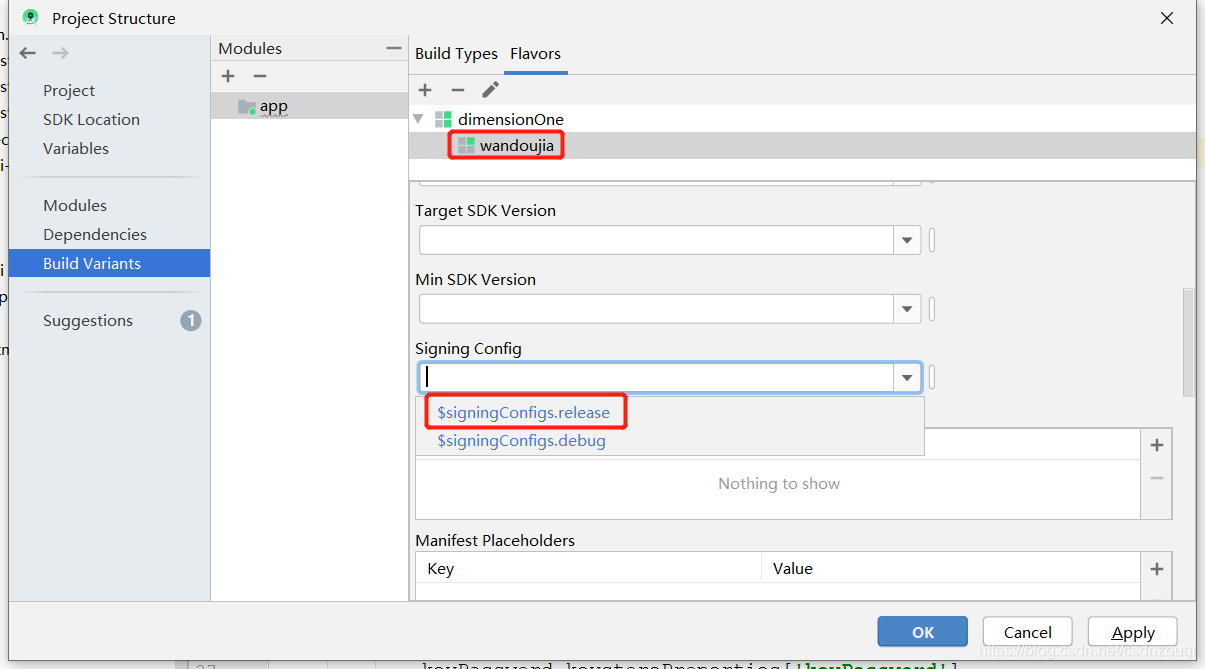
product flavor 名称创建完成后选择 release 签名配置如下图示:
依次添加 baidu 和 yingyongbao 渠道并点击 apply 如下图示:
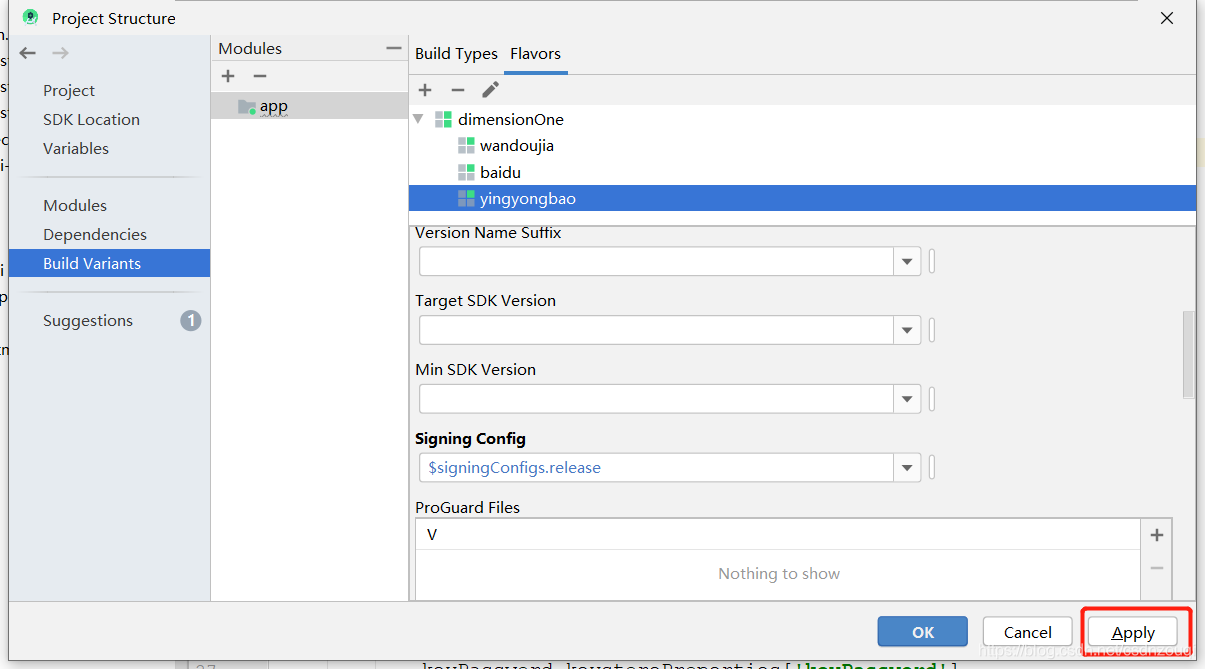
等待 gradle 同步完成后我们再看 app 模块下的 build.gradle 文件多出的风味配置项如下图示:

占位符使用减少重复配置

可自定义打包后的 apk 名称
最后给出完整的 build.gradle 文件内容如下:
apply plugin: 'com.android.application'def keystorePropertiesFile = rootProject.file("keystore.properties")def keystoreProperties = new Properties()keystoreProperties.load(new FileInputStream(keystorePropertiesFile))android {
compileSdkVersion 28
buildToolsVersion "29.0.3"
defaultConfig {
applicationId "com.example.fragmentdemo"
minSdkVersion 19
targetSdkVersion 28
versionCode 1
versionName "1.0"
testInstrumentationRunner "androidx.test.runner.AndroidJUnitRunner"
}
signingConfigs {
release {
storeFile file(keystoreProperties['storeFile'])
storePassword keystoreProperties['storePassword']
keyAlias keystoreProperties['keyAlias']
keyPassword keystoreProperties['keyPassword']
}
}
buildTypes {
release {
minifyEnabled false // 不启用混淆
proguardFiles getDefaultProguardFile('proguard-android-optimize.txt'), 'proguard-rules.pro'
signingConfig signingConfigs.release }
}
flavorDimensions 'dimensionOne'
productFlavors {
wandoujia {
dimension = 'dimensionOne'
signingConfig signingConfigs.release }
baidu {
dimension = 'dimensionOne'
signingConfig signingConfigs.release }
yingyongbao {
dimension = 'dimensionOne'
signingConfig signingConfigs.release }
}
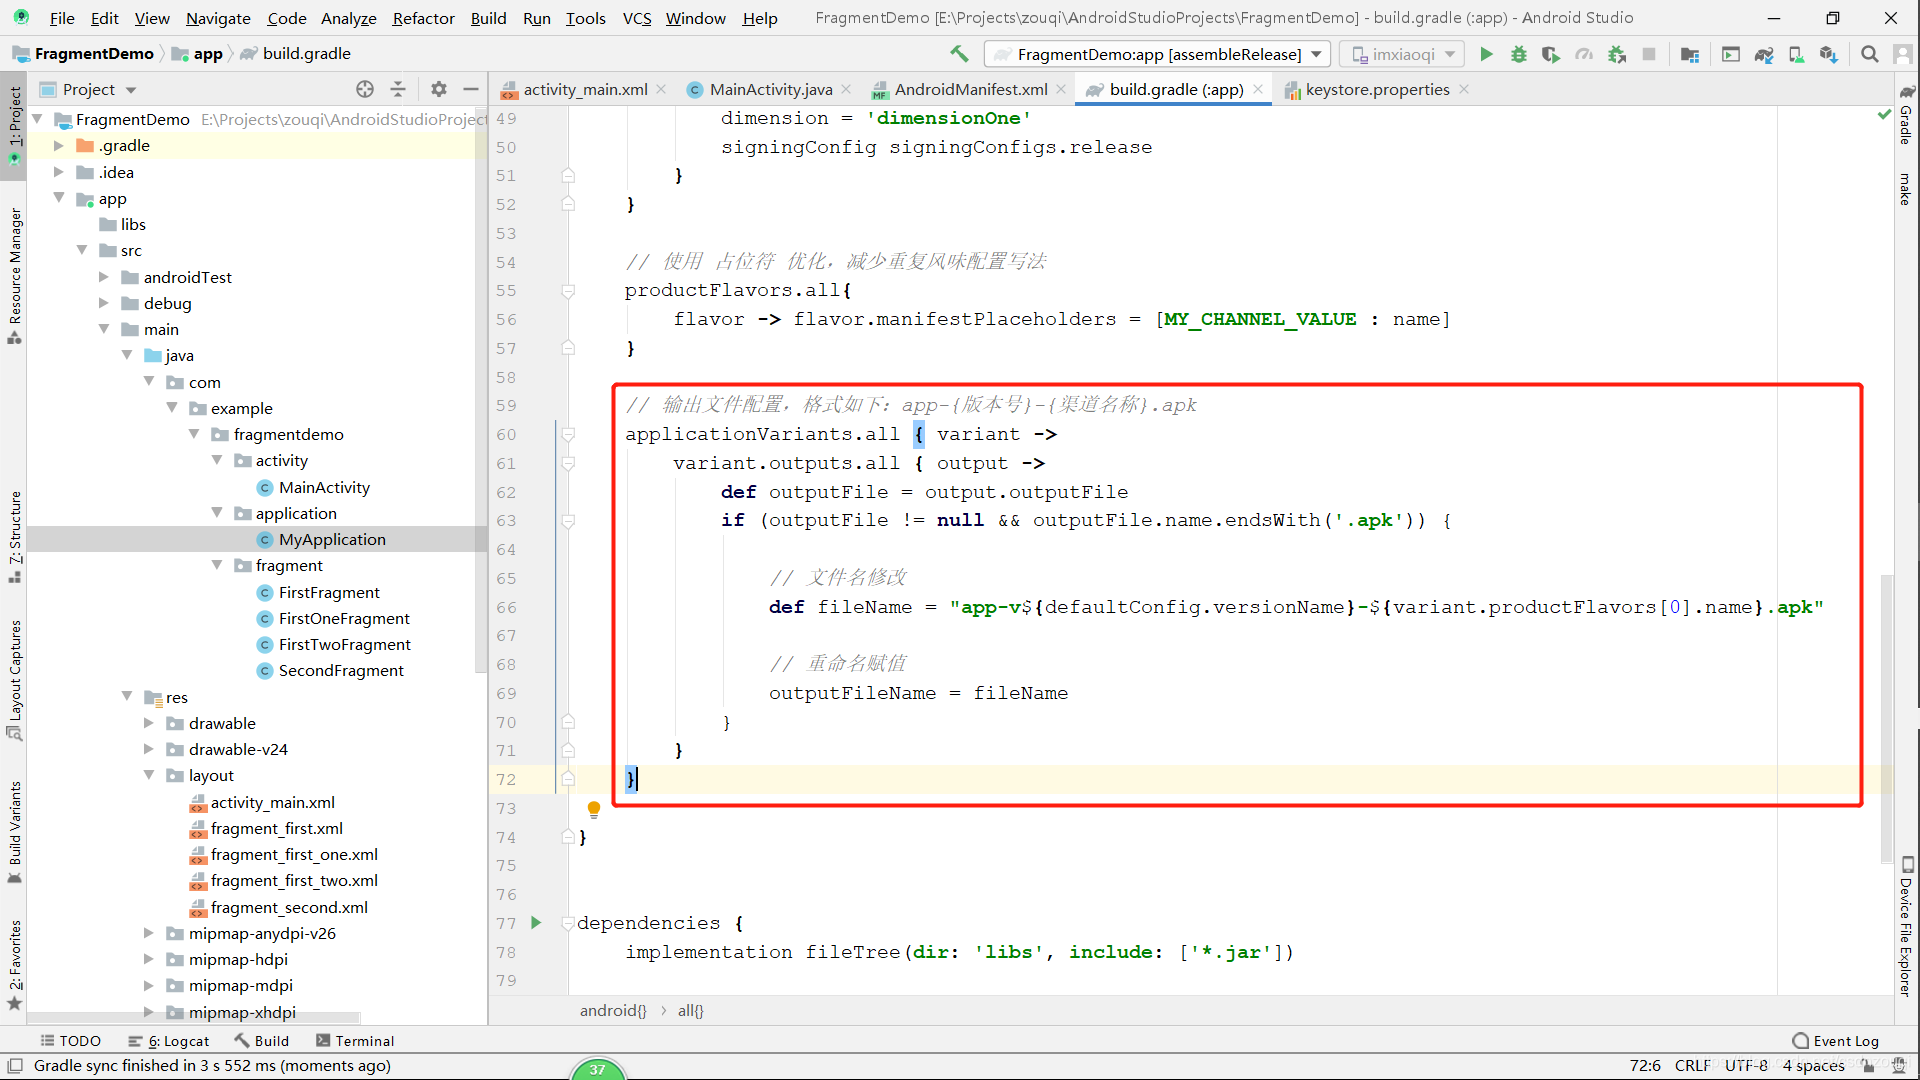
// 使用 占位符 优化减少重复风味配置写法
productFlavors.all{
flavor -> flavor.manifestPlaceholders = [MY_CHANNEL_VALUE : name]
}
// 输出文件配置格式如下:app-{版本号}-{渠道名称}.apk
applicationVariants.all { variant ->
variant.outputs.all { output ->
def outputFile = output.outputFile if (outputFile != null && outputFile.name.endsWith('.apk')) {
// 文件名修改
def fileName = "app-v${defaultConfig.versionName}-${variant.productFlavors[0].name}.apk"
// 重命名赋值
outputFileName = fileName }
}
}}dependencies {
implementation fileTree(dir: 'libs', include: ['*.jar'])
implementation 'androidx.appcompat:appcompat:1.1.0'
implementation 'androidx.constraintlayout:constraintlayout:1.1.3'
implementation 'androidx.legacy:legacy-support-v4:1.0.0'
testImplementation 'junit:junit:4.12'
androidTestImplementation 'androidx.test.ext:junit:1.1.1'
androidTestImplementation 'androidx.test.espresso:espresso-core:3.2.0'}如下图示:

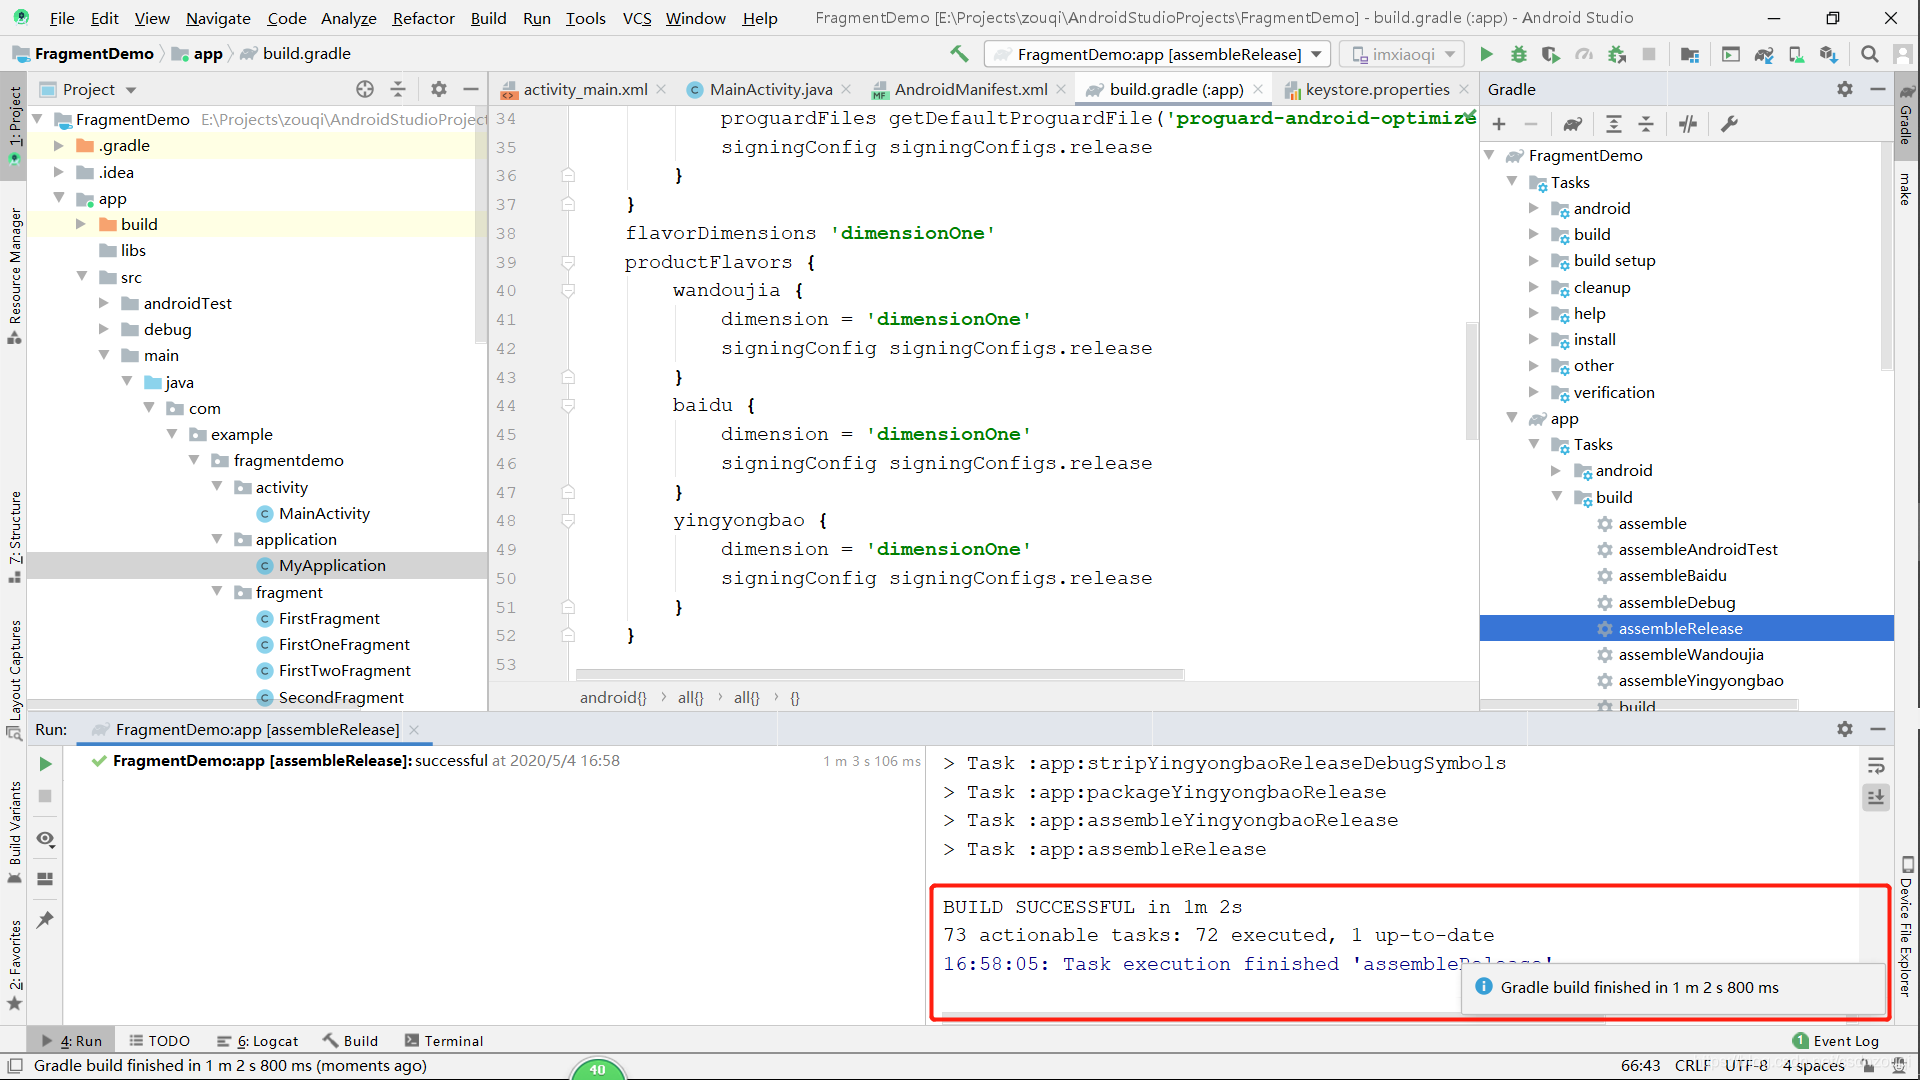
打包成功后如下图示:
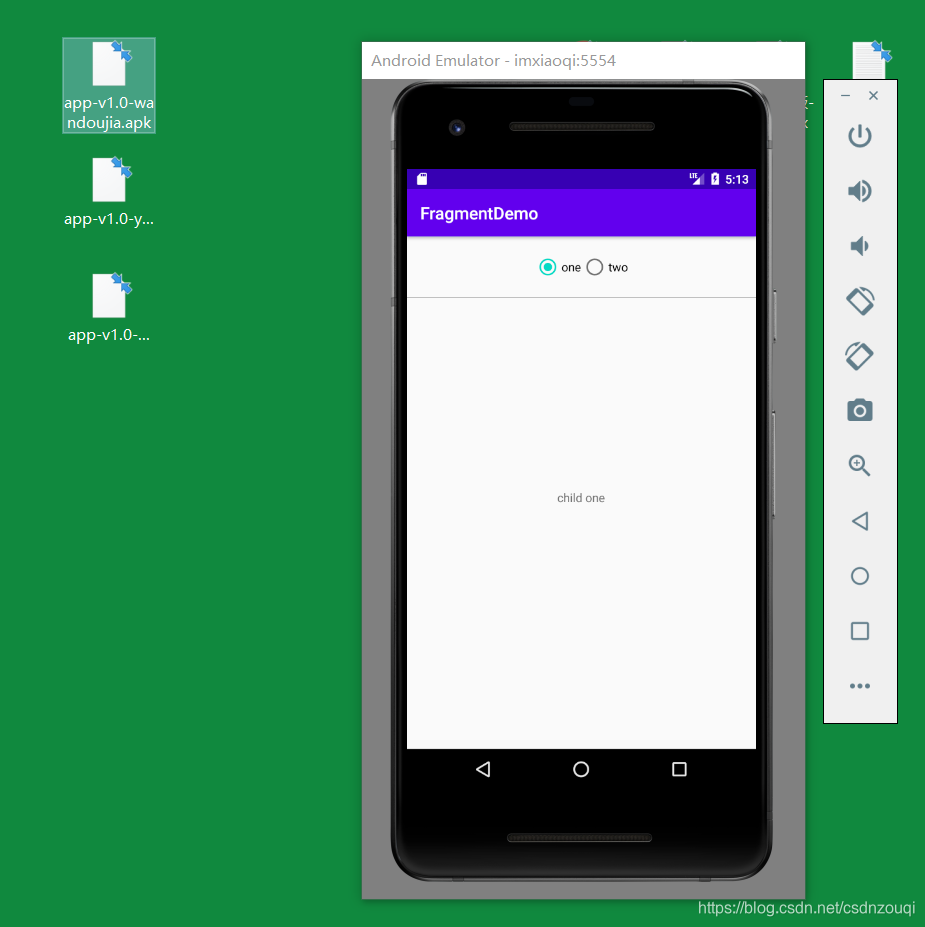
我们打完多渠道包后可在如下图示位置查看一次性生成的多渠道包:

获取渠道信息代码如下:
// 获取渠道信息
try {
ApplicationInfo applicationInfo = MainActivity.this.getPackageManager().getApplicationInfo(
MainActivity.this.getPackageName(), PackageManager.GET_META_DATA );
String channel = applicationInfo.metaData.getString("MY_CHANNEL");
Log.e("TAG", "metaData value is :" + channel);
Toast.makeText(MainActivity.this, "当前应用的渠道为:" + channel,
Toast.LENGTH_LONG).show();
} catch (PackageManager.NameNotFoundException e) {
e.printStackTrace();
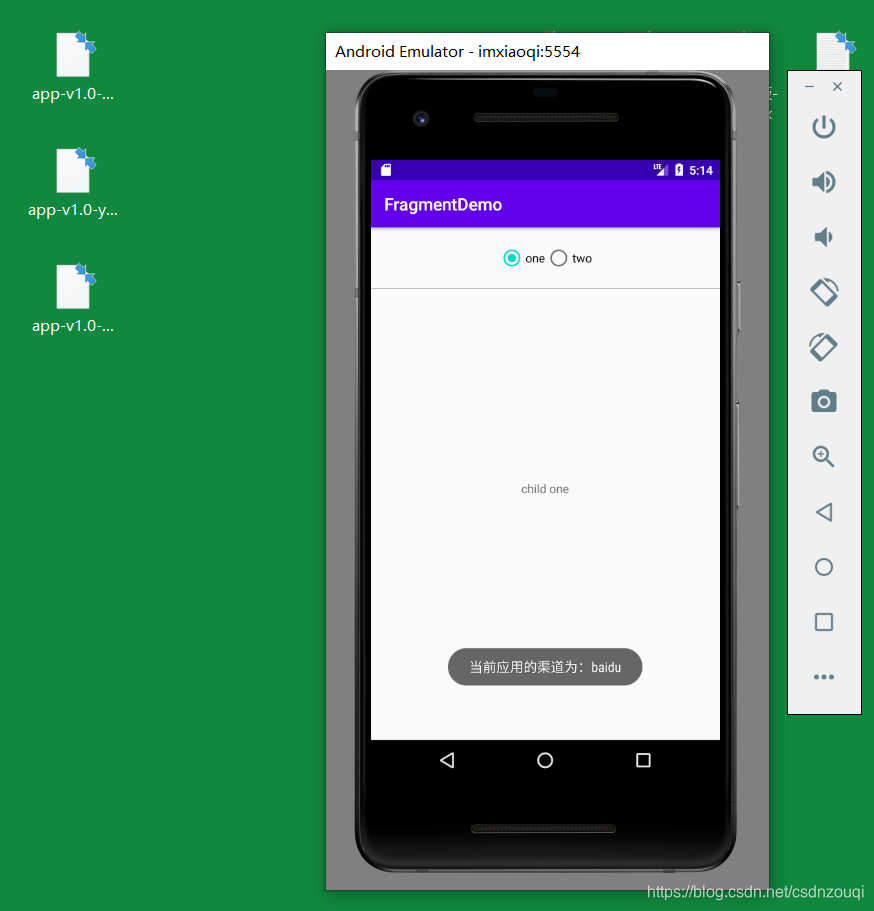
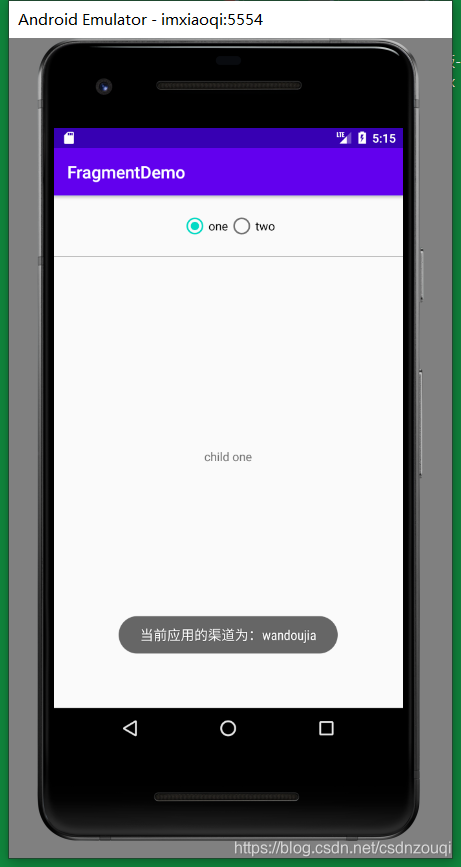
}我们依次安装打开获取渠道信息如下图示:

到此我们就实现了多渠道打包。
--结束END--
本文标题: Android 开发--多渠道打包实现
本文链接: https://www.lsjlt.com/news/29764.html(转载时请注明来源链接)
有问题或投稿请发送至: 邮箱/279061341@qq.com QQ/279061341
下载Word文档到电脑,方便收藏和打印~
2024-01-21
2023-10-28
2023-10-28
2023-10-27
2023-10-27
2023-10-27
2023-10-27
回答
回答
回答
回答
回答
回答
回答
回答
回答
回答


官方手机版

微信公众号

商务合作


0