这篇文章主要介绍“怎么用Vue组件封装上传图片和视频”,在日常操作中,相信很多人在怎么用Vue组件封装上传图片和视频问题上存在疑惑,小编查阅了各式资料,整理出简单好用的操作方法,希望对大家解答”怎么用Vue组件封装上传图片和视频”的疑惑有所
这篇文章主要介绍“怎么用Vue组件封装上传图片和视频”,在日常操作中,相信很多人在怎么用Vue组件封装上传图片和视频问题上存在疑惑,小编查阅了各式资料,整理出简单好用的操作方法,希望对大家解答”怎么用Vue组件封装上传图片和视频”的疑惑有所帮助!接下来,请跟着小编一起来学习吧!
首先下载依赖:
cnpm i -S vue-uuid ali-oss
图片和视频字段都是数组类型,保证可以上传多个文件。
UploadImageVideo:
<!--UploadImageVideo 分片上传 --><template> <div class="UploadImageVideo"> <el-upload action :on-change="handleChange" :on-remove="handleRemove" :limit="limitFileNumber" :on-exceed="handleExceed" :file-list="_fileList" :Http-request="handleHttpRequest" :before-upload="handleBeforeUpload" :multiple="isMultiple" > <el-button slot="trigger" size="small" type="primary">选择文件</el-button> <div slot="tip" class="el-upload__tip">{{ tip }}</div> </el-upload> <el-dialog title="上传进度" :visible.sync="dialogTableVisible" :close-on-click-modal="false" :modal-append-to-body="false" > <el-progress :text-inside="true" :stroke-width="26" :percentage="percentage"></el-progress> </el-dialog> </div></template> <script>import { uuid } from "vue-uuid";const OSS = require("ali-oss"); export default { name: "", components: {}, props: { region: { type: String, default: "oss-cn-chengdu" }, accessKeyId: { type: String, default: "xxx" }, accessKeySecret: { type: String, default: "xxx" }, //存储位置 bucket: { type: String, required: true }, currentUrls: { type: Array, default: () => [], required: true }, //限制上传文件数量 limitFileNumber: { type: Number, default: 1 }, //是否支持多选 isMultiple: { type: Boolean, default: false }, //文件格式 fileType: { type: String, default: "" }, //提示 tip: { type: String } }, data() { return { client: new OSS({ region: this.region, accessKeyId: this.accessKeyId, accessKeySecret: this.accessKeySecret, bucket: this.bucket }), percentage: 0, dialogTableVisible: false, fileList: [] }; }, computed: { //注意:计算属性里面慎用console.log()来打印,因为有可能打印的变量是依赖某个属性而出现该计算属性重复调用!!!!!! _fileList() { const arr = []; //一定要this.currentUrls判断一下是否非空,否则要报错 if (this.currentUrls.length !== 0) { for (const item of this.currentUrls) { let { pathname } = new URL(item); arr.push({ name: decodeURIComponent(pathname), url: item }); } } this.fileList = arr; //这行代码很重要!! return arr; } }, created() {}, mounted() {}, methods: { handleChange(file, fileList) { this.fileList = fileList; }, handleRemove(file, fileList) { this.fileList = fileList; }, handleExceed(files, fileList) { this.$message.warning( `当前限制选择 ${this.limitFileNumber} 个文件,本次选择了 ${ files.length } 个文件,共选择了 ${files.length + fileList.length} 个文件` ); }, //注意:为了让自定义上传handleHttpRequest生效,需满足: // 1、设置:auto-upload='true'或者不写这个属性,因为它默认为true 2、设置action='#'或者直接写action handleHttpRequest(file) { //虽然没有内容,但是这个函数不能少! }, //注意:自定义上传handleHttpRequest必须要生效,才会触发before-upload钩子函数 handleBeforeUpload(file) { if (this.fileType == "image") { let { type, size, name } = file; let isJPEG = type === "image/jpeg"; let isJPG = type === "image/jpg"; let isPNG = type === "image/png"; let isLt5M = size / 1024 / 1024 < 5; if (!isJPEG && !isJPG && !isPNG) { this.$message.error("上传图片只能是 JPEG/JPG/PNG 格式!"); return false; } if (!isLt5M) { this.$message.error("单张图片大小不能超过 5MB!"); return false; } } if (this.fileType == "video") { let { type, size, name } = file; let isMP4 = type === "video/mp4"; let isLt50M = size / 1024 / 1024 < 50; if (!isMP4) { this.$message.error("上传视频只能是 MP4 格式!"); return false; } if (!isLt50M) { this.$message.error("单个视频大小不能超过 50MB!"); return false; } } }, // 分片上传数据,可展示进度条。上传重命名后的文件到aliOSs, 并返回单个文件url字符串。可支持中文文件名 async UploadImageVideo(filename, file) { let newFileName = filename.split(".")[0] + "-" + uuid.v1() + "." + filename.split(".")[1]; let that = this; that.dialogTableVisible = true; let { res: { requestUrls } } = await this.client.multipartUpload(newFileName, file, { progress: function(p, checkpoint) { that.percentage = parseFloat((p * 100).toFixed(2)); } }); if (that.percentage == 100) { that.dialogTableVisible = false; } let { origin, pathname } = new URL(requestUrls[0]); return origin + decodeURIComponent(pathname); }, //批量上传文件。返回成功上传的url数组 async addFiles() { let urls = []; if (this.fileList.length !== 0) { for (const item of this.fileList) { let { name, raw } = item; let pathname = await this.UploadImageVideo(name, raw); urls.push(pathname); } } return urls; }, //更新文件数据。上传新数据到服务器,并删除服务器中的旧数据,返回更新后的url数组 async UpdateFiles() { let arr_newUploaded = []; //新上传的图片url。 let arr_original = []; //原有的图片url。不用删除 let arr_delete = []; //需要删除的图片url。 if (this.fileList.length !== 0) { for (const { raw, name, url } of this.fileList) { //注意:这里一定要判断raw是否存在。存在,则表示是新上传的;不存在,则表示是原有的 if (raw) { let pathname = await this.UploadImageVideo(name, raw); arr_newUploaded.push(pathname); } if (this.currentUrls.includes(url)) { arr_original.push(url); } } } for (const element of this.currentUrls) { if (!arr_original.includes(element)) { arr_delete.push(element); } } await this.deleteMultiFiles(arr_delete); return [...arr_original, ...arr_newUploaded]; }, //批量删除服务器中的文件。参数:待删除到服务器文件url数组。 async deleteMultiFiles(urls = []) { let arr_pathname = []; if (urls.length !== 0) { for (const item of urls) { //不要用let url=require("url");url.parse();已失效。要用new URL() let { pathname } = new URL(item); // decodeURIComponent()函数将中文乱码转为中文 arr_pathname.push(decodeURIComponent(pathname)); } //删除服务器中的图片 await this.client.deleteMulti(arr_pathname); } } }, watch: {}};</script> <style lang="sCSS" scoped>.UploadImageVideo { ::v-deep .el-upload-list__item { transition: none !important; }}</style>使用:
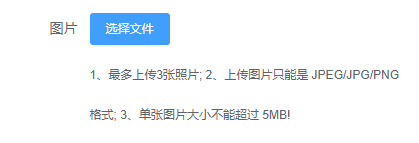
<UploadImageVideo ref="ref_UploadImageVideo" bucket="xxx" :currentUrls="fORMData.imgurl" :limitFileNumber="3" tip="1、最多上传3张照片; 2、上传图片只能是 JPEG/JPG/PNG 格式; 3、单张图片大小不能超过 5MB!" fileType="image" :isMultiple="true"></UploadImageVideo>fileType可选。默认不写,表示图片、视频都可上传。fileType="image"表示只能上传图片。fileType="video"表示只能上传视频
bucket必选。
isMultiple可选。默认为false
currentUrls必选。当前目前已有的文件服务器url数组。通常新增文件时,传入的currentUrls为空数组[];更新文件时,传入到currentUrls为非空数组
tip可选。提示内容
提供的方法:(当前组件中所有的上传都是批量上传,且为分片上传,以展示上传进度条)
UpdateFiles()。更新文件数据。上传新数据到服务器,并删除服务器中的旧数据,返回更新后的url数组
addFiles()。批量上传文件。返回成功上传的url数组
deleteMultiFiles(urls = [])。批量删除服务器中的文件。参数:待删除到服务器文件url数组。
UploadImageVideo(filename, file)。分片上传数据,可展示进度条。上传重命名后的文件到alioss, 并返回单个文件url字符串。可支持中文文件名
调用组件中的方法:例如可通过 let urls = await this.$refs["ref_UploadImageVideo"].addFiles();调用批量上传图片或视频的方法
例1:

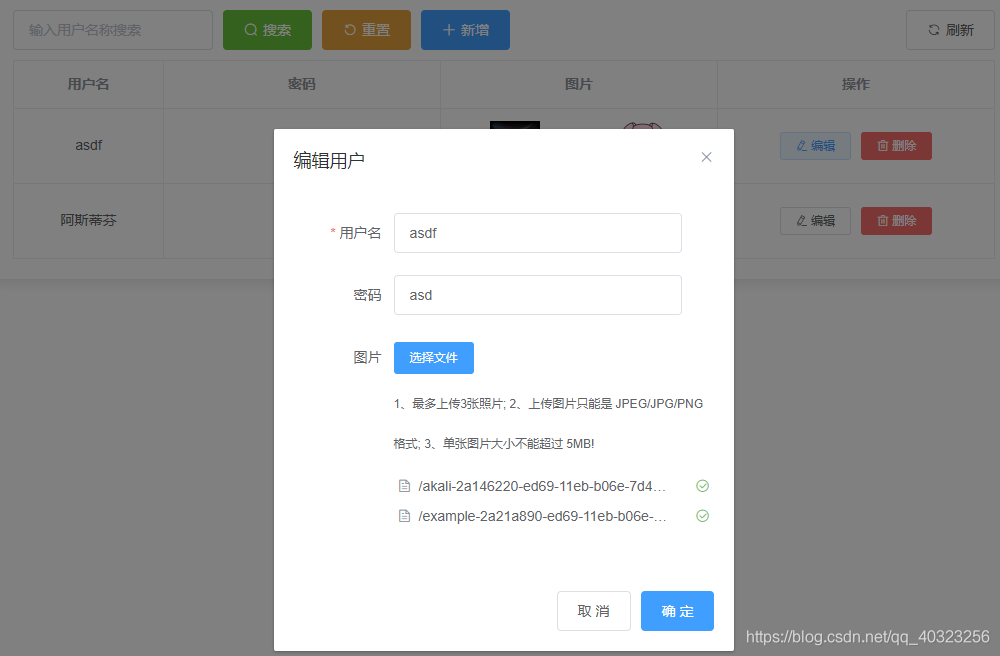
<!--userManage--><template> <div class="userManage"> <el-card> <div > <el-input v-model="searchName" clearable placeholder="输入用户名称搜索" /> <el-button sizi="mini" type="success" icon="el-icon-search" @click="searchUser(searchName)" >搜索</el-button> <el-button sizi="mini" type="warning" icon="el-icon-refresh-left" @click="searchName = ''" >重置</el-button> <el-button sizi="mini" @click="handleAdd()" type="primary" icon="el-icon-plus">新增</el-button> <el-button @click="getUserList()" sizi="mini" icon="el-icon-refresh" >刷新</el-button> </div> <el-table :data="tableData" border v-loading="isLoading"> <el-table-column label="用户名" prop="username" align="center" width="150px"></el-table-column> <el-table-column label="密码" prop="passWord" align="center"></el-table-column> <el-table-column label="图片" align="center"> <template slot-scope="scope"> <div style=" display: flex; justify-content: space-around; flex-flow: row wrap; " > <el-image v-for="(item, index) in scope.row.imgurl" :key="index" :src="item" :preview-src-list="scope.row.imgurl" ></el-image> <!-- <a :href="scope.row.imgurl" rel="external nofollow" target="_blank">{{scope.row.imgurl}}</a> --> </div> </template> </el-table-column> <el-table-column label="操作" align="center"> <template slot-scope="scope"> <el-button size="mini" @click="showEditDialog(scope.row)"> <i class="el-icon-edit" /> 编辑 </el-button> <el-button size="mini" type="danger" @click="handleDelete(scope.row)"> <i class="el-icon-delete" /> 删除 </el-button> </template> </el-table-column> </el-table> </el-card> <UserManageDialog :dialog="dialog" :formData="formData" @addUser="addUser" @editUser="editUser"></UserManageDialog> </div></template> <script>import UserManageDialog from "./userManageDialog.vue";import { client_alioss, deleteMultiFiles } from "@/utils/alioss.js"; import { addUser, getUserList, editUser, deleteUser, searchUser} from "@/api/userManage/index";export default { name: "userManage", components: { UserManageDialog }, data() { return { searchName: "", isLoading: false, dialog: { show: false, title: "" }, formData: {}, tableData: [ { _id: "", username: "admin", password: "123", imgurl: [] } ], currentImgs: [] }; }, props: {}, created() {}, mounted() { this.getUserList(); }, computed: {}, methods: { //获取用户列表 async getUserList() { this.isLoading = true; let { data } = await getUserList(); this.tableData = data.data; this.isLoading = false; }, //打开新增用户窗口 handleAdd() { this.dialog = { show: true, title: "新增用户", option: "add" }; this.formData = { username: "", password: "", imgurl: [] }; }, //打开编辑用户窗口 showEditDialog(row) { this.currentImgs = row.imgurl; this.dialog = { show: true, title: "编辑用户", option: "edit" }; this.formData = { _id: row._id, username: row.username, password: row.password, imgurl: row.imgurl }; }, //新增用户 async addUser(urls) { this.formData.imgurl = urls; await addUser(this.formData); this.dialog.show = false; this.$notify({ title: "成功", message: "新增用户成功!", type: "success" }); this.getUserList(); }, //编辑用户 async editUser(urls) { this.formData.imgurl = urls; await editUser(this.formData, this.formData._id); //更新数据库,尤其是图片url this.dialog.show = false; this.$notify({ title: "成功", message: "编辑用户成功!", type: "success" }); this.getUserList(); }, //删除用户 handleDelete({ _id }) { this.$confirm("此操作将永久删除该文件, 是否继续?", "提示", { confirmButtonText: "确定", cancelButtonText: "取消", type: "warning" }) .then(async () => { this.$message({ type: "success", message: "删除成功!", showClose: true }); let { data: { imgurl } } = await deleteUser(_id); //删除服务器中的文件。传入待删除的url数组 await deleteMultiFiles(imgurl); this.getUserList(); }) .catch(() => { this.$message({ type: "info", message: "已取消删除", showClose: true }); }); }, //根据用户名查询 async searchUser(searchName) { this.isLoading = true; let { data } = await searchUser({ searchName }); this.tableData = data.data; this.isLoading = false; } }, watch: {}};</script> <style lang="scss" scoped>.userManage {}</style> 
<!--userManageDialog --><template> <div class="userManageDialog"> <el-dialog :title="dialog.title" width="45%" :visible.sync="dialog.show" v-if="dialog.show"> <el-form ref="ref_form_userManage" :model="formData" :rules="rules" label-width="100px"> <el-form-item label="用户名" prop="username"> <el-input v-model="formData.username" autocomplete="off" ></el-input> </el-form-item> <el-form-item label="密码" prop="password"> <el-input v-model="formData.password" autocomplete="off" ></el-input> </el-form-item> <el-form-item label="图片" prop="imgurl"> <!-- fileType属性不写的话,表示图片、视频都可上传。fileType="image"表示只能上传图片。fileType="video"表示只能上传视频 --> <UploadImageVideo ref="ref_UploadImageVideo" bucket="bucket-lijiang-test" :currentUrls="formData.imgurl" :limitFileNumber="3" tip="1、最多上传3张照片; 2、上传图片只能是 JPEG/JPG/PNG 格式; 3、单张图片大小不能超过 5MB!" fileType="image" :isMultiple="true" ></UploadImageVideo> </el-form-item> </el-form> <div slot="footer" class="dialog-footer"> <el-button @click="dialog.show = false">取 消</el-button> <el-button v-if="dialog.option == 'add'" @click="addUser('ref_form_userManage')" type="primary" >确 定</el-button> <el-button v-if="dialog.option == 'edit'" @click="editUser('ref_form_userManage')" type="primary" >确 定</el-button> </div> </el-dialog> </div></template> <script>import UploadImageVideo from "@/components/UploadImageVideo"; export default { name: "userManageDialog", components: { UploadImageVideo }, props: ["dialog", "formData"], data() { return { fileList: [], rules: { username: [ { required: true, message: "请输入用户名称", trigger: "blur" } ] } }; }, created() {}, mounted() {}, computed: {}, methods: { addUser(formName) { this.$refs[formName].validate(async valid => { if (valid) { let urls = await this.$refs["ref_UploadImageVideo"].addFiles(); this.$emit("addUser", urls); } else { console.log("error submit!!"); return false; } }); }, editUser(formName) { this.$refs[formName].validate(async valid => { if (valid) { let urls = await this.$refs["ref_UploadImageVideo"].UpdateFiles(); this.$emit("editUser", urls); } else { console.log("error submit!!"); return false; } }); } }, watch: {}};</script><style lang="scss" scoped></style> 
import { uuid } from 'vue-uuid';const OSS = require("ali-oss"); let client = new OSS({ region: "oss-cn-chengdu", accessKeyId: "LTAI5tQPHvixV8aakp1vg8Jr", accessKeySecret: "xYyToToPe8UFQMdt4hpTUS4PNxzl9S", bucket: "bucket-lijiang-test", }); export const client_alioss = client; //删除文件数组export async function deleteMultiFiles(urls = []) { let arr_pathname = []; if (urls.length !== 0) { for (const item of urls) { //不要用let url=require("url");url.parse();已失效。要用new URL() let { pathname } = new URL(item); // decodeURIComponent()函数将中文乱码转为中文 arr_pathname.push(decodeURIComponent(pathname)); } await client.deleteMulti(arr_pathname); }} 
import request from '@/utils/request'// 获取用户列表export function getUserList() { return request({ url: '/api/userManage', method: 'get' })} // 新增用户export function addUser(data) { return request({ url: '/api/userManage', method: 'post', data })} // 编辑用户export function editUser(data, _id) { return request({ url: `/api/userManage/${_id}`, method: 'put', data })} // 删除用户export function deleteUser(_id) { return request({ url: `/api/userManage/${_id}`, method: 'delete' })} // 根据关键字查询export function searchUser(data) { return request({ url: `/api/userManage/search`, method: 'get', params: data })}
const router = require('koa-router')() const User = require("../models/User"); //引入模块模型router.prefix('/userManage') //获取用户列表router.get('/', async (ctx, next) => { let data = await User.find({}) ctx.body = { code: 200, message: "请求成功", data, }})//新增用户router.post('/', async (ctx, next) => { let { username, password, imgurl } = ctx.request.body; await User.create({ username, password, imgurl }) ctx.body = { code: 200, message: "新增成功" }})//编辑用户router.put('/:_id', async (ctx, next) => { let { username, password, imgurl } = ctx.request.body; let { _id } = ctx.params await User.findByIdAndUpdate(_id, { username, password, imgurl }) ctx.body = { code: 200, message: "编辑成功" }})//删除用户router.delete('/:_id', async (ctx, next) => { let { _id } = ctx.params; let { imgurl } = await User.findByIdAndDelete(_id) ctx.body = { code: 200, message: "删除成功", imgurl } }) //根据关键字查询用户。模糊查询 router.get('/search', async (ctx, next) => { let { searchName } = ctx.request.query; let data = await User.find({ username: { $regex: searchName } }) ctx.body = { code: 200, message: "查询成功", data }})module.exports = router到此,关于“怎么用Vue组件封装上传图片和视频”的学习就结束了,希望能够解决大家的疑惑。理论与实践的搭配能更好的帮助大家学习,快去试试吧!若想继续学习更多相关知识,请继续关注编程网网站,小编会继续努力为大家带来更多实用的文章!
--结束END--
本文标题: 怎么用Vue组件封装上传图片和视频
本文链接: https://www.lsjlt.com/news/299234.html(转载时请注明来源链接)
有问题或投稿请发送至: 邮箱/279061341@qq.com QQ/279061341
下载Word文档到电脑,方便收藏和打印~
2024-05-09
2024-05-09
2024-05-09
2024-05-09
2024-05-09
2024-05-09
2024-05-09
2024-05-09
2024-05-09
2024-05-09
回答
回答
回答
回答
回答
回答
回答
回答
回答
回答


官方手机版

微信公众号

商务合作


0