本篇文章给大家分享的是有关SpringBoot中怎样整合RabbitMQ,小编觉得挺实用的,因此分享给大家学习,希望大家阅读完这篇文章后可以有所收获,话不多说,跟着小编一起来看看吧。一、环境准备1、pom依赖<!-- 父工程
本篇文章给大家分享的是有关SpringBoot中怎样整合RabbitMQ,小编觉得挺实用的,因此分享给大家学习,希望大家阅读完这篇文章后可以有所收获,话不多说,跟着小编一起来看看吧。
1、pom依赖
<!-- 父工程依赖 --> <parent> <groupId>org.springframework.boot</groupId> <artifactId>spring-boot-starter-parent</artifactId> <version>2.3.6.RELEASE</version> </parent> <dependencies> <dependency> <groupId>org.springframework.boot</groupId> <artifactId>spring-boot-starter-WEB</artifactId> </dependency> <dependency> <groupId>org.springframework.boot</groupId> <artifactId>spring-boot-starter-aMQp</artifactId> </dependency> <dependency> <groupId>org.springframework.boot</groupId> <artifactId>spring-boot-starter-test</artifactId> </dependency> <dependency> <groupId>io.springfox</groupId> <artifactId>springfox-swagger2</artifactId> <version>2.6.0</version> </dependency> <dependency> <groupId>io.springfox</groupId> <artifactId>springfox-swagger-ui</artifactId> <version>2.6.0</version> </dependency> </dependencies>2、配置文件
server: port: 8080spring: rabbitmq: host: 192.168.131.171 port: 5672 username: jihu passWord: jihu virtual-host: /jihu3、启动类
@SpringBootApplicationpublic class RabbitMQApplication { public static void main(String[] args) { SpringApplication.run(RabbitMQApplication.class); }}5、Swagger2类
@Configuration@EnableSwagger2public class Swagger2 { // Http://127.0.0.1:8080/swagger-ui.html @Bean public Docket createRestapi() { return new Docket(DocumentationType.SWAGGER_2) .apiInfo(apiInfo()) .select() .apis(RequestHandlerSelectors.basePackage("com.jihu")) .paths(PathSelectors.any()) .build(); } private ApiInfo apiInfo() { return new ApiInfoBuilder() .title("极狐-Spring Boot中使用spring-boot-starter-amqp集成rabbitmq") .description("测试SpringBoot整合进行各种工作模式信息的发送") .contact("roykingw") .version("1.0") .build(); }}6、ProducerController
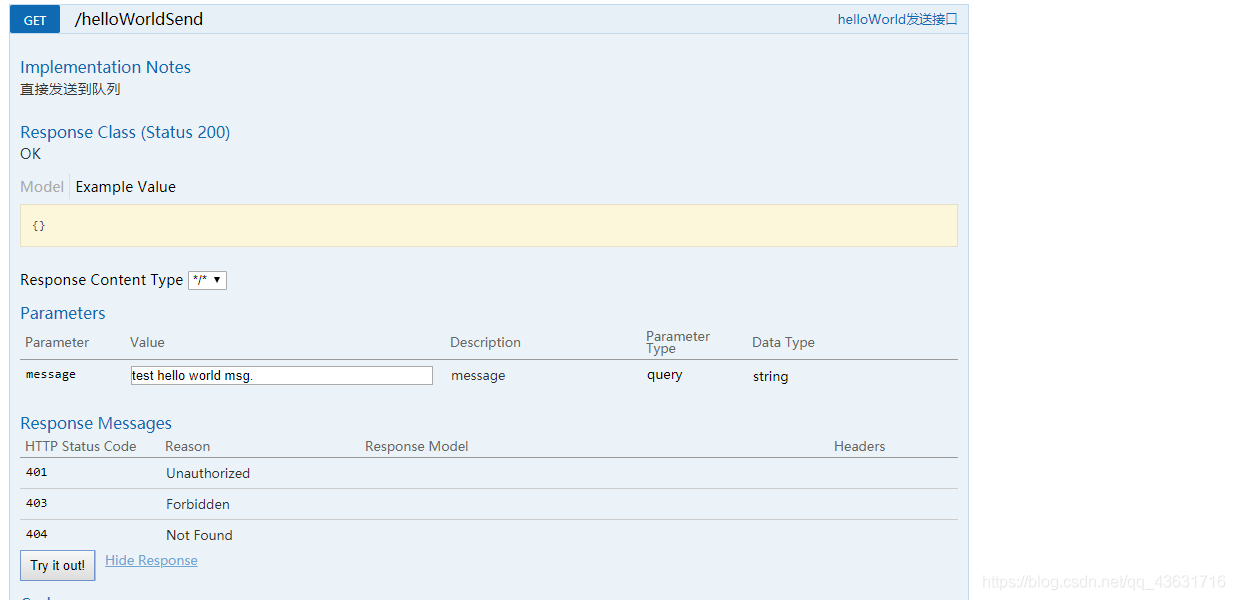
@RestControllerpublic class ProducerController { @Autowired private RabbitTemplate rabbitTemplate; //helloWorld 直连模式 @ApiOperation(value = "helloWorld发送接口", notes = "直接发送到队列") @GetMapping(value = "/helloWorldSend") public Object helloWorldSend(String message) throws AmqpException, UnsupportedEncodingException { //设置部分请求参数 MessageProperties messageProperties = new MessageProperties(); messageProperties.setContentType(MessageProperties.CONTENT_TYPE_TEXT_PLAIN); //发消息 rabbitTemplate.send("helloWorldqueue", new Message(message.getBytes("UTF-8"), messageProperties)); return "message sended : " + message; } //工作队列模式 @ApiOperation(value = "workqueue发送接口", notes = "发送到所有监听该队列的消费") @GetMapping(value = "/workqueueSend") public Object workqueueSend(String message) throws AmqpException, UnsupportedEncodingException { MessageProperties messageProperties = new MessageProperties(); messageProperties.setContentType(MessageProperties.CONTENT_TYPE_TEXT_PLAIN); //制造多个消息进行发送操作 for (int i = 0; i < 10; i++) { rabbitTemplate.send("work_sb_mq_q", new Message(message.getBytes("UTF-8"), messageProperties)); } return "message sended : " + message; } // pub/sub 发布订阅模式 交换机类型 fanout @ApiOperation(value = "fanout发送接口", notes = "发送到fanoutExchange。消息将往该exchange下的所有queue转发") @GetMapping(value = "/fanoutSend") public Object fanoutSend(String message) throws AmqpException, UnsupportedEncodingException { MessageProperties messageProperties = new MessageProperties(); messageProperties.setContentType(MessageProperties.CONTENT_TYPE_TEXT_PLAIN); //fanout模式只往exchange里发送消息。分发到exchange下的所有queue rabbitTemplate.send("fanoutExchange", "", new Message(message.getBytes("UTF-8"), messageProperties)); return "message sended : " + message; } //routing路由工作模式 交换机类型 direct @ApiOperation(value = "direct发送接口", notes = "发送到directExchange。exchange转发消息时,会往routingKey匹配的queue发送") @GetMapping(value = "/directSend") public Object routingSend(String routingKey, String message) throws AmqpException, UnsupportedEncodingException { if (null == routingKey) { routingKey = "china.changsha"; } MessageProperties messageProperties = new MessageProperties(); messageProperties.setContentType(MessageProperties.CONTENT_TYPE_TEXT_PLAIN); //fanout模式只往exchange里发送消息。分发到exchange下的所有queue rabbitTemplate.send("directExchange", routingKey, new Message(message.getBytes("UTF-8"), messageProperties)); return "message sended : routingKey >" + routingKey + ";message > " + message; } //topic 工作模式 交换机类型 topic @ApiOperation(value = "topic发送接口", notes = "发送到topicExchange。exchange转发消息时,会往routingKey匹配的queue发送,*代表一个单词,#代表0个或多个单词。") @GetMapping(value = "/topicSend") public Object topicSend(String routingKey, String message) throws AmqpException, UnsupportedEncodingException { if (null == routingKey) { routingKey = "changsha.kf"; } MessageProperties messageProperties = new MessageProperties(); messageProperties.setContentType(MessageProperties.CONTENT_TYPE_TEXT_PLAIN); //fanout模式只往exchange里发送消息。分发到exchange下的所有queue rabbitTemplate.send("topicExchange", routingKey, new Message(message.getBytes("UTF-8"), messageProperties)); return "message sended : routingKey >" + routingKey + ";message > " + message; }}7、ConcumerReceiver
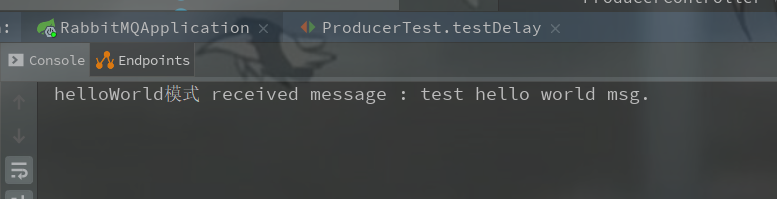
@Componentpublic class ConcumerReceiver { //直连模式的多个消费者,会分到其中一个消费者进行消费。类似task模式 //通过注入RabbitContainerFactory对象,来设置一些属性,相当于task里的channel.basicQos @RabbitListener(queues = "helloWorldqueue") public void helloWorldReceive(String message) { System.out.println("helloWorld模式 received message : " + message); } //工作队列模式 @RabbitListener(queues = "work_sb_mq_q") public void wordQueueReceiveq1(String message) { System.out.println("工作队列模式1 received message : " + message); } @RabbitListener(queues = "work_sb_mq_q") public void wordQueueReceiveq2(String message) { System.out.println("工作队列模式2 received message : " + message); } //pub/sub模式进行消息监听 @RabbitListener(queues = "fanout.q1") public void fanoutReceiveq1(String message) { System.out.println("发布订阅模式1received message : " + message); } @RabbitListener(queues = "fanout.q2") public void fanoutReceiveq2(String message) { System.out.println("发布订阅模式2 received message : " + message); } //Routing路由模式 @RabbitListener(queues = "direct_sb_mq_q1") public void routingReceiveq1(String message) { System.out.println("Routing路由模式routingReceiveq11111 received message : " + message); } @RabbitListener(queues = "direct_sb_mq_q2") public void routingReceiveq2(String message) { System.out.println("Routing路由模式routingReceiveq22222 received message : " + message); } //topic 模式 //注意这个模式会有优先匹配原则。例如发送routingKey=hunan.IT,那匹配到hunan.*(hunan.IT,hunan.eco),之后就不会再去匹配*.ITd @RabbitListener(queues = "topic_sb_mq_q1") public void topicReceiveq1(String message) { System.out.println("Topic模式 topic_sb_mq_q1 received message : " + message); } @RabbitListener(queues = "topic_sb_mq_q2") public void topicReceiveq2(String message) { System.out.println("Topic模式 topic_sb_mq_q2 received message : " + message); }}队列配置:
@Configurationpublic class HelloWorldConfig {@Beanpublic Queue setQueue() {return new Queue("helloWorldqueue");}}@Configurationpublic class WorkConfig { //声明队列 @Bean public Queue workQ1() { return new Queue("work_sb_mq_q"); }}@Configurationpublic class FanoutConfig {//声明队列@Beanpublic Queue fanoutQ1() {return new Queue("fanout.q1");}@Beanpublic Queue fanoutQ2() {return new Queue("fanout.q2");}//声明exchange@Beanpublic FanoutExchange setFanoutExchange() {return new FanoutExchange("fanoutExchange");}//声明Binding,exchange与queue的绑定关系@Beanpublic Binding bindQ1() {return BindingBuilder.bind(fanoutQ1()).to(setFanoutExchange());}@Beanpublic Binding bindQ2() {return BindingBuilder.bind(fanoutQ2()).to(setFanoutExchange());}}@Configurationpublic class DirectConfig {//声明队列@Beanpublic Queue directQ1() {return new Queue("direct_sb_mq_q1");}@Beanpublic Queue directQ2() {return new Queue("direct_sb_mq_q2");}//声明exchange@Beanpublic DirectExchange setDirectExchange() {return new DirectExchange("directExchange");}//声明binding,需要声明一个routingKey@Beanpublic Binding bindDirectBind1() {return BindingBuilder.bind(directQ1()).to(setDirectExchange()).with("china.changsha");}@Beanpublic Binding bindDirectBind2() {return BindingBuilder.bind(directQ2()).to(setDirectExchange()).with("china.beijing");}}@Configurationpublic class TopicConfig {//声明队列@Beanpublic Queue topicQ1() {return new Queue("topic_sb_mq_q1");}@Beanpublic Queue topicQ2() {return new Queue("topic_sb_mq_q2");}//声明exchange@Beanpublic TopicExchange setTopicExchange() {return new TopicExchange("topicExchange");}//声明binding,需要声明一个roytingKey@Beanpublic Binding bindTopicHebei1() {return BindingBuilder.bind(topicQ1()).to(setTopicExchange()).with("changsha.*");}@Beanpublic Binding bindTopicHebei2() {return BindingBuilder.bind(topicQ2()).to(setTopicExchange()).with("#.beijing");}}测试
我们启动上面的SpringBoot项目。
然后我们访问swagger地址:http://127.0.0.1:8080/swagger-ui.html
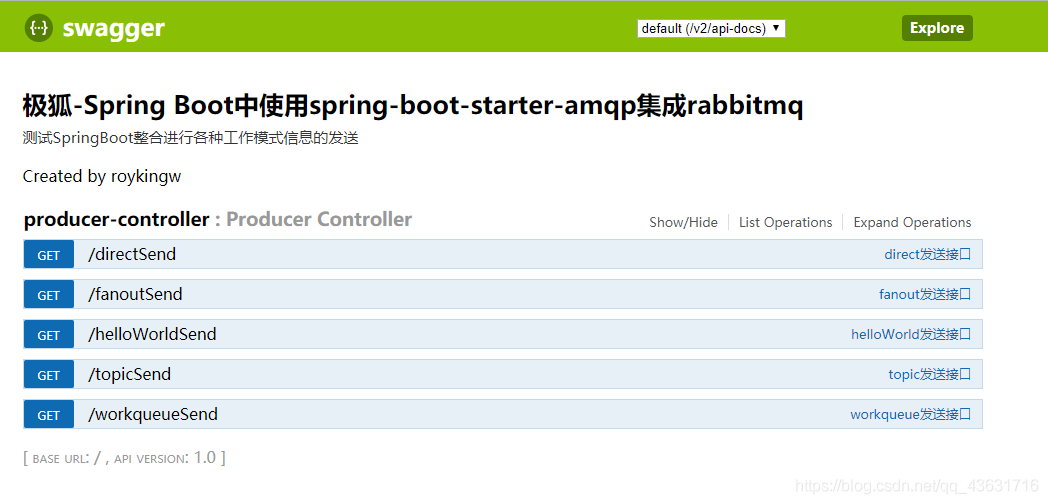
然后我们就可以使用swagger测试接口了。
以上就是SpringBoot中怎样整合RabbitMQ,小编相信有部分知识点可能是我们日常工作会见到或用到的。希望你能通过这篇文章学到更多知识。更多详情敬请关注编程网精选频道。
--结束END--
本文标题: SpringBoot中怎样整合RabbitMQ
本文链接: https://www.lsjlt.com/news/299370.html(转载时请注明来源链接)
有问题或投稿请发送至: 邮箱/279061341@qq.com QQ/279061341
下载Word文档到电脑,方便收藏和打印~
2024-05-16
2024-05-16
2024-05-16
2024-05-16
2024-05-16
2024-05-16
2024-05-16
2024-05-16
2024-05-16
2024-05-16
回答
回答
回答
回答
回答
回答
回答
回答
回答
回答


官方手机版

微信公众号

商务合作


0