这篇文章将为大家详细讲解有关SpringBoot如何使用websocket技术主动给前端发送消息,小编觉得挺实用的,因此分享给大家做个参考,希望大家阅读完这篇文章后可以有所收获。使用WEBSocket技术主动给前端发送消息springBoo
这篇文章将为大家详细讲解有关SpringBoot如何使用websocket技术主动给前端发送消息,小编觉得挺实用的,因此分享给大家做个参考,希望大家阅读完这篇文章后可以有所收获。
springBoot2.0对WebSocket的支持简直太棒了,直接就有包可以引入
<dependency> <groupId>org.springframework.boot</groupId> <artifactId>spring-boot-starter-websocket</artifactId> </dependency>启用WebSocket的支持也是很简单
package com.spark.common.config; import org.springframework.context.annotation.Bean;import org.springframework.context.annotation.Configuration;import org.springframework.web.socket.server.standard.ServerEndpointExporter; @Configurationpublic class WebSocketConfig { @Bean public ServerEndpointExporter serverEndpointExporter() { return new ServerEndpointExporter(); }}这就是重点了,核心都在这里。
因为WebSocket是类似客户端服务端的形式(采用ws协议),那么这里的WebSocketServer其实就相当于一个ws协议的Controller
直接@ServerEndpoint("/socketServer/{userId}") 、@Component启用即可,然后在里面实现@OnOpen开启连接,@onClose关闭连接,@onMessage接收消息等方法。
新建一个ConcurrentHashMap webSocketMap 用于接收当前userId的WebSocket,方便IM之间对userId进行推送消息。单机版实现到这里就可以。
package com.spark.common.utils.websocket; import com.alibaba.fastJSON.jsON;import com.alibaba.fastjson.JSONObject;import com.spark.common.utils.StringUtils;import lombok.extern.slf4j.Slf4j;import org.springframework.stereotype.Component; import javax.websocket.*;import javax.websocket.server.PathParam;import javax.websocket.server.ServerEndpoint;import java.io.IOException;import java.util.concurrent.ConcurrentHashMap; @ServerEndpoint("/socketServer/{userId}")@Component@Slf4jpublic class WebSocketServer { private static int onlineCount = 0; private static ConcurrentHashMap<String, WebSocketServer> webSocketMap = new ConcurrentHashMap<>(); private Session session; private String userId = ""; @OnOpen public void onOpen(Session session, @PathParam("userId") String userId) { this.session = session; this.userId = userId; if (webSocketMap.containsKey(userId)) { webSocketMap.remove(userId); webSocketMap.put(userId, this); //加入set中 } else { webSocketMap.put(userId, this); //加入set中 addOnlineCount(); //在线数加1 } log.info("用户连接:" + userId + ",当前在线人数为:" + getOnlineCount()); try { sendMessage("连接成功"); } catch (IOException e) { log.error("用户:" + userId + ",网络异常!"); } } @OnClose public void onClose() { if (webSocketMap.containsKey(userId)) { webSocketMap.remove(userId); //从set中删除 subOnlineCount(); } log.info("用户退出:" + userId + ",当前在线人数为:" + getOnlineCount()); } @OnMessage public void onMessage(String message, Session session) { log.info("用户消息:" + userId + ",报文:" + message); //可以群发消息 //消息保存到数据库、redis if (StringUtils.isNotBlank(message)) { try { //解析发送的报文 JSONObject jsonObject = JSON.parseObject(message); //追加发送人(防止串改) jsonObject.put("fromUserId", this.userId); String toUserId = jsonObject.getString("toUserId"); //传送给对应toUserId用户的websocket if (StringUtils.isNotBlank(toUserId) && webSocketMap.containsKey(toUserId)) { webSocketMap.get(toUserId).sendMessage(jsonObject.toJSONString()); } else { log.error("请求的userId:" + toUserId + "不在该服务器上"); //否则不在这个服务器上,发送到mysql或者Redis } } catch (Exception e) { e.printStackTrace(); } } } @OnError public void onError(Session session, Throwable error) { log.error("用户错误:" + this.userId + ",原因:" + error.getMessage()); error.printStackTrace(); } public void sendMessage(String message) throws IOException { this.session.getBasicRemote().sendText(message); } public static void sendInfo(String message, @PathParam("userId") String userId) throws IOException { log.info("发送消息到:" + userId + ",报文:" + message); if (StringUtils.isNotBlank(userId) && webSocketMap.containsKey(userId)) { webSocketMap.get(userId).sendMessage(message); } else { log.error("用户" + userId + ",不在线!"); } } public static synchronized int getOnlineCount() { return onlineCount; } public static synchronized void addOnlineCount() { WebSocketServer.onlineCount++; } public static synchronized void subOnlineCount() { WebSocketServer.onlineCount--; } }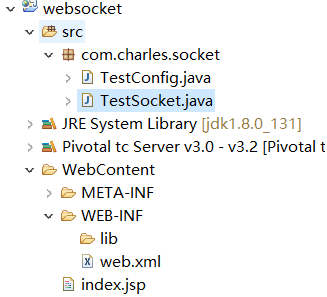
TestSocket.java
package com.charles.socket; import javax.websocket.OnMessage;import javax.websocket.OnOpen;import javax.websocket.Session;import javax.websocket.server.ServerEndpoint; @ServerEndpoint(value = "/helloSocket")public class TestSocket { @OnOpen public void open(Session session) { System.out.println("开始建立了链接..."); System.out.println("当前session的id是:" + session.getId()); } @OnMessage public void message(Session session, String data) { System.out.println("开始处理消息..."); System.out.println("当前session的id是:" + session.getId()); System.out.println("从前端页面传过来的数据是:" + data); }}index.jsp 代码如下:
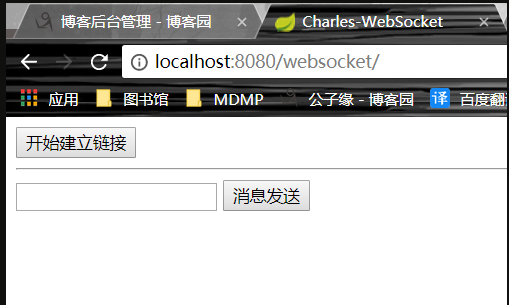
<%@ page language="java" contentType="text/html; charset=UTF-8" pageEncoding="UTF-8"%><!DOCTYPE html PUBLIC "-//W3C//DTD HTML 4.01 Transitional//EN" "Http://www.w3.org/TR/html4/loose.dtd"><html><head><meta http-equiv="Content-Type" content="text/html; charset=UTF-8"><title>Charles-WebSocket</title> <script type="text/javascript"> var websocket = null; var target = "ws://localhost:8080/websocket/helloSocket"; function buildConnection() { if('WebSocket' in window) { websocket = new WebSocket(target); } else if('MozWebSocket' in window) { websocket = MozWebSocket(target); } else { window.alert("浏览器不支持WebSocket"); } } // 往后台服务器发送消息. function sendMessage() { var sendmsg = document.getElementById("sendMsg").value; console.log("发送的消息:" + sendmsg); // 发送至后台服务器中. websocket.send(sendmsg); } </script></head><body> <button onclick="buildConnection();">开始建立链接</button> <hr> <input id="sendMsg" /> <button onclick="sendMessage();">消息发送</button> </body></html>注意:
和后台交互的时候,一定要先点击:开始建立连接。你懂的...没有建立连接的话,是不能发送消息的。
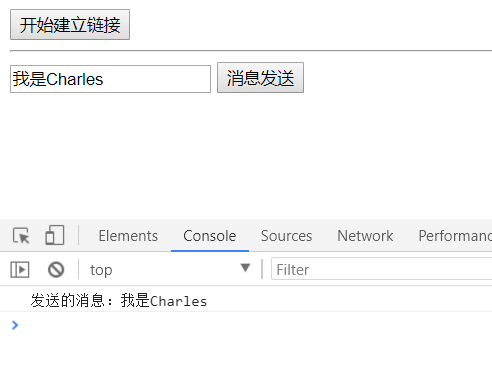
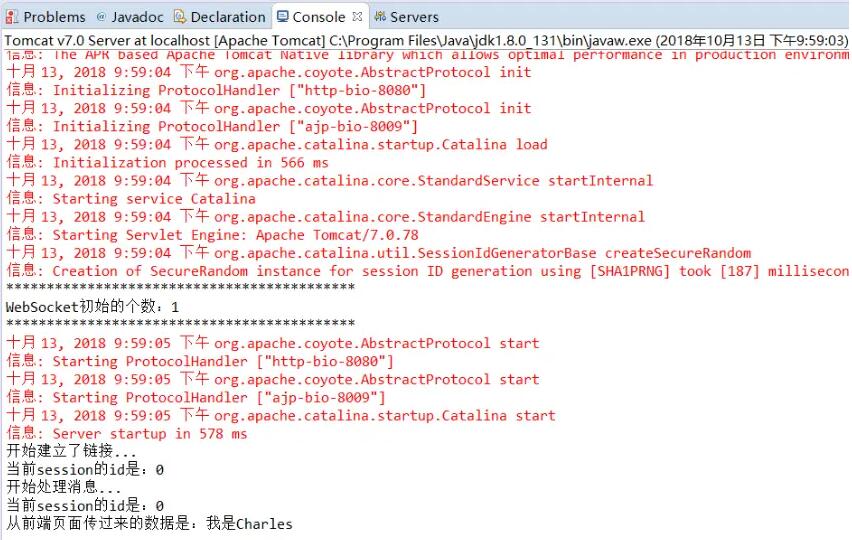
先点击,开始建立连接,然后在文本框中输入内容:我是Charles,点击消息发送,在看后台日志。
关于“springboot如何使用websocket技术主动给前端发送消息”这篇文章就分享到这里了,希望以上内容可以对大家有一定的帮助,使各位可以学到更多知识,如果觉得文章不错,请把它分享出去让更多的人看到。
--结束END--
本文标题: springboot如何使用websocket技术主动给前端发送消息
本文链接: https://www.lsjlt.com/news/302267.html(转载时请注明来源链接)
有问题或投稿请发送至: 邮箱/279061341@qq.com QQ/279061341
下载Word文档到电脑,方便收藏和打印~
2024-05-22
2024-05-22
2024-05-22
2024-05-21
2024-05-21
2024-05-21
2024-05-21
2024-05-21
2024-05-21
2024-05-21
回答
回答
回答
回答
回答
回答
回答
回答
回答
回答


官方手机版

微信公众号

商务合作


0