本篇文章为大家展示了ZooKeeper如何实现分布式服务配置中心,内容简明扼要并且容易理解,绝对能使你眼前一亮,通过这篇文章的详细介绍希望你能有所收获。1 linux安装并启动Zookeeper1.1 安装下载链接:https://arcH
本篇文章为大家展示了ZooKeeper如何实现分布式服务配置中心,内容简明扼要并且容易理解,绝对能使你眼前一亮,通过这篇文章的详细介绍希望你能有所收获。
下载链接:https://arcHive.apache.org/dist/zookeeper/
[root@iZ1608aqb7ntn9Z tmp]# lsapache-zookeeper-3.5.7-bin.tar.gz hsperfdata_root[root@iZ1608aqb7ntn9Z tmp]# tar -zxvf apache-zookeeper-3.5.7-bin.tar.gz apache-zookeeper-3.5.7-bin/docs/apache-zookeeper-3.5.7-bin/docs/skin/apache-zookeeper-3.5.7-bin/docs/images/......[root@iZ1608aqb7ntn9Z tmp]# mv apache-zookeeper-3.5.7-bin /usr/local/zookeeper[root@iZ1608aqb7ntn9Z tmp]# cd /usr/local/zookeeper[root@iZ1608aqb7ntn9Z zookeeper]# cd conf/[root@iZ1608aqb7ntn9Z conf]# lsconfiguration.xsl log4j.properties zoo_sample.cfg[root@iZ1608aqb7ntn9Z conf]# cp zoo_sample.cfg zoo.cfg[root@iZ1608aqb7ntn9Z conf]# lsconfiguration.xsl log4j.properties zoo.cfg zoo_sample.cfg[root@iZ1608aqb7ntn9Z conf]# vim zoo.cfg # 修改zoo.cfg配置文件 内容为:tickTime=2000initLimit=10syncLimit=5dataDir=/usr/local/zookeeper/dataclientPort=2181# 保存退出[root@iZ1608aqb7ntn9Z conf]# cd ..[root@iZ1608aqb7ntn9Z zookeeper]# mkdir data[root@iZ1608aqb7ntn9Z zookeeper]# lsbin conf data docs lib LICENSE.txt NOTICE.txt README.md README_packaging.txt[root@iZ1608aqb7ntn9Z zookeeper]# cd bin/[root@iZ1608aqb7ntn9Z bin]# ./zkServer start ......[root@iZ1608aqb7ntn9Z bin]# ./zkServer.sh statusZooKeeper JMX enabled by defaultUsing config: /usr/local/zookeeper/bin/../conf/zoo.cfGClient port found: 2181. Client address: localhost. Client SSL: false.Error contacting service. It is probably not running.在上边我们发现了启动错误,查看日志,发现8080端口被占用,通过查阅Zookeeper3.5的官方文档,发现这是Zookeeper3.5的新特性:

所以我们需要再次修改配置文件,修改启动端口:
在配置文件中加入admin.serverPort=8888
然后再次启动,查看状态:
[root@iZ1608aqb7ntn9Z bin]# ./zkServer.sh statusZooKeeper JMX enabled by defaultUsing config: /usr/local/zookeeper3.5.7/bin/../conf/zoo.cfgClient port found: 2181. Client address: localhost.Mode: standalone发现启动成功,接下来我们用客户端链接:
[root@iZ1608aqb7ntn9Z bin]# ./zkCli.sh Connecting to localhost:2181......WatchedEvent state:SyncConnected type:None path:null[zk: localhost:2181(CONNECTING) 0] ls /[zookeeper](略)
2 zookeeper配置
[zk: localhost:2181(CONNECTING) 0] ls /[zookeeper][zk: localhost:2181(CONNECTED) 4] create /configCreated /config[zk: localhost:2181(CONNECTED) 6] create /config/hello # config后的名称要与spring.name的名称对应Created /config/hello[zk: localhost:2181(CONNECTED) 7] create /config/hello/student.name zsCreated /config/hello/student.name[zk: localhost:2181(CONNECTED) 8] get /config/hello/student.name zs<dependencies> <dependency> <groupId>org.springframework.boot</groupId> <artifactId>spring-boot-starter-WEB</artifactId> </dependency> <dependency> <groupId>org.springframework.cloud</groupId> <artifactId>spring-cloud-starter-zookeeper-discovery</artifactId> <version>2.1.4.RELEASE</version> <type>pom</type> <scope>runtime</scope> </dependency> <dependency> <groupId>org.springframework.cloud</groupId> <artifactId>spring-cloud-starter-zookeeper-config</artifactId> <version>2.1.4.RELEASE</version> <type>pom</type> <scope>runtime</scope> </dependency></dependencies>注意:一定要注意Spring Boot和spring cloud的版本对应!
application.yml
server: port: 0 # 表示随机端口student: name: 1bootstrap.yml
spring: cloud: zookeeper: connect-string: 8.131.57.161:2181 # zk服务端地址 enabled: true # 启动远程配置 application: name: hello@RestControllerpublic class HelloController { @Value("${student.name}") private String name; @RequestMapping("/hello") public String getName() { return name; }}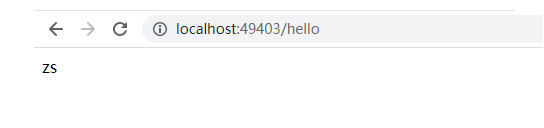
下面我们来修改下远程配置,看下是不是真的使用了zookeeper的配置文件:
[zk: localhost:2181(CONNECTED) 9] delete /config/hello/student.name [zk: localhost:2181(CONNECTED) 10] get /config/hello/student.name org.apache.zookeeper.KeeperException$NonodeException: KeeperErrorCode = NoNode for /config/hello/student.name[zk: localhost:2181(CONNECTED) 11] create /config/hello/student.name ls Created /config/hello/student.name[zk: localhost:2181(CONNECTED) 12] get /config/hello/student.name ls重新启动项目:

上述内容就是Zookeeper如何实现分布式服务配置中心,你们学到知识或技能了吗?如果还想学到更多技能或者丰富自己的知识储备,欢迎关注编程网精选频道。
--结束END--
本文标题: Zookeeper如何实现分布式服务配置中心
本文链接: https://www.lsjlt.com/news/306073.html(转载时请注明来源链接)
有问题或投稿请发送至: 邮箱/279061341@qq.com QQ/279061341
下载Word文档到电脑,方便收藏和打印~
2024-05-16
2024-05-16
2024-05-16
2024-05-16
2024-05-16
2024-05-16
2024-05-16
2024-05-16
2024-05-16
2024-05-16
回答
回答
回答
回答
回答
回答
回答
回答
回答
回答


官方手机版

微信公众号

商务合作


0