这篇文章主要介绍“微信小程序日历签到怎么实现”,在日常操作中,相信很多人在微信小程序日历签到怎么实现问题上存在疑惑,小编查阅了各式资料,整理出简单好用的操作方法,希望对大家解答”微信小程序日历签到怎么实现”的疑惑有所帮助!接下来,请跟着小编
这篇文章主要介绍“微信小程序日历签到怎么实现”,在日常操作中,相信很多人在微信小程序日历签到怎么实现问题上存在疑惑,小编查阅了各式资料,整理出简单好用的操作方法,希望对大家解答”微信小程序日历签到怎么实现”的疑惑有所帮助!接下来,请跟着小编一起来学习吧!
今天是16号,所以显示已签到,渲染页面时请求后台传的参数为这月签到的日期
如:["16", "14"]
点击签到执行
calendarSign
sign.wxml
<!--index.wxml-->
<view class="calendar">
<view class='bcfff'>
<view class="weekName">
<view class="monday">一</view>
<view class="tuesday">二</view>
<view class="wednesday">三</view>
<view class="thursday">四</view>
<view class="friday">五</view>
<view class="saturday">六</view>
<view class="sunday">日</view>
</view>
<view class="week">
<!--填补空格-->
<view wx:for="{{nbsp}}">\n</view>
<!--循环日期-->
<!-- 当天以前 -->
<view wx:for="{{date-1}}" style="color:gainsboro;">
<text wx:if="{{item+1==calendarSignData[item+1]}}" style="color: #2ccecb;">{{item+1}}</text>
<text wx:else="">{{item+1}}</text>
</view>
<!-- 当天 -->
<view style="">
<text wx:if="{{is_qd}}" style="color: #2ccecb;">{{date}}</text>
<text wx:else="" style="">{{date}}</text>
</view>
<!-- 以后 -->
<view wx:for="{{monthDaySize-date}}">{{item+date+1}}</view>
</view>
</view>
<view class="calendarSign">
<image bindtap="calendarSign" class='btnimg' src='https://jpadmin.99dudesign.com/public/img/source/btn_icon_wodekaoqin1.png'></image>
<!-- wx:if="{{date!=calendarSignData[date]}}" -->
</view>
</view>
<!-- 签到成功 -->
<view class='zhegai hide {{qdView?"block":""}}' bindtap='quxiaoQd'></view>
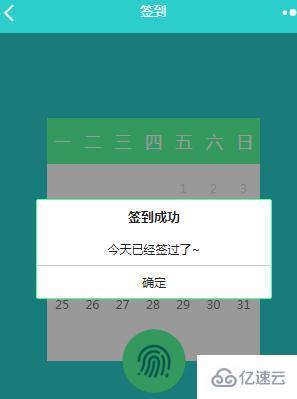
<view class='successqd hide {{qdView?"block":""}}'>
<view class='qdtitle'>签到成功</view>
<view class='qdcontent' wx:if="{{is_qd}}">今天已经签过了~</view>
<view class='qdcontent' wx:else>签到成功,获得{{integral}}积分,您已连续签到{{rule}}天!</view>
<view class='queding' bindtap='quxiaoQd'>确定</view>
</view>
sign.js
var app = getApp();
var calendarSignData;
var date;
var calendarSignDay;
var is_qd;
Page({
data: {
qdView: false,
calendarSignData: "",
calendarSignDay: "",
is_qd: false,
},
quxiaoQd: function (e) {
var that = this;
that.setData({
qdView: false,
is_qd: true
})
},
//事件处理函数
calendarSign: function (e) {
var that = this;
that.setData({
qdView: true
})
calendarSignData[date] = date;
console.log(calendarSignData);
calendarSignDay = calendarSignDay + 1;
var today = new Date().getDate()
wx.request({
url: getApp().data.host + '后台的接口',
method: "POST",
data: {
"user_id": wx.getStorageSync('user_id'),
"sign_num": today
},
header: {
'content-type': 'application/x-www-fORM-urlencoded' //通过post传值,所以要加header
},
success: function (res) {
that.setData({
rule: res.data.rule,
integral: res.data.integral,
})
}
})
wx.setStorageSync("calendarSignData", calendarSignData);
wx.setStorageSync("calendarSignDay", calendarSignDay);
this.setData({
calendarSignData: calendarSignData,
calendarSignDay: calendarSignDay
})
},
onLoad: function () {
var that = this;
var mydate = new Date();
var year = mydate.getFullYear();
var month = mydate.getMonth() + 1;
date = mydate.getDate();
console.log("date" + date)
var day = mydate.getDay();
console.log(day)
var nbsp = 7 - ((date - day) % 7);
console.log("nbsp" + nbsp);
var monthDaySize;
if (month == 1 || month == 3 || month == 5 || month == 7 || month == 8 || month == 10 || month == 12) {
monthDaySize = 31;
} else if (month == 4 || month == 6 || month == 9 || month == 11) {
monthDaySize = 30;
} else if (month == 2) {
// 计算是否是闰年,如果是二月份则是29天
if ((year - 2000) % 4 == 0) {
monthDaySize = 29;
} else {
monthDaySize = 28;
}
};
// 传ajax
wx.request({
url: getApp().data.host + 'index.PHP?g=api&m=output&a=sign_list',
method: "POST",
data: {
"user_id": wx.getStorageSync('user_id')
},
header: {
'content-type': 'application/x-www-form-urlencoded'
},
success: function (res) {
// 判断是否签到过
if (res.data == null) {
calendarSignData = new Array(monthDaySize)
wx.setStorageSync("calendarSignData", calendarSignData);
} else {
var is_qd;
for (var i in res.data) {
parseInt(res.data[i])
calendarSignData = new Array(monthDaySize)
calendarSignData[parseInt(res.data[i])] = parseInt(res.data[i])
wx.setStorageSync("calendarSignData", calendarSignData);
console.log(date)
console.log(parseInt(res.data[i]))
if (parseInt(res.data[i]) == date) {
console.log(1)
wx.setStorageSync("calendarSignDay", 1);
is_qd = true
} else {
wx.setStorageSync("calendarSignDay", 0);
}
}
}
console.log(is_qd)
calendarSignData = wx.getStorageSync("calendarSignData")
calendarSignDay = wx.getStorageSync("calendarSignDay")
console.log(calendarSignData);
console.log(calendarSignDay)
that.setData({
is_qd: is_qd,
year: year,
month: month,
nbsp: nbsp,
monthDaySize: monthDaySize,
date: date,
calendarSignData: calendarSignData,
calendarSignDay: calendarSignDay
})
}
})
},
onReady: function () {
},
onShow: function () {
},
onHide: function () {
},
onUnload: function () {
wx.removeStorageSync("calendarSignData")
wx.removeStorageSync("calendarSignDay")
},
onPullDownRefresh: function () {
},
onReachBottom: function () {
},
onShareAppMessage: function () {
}
})
sign.wxss
page {
background-color: #2ccecb;
}
.t_red {
color: red;
}
.t_blue {
color: royalblue;
}
.calendar {
width: 500rpx;
margin: 200rpx 125rpx;
border-radius: 4rpx;
}
.time {
padding: 16rpx 20rpx;
background-color: wheat;
display: flex;
}
.time view {
flex: 1;
font-size: 30rpx;
}
.time view text {
font-size: 38rpx;
}
.weekName {
background-color: #54ff9c;
width: 100%;
display: flex;
padding: 30rpx 0;
font-size: 40rpx;
color: #fff;
}
.weekName view {
flex: 1;
text-align: center;
}
.week {
width: 100%;
}
.week view {
width: 14.2%;
height: 50rpx;
line-height: 50rpx;
display: inline-block;
margin: 10rpx 0;
text-align: center;
font-size: 30rpx;
color: #747474;
}
.week view text {
width: 100%;
height: 100%;
display: inline-block;
}
.calendarSign {
margin-top: -75rpx;
text-align: center;
}
.btnimg {
width: 150rpx;
height: 150rpx;
border-radius: 50%;
}
.bcfff {
background-color: white;
padding-bottom: 100rpx;
}
.zhegai {
position: fixed;
top: 0;
left: 0;
bottom: 0;
width: 100%;
height: 100%;
background-color: black;
opacity: 0.4;
}
.successqd {
position: fixed;
top: 50%;
left: 50%;
width: 550rpx;
margin-left: -275rpx;
margin-top: -200rpx;
background-color:white;
border-radius: 6rpx;
border: 2rpx solid #54ff9c;
text-align: center;
}
.qdtitle{
font-size: 32rpx;
font-weight: bold;
color: #232323;
padding: 20rpx;
}
.qdcontent{
font-size: 30rpx;
color: #232323;
padding: 20rpx 10rpx;
}
.queding{
font-size: 30rpx;
color: #232323;
border-top: 1rpx solid #cccccc;
padding: 20rpx;
}
到此,关于“微信小程序日历签到怎么实现”的学习就结束了,希望能够解决大家的疑惑。理论与实践的搭配能更好的帮助大家学习,快去试试吧!若想继续学习更多相关知识,请继续关注编程网网站,小编会继续努力为大家带来更多实用的文章!
--结束END--
本文标题: 微信小程序日历签到怎么实现
本文链接: https://www.lsjlt.com/news/308192.html(转载时请注明来源链接)
有问题或投稿请发送至: 邮箱/279061341@qq.com QQ/279061341
下载Word文档到电脑,方便收藏和打印~
2024-05-07
2024-05-07
2024-05-07
2024-05-07
2024-05-07
2024-05-07
2024-05-07
2024-05-07
2024-05-07
2024-05-07
回答
回答
回答
回答
回答
回答
回答
回答
回答
回答


官方手机版

微信公众号

商务合作


0