Python 官方文档:入门教程 => 点击学习
小编给大家分享一下python如何实现使用遗传算法进行图片拟合,希望大家阅读完这篇文章之后都有所收获,下面让我们一起去探讨吧!引言算法思路假设我们有这样一个生物族群,他们的每个基因片段都是一个个三角形(即只含三个点和颜色信息),他们每个个体
小编给大家分享一下python如何实现使用遗传算法进行图片拟合,希望大家阅读完这篇文章之后都有所收获,下面让我们一起去探讨吧!
算法思路
假设我们有这样一个生物族群,他们的每个基因片段都是一个个三角形(即只含三个点和颜色信息),他们每个个体表现出的性状就是若干个三角形叠加在一起。假设我们有一张图片可以作为这种生物族群最适应环境的性状,即长得越像这张图片的越能适应环境,越不像这张图片的越容易被淘汰。
当然作为一个正常的生物族群,他应该也会有正常的繁衍以产生新个体。产生新个体的过程中来自父亲和母亲的基因会进行交叉互换和变异,变异又可以有增加基因片段、减少基因片段以及不同位置的基因片段顺序互换。
但是一个族群不能够无限的繁殖,我们假设环境资源只能容纳有限的生物族群规模,所以我们在产生足够多的后代之后就要把他们放到族群里与族群内部进行竞争淘汰。这样一来,通过不断地淘汰,这个族群就会越来越像我们给定的图片。这就是算法的基本思路。
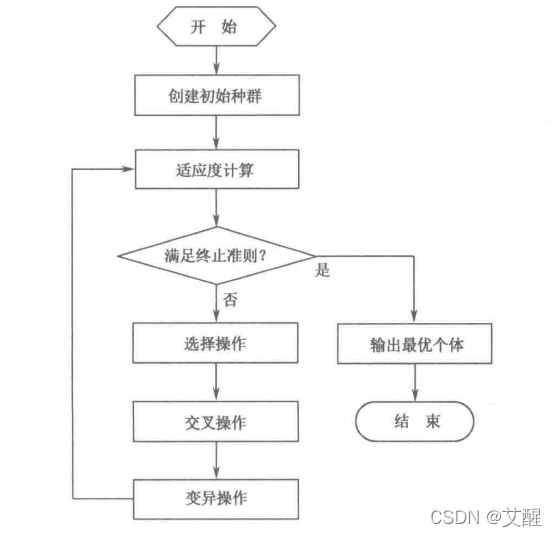
流程图
下面我们来看一下实现过程,为了方便解释,我们会结合Python建立类似于伪代码的函数进行解释,不能直接运行,具体可运行的代码可直接下载参照最后的类封装的完整代码
我们使用imageio中的imread打开图片,这里为了方便后续使用我们建立OpenImg函数,返回打开的图片img(格式为array),图片的格式(方便后期图片的保存),图片的大小:row和col(为后期画图做准备)。
from imageio import imreaddef OpenImg(imgPath):img = imread(imgPath) row, col = img.shape[0], img.shape[1] return img, imgPath.split(".")[-1], row, col我们假设一个族群的最大生物个数为max_group,用groups来表示族群,g为族群内的生物个体,运用随机数随机产生个体。
from random import choicefor i in range(max_group):g = [] for j in range(features): tmp = [[choice(np.linspace(0, row, features)), choice(np.linspace(0, col, features))] for x in range(3)] tmp.append("#" + ''.join(choice('0123456789ABCDEF') for x in range(6))) g.append(tmp.copy()) groups.append(g.copy())我们使用PIL画图,首先我们建立一个空白的画布,然后再将个体的特征(三角形)画到图上。
from PIL import Image, ImageDrawdef to_image(g):array = np.ndarray((img.shape[0], img.shape[1], img.shape[2]), np.uint8)array[:, :, 0] = 255array[:, :, 1] = 255array[:, :, 2] = 255newIm1 = Image.fromarray(array)draw = ImageDraw.Draw(newIm1)for d in g:draw.polyGon((d[0][0], d[0][1], d[1][0], d[1][1], d[2][0], d[2][1]), d[3])return newIm1使用structural_similarity对比两个图片的相似度,此时两个图片都应该是array类型
from skimage.metrics import structural_similaritydef getSimilar(g) -> float:newIm1 = to_image(g) ssim = structural_similarity(np.array(img), np.array(newIm1), multichannel=True) return ssim调用我们之前建立好的to_image函数先将个体转换成图片,然后将图片保存即可。
def draw_image(g, cur, imgtype): image1 = to_image(g) image1.save(os.path.join(str(cur) + "." + imgtype))考虑到后期的基因片段的增添和减少,所以应该分为两步,其一是相重合的位置进行交叉互换,以及对于多出来的尾部进行交叉互换,我们按照随机率random_rate和重合位置长度min_locate来确定交换的位数。然后我们使用sample选出若干位置进行互换。交换结束后再对尾部进行互换
random_rate = random()def exchange(father, mother)->[]:# 交换# 随机生成互换个数min_locate = min(len(father), len(mother))n = randint(0, int(random_rate * min_locate))# 随机选出多个位置selected = sample(range(0, min_locate), n)# 交换内部for s in selected:father[s], mother[s] = mother[s], father[s] # 交换尾部locat = randint(0, min_locate)fhead = father[:locat].copy()mhead = mother[:locat].copy()ftail = father[locat:].copy()mtail = mother[locat:].copy()# print(fhead, ftail, mhead, mtail)fhead.extend(mtail)father = fheadmhead.extend(ftail)mother = mheadreturn [father, mother]随机选择的原理和目的与上面类似,这里我们把重新生成某个基因片段的信息看作基因突变。
random_rate = random()def mutation(gen):# 突变# 随机生成变异个数n = int(randint(1, 100) / 1000 * len(gen))selected = sample(range(0, len(gen)), n)for s in selected:tmp = [[choice(np.linspace(0, row, 100)), choice(np.linspace(0, col, 100))] for x inrange(3)]tmp.append("#" + ''.join(choice('0123456789ABCDEF') for x in range(6)))gen[s] = tmpreturn gen在个体的基因组内随机选择基因片段进行位置互换。
def move(gen):# 易位exchage = int(randint(1, 100) / 1000 * len(gen))for e in range(exchage):sec1 = randint(0, len(gen) - 1)sec2 = randint(0, len(gen) - 1)gen[sec1], gen[sec2] = gen[sec2], gen[sec1]return gen直接在个体基因组后面添加随机产生的基因片段即可。
features = 100def add(gen):# 增加n = int(randint(1, 100) / 1000 * len(gen))for s in range(n):tmp = [[choice(np.linspace(0, row,features)),choice(np.linspace(0, col, features))] for x in range(3)]tmp.append("#" + ''.join(choice('0123456789ABCDEF') for x in range(6)))gen.append(tmp)return gen随机减少个体的若干基因片段
def cut(self, gen): # 减少n = int(randint(1, 100) / 1000 * len(gen))selected = sample(range(0, len(gen)), n)g = []for gp in range(len(gen)):if gp not in selected:g.append(gen[gp]) return g以此调用以上的突变、易位、增添和减少产生4种状态的基因片段
def variation(gen):# 变异gen = mutation(gen.copy())gen1 = move(gen.copy())gen2 = add(gen1.copy())gen3 = cut(gen2.copy())return [gen, gen1, gen2, gen3]繁殖过程包括交叉互换和变异,直接调用之前构造的函数即可
def breeds(father, mother):new1, new2 = exchange(father.copy(), mother.copy())# 变异new3, new4, new5, new6 = variation(father.copy())new7, new8, new9, new10 = variation(mother.copy())return [new1, new2, new3, new4, new5, new6, new7, new8, new9, new10]建立个体和其与目标的相似度相关的映射关系,并按照相似度排序,然后去除相似度较低的个体,直到剩余生物个体的数量为max_group为止。在这个函数中我们还返回了一个最优个体的相似度来方便监测。
def eliminated(groups):group_dict = dict()for gp in range(len(groups)):group_dict[gp] = getSimilar(groups[gp])group_dict = {key: value for key, value in sorted(group_dict.items(), key=lambda item: item[1], reverse=True)}g = []for key in list(group_dict.keys())[:max_group]:g.append(groups[key].copy())groups = g.copy()return groups, list(group_dict.values())[0]拟合过程先要进行若干次的繁殖,为了保证每次繁殖的个体数我们规定其至少选择最大个体数的一半数量的次数进行繁殖,繁殖之后的个体加入到种群当作和之前种群中的个体一起进行淘汰。通过这个过程我们每次淘汰都会将与目标差距最大的个体淘汰。
def breeds(father, mother):new1, new2 = exchange(father.copy(), mother.copy())# 变异new3, new4, new5, new6 = variation(father.copy())new7, new8, new9, new10 = variation(mother.copy())return [new1, new2, new3, new4, new5, new6, new7, new8, new9, new10]拟合时建议选择分辨率低的图片,如果选择的图片分辨率较高,可以使用以下代码降低图片分辨率
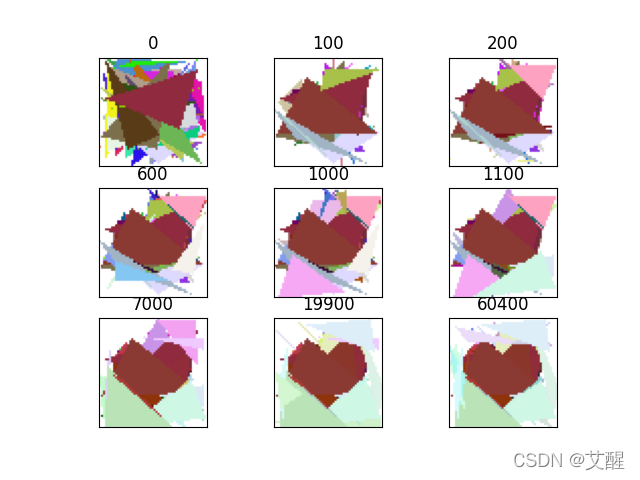
from imageio import imreadfrom PIL import ImageimgPath = input("输入图片路径")img = imread(imgPath)img = img[::2, ::2, :]img = Image.fromarray(img)img.save(imgPath)我们以拟合一个小蓝鸟和一个心形为例来展示拟合过程


代码实现(这里已经事先将重复图片删除了)
import osimport mathimport matplotlib.pyplot as pltimport matplotlib.image as imagepath = "./xl"length = len(os.listdir(path))row = col = math.ceil(math.sqrt(length))x = 1lst = []for d in os.listdir(path): lst.append(int(d.split('.')[0]))lst = sorted(lst)for l in lst: img = image.imread(os.path.join(path, str(l)+'.png')) plt.xticks([]) plt.yticks([]) plt.subplot(row, col, x) plt.imshow(img) plt.xticks([]) plt.yticks([]) plt.title(str(l)) x += 1plt.savefig(path)plt.show()效果

看完了这篇文章,相信你对“python如何实现使用遗传算法进行图片拟合”有了一定的了解,如果想了解更多相关知识,欢迎关注编程网Python频道,感谢各位的阅读!
--结束END--
本文标题: python如何实现使用遗传算法进行图片拟合
本文链接: https://www.lsjlt.com/news/324537.html(转载时请注明来源链接)
有问题或投稿请发送至: 邮箱/279061341@qq.com QQ/279061341
下载Word文档到电脑,方便收藏和打印~
2024-03-01
2024-03-01
2024-03-01
2024-02-29
2024-02-29
2024-02-29
2024-02-29
2024-02-29
2024-02-29
2024-02-29
回答
回答
回答
回答
回答
回答
回答
回答
回答
回答


官方手机版

微信公众号

商务合作


0