本文小编为大家详细介绍“Vue视频时间进度条组件如何使用”,内容详细,步骤清晰,细节处理妥当,希望这篇“vue视频时间进度条组件如何使用”文章能帮助大家解决疑惑,下面跟着小编的思路慢慢深入,一起来学习新知识吧。有些视频是以视频流的形式进行渲
本文小编为大家详细介绍“Vue视频时间进度条组件如何使用”,内容详细,步骤清晰,细节处理妥当,希望这篇“vue视频时间进度条组件如何使用”文章能帮助大家解决疑惑,下面跟着小编的思路慢慢深入,一起来学习新知识吧。
有些视频是以视频流的形式进行渲染的,没有视频滚动条,所以就写了24h的时间组件
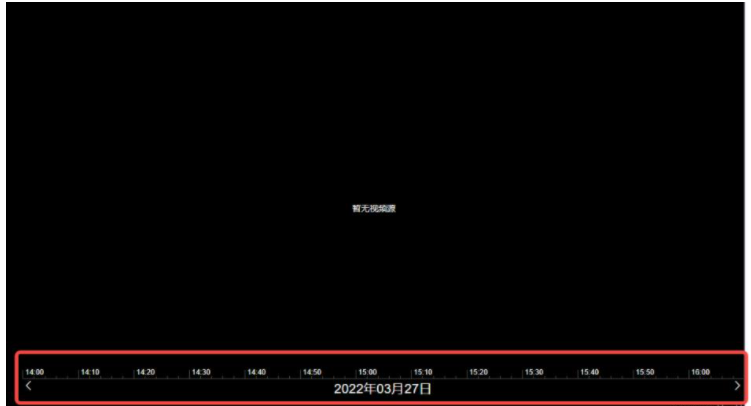
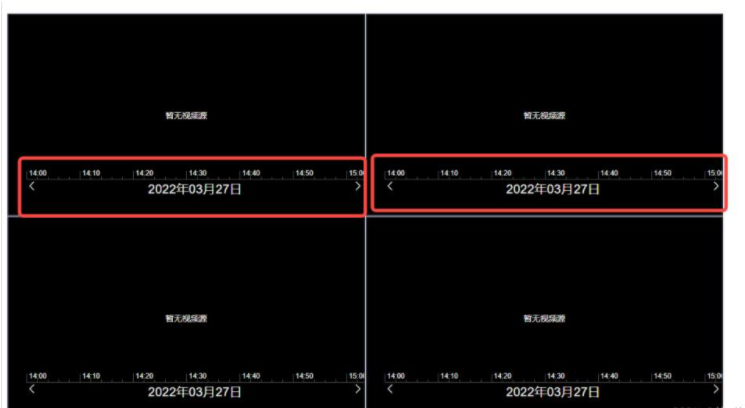
24h的时间刻度线总宽度为12960px
2、点击24h线的某一点,获取这一点离左侧原点的距离(使用dom元素layerX和offsetLeft综合判断)
3、计算点击时线段的占比比率
4、每天的时间是86400000毫秒
5、占比比率乘以86400000就是获取的你点击的时间
代码如下:
<template> <div class="time-main"> <div class="center-content" ref="centerRef"> <div ref="timeRef" class="time-line" @click.capture="clickTimeLine($event)" > <template v-for="(item, i) in timeArr"> <div :key="'a' + i" class="base-line" : ></div> <div :key="i" class="base-title" :> {{ item }} </div> <div :key="'b' + i" class="base-line" : ></div> <div :key="'c' + i" class="base-line" : ></div> <div :key="'d' + i" class="base-line" : ></div> <div :key="'e' + i" class="base-line" : ></div> </template> </div> </div> <div class="btn-content"> <div class="left-arow" @click="clickRightMove"> <i class="el-icon-arrow-left"></i> </div> <div>{{ yesterdayTime | fORMatDateTime }}</div> <div class="right-arow" @click="clickLeftMove"> <i class="el-icon-arrow-right"></i> </div> </div> </div></template><script>import { compare, exactDiv, exactMul, exactSub, exactAdd, decimalsFormat,} from "@/util/util.js";export default { name: "timeLine", // inject: ["screenNum"], // watch: { // screenNum: { // handler(val) { // console.log("切换了val==", val); // }, // }, // }, props: { dateArr: { type: Array, }, }, data() { return { clickCnt: 0, leftMoveWidth: 0, endTimeFlag: false, timeArr: [ "00:00", "00:10", "00:20", "00:30", "00:40", "00:50", "01:00", "01:10", "01:20", "01:30", "01:40", "01:50", "02:00", "02:10", "02:20", "02:30", "02:40", "02:50", "03:00", "03:10", "03:20", "03:30", "03:40", "03:50", "04:00", "04:10", "04:20", "04:30", "04:40", "04:50", "05:00", "05:10", "05:20", "05:30", "05:40", "05:60", "06:00", "06:10", "06:20", "06:30", "06:40", "06:50", "07:00", "07:10", "07:20", "07:30", "07:40", "07:50", "08:00", "08:10", "08:20", "08:30", "08:40", "08:50", "09:00", "09:10", "09:20", "09:30", "09:40", "09:50", "10:00", "10:10", "10:20", "10:30", "10:40", "10:50", "11:00", "11:10", "11:20", "11:30", "11:40", "11:50", "12:00", "12:10", "12:20", "12:30", "12:40", "12:50", "13:00", "13:10", "13:20", "13:30", "13:40", "13:50", "14:00", "14:10", "14:20", "14:30", "14:40", "14:50", "15:00", "15:10", "15:20", "15:30", "15:40", "15:50", "16:00", "16:10", "16:20", "16:30", "16:40", "16:50", "17:00", "17:10", "17:20", "17:30", "17:40", "17:50", "18:00", "18:10", "18:20", "18:30", "18:40", "18:50", "19:00", "19:10", "19:20", "19:30", "19:40", "19:50", "20:00", "20:10", "20:20", "20:30", "20:40", "20:50", "21:00", "21:10", "21:20", "21:30", "21:40", "21:50", "22:00", "22:10", "22:20", "22:30", "22:40", "22:50", "23:00", "23:10", "23:20", "23:30", "23:40", "23:50", ], switchWidthNum: 540, yesterdayTime: 0, clickTimeVal: 0, }; }, mounted() { // this.handleWidthFn(); this.dealScrollMove(); // console.log("mounted==", this.dateArr); }, methods: { dealScrollMove() { if (this.$refs.centerRef.offsetWidth >= 540) { this.switchWidthNum = 540; } else if (this.$refs.centerRef.offsetWidth >= 360) { this.switchWidthNum = 360; } else if (this.$refs.centerRef.offsetWidth >= 270) { this.switchWidthNum = 270; } else if (this.$refs.centerRef.offsetWidth >= 180) { this.switchWidthNum = 180; } else { this.switchWidthNum = 90; } let time0 = new Date(new Date().toLocaleDateString()).getTime(); //获取当日0点时间戳 let time1 = new Date().getTime(); // 当前时间 let sumTimeWidth = 12960; let dayTimeSum = 86400000; //一天的毫秒数 // if (this.clickTimeVal) { // time1 = this.clickTimeVal; // console.log("进==", time1); // console.log("进=2=", this.clickTimeVal); // } if (this.dateArr.length > 0) { time1 = this.dateArr[0]; time0 = exactSub(time0, dayTimeSum); console.log("进==", this.dateArr); console.log("进=2=", this.clickTimeVal); } let timeSub = exactSub(time1, time0); // console.log("timeSub=", timeSub); if (this.dateArr.length > 0) { this.yesterdayTime = this.dateArr[0]; this.clickTimeVal = this.dateArr[0]; } else { this.yesterdayTime = exactSub(time0, dayTimeSum); } let dayPer = exactDiv(timeSub, dayTimeSum); //一天的百分比 console.log("exactDiv(timeSub, dayTimeSum)==", this.yesterdayTime); // console.log("dayPer==", dayPer); let scrollWidth = exactMul(sumTimeWidth, dayPer); // console.log("scrollWidth=333333=", scrollWidth); // console.log("scrollWidth=33333555553=", this.switchWidthNum); // 除以switchWidthNum 获取点击的个数 let switchClickCnt = exactDiv(scrollWidth, this.switchWidthNum); // console.log("switchClickCnt==", switchClickCnt); this.clickCnt = parseInt(switchClickCnt) - 1; this.clickLeftMove(); // console.log("点击的数量1===", this.clickCnt); }, handleWidthFn() { this.$nextTick(() => { if (this.$refs.centerRef.offsetWidth >= 540) { this.switchWidthNum = 540; } else if (this.$refs.centerRef.offsetWidth >= 360) { this.switchWidthNum = 360; } else if (this.$refs.centerRef.offsetWidth >= 270) { this.switchWidthNum = 270; } else if (this.$refs.centerRef.offsetWidth >= 180) { this.switchWidthNum = 180; } else { this.switchWidthNum = 90; } }); }, clickTimeLine(event) { // console.log("event==", event); // console.log("event=layerX==", event.layerX); // console.log("event=layerX=target===", event.target.offsetLeft); let sumTimeWidth = 12960; let dayTimeSum = 86400000; //一天的毫秒数 let time0 = new Date(new Date().toLocaleDateString()).getTime(); //获取当日0点时间戳 let yesterdayTime = exactSub(time0, dayTimeSum); let timePointNum = 0; // className: "time-line" if (event.target.className == "time-line") { timePointNum = event.layerX; } else { timePointNum = exactAdd(event.layerX, event.target.offsetLeft); } let timemove = exactAdd(timePointNum, this.leftMoveWidth); let timePer = exactDiv(timemove, sumTimeWidth); // 点击的百分比 let clickTimeNum = exactMul(dayTimeSum, timePer); // let trueTimeNum = exactAdd(clickTimeNum, yesterdayTime); // time let fomretTime = parseInt(trueTimeNum); this.clickTimeVal = new Date(fomretTime).getTime(); this.$emit( "handleClickTimeLineFn", new Date(fomretTime) ); // console.log("trueTimeNum==", trueTimeNum); // console.log("fomretTime==", fomretTime); // console.log("new Date==", new Date(fomretTime)); }, clickLeftMove() { // console.log("点击的数量==2=", this.clickCnt); this.handleWidthFn(); // console.log("this.$refs.centerRef==", this.$refs.centerRef); // console.log("centerRef=offsetWidth=", this.$refs.centerRef.offsetWidth); // console.log("centerRef=clientWidth=", this.$refs.centerRef.clientWidth); if (this.endTimeFlag) { return; } this.clickCnt++; this.leftMoveWidth = this.clickCnt * this.switchWidthNum; let letWidth = this.clickCnt * this.switchWidthNum + "px"; // console.log(this.clickCnt); // console.log("this.$refs.timeRef==", this.$refs.timeRef); if (this.leftMoveWidth + this.$refs.centerRef.offsetWidth > 12960) { letWidth = 12960 - this.$refs.centerRef.offsetWidth + "px"; this.endTimeFlag = true; } else { this.endTimeFlag = false; } this.$refs.timeRef.style.transform = "translateX(-" + letWidth + ")"; this.$refs.timeRef.style.transition = "all 0.5s"; }, clickRightMove() { this.handleWidthFn(); if (this.clickCnt > 0) { this.clickCnt--; } this.leftMoveWidth = this.clickCnt * this.switchWidthNum; let letWidth = this.clickCnt * this.switchWidthNum + "px"; // console.log(this.clickCnt); // console.log("this.$refs.timeRef==", this.$refs.timeRef); if (this.endTimeFlag) { this.endTimeFlag = false; } this.$refs.timeRef.style.transform = "translateX(-" + letWidth + ")"; this.$refs.timeRef.style.transition = "all 0.5s"; }, },};</script><style scoped lang="sCSS">.time-main { position: relative; width: 100%; margin: auto; overflow: hidden; // display: flex; // border: 1px solid red;}.center-content { width: calc(100% - 30px); margin-left: 30px; overflow: hidden;}.btn-content { width: calc(100% - 30px); margin-left: 30px; display: flex; justify-content: space-between; color: #fff;}.time-line { position: relative; font-size: 12px; // left: 30px; height: 19px; width: 12960px; border-bottom: 1px solid rgb(90, 90, 90); margin: 0px; padding: 0px; transition: left 0.9s ease 0s; color: #fff; z-index: 10; &:hover { cursor: pointer; } .base-title { position: absolute; left: 4px; bottom: 3px; color: #fff; z-index: -1; }}.base-line { position: absolute; width: 1px; height: 4px; bottom: 0px; background-color: rgb(90, 90, 90); z-index: 9;}.left-arow { // position: absolute; // left: 2%; color: #fff; font-size: 20px;}.right-arow { // position: absolute; // right: 2%; color: #fff; font-size: 20px;}</style>读到这里,这篇“vue视频时间进度条组件如何使用”文章已经介绍完毕,想要掌握这篇文章的知识点还需要大家自己动手实践使用过才能领会,如果想了解更多相关内容的文章,欢迎关注编程网精选频道。
--结束END--
本文标题: vue视频时间进度条组件如何使用
本文链接: https://www.lsjlt.com/news/326001.html(转载时请注明来源链接)
有问题或投稿请发送至: 邮箱/279061341@qq.com QQ/279061341
下载Word文档到电脑,方便收藏和打印~
2024-05-16
2024-05-16
2024-05-16
2024-05-16
2024-05-16
2024-05-16
2024-05-16
2024-05-16
2024-05-16
2024-05-16
回答
回答
回答
回答
回答
回答
回答
回答
回答
回答


官方手机版

微信公众号

商务合作


0