这篇文章主要介绍“SpringBoot整合shiro怎么实现登录与权限校验”的相关知识,小编通过实际案例向大家展示操作过程,操作方法简单快捷,实用性强,希望这篇“springboot整合Shiro怎么实现登录与权限校验”文章能帮助大家解决问
这篇文章主要介绍“SpringBoot整合shiro怎么实现登录与权限校验”的相关知识,小编通过实际案例向大家展示操作过程,操作方法简单快捷,实用性强,希望这篇“springboot整合Shiro怎么实现登录与权限校验”文章能帮助大家解决问题。
Springboot优雅的整合Shiro进行登录校验,权限认证(附源码下载)
Springboo配置Shiro进行登录校验,权限认证,附demo演示。
我们致力于让开发者快速搭建基础环境并让应用跑起来,提供使用示例供使用者参考,让初学者快速上手。
本博客项目源码地址:
项目源码GitHub地址
项目源码国内gitee地址
依赖
<!-- Shiro核心框架 --> <dependency> <groupId>org.apache.shiro</groupId> <artifactId>shiro-core</artifactId> <version>1.9.0</version> </dependency> <!-- Shiro使用Spring框架 --> <dependency> <groupId>org.apache.shiro</groupId> <artifactId>shiro-spring</artifactId> <version>1.9.0</version> </dependency> <!-- Thymeleaf中使用Shiro标签 --> <dependency> <groupId>com.github.theborakompaNIOni</groupId> <artifactId>thymeleaf-extras-shiro</artifactId> <version>2.1.0</version> </dependency> <dependency> <groupId>org.springframework.boot</groupId> <artifactId>spring-boot-starter-thymeleaf</artifactId> </dependency>yml配置
server:
port: 9999
servlet:
session:
# 让Tomcat只能从COOKIE中获取会话信息,这样,当没有Cookie时,URL也就不会被自动添加上 ;jsessionid=… 了。
tracking-modes: COOKIEspring:
thymeleaf:
# 关闭页面缓存,便于开发环境测试
cache: false
# 静态资源路径
prefix: classpath:/templates/
# 网页资源默认.html结尾
mode: HTML
Shiro三大功能模块
Subject
认证主体,通常指用户(把操做交给SecurityManager)。
SecurityManager
安全管理器,安全管理器,管理全部Subject,能够配合内部安全组件(关联Realm)
Realm
域对象,用于进行权限信息的验证,shiro连接数据的桥梁,如我们的登录校验,权限校验就在Realm进行定义。
定义用户实体User ,可根据自己的业务自行定义
@Data@Accessors(chain = true)public class User { private Long userId; private String username; private String passWord; private String name;}重写AuthorizingRealm 中登录校验doGetAuthenticationInfo及授权doGetAuthorizationInfo方法,编写我们自定义的校验逻辑。
public class UserRealm extends AuthorizingRealm { @Override protected AuthorizationInfo doGetAuthorizationInfo(PrincipalCollection principalCollection) { SimpleAuthorizationInfo info = new SimpleAuthorizationInfo(); // 在这里为每一个用户添加vip权限 info.addStringPermission("vip"); return info; } @Override protected AuthenticationInfo doGetAuthenticationInfo(AuthenticationToken authenticationToken) throws AuthenticationException { // 获取到token UsernamePasswordToken token = (UsernamePasswordToken) authenticationToken; // 从token中获取到用户名和密码 String username = token.getUsername(); String password = String.valueOf(token.getPassword()); // 为了方便,这里模拟获取用户 User user = this.getUser(); if (!user.getUsername().equals(username)) { throw new UnknownAccountException("用户不存在"); } else if (!user.getPassword().equals(password)) { throw new IncorrectCredentialsException("密码错误"); } // 校验完成后,此处我们把用户信息返回,便于后面我们通过Subject获取用户的登录信息 return new SimpleAuthenticationInfo(user, password, getName()); } private User getUser() { return new User() .setName("admin") .setUserId(1L) .setUsername("admin") .setPassword("123456"); }}ShiroConfig.java
@Configurationpublic class ShiroConfig { private final static String ANON = "anon"; private final static String AUTHC = "authc"; private final static String PERMS = "perms"; @Bean(name = "userRealm") public UserRealm userRealm() { return new UserRealm(); } @Bean(name = "securityManager") public DefaultWEBSecurityManager getDefaultWebSecurityManager(@Qualifier("userRealm") UserRealm userRealm) { DefaultWebSecurityManager securityManager = new DefaultWebSecurityManager(); //绑定realm对象 securityManager.setRealm(userRealm); return securityManager; } @Bean public ShiroFilterFactoryBean getShiroFilterFactoryBean(@Qualifier("securityManager") DefaultWebSecurityManager defaultWebSecurityManager) { ShiroFilterFactoryBean bean = new ShiroFilterFactoryBean(); // 设置安全管理器 bean.setSecurityManager(defaultWebSecurityManager); // 添加shiro的内置过滤器 Map<String, String> filterMap = new LinkedHashMap<>(); filterMap.put("/index", ANON); filterMap.put("/userInfo", PERMS + "[vip]"); filterMap.put("/table2", AUTHC); filterMap.put("/table3", PERMS + "[vip2]"); bean.setFilterChainDefinitionMap(filterMap); // 设置跳转登陆页 bean.setLoginUrl("/login"); // 无权限跳转 bean.setUnauthorizedUrl("/unAuth"); return bean; } @Bean public ShiroDialect shiroDialect() { return new ShiroDialect(); }}IndexController.java
@Controllerpublic class IndexController { @RequestMapping({"/", "/index"}) public String index(Model model) { model.addAttribute("msg", "hello,shiro"); return "/index"; } @RequestMapping("/userInfo") public String table1(Model model) { return "userInfo"; } @RequestMapping("/table") public String table(Model model) { return "table"; } @GetMapping("/login") public String login() { return "login"; } @PostMapping(value = "/doLogin") public String doLogin(@RequestParam("username") String username, @RequestParam("password") String password, Model model) { //获取当前的用户 Subject subject = SecurityUtils.getSubject(); //用来存放错误信息 String msg = ""; //如果未认证 if (!subject.isAuthenticated()) { //将用户名和密码封装到shiro中 UsernamePasswordToken token = new UsernamePasswordToken(username, password); try { // 执行登陆方法 subject.login(token); } catch (Exception e) { e.printStackTrace(); msg = "账号或密码错误"; } //如果msg为空,说明没有异常,就返回到主页 if (msg.isEmpty()) { return "redirect:/index"; } else { model.addAttribute("errORMsg", msg); return "login"; } } return "/login"; } @GetMapping("/loGout") public String logout() { SecurityUtils.getSubject().logout(); return "index"; } @GetMapping("/unAuth") public String unAuth() { return "unAuth"; }}在resources中创建templates文件夹存放页面资源
index.html
<!DOCTYPE html><html xmlns:th="Http://www.thymeleaf.org"><html xmlns:shiro="http://www.pollix.at/thymeleaf/shiro"><head> <meta charset="UTF-8"> <title>Title</title></head><body><h2>首页</h2><!-- 使用shiro标签 --><shiro:authenticated> <p>用户已登录</p> <a th:href="@{/logout}" rel="external nofollow" >退出登录</a></shiro:authenticated><shiro:notAuthenticated> <p>用户未登录</p> </shiro:notAuthenticated><br/><a th:href="@{/userInfo}" rel="external nofollow" >用户信息</a><a th:href="@{/table}" rel="external nofollow" >table</a></body></html>login.html
<!DOCTYPE html><html lang="en" xmlns:th="http://www.thymeleaf.org"><head> <meta charset="UTF-8"> <title>登陆页</title></head><body><div> <p th:text="${errorMsg}"></p> <form action="/doLogin" method="post"> <h3>登陆页</h3> <h7>账号:admin,密码:123456</h7> <input type="text" id="username" name="username" placeholder="admin"> <input type="password" id="password" name="password" placeholder="123456"> <button type="submit">登陆</button> </form></div></body></html>userInfo.html
<!DOCTYPE html><html lang="en" xmlns:shiro="http://www.pollix.at/thymeleaf/shiro"><head> <meta charset="UTF-8"> <title>table1</title></head><body><h2>用户信息</h2><!-- 利用shiro获取用户信息 -->用户名:<shiro:principal property="username"/><br/>用户完整信息: <shiro:principal/></body></html>table.hetml
<!DOCTYPE html><html lang="en"><head> <meta charset="UTF-8"> <title>table</title></head><body><h2>table</h2></body></html>启动项目浏览器输入127.0.0.1:9999
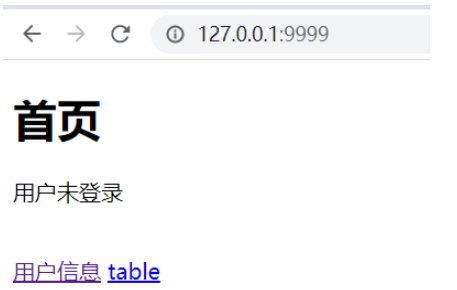
当我们点击用户信息和table时会自动跳转登录页面
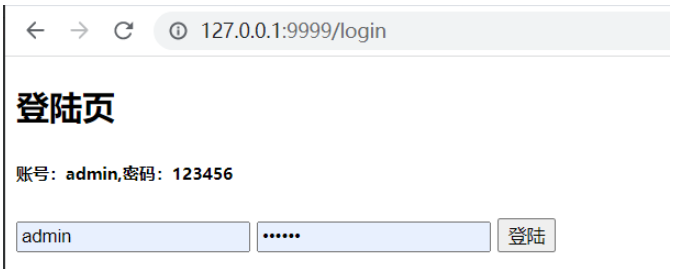
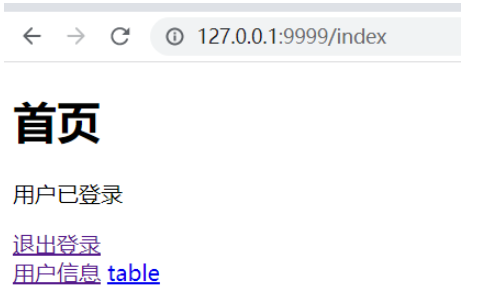
登录成功后
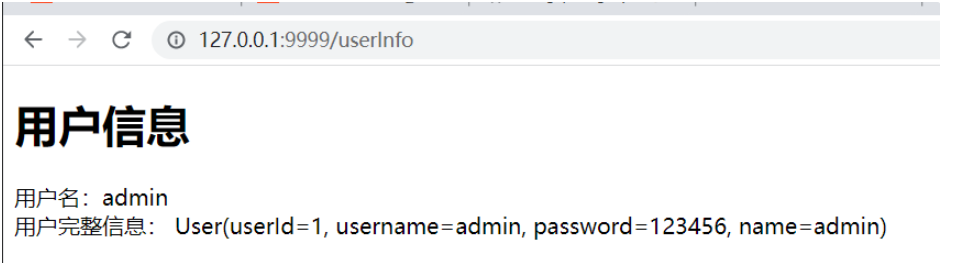
获取用户信息
此处获取的就是我们就是我们前面doGetAuthenticationInfo方法返回的用户信息,这里为了演示就全部返回了,实际生产中密码是不能返回的。
关于“Springboot整合Shiro怎么实现登录与权限校验”的内容就介绍到这里了,感谢大家的阅读。如果想了解更多行业相关的知识,可以关注编程网精选频道,小编每天都会为大家更新不同的知识点。
--结束END--
本文标题: Springboot整合Shiro怎么实现登录与权限校验
本文链接: https://www.lsjlt.com/news/328321.html(转载时请注明来源链接)
有问题或投稿请发送至: 邮箱/279061341@qq.com QQ/279061341
下载Word文档到电脑,方便收藏和打印~
2024-05-21
2024-05-21
2024-05-21
2024-05-21
2024-05-21
2024-05-21
2024-05-21
2024-05-21
2024-05-21
2024-05-21
回答
回答
回答
回答
回答
回答
回答
回答
回答
回答


官方手机版

微信公众号

商务合作


0