本篇内容主要讲解“Android如何自定义Dialog”,感兴趣的朋友不妨来看看。本文介绍的方法操作简单快捷,实用性强。下面就让小编来带大家学习“Android如何自定义Dialog”吧!接下来看代码:public class&n
本篇内容主要讲解“Android如何自定义Dialog”,感兴趣的朋友不妨来看看。本文介绍的方法操作简单快捷,实用性强。下面就让小编来带大家学习“Android如何自定义Dialog”吧!

接下来看代码:
public class MyDialog extends Dialog { private Button yes;//确定按钮 private Button no;//取消按钮 private TextView titleTv;//消息标题文本 private TextView messageTv;//消息提示文本 private String titleStr;//从外界设置的title文本 private String messageStr;//从外界设置的消息文本 private View view; //确定文本和取消文本的显示内容 private String yesStr, noStr; private onNoOnclickListener noOnclickListener;//取消按钮被点击了的监听器 private onYesOnclickListener yesOnclickListener;//确定按钮被点击了的监听器 public void setNoOnclickListener(String str, onNoOnclickListener onNoOnclickListener) { if (str != null) { noStr = str; } this.noOnclickListener = onNoOnclickListener; } public void setYesOnclickListener(String str, onYesOnclickListener onYesOnclickListener) { if (str != null) { yesStr = str; } this.yesOnclickListener = onYesOnclickListener; } public MyDialog(Context context) { super(context, R.style.MyDialog); } @Override protected void onCreate(Bundle savedInstanceState) { super.onCreate(savedInstanceState); setContentView(R.layout.mydialog); //按空白处不能取消动画 setCanceledOnTouchOutside(false); //初始化界面控件 initView(); //初始化界面数据 initData(); //初始化界面控件的事件 initEvent(); } private void initEvent() { //设置确定按钮被点击后,向外界提供监听 yes.setOnClickListener(new View.OnClickListener() { @Override public void onClick(View v) { if (yesOnclickListener != null) { yesOnclickListener.onYesClick(); } } }); //设置取消按钮被点击后,向外界提供监听 no.setOnClickListener(new View.OnClickListener() { @Override public void onClick(View v) { if (noOnclickListener != null) { noOnclickListener.onNoClick(); } } }); } private void initData() { //如果用户自定了title和message if (titleStr != null) { titleTv.setText(titleStr); } if (messageStr != null) { messageTv.setText(messageStr); } //如果设置按钮的文字 if (yesStr != null) { yes.setText(yesStr); } if (noStr != null) { no.setVisibility(View.VISIBLE); view.setVisibility(View.VISIBLE); no.setText(noStr); } else { no.setVisibility(View.GoNE); view.setVisibility(View.GONE); } } private void initView() { yes = (Button) findViewById(R.id.yes); no = (Button) findViewById(R.id.no); titleTv = (TextView) findViewById(R.id.title); messageTv = (TextView) findViewById(R.id.message); view = findViewById(R.id.view_dialog); } public void setTitle(String title) { titleStr = title; } public void setMessage(String message) { messageStr = message; } public interface onYesOnclickListener { public void onYesClick(); } public interface onNoOnclickListener { public void onNoClick(); }}Xml文件:
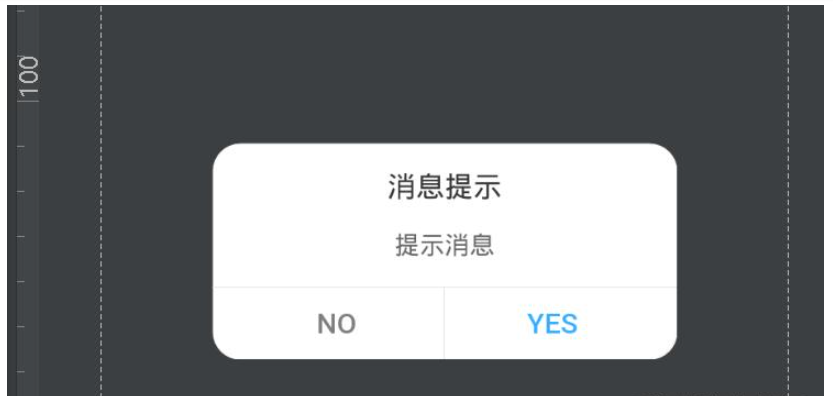
<?xml version="1.0" encoding="utf-8"?><RelativeLayout xmlns:android="Http://schemas.android.com/apk/res/android" android:layout_width="match_parent" android:layout_height="match_parent" > <LinearLayout android:layout_width="260dp" android:layout_height="wrap_content" android:background="@drawable/mydialog_shape" android:orientation="vertical" android:layout_centerVertical="true" android:layout_centerHorizontal="true"> <TextView android:id="@+id/title" android:layout_width="wrap_content" android:layout_height="wrap_content" android:layout_gravity="center" android:layout_margin="15dp" android:gravity="center" android:text="消息提示" android:textColor="#333333" android:textSize="16sp" /> <TextView android:id="@+id/message" android:layout_width="wrap_content" android:layout_height="wrap_content" android:layout_marginLeft="20dp" android:layout_marginRight="20dp" android:layout_gravity="center" android:textColor="#666666" android:text="提示消息" /> <View android:layout_width="match_parent" android:layout_height="1px" android:layout_marginTop="15dp" android:background="#E4E4E4" /> <LinearLayout android:layout_width="match_parent" android:layout_height="40dp" android:orientation="horizontal"> <Button android:id="@+id/no" android:layout_width="0dp" android:layout_height="match_parent" android:layout_marginLeft="10dp" android:layout_weight="1" android:background="@null" android:gravity="center" android:singleLine="true" android:text="No" android:textColor="#7D7D7D" android:visibility="gone" android:textSize="16sp" /> <View android:id="@+id/view_dialog" android:layout_width="1px" android:layout_height="match_parent" android:background="#E4E4E4" /> <Button android:id="@+id/yes" android:layout_width="0dp" android:layout_height="match_parent" android:layout_marginRight="10dp" android:layout_weight="1" android:background="@null" android:gravity="center" android:singleLine="true" android:text="Yes" android:textColor="#38ADFF" android:textSize="16sp" /> </LinearLayout> </LinearLayout></RelativeLayout>调用的方法:
myDialog = new MyDialog(activity); myDialog.setTitle("提示"); myDialog.setMessage("您输入的关键字未查询到信息,请重新输入"); myDialog.setYesOnclickListener("确定", new MyDialog.onYesOnclickListener() { @Override public void onYesClick() { myDialog.dismiss(); } }); myDialog.show();这是一个调用只含有确认键的方法,通过mydialog中传的str来进行判断,gone或者vs:
if (noStr != null) { no.setVisibility(View.VISIBLE); view.setVisibility(View.VISIBLE); no.setText(noStr); } else { no.setVisibility(View.GONE); view.setVisibility(View.GONE); }调用俩个按键:
myDialog = new MyDialog(activity); myDialog.setTitle("指纹关闭确认"); myDialog.setMessage("确认关闭指纹登陆?"); myDialog.setYesOnclickListener("确定", new MyDialog.onYesOnclickListener() { @Override public void onYesClick() { SharedPreferenceUtil.setInfoToShared("Z", "N"); myDialog.dismiss(); } }); myDialog.setNoOnclickListener("取消", new MyDialog.onNoOnclickListener() { @Override public void onNoClick() { cbFingerprint.setChecked(true); myDialog.dismiss(); } }); myDialog.show();到此,相信大家对“Android如何自定义Dialog”有了更深的了解,不妨来实际操作一番吧!这里是编程网网站,更多相关内容可以进入相关频道进行查询,关注我们,继续学习!
--结束END--
本文标题: Android如何自定义Dialog
本文链接: https://www.lsjlt.com/news/340014.html(转载时请注明来源链接)
有问题或投稿请发送至: 邮箱/279061341@qq.com QQ/279061341
下载Word文档到电脑,方便收藏和打印~
2024-05-12
2024-05-12
2024-05-12
2024-05-12
2024-05-12
2024-05-12
2024-05-12
2024-05-12
2024-05-12
2024-05-12
回答
回答
回答
回答
回答
回答
回答
回答
回答
回答


官方手机版

微信公众号

商务合作


0