这篇文章主要讲解了“Vue中elementUI里的插件怎么使用”,文中的讲解内容简单清晰,易于学习与理解,下面请大家跟着小编的思路慢慢深入,一起来研究和学习“vue中elementUI里的插件怎么使用”吧!全屏插件的引用全屏功能可以使用插件
这篇文章主要讲解了“Vue中elementUI里的插件怎么使用”,文中的讲解内容简单清晰,易于学习与理解,下面请大家跟着小编的思路慢慢深入,一起来研究和学习“vue中elementUI里的插件怎么使用”吧!
全屏功能可以使用插件来实现
第一步,安装全局插件screenfull
npm i screenfull@5.1.0第二步,封装全屏显示的插件 ScreenFull/index.vue
<template> <div> <!-- 放置一个按钮 --> <el-button class="icon" @click="changeScreen">全屏</el-button> </div></template><script>import ScreenFull from 'screenfull'export default { methods: { // 改变全屏 changeScreen() { if (!ScreenFull.isEnabled) { // 此时全屏不可用 this.$message.warning('此时全屏组件不可用') return } // document.documentElement.requestFullscreen() 原生js调用 // 如果可用 就可以全屏 ScreenFull.toggle() } }}</script><style scoped>.icon{width: 40px;height: 40px;background-color: #ff0;}</style>第三步,全局注册该组件 main.js
import ScreenFull from './ScreenFull'Vue.component('ScreenFull', ScreenFull) // 注册全屏组件第四步,放置于 App.vue 中
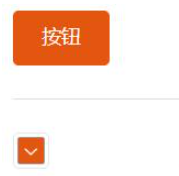
<template> <div id="app"> //全屏按钮 <screen-full /> </div></template><script>export default { name: 'App'}</script>我们想要实现在页面中实时的切换颜色,此时页面的主题可以跟着设置的颜色进行变化
简单说明一下它的原理: element-ui 2.0 版本之后所有的样式都是基于 SCSS 编写的,所有的颜色都是基于几个基础颜色变量来设置的,所以就不难实现动态换肤了,只要找到那几个颜色变量修改它就可以了。 首先我们需要拿到通过 package.JSON 拿到 element-ui 的版本号,根据该版本号去请求相应的样式。拿到样式之后将样色,通过正则匹配和替换,将颜色变量替换成你需要的,之后动态添加 style 标签来覆盖原有的 css 样式。
第一步, 封装颜色选择组件 ThemePicker
实现代码
<template> <el-color-picker v-model="theme" :predefine="['#409EFF', '#1890ff', '#304156','#212121','#11a983', '#13c2c2', '#6959CD', '#f5222d', ]" class="theme-picker" popper-class="theme-picker-dropdown" /></template><script>const version = require('element-ui/package.json').version // element-ui version from node_modulesconst ORIGINAL_THEME = '#409EFF' // default colorexport default { data() { return { chalk: '', // content of theme-chalk css theme: '' } }, computed: { defaultTheme() { return this.$store.state.settings.theme } }, watch: { defaultTheme: { handler: function(val, oldVal) { this.theme = val }, immediate: true }, async theme(val) { const oldVal = this.chalk ? this.theme : ORIGINAL_THEME if (typeof val !== 'string') return const themeCluster = this.getThemeCluster(val.replace('#', '')) const originalCluster = this.getThemeCluster(oldVal.replace('#', '')) console.log(themeCluster, originalCluster) const $message = this.$message({ message: ' Compiling the theme', customClass: 'theme-message', type: 'success', duration: 0, iconClass: 'el-icon-loading' }) const getHandler = (variable, id) => { return () => { const originalCluster = this.getThemeCluster(ORIGINAL_THEME.replace('#', '')) const newStyle = this.updateStyle(this[variable], originalCluster, themeCluster) let styleTag = document.getElementById(id) if (!styleTag) { styleTag = document.createElement('style') styleTag.setAttribute('id', id) document.head.appendChild(styleTag) } styleTag.innerText = newStyle } } if (!this.chalk) { const url = `https://unpkg.com/element-ui@${version}/lib/theme-chalk/index.css` await this.getCSSString(url, 'chalk') } const chalkHandler = getHandler('chalk', 'chalk-style') chalkHandler() const styles = [].slice.call(document.querySelectorAll('style')) .filter(style => { const text = style.innerText return new RegExp(oldVal, 'i').test(text) && !/Chalk Variables/.test(text) }) styles.forEach(style => { const { innerText } = style if (typeof innerText !== 'string') return style.innerText = this.updateStyle(innerText, originalCluster, themeCluster) }) this.$emit('change', val) $message.close() } }, methods: { updateStyle(style, oldCluster, newCluster) { let newStyle = style oldCluster.forEach((color, index) => { newStyle = newStyle.replace(new RegExp(color, 'ig'), newCluster[index]) }) return newStyle }, getCSSString(url, variable) { return new Promise(resolve => { const xhr = new XMLHttpRequest() xhr.onreadystatechange = () => { if (xhr.readyState === 4 && xhr.status === 200) { this[variable] = xhr.responseText.replace(/@font-face{[^}]+}/, '') resolve() } } xhr.open('GET', url) xhr.send() }) }, getThemeCluster(theme) { const tintColor = (color, tint) => { let red = parseInt(color.slice(0, 2), 16) let green = parseInt(color.slice(2, 4), 16) let blue = parseInt(color.slice(4, 6), 16) if (tint === 0) { // when primary color is in its rgb space return [red, green, blue].join(',') } else { red += Math.round(tint * (255 - red)) green += Math.round(tint * (255 - green)) blue += Math.round(tint * (255 - blue)) red = red.toString(16) green = green.toString(16) blue = blue.toString(16) return `#${red}${green}${blue}` } } const shadeColor = (color, shade) => { let red = parseInt(color.slice(0, 2), 16) let green = parseInt(color.slice(2, 4), 16) let blue = parseInt(color.slice(4, 6), 16) red = Math.round((1 - shade) * red) green = Math.round((1 - shade) * green) blue = Math.round((1 - shade) * blue) red = red.toString(16) green = green.toString(16) blue = blue.toString(16) return `#${red}${green}${blue}` } const clusters = [theme] for (let i = 0; i <= 9; i++) { clusters.push(tintColor(theme, Number((i / 10).toFixed(2)))) } clusters.push(shadeColor(theme, 0.1)) return clusters } }}</script><style>.theme-message,.theme-picker-dropdown { z-index: 99999 !important;}.theme-picker .el-color-picker__trigger { height: 26px !important; width: 26px !important; padding: 2px;}.theme-picker-dropdown .el-color-dropdown__link-btn { display: none;}.el-color-picker { height: auto !important;}</style>注册代码
import ThemePicker from './ThemePicker'Vue.component('ThemePicker', ThemePicker)第二步, 放置于 App.vue 中
<template> <div id="app"> <el-button type="primary">按钮</el-button> <el-divider/> //放置动态主题按钮 <ThemePicker></ThemePicker> </div></template><script>export default {}</script><style></style>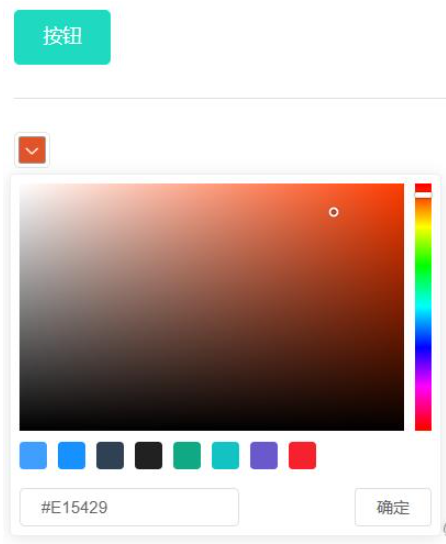
使用vue-element-admin模板二次开发的都可以使用
使用国际化 i18n 方案。通过 vue-i18n而实现。
第一步,我们需要首先国际化的包
npm i vue-i18n@8第二步,需要单独一个多语言的实例化文件 src/lang/index.js
import Vue from 'vue' // 引入Vueimport VueI18n from 'vue-i18n' // 引入国际化的包import elementEN from 'element-ui/lib/locale/lang/en' // 引入饿了么的英文包import elementZH from 'element-ui/lib/locale/lang/zh-CN' // 引入饿了么的中文包Vue.use(VueI18n) // 全局注册国际化包export default new VueI18n({ locale: 'zh', // 从cookie中获取语言类型 获取不到就是中文 messages: { en: { ...elementEN // 将饿了么的英文语言包引入 }, zh: { ...elementZH // 将饿了么的中文语言包引入 } }})上面的代码的作用是将Element的两种语言导入了
第三步,在main.js中对挂载 i18n的插件,并设置element为当前的语言
import Vue from 'vue'import ElementUI from 'element-ui'import locale from 'element-ui/lib/locale/lang/en'// 设置element为当前的语言import i18n from '@/lang/index'Vue.use(ElementUI, { locale })new Vue({ el: '#app', i18n, render: h => h(App)})此时,element已经变成了zh,也就是中文,但是我们常规的内容怎么根据当前语言类型显示?
这里,针对英文和中文,我们可以自己封装不同的语言包 src/lang/zh.js , src/lang/en.js src/lang/zh.js
export default { lang: { dashboard: '首页', bug:'bug就是bug' }}src/lang/en.js
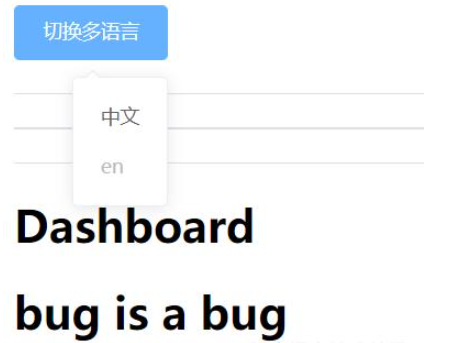
export default { lang: { dashboard: 'Dashboard', bug:'bug is a bug' }}第四步,在index.js中同样引入该语言包
import customZH from './zh' // 引入自定义中文包import customEN from './en' // 引入自定义英文包Vue.use(VueI18n) // 全局注册国际化包export default new VueI18n({ locale: 'zh', // 从cookie中获取语言类型 获取不到就是中文 messages: { en: { ...elementEN, // 将饿了么的英文语言包引入 ...customEN }, zh: { ...elementZH, // 将饿了么的中文语言包引入 ...customZH } }})自定义语言包的内容怎么使用?
第五步,在App.vue中应用
当我们全局注册i18n的时候,每个组件都会拥有一个 $t 的方法,它会根据传入的key,自动的去寻找当前语言的文本,我们可以将左侧菜单变成多语言展示文本
App.vue
<template> <div id="app"> <h2 v-text="$t('lang.dashboard')"></h2> <h2 v-text="$t('lang.bug')"></h2> </div></template>注意:当文本的值为嵌套时,可以通过 $t('key1.key2.key3...') 的方式获取
现在已经完成了多语言的接入,接下来封装切换多语言的组件
第六步,封装多语言组件 src/components/lang/index.vue
<template> <el-dropdown trigger="click" @command="changeLanguage"> <!-- 这里必须加一个div --> <div> <el-button type="primary">切换多语言</el-button> </div> <el-dropdown-menu slot="dropdown"> <el-dropdown-item command="zh" :disabled="'zh'=== $i18n.locale ">中文</el-dropdown-item> <el-dropdown-item command="en" :disabled="'en'=== $i18n.locale ">en</el-dropdown-item> </el-dropdown-menu> </el-dropdown></template><script>export default { methods: { changeLanguage(lang) { this.$i18n.locale = lang // 设置给本地的i18n插件 this.$message.success('切换多语言成功') } }}</script>第七步,在App.vue中引入
<!-- 切换多语言 --> <template> <div id="app"> <lang/> <el-divider/> <el-divider/> <el-divider/> <h2 v-text="$t('lang.dashboard')"></h2> <h2 v-text="$t('lang.bug')"></h2> </div></template>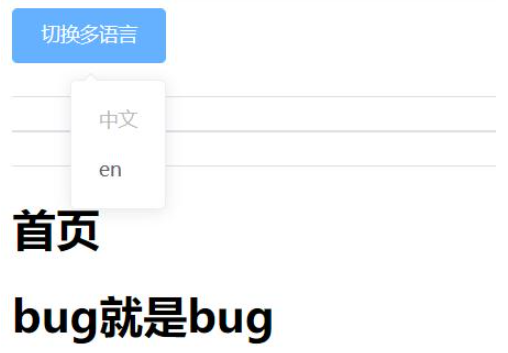
感谢各位的阅读,以上就是“vue中elementUI里的插件怎么使用”的内容了,经过本文的学习后,相信大家对vue中elementUI里的插件怎么使用这一问题有了更深刻的体会,具体使用情况还需要大家实践验证。这里是编程网,小编将为大家推送更多相关知识点的文章,欢迎关注!
--结束END--
本文标题: vue中elementUI里的插件怎么使用
本文链接: https://www.lsjlt.com/news/340946.html(转载时请注明来源链接)
有问题或投稿请发送至: 邮箱/279061341@qq.com QQ/279061341
下载Word文档到电脑,方便收藏和打印~
2024-05-07
2024-05-07
2024-05-07
2024-05-07
2024-05-07
2024-05-06
2024-05-06
2024-05-06
2024-05-06
2024-05-06
回答
回答
回答
回答
回答
回答
回答
回答
回答
回答


官方手机版

微信公众号

商务合作


0