这篇“IdentityServer4怎么使用”文章的知识点大部分人都不太理解,所以小编给大家总结了以下内容,内容详细,步骤清晰,具有一定的借鉴价值,希望大家阅读完这篇文章能有所收获,下面我们一起来看看这篇“IdentityServer4怎么
这篇“IdentityServer4怎么使用”文章的知识点大部分人都不太理解,所以小编给大家总结了以下内容,内容详细,步骤清晰,具有一定的借鉴价值,希望大家阅读完这篇文章能有所收获,下面我们一起来看看这篇“IdentityServer4怎么使用”文章吧。
OpenID是Authentication,即认证,对用户的身份进行认证。
OAuth是一个开放标准,是Authorization,即授权,允许用户授权第三方移动应用访问他们存储在其他服务商上存储的私密的资源(如照片,视频,联系人列表),而无需将用户名和密码提供给第三方应用。OAuth允许用户提供一个令牌而不是用户名和密码来访问他们存放在特定服务商上的数据。每一个令牌授权一个特定的网站内访问特定的资源(例如仅仅是某一相册中的视频)。这样,OAuth可以允许用户授权第三方网站访问他们存储在另外服务提供者的某些特定信息,而非所有内容。
OIDC是OpenID Connect的简称,是一个基于OAuth3协议的身份认证标准协议。是认证和授权的结合。OAuth3是一个授权协议,它无法提供完善的身份认证功能,OIDC使用OAuth3的授权服务器来为第三方客户端提供用户的身份认证,并把对应的身份认证信息传递给客户端,且可以适用于各种类型的客户端(比如服务端应用,移动APP,js应用),且完全兼容OAuth3,也就是说你搭建了一个OIDC的服务后,也可以当作一个OAuth3的服务来用。
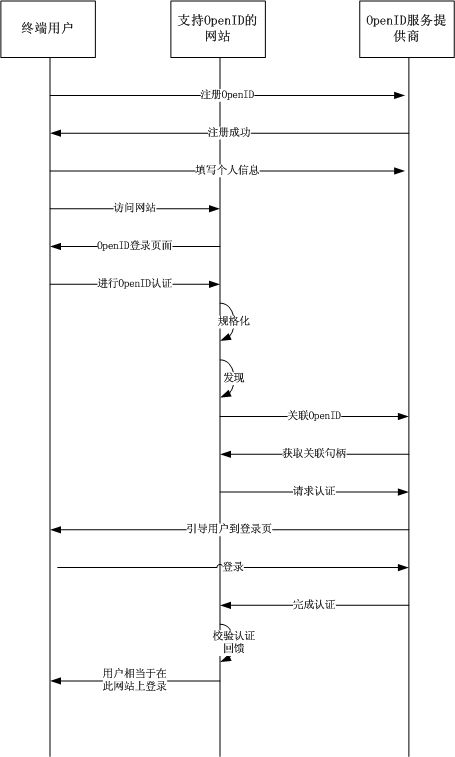
用户访问xxx.com(该网站支持OpenID)
xxx.com将用户导向OpenID服务的登录页面
用户输入用户名密码,成功后回调到xxx.com网站,并携带用户在OpenID服务中的唯一标识(这个表示可能仅仅是一个GUID,不含用户个人信息)
xxx.com校检成功后,就认为用户完成了登录认证
OpenID 目的就是做认证,使用简单,不透露用户的个人信息。
OAuth是用来做授权的,如果用来做认证,具体的流程如下图所示:
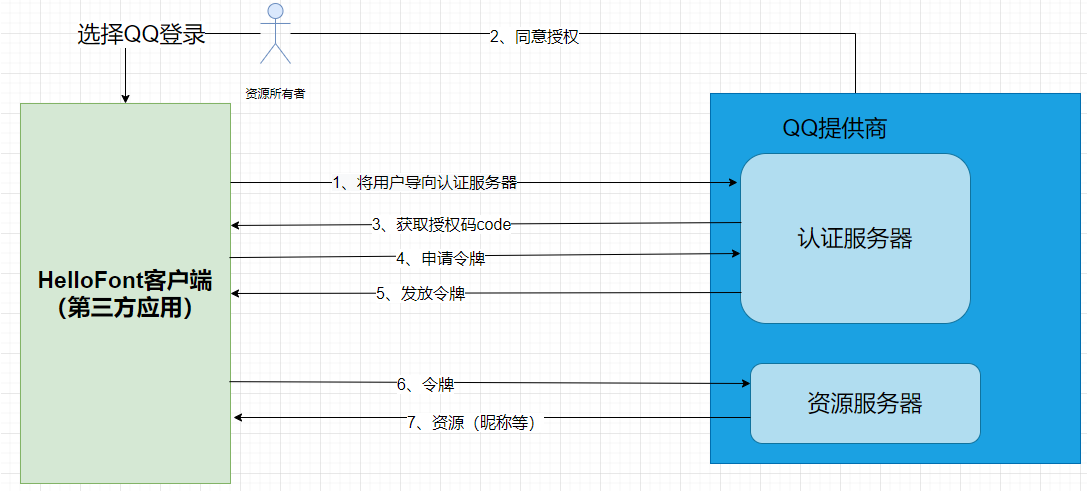
用户使用QQ登录HelloFont
HelloFont将用户导向QQ授权服务的登录页面
用户登录成功并授权后,页面返回HelloFont并携带访问令牌
如果想获取用户的详细信息,还需要通过访问令牌再次调用QQ服务提供的相关接口进行请求
可以看出,OAuth 相对于 OpenID 最大的区别就是,网站实际上是拿到了用户帐户访问权限继而确认你的身份。同时OAuth还比OpenID多了几个操作步骤。
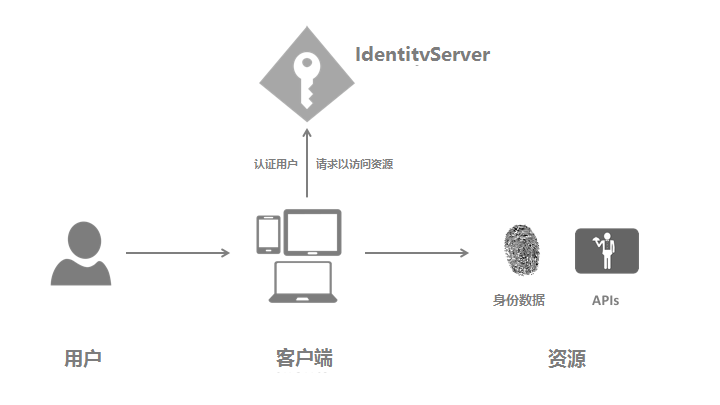
下面简单的介绍下Identityserver4中涉及的对象,具体的可以参考下官方文档。
用户(User):用户是使用已注册的客户端(指在id4中已经注册)访问资源的人。
客户端(Client):客户端就是从identityserver请求令牌的软件(你可以理解为一个app即可),既可以通过身份认证令牌来验证识别用户身份,又可以通过授权令牌来访问服务端的资源。但是客户端首先必须在申请令牌前已经在identityserver服务中注册过。
资源(Resources):资源就是你想用identityserver保护的东东,可以是用户的身份数据或者api资源。
身份令牌(顾名思义用于做身份认证,例如sso其实主要就是用于身份认证):一个身份令牌指的就是对认证过程的描述。它至少要标识某个用户(Called the sub aka subject claim)的主身份信息,和该用户的认证时间和认证方式。但是身份令牌可以包含额外的身份数据,具体开发者可以自行设定,但是一般情况为了确保数据传输的效率,开发者一般不做过多额外的设置,大家也可以根据使用场景自行决定。
访问令牌(用于做客户端访问授权):访问令牌允许客户端访问某个 API 资源。客户端请求到访问令牌,然后使用这个令牌来访问 API资源。访问令牌包含了客户端和用户(如果有的话,这取决于业务是否需要,但通常不必要)的相关信息,API通过这些令牌信息来授予客户端的数据访问权限。
下面简单的介绍下大体流程,看懂思路即可:
IDS4本身已经将OAuth3.0+OIDC+SSO思想给实现了,并且提供了成熟的组件IdentityServer4,如下图,只需要将该组件引入,进行相关的配置即可。

正常来说我们通过nuget下载了IdentityServer4包,就需要在startup.cs中引入使用,如下:
using System;using Microsoft.Aspnetcore.Builder;using Microsoft.AspNetCore.Hosting;using Microsoft.Extensions.DependencyInjection;namespace IdentityServer{ public class Startup { public IHostingEnvironment Environment { get; } public Startup(IHostingEnvironment environment) { Environment = environment; } public void ConfigureServices(IServiceCollection services) { var builder = services.AddIdentityServer() .AddInMemoryIdentityResources(Config.GetIdentityResources()) .AddInMemoryApiResources(Config.GetApis()) .AddInMemoryClients(Config.GetClients()); if (Environment.IsDevelopment()) { builder.ADDDeveloperSigninGCredential(); } else { throw new Exception("need to configure key material"); } } public void Configure(IApplicationBuilder app) { if (Environment.IsDevelopment()) { app.UseDeveloperExceptionPage(); } app.UseIdentityServer(); } }}可以从上面代码看出,采用的是本地配置文件的方式,我们看下配置文件:
using IdentityServer4.Models;using System.Collections.Generic;namespace IdentityServer{ public static class Config { public static IEnumerable<IdentityResource> GetIdentityResources() { return new IdentityResource[] { new IdentityResources.OpenId() }; } public static IEnumerable<ApiResource> GetApis() { return new List<ApiResource> { new ApiResource("api1", "My API") }; } public static IEnumerable<Client> GetClients() { return new List<Client> { new Client { ClientId = "client", // no interactive user, use the clientid/secret for authentication AllowedGrantTypes = GrantTypes.ClientCredentials, // secret for authentication ClientSecrets = { new Secret("secret".Sha256()) }, // scopes that client has access to AllowedScopes = { "api1" } } }; } }}在配置文件中我们定义了身份资源IdentityResource、API资源Apis、客户端Clients等等吧,具体怎么配置建议还是看一下官方文档,很详细,里面包含了相应的属性及示例等,可根据实际需求进行选择配置。
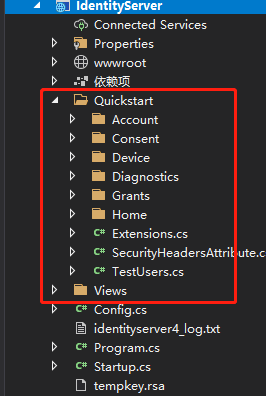
简单的认证服务就搭建好了,当然这个是比较简单的,支持客户端模式,不需要用户参与的授权。如果说站外应用需要使用授权码模式、或者implact模式,我们搭建的identityserver4项目还要提供登录授权等相关的页面的,不然用户在哪里登录和授权呢。这个官网也有示例,可以在GitHub中搜索下载源码查看,直接使用他们提供的界面(mvc)即可,当然也可以自己进行UI优化,但是他们提供的action的名称最好不要更改,因为identityserver4包中退出、登录相关的跳转都是指定好的,通过示例来说明下为啥不建议改动:
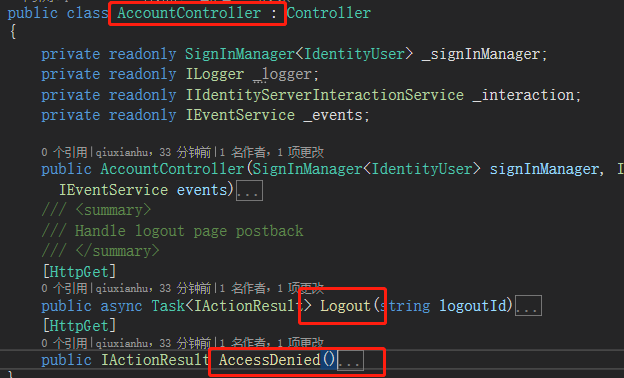
截图中是identityserver4提供的界面代码(mvc),有个Account控制器,里面有退出登录、授权受限等action,如果站外应用使用授权码模式登录,发现授权受限或者用户退出登录,那么identityserver4服务会将用户指向Account/LoGout或者Account/AccessDenied,如果把名称改了就找不到相应的action了。当然并不是所有的都不能改,比方说登录,我就自己单独在另一个action写的(有需求的原因),所以需要在startup.cs引入identityserver4的时候指定,如下:
//用户交互的选项options.UserInteraction = new IdentityServer4.Configuration.UserInteractionOptions{ LoginUrl = "/login/index",//登录地址};还有一种办法就是将identityserver4源码进行二次开发,改成你想要的样子。。。
上边的identityserver4的配置信息是写死在文件中的,在实际开发中,还是要将配置信息写入到数据库中,所以就需要持久化了。另外还需要提供人为配置信息的管理界面。总的来说就是基于IdentityServer4包加两块功能:管理界面+持久化。如下图:

先来说持久化吧,我们先选择EFCore作为ORM,所以startup.cs引入identityserver4的方式稍微有点不同,因为要将数据保存到数据库中,另外还要引入efcore,来看下startup.cs:
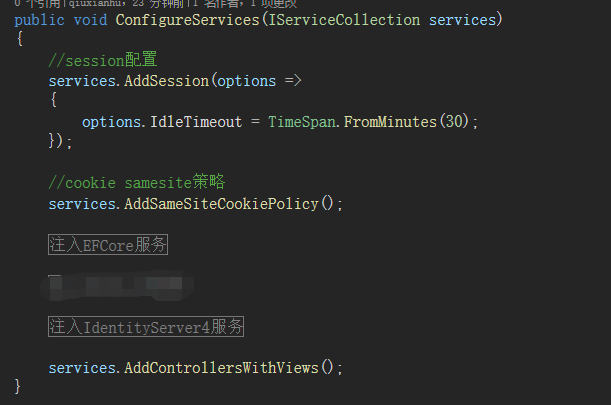
具体代码如下(伪代码,主要是思路):
using HyIdentityServer4.Authorization;using HyIdentityServer4.Data;using HyIdentityServer4.Extention;using HyIdentityServer4.Implementation;using IdentityServer4.Services;using IdentityServer4.Validation;using Microsoft.AspNetCore.Authorization;using Microsoft.AspNetCore.Builder;using Microsoft.AspNetCore.Hosting;using Microsoft.AspNetCore.Http;using Microsoft.AspNetCore.Identity;using Microsoft.EntityFrameworkCore;using Microsoft.Extensions.Configuration;using Microsoft.Extensions.DependencyInjection;using Microsoft.Extensions.Hosting;using System;using System.IO;using System.Reflection;using System.Security.Cryptography.X509Certificates;namespace HyIdentityServer4{ public class Startup { public Startup(IConfiguration configuration, IWEBHostEnvironment environment) { Configuration = configuration; Environment = environment; } public IConfiguration Configuration { get; } public IWebHostEnvironment Environment { get; } // This method gets called by the runtime. Use this method to add services to the container. public void ConfigureServices(IServiceCollection services) { //session配置 services.AddSession(options => { options.IdleTimeout = TimeSpan.FromMinutes(30); }); //cookie samesite策略 services.AddSameSiteCookiePolicy(); #region 注入EFCore服务(支持mysql和sqlserver)#if DEBUG string connectionString = Configuration.GetConnectionString("HyIds4ConnectionDebug");#else string connectionString = Configuration.GetConnectionString("HyIds4ConnectionRelease");#endif bool isMysql = Configuration.GetConnectionString("Ismysql").ObjToBool(); if (isMysql) { services.AddDbContext<ApplicationDbContext>(options => options.UseMySql(connectionString, MySqlServerVersion.LatestSupportedServerVersion)); } else { services.AddDbContext<ApplicationDbContext>(options => options.UseSqlServer(connectionString)); }; #endregion #region 注入IdentityServer4服务 var migrationsAssembly = typeof(Startup).GetTypeInfo().Assembly.GetName().Name; var builder = services.AddIdentityServer(options => { options.Events.RaiseErrorEvents = true;//是否引发错误事件 options.Events.RaiseInformationEvents = true;//是否引发信息事件 options.Events.RaiseFailureEvents = true;//是否引发失败事件 options.Events.RaiseSuccessEvents = true;//是否引发成功事件 //用户交互的选项 options.UserInteraction = new IdentityServer4.Configuration.UserInteractionOptions { LoginUrl = "/login/index",//登录地址 }; }) //IdentityServer4使用asp.net identity身份实现 .AddAspNetIdentity<IdentityUser>() //IdentityServer4采用EFCore的方式实现数据库模式 .AddConfigurationStore(options => { if (isMysql) { options.ConfigureDbContext = b => b.UseMySql(connectionString, MySqlServerVersion.LatestSupportedServerVersion, sql => sql.MigrationsAssembly(migrationsAssembly)); } else { options.ConfigureDbContext = b => b.UseSqlServer(connectionString, sql => sql.MigrationsAssembly(migrationsAssembly)); } }) // IdentityServer4采用EFCore进行一些操作,实现持久化 .AddOperationalStore(options => { if (isMysql) { options.ConfigureDbContext = b => b.UseMySql(connectionString, MySqlServerVersion.LatestSupportedServerVersion, sql => sql.MigrationsAssembly(migrationsAssembly)); } else { options.ConfigureDbContext = b => b.UseSqlServer(connectionString, sql => sql.MigrationsAssembly(migrationsAssembly)); } //是否可以自动清理令牌 options.EnableTokenCleanup = true; //设置清理的间隔(频率),以秒为单位 options.TokenCleanupInterval = 15; }); //配置证书 if (Environment.IsDevelopment()) { builder.AddDeveloperSigningCredential(); } else { builder.AddDeveloperSigningCredential(); //builder.AddSigningCredential(new X509Certificate2( // Path.Combine(Environment.ContentRootPath, Configuration["Certificates:CerPath"]), Configuration["Certificates:PassWord"] // )); } //https://www.javaroad.cn/questions/53540 services.AddTransient<IResourceOwnerPasswordValidator, CustomResourceOwnerPasswordValidator>();//重写 services.AddTransient<IProfileService, CustomProfileService>();//重写 services.AddAuthorization(options => { options.AddPolicy("超级管理员", policy => policy.Requirements.Add(new ClaimRequirement("rolename", "超级管理员"))); }); //实现此接口的类能够决定是否授权是被允许的。 services.AddSingleton<IAuthorizationHandler, ClaimsRequirementHandler>();//重写 #endregion services.AddControllersWithViews(); } // This method gets called by the runtime. Use this method to configure the HTTP request pipeline. public void Configure(IApplicationBuilder app, IWebHostEnvironment env) { app.UseCookiePolicy(); if (env.IsDevelopment()) { app.UseDeveloperExceptionPage(); } else { // The default HSTS value is 30 days. You may want to change this for production scenariOS, see https://aka.ms/aspnetcore-hsts. app.UseHsts(); } app.UseSession(); app.UseStaticFiles(); app.UseSession(); app.UseRouting(); app.UseIdentityServer(); app.UseAuthentication(); app.UseAuthorization(); app.UseEndpoints(endpoints => { endpoints.MapControllerRoute( name: "default", pattern: "{controller=home}/{action=index}/{id?}"); }); } }}再来说管理界面,上边也说到identityserver4提供了mvc的界面,如果界面要求不高可以使用这一套UI,如下图:
当然我们也可以自定义管理界面,但是要注意的Account控制器中的action尽量和Quickstart中的保持一致,因为这里面的action涉及到了identityserver4相关的回调,如果改了名称,就找不到action了。至于Client、API、IdentityResource、Scope等相关配置的接口就可以自定义了,只要能正确的写入数据库就行。
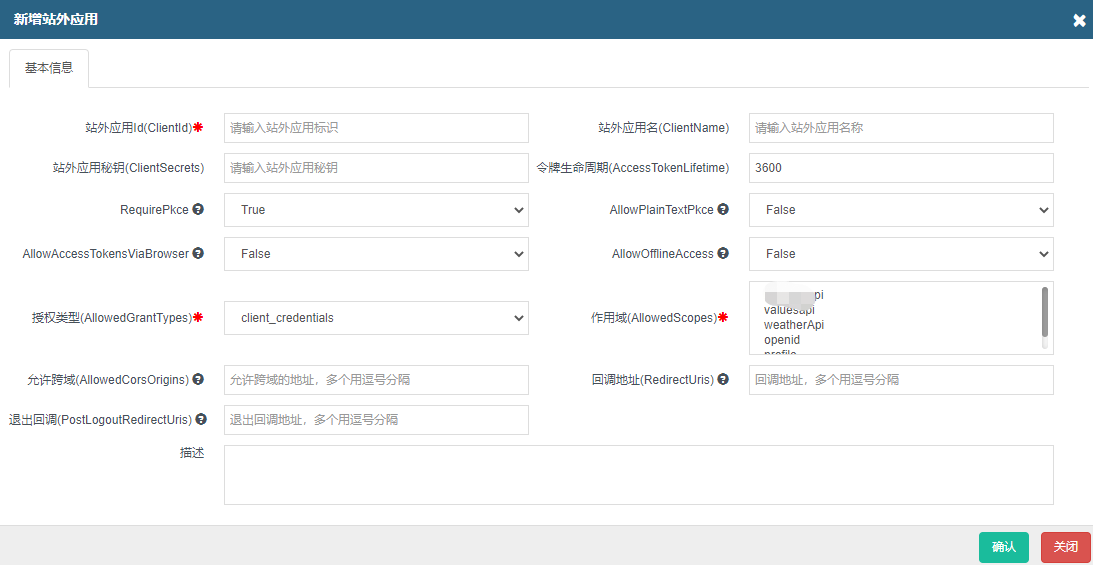
总结一下:identityserver4本身就是实现了认证和授权相关的功能,我们这里仅仅是引入identityserver4并对其进行相应的配置,这里的配置信息可以持久化到数据库,也可以写死在配置文件Config中。提供的界面(mvc)一方面是支持identityserver4某些授权方式(比如授权码模式、Implict)的回调,回调的action主要是Account控制器中的action;另一方面是让管理员配置站外应用、作用域、Api资源信息的,如下图:
identityserver4项目提供了认证授权相关的功能,但是如果我们的认证授权项目有了管理界面,如上边介绍的,就需要管理员,管理员可以配置客户端、作用域等信息。但是管理员也需要权限,所以需要引入认证相关模块,这里使用ASP.net coreIdentity 。千万不要混淆以下几个概念:identityserver4、aspNet Core identity、efcore。再啰嗦下,我们利用identityserver4构建了认证授权项目,在该项目中我们使用efcore实现持久化,使用aspnet core identity来认证管理员的所拥有的权限。所以在startup.cs的ConfigureServices方法中需要引入aspnetcore identity,代码如下:
#region 注入Identity服务 //IdentityOptions文档说明 //https://docs.microsoft.com/zh-cn/dotnet/api/microsoft.aspnetcore.builder.identityoptions?view=aspnetcore-1.1 //AddIdentity为指定的用户和角色类型添加并配置身份系统。 services.AddIdentity<IdentityUser, IdentityRole>(options => { options.User = new UserOptions { RequireUniqueEmail = true, //要求Email唯一 AllowedUserNameCharacters = null //允许的用户名字符 }; options.Password = new PasswordOptions { RequiredLength = 6, //要求密码最小长度,默认是 6 个字符 RequireDigit = false, //要求有数字 RequiredUniqueChars = 0, //要求至少要出现的字母数 RequireLowercase = false, //要求小写字母 RequireNonAlphanumeric = false, //要求特殊字符 RequireUppercase = false //要求大写字母 }; }) //认证信息存储的框架实现 .AddEntityFrameworkStores<ApplicationDbContext>() //令牌提供程序,用于生成重置密码的令牌、更改电子邮件和更改电话号码操作以及双因素身份验证的令牌 .AddDefaultTokenProviders(); //配置应用的cookie services.ConfigureApplicationCookie(options => { //重定向 options.LoginPath = new PathString("/login/index"); }); //配置session的有效时间,单位秒 services.AddSession(options => { options.IdleTimeout = TimeSpan.FromSeconds(180); }); #endregion为了简单,我们不做角色管理了(满足了我的需求),直接写死个角色,如下代码,这样该项目中的用户就会涉及到两个角色:普通用户、超级管理员角色
services.AddAuthorization(options =>{ options.AddPolicy("超级管理员", policy => policy.Requirements.Add(new ClaimRequirement("rolename", "超级管理员")));});startup.cs的代码截图:
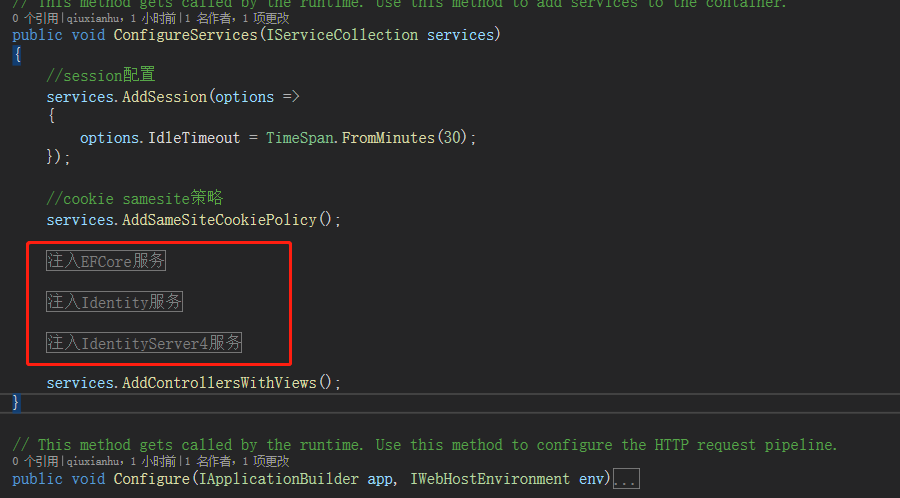
完整的startup.cs代码如下:
using HyIdentityServer4.Authorization;using HyIdentityServer4.Data;using HyIdentityServer4.Extention;using HyIdentityServer4.Implementation;using IdentityServer4.Services;using IdentityServer4.Validation;using Microsoft.AspNetCore.Authorization;using Microsoft.AspNetCore.Builder;using Microsoft.AspNetCore.Hosting;using Microsoft.AspNetCore.Http;using Microsoft.AspNetCore.Identity;using Microsoft.EntityFrameworkCore;using Microsoft.Extensions.Configuration;using Microsoft.Extensions.DependencyInjection;using Microsoft.Extensions.Hosting;using System;using System.IO;using System.Reflection;using System.Security.Cryptography.X509Certificates;namespace HyIdentityServer4{ public class Startup { public Startup(IConfiguration configuration, IWebHostEnvironment environment) { Configuration = configuration; Environment = environment; } public IConfiguration Configuration { get; } public IWebHostEnvironment Environment { get; } // This method gets called by the runtime. Use this method to add services to the container. public void ConfigureServices(IServiceCollection services) { //session配置 services.AddSession(options => { options.IdleTimeout = TimeSpan.FromMinutes(30); }); //cookie samesite策略 services.AddSameSiteCookiePolicy(); #region 注入EFCore服务#if DEBUG string connectionString = Configuration.GetConnectionString("HyIds4ConnectionDebug");#else string connectionString = Configuration.GetConnectionString("HyIds4ConnectionRelease");#endif bool isMysql = Configuration.GetConnectionString("IsMysql").ObjToBool(); if (isMysql) { services.AddDbContext<ApplicationDbContext>(options => options.UseMySql(connectionString, MySqlServerVersion.LatestSupportedServerVersion)); } else { services.AddDbContext<ApplicationDbContext>(options => options.UseSqlServer(connectionString)); }; #endregion #region 注入Identity服务 //IdentityOptions文档说明 //https://docs.microsoft.com/zh-cn/dotnet/api/microsoft.aspnetcore.builder.identityoptions?view=aspnetcore-1.1 //AddIdentity为指定的用户和角色类型添加并配置身份系统。 services.AddIdentity<IdentityUser, IdentityRole>(options => { options.User = new UserOptions { RequireUniqueEmail = true, //要求Email唯一 AllowedUserNameCharacters = null //允许的用户名字符 }; options.Password = new PasswordOptions { RequiredLength = 1, //要求密码最小长度,默认是 6 个字符 RequireDigit = false, //要求有数字 RequiredUniqueChars = 0, //要求至少要出现的字母数 RequireLowercase = false, //要求小写字母 RequireNonAlphanumeric = false, //要求特殊字符 RequireUppercase = false //要求大写字母 }; }) //认证信息存储的框架实现 .AddEntityFrameworkStores<ApplicationDbContext>() //令牌提供程序,用于生成重置密码的令牌、更改电子邮件和更改电话号码操作以及双因素身份验证的令牌 .AddDefaultTokenProviders(); //配置应用的cookie services.ConfigureApplicationCookie(options => { //重定向 options.LoginPath = new PathString("/login/index"); }); //配置session的有效时间,单位秒 services.AddSession(options => { options.IdleTimeout = TimeSpan.FromSeconds(180); }); #endregion #region 注入IdentityServer4服务 var migrationsAssembly = typeof(Startup).GetTypeInfo().Assembly.GetName().Name; var builder = services.AddIdentityServer(options => { options.Events.RaiseErrorEvents = true;//是否引发错误事件 options.Events.RaiseInformationEvents = true;//是否引发信息事件 options.Events.RaiseFailureEvents = true;//是否引发失败事件 options.Events.RaiseSuccessEvents = true;//是否引发成功事件 //用户交互的选项 options.UserInteraction = new IdentityServer4.Configuration.UserInteractionOptions { LoginUrl = "/login/index",//登录地址 }; }) //IdentityServer4使用asp.net identity身份实现 .AddAspNetIdentity<IdentityUser>() //IdentityServer4采用EFCore的方式实现数据库模式 .AddConfigurationStore(options => { if (isMysql) { options.ConfigureDbContext = b => b.UseMySql(connectionString, MySqlServerVersion.LatestSupportedServerVersion, sql => sql.MigrationsAssembly(migrationsAssembly)); } else { options.ConfigureDbContext = b => b.UseSqlServer(connectionString, sql => sql.MigrationsAssembly(migrationsAssembly)); } }) // IdentityServer4采用EFCore进行一些操作,实现持久化 .AddOperationalStore(options => { if (isMysql) { options.ConfigureDbContext = b => b.UseMySql(connectionString, MySqlServerVersion.LatestSupportedServerVersion, sql => sql.MigrationsAssembly(migrationsAssembly)); } else { options.ConfigureDbContext = b => b.UseSqlServer(connectionString, sql => sql.MigrationsAssembly(migrationsAssembly)); } //是否可以自动清理令牌 options.EnableTokenCleanup = true; //设置清理的间隔(频率),以秒为单位 options.TokenCleanupInterval = 15; }); //配置证书 if (Environment.IsDevelopment()) { builder.AddDeveloperSigningCredential(); } else { builder.AddDeveloperSigningCredential(); //builder.AddSigningCredential(new X509Certificate2( // Path.Combine(Environment.ContentRootPath, Configuration["Certificates:CerPath"]), Configuration["Certificates:Password"] // )); } //https://www.javaroad.cn/questions/53540 services.AddTransient<IResourceOwnerPasswordValidator, CustomResourceOwnerPasswordValidator>(); services.AddTransient<IProfileService, CustomProfileService>(); services.AddAuthorization(options => { options.AddPolicy("超级管理员", policy => policy.Requirements.Add(new ClaimRequirement("rolename", "超级管理员"))); }); //实现此接口的类能够决定是否授权是被允许的。 services.AddSingleton<IAuthorizationHandler, ClaimsRequirementHandler>(); #endregion services.AddControllersWithViews(); } // This method gets called by the runtime. Use this method to configure the HTTP request pipeline. public void Configure(IApplicationBuilder app, IWebHostEnvironment env) { app.UseCookiePolicy(); if (env.IsDevelopment()) { app.UseDeveloperExceptionPage(); } else { // The default HSTS value is 30 days. You may want to change this for production scenarios, see https://aka.ms/aspnetcore-hsts. app.UseHsts(); } app.UseSession(); app.UseStaticFiles(); app.UseSession(); app.UseRouting(); app.UseIdentityServer(); app.UseAuthentication(); app.UseAuthorization(); app.UseEndpoints(endpoints => { endpoints.MapControllerRoute( name: "default", pattern: "{controller=home}/{action=index}/{id?}"); }); } }}需要权限认证的action要加上Authorize,如果想了解Authorize做了哪些功能可以看下微软官网。因为控制器比较多,所以抽象出来一个basecontroller,加上Authorize特性,需要的controller继承basecontroller,如下:
using Microsoft.AspNetCore.Authorization;using Microsoft.AspNetCore.Mvc;namespace HyIdentityServer4.Controllers{ //[SecurityHeaders] [Authorize(Policy = "超级管理员")] public class BaseController : Controller { }}管理员就可以通过用户管理为用户配置角色了:

(1)问题
Access_Token是Jwt格式的,因为站外应用获取到token后,想要从token中解析出用户标识、用户邮箱等信息,如何让identityserver4项目生成的token包含这些信息呢?
(2)解决方法
为了获得分配给用户的声明并将其附加到访问令牌,需要在授权服务上实现两个接口:IResourceOwnerPasswordValidator和IProfileService。以下是对这两个类的实现:(注意请务必获取最新版本的IdentityServer4)
public class ResourceOwnerPasswordValidator : IResourceOwnerPasswordValidator{ private readonly UserManager<ApplicationUser> _userManager; public ResourceOwnerPasswordValidator(UserManager<ApplicationUser> userManager) { _userManager = userManager; } public Task ValidateAsync(ResourceOwnerPasswordValidationContext context) { var userTask = _userManager.FindByNameAsync(context.UserName); var user = userTask.Result; context.Result = new GrantValidationResult(user.Id, "password", null, "local", null); return Task.FromResult(context.Result); }}和public class AspNetIdentityProfileService : IProfileService{ private readonly UserManager<ApplicationUser> _userManager; public AspNetIdentityProfileService(UserManager<ApplicationUser> userManager) { _userManager = userManager; } public async Task GetProfileDataAsync(ProfileDataRequestContext context) { var subject = context.Subject; if (subject == null) throw new ArgumentNullException(nameof(context.Subject)); var subjectId = subject.GetSubjectId(); var user = await _userManager.FindByIdAsync(subjectId); if (user == null) throw new ArgumentException("Invalid subject identifier"); var claims = await GetClaimsFromUser(user); var siteIdClaim = claims.SingleOrDefault(x => x.Type == "http://schemas.xmlsoap.org/ws/2005/05/identity/claims/emailaddress"); context.IssuedClaims.Add(new Claim(JwtClaimTypes.Email, user.Email)); context.IssuedClaims.Add(new Claim("siteid", siteIdClaim.Value)); context.IssuedClaims.Add(new Claim(JwtClaimTypes.Role, "User")); var roleClaims = claims.Where(x => x.Type == "http://schemas.microsoft.com/ws/2008/06/identity/claims/role"); foreach (var roleClaim in roleClaims) { context.IssuedClaims.Add(new Claim(JwtClaimTypes.Role, roleClaim.Value)); } } public async Task IsActiveAsync(IsActiveContext context) { var subject = context.Subject; if (subject == null) throw new ArgumentNullException(nameof(context.Subject)); var subjectId = subject.GetSubjectId(); var user = await _userManager.FindByIdAsync(subjectId); context.IsActive = false; if (user != null) { if (_userManager.SupportsUserSecurityStamp) { var security_stamp = subject.Claims.Where(c => c.Type == "security_stamp").Select(c => c.Value).SingleOrDefault(); if (security_stamp != null) { var db_security_stamp = await _userManager.GetSecurityStampAsync(user); if (db_security_stamp != security_stamp) return; } } context.IsActive = !user.LockoutEnabled || !user.LockoutEnd.HasValue || user.LockoutEnd <= DateTime.Now; } } private async Task<IEnumerable<Claim>> GetClaimsFromUser(ApplicationUser user) { var claims = new List<Claim> { new Claim(JwtClaimTypes.Subject, user.Id), new Claim(JwtClaimTypes.PreferredUserName, user.UserName) }; if (_userManager.SupportsUserEmail) { claims.AddRange(new[] { new Claim(JwtClaimTypes.Email, user.Email), new Claim(JwtClaimTypes.EmailVerified, user.EmailConfirmed ? "true" : "false", ClaimValueTypes.Boolean) }); } if (_userManager.SupportsUserPhoneNumber && !string.IsNullOrWhiteSpace(user.PhoneNumber)) { claims.AddRange(new[] { new Claim(JwtClaimTypes.PhoneNumber, user.PhoneNumber), new Claim(JwtClaimTypes.PhoneNumberVerified, user.PhoneNumberConfirmed ? "true" : "false", ClaimValueTypes.Boolean) }); } if (_userManager.SupportsUserClaim) { claims.AddRange(await _userManager.GetClaimsAsync(user)); } if (_userManager.SupportsUserRole) { var roles = await _userManager.GetRolesAsync(user); claims.AddRange(roles.Select(role => new Claim(JwtClaimTypes.Role, role))); } return claims; }}然后需要在startup.cs中添加到你的服务:
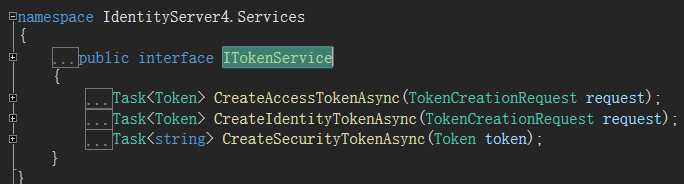
services.AddTransient<IResourceOwnerPasswordValidator, ResourceOwnerPasswordValidator>();services.AddTransient<IProfileService, AspNetIdentityProfileService>();主要是引入 ITokenService 接口,调用CreateSecurityTokenAsync方法
代码如下:
/// <summary> /// 为用户创建token /// </summary> private async Task<TokenDto> CreateToken(Client client, CreateTokenInput input) { Token accessToken = await CreateAccessToken(client, input); string token = await _tokenService.CreateSecurityTokenAsync(accessToken); return new TokenDto() { AccessToken = token, ExpiresIn = input.Lifetime > 0 ? input.Lifetime : client.AccessTokenLifetime, TokenType = "Bearer" }; } /// <summary> /// 创建生成jwt的Token所包含信息 /// </summary> /// <param name="client"></param> /// <param name="input"></param> /// <returns></returns> private async Task<Token> CreateAccessToken(Client client, CreateTokenInput input) { #region claims //, string subjectId, int lifetime, params string[] scopes var claims = new List<Claim> { new Claim(JwtClaimTypes.ClientId, client.ClientId), new Claim(JwtClaimTypes.Id, input.SubjectId), }; input.Claims?.ForEach(c => claims.Add(c)); input.Scopes?.ForEach(s => claims.Add(new Claim(JwtClaimTypes.Scope, s))); //client scopes claims.AddRange(client.AllowedScopes.Select(s => new Claim(JwtClaimTypes.Scope, s))); #endregion #region aud var website = _configuration.GetValue<string>("AuthWebSite", "").RemoveTrailingSlash(); List<string> aud = new List<string>() { string.Concat(website, "/resources") }; //client aud:apiResourceName var apiResourceNameList = await _identityServer4Service.GetApiResourceNames(client.AllowedScopes.ToList()); aud.AddRange(apiResourceNameList ?? new List<string>()); #endregion var token = new Token(OidcConstants.TokenTypes.AccessToken) { CreationTime = DateTime.UtcNow, Claims = claims, Audiences = aud, Issuer = website, Lifetime = input.Lifetime > 0 ? input.Lifetime : client.AccessTokenLifetime, ClientId = client.ClientId, AccessTokenType = client.AccessTokenType, //Scopes = client.AllowedScopes.ToList(), }; return token; } #endregion以上就是关于“IdentityServer4怎么使用”这篇文章的内容,相信大家都有了一定的了解,希望小编分享的内容对大家有帮助,若想了解更多相关的知识内容,请关注编程网精选频道。
--结束END--
本文标题: IdentityServer4怎么使用
本文链接: https://www.lsjlt.com/news/343541.html(转载时请注明来源链接)
有问题或投稿请发送至: 邮箱/279061341@qq.com QQ/279061341
下载Word文档到电脑,方便收藏和打印~
2024-05-16
2024-05-16
2024-05-16
2024-05-16
2024-05-16
2024-05-16
2024-05-16
2024-05-16
2024-05-16
2024-05-16
回答
回答
回答
回答
回答
回答
回答
回答
回答
回答


官方手机版

微信公众号

商务合作


0