下文我给大家简单讲讲关于Mysql中MMM高可用架构的安装配置流程,大家之前了解过相关类似主题内容吗?感兴趣的话就一起来看看这篇文章吧,相信看完mysql中MMM高可用架构的安装配置流程对大家多少有点帮助吧
下文我给大家简单讲讲关于Mysql中MMM高可用架构的安装配置流程,大家之前了解过相关类似主题内容吗?感兴趣的话就一起来看看这篇文章吧,相信看完mysql中MMM高可用架构的安装配置流程对大家多少有点帮助吧。
| 主机 | IP地址 |
|---|---|
| mysql-m1主云服务器 | 192.168.58.131 |
| mysql-m2主云服务器 | 192.168.58.136 |
| mysql-m3从云服务器 | 192.168.58.146 |
| mysql-m4从云服务器 | 192.168.58.147 |
| mysql-monitor监视代理云服务器 | 192.168.58.148 |
1、在四台MySQL云服务器上,都安装MySQL,过程省略
2、配置ALI云源,然后安装epel-rlease源,为了下面安装mysql-mmm工具套件。
[root@localhost ~]# wget -O /etc/yum.repos.d/Centos-Base.repo Http://mirrors.aliyun.com/repo/Centos-7.repo
[root@localhost ~]# yum -y install epel-release
[root@localhost ~]# yum clean all && yum makecache
3、配置修改m1主配置文件。
vim /etc/my.cnf

[mysqld]
log_error=/var/lib/mysql/mysql.err                     #配置错误日志
log=/var/lib/mysql/mysql_log.log                       #配置常用日志
log_slow_queries=/var/lib/mysql_slow_queris.log        #配置慢日志
binlog-ignore-db=mysql,infORMation_schema              #配置不需要记录二进制日志的数据库
character_set_server=utf8                              #配置字符集
log_bin=mysql_bin                                      #开启binlog日志用于主从数据复制
server_id=1                                            #每台server-id的值不能一样
log_slave_updates=true                                 #此数据库宕机,备用数据库接管
sync_binlog=1                                          #允许同步二进制日志
auto_increment_increment=2                             #字段依次递增多少
auto_increment_offset=1                                #自增字段的起始值:1、3、5等奇数ID
配置没问题后,把配置文件复制到另外一台主云服务器
[root@localhost ~]# scp /etc/my.cnf root@192.168.58.136:/etc/4、配置mysql-m1、mysql-m2主主模式
首先查看log bin日志和pos值的位置。
[root@localhost1 ~]# mysql
Welcome to the MariaDB monitor.  Commands end with ; or \g.
Your MySQL connection id is 1065
Server version: 5.5.24-log Source distribution

Copyright (c) 2000, 2017, oracle, MariaDB Corporation Ab and others.

Type 'help;' or '\h' for help. Type '\c' to clear the current input statement.

MySQL [(none)]> show master status;
+------------------+----------+--------------+--------------------------+
| File             | Position | Binlog_Do_DB | Binlog_Ignore_DB         |
+------------------+----------+--------------+--------------------------+
| mysql_bin.000002 |      107 |              | mysql,information_schema |
+------------------+----------+--------------+--------------------------+
1 row in set (0.00 sec)

[root@localhost2 ~]# mysql
Welcome to the MariaDB monitor.  Commands end with ; or \g.
Your MySQL connection id is 1065
Server version: 5.5.24-log Source distribution

Copyright (c) 2000, 2017, Oracle, MariaDB Corporation Ab and others.

Type 'help;' or '\h' for help. Type '\c' to clear the current input statement.

MySQL [(none)]> show master status;
+------------------+----------+--------------+--------------------------+
| File             | Position | Binlog_Do_DB | Binlog_Ignore_DB         |
+------------------+----------+--------------+--------------------------+
| mysql_bin.000002 |      107 |              | mysql,information_schema |
+------------------+----------+--------------+--------------------------+
1 row in set (0.00 sec)
然后,mysql-m1、mysql-m2互相提升访问权限。
mysql-m1
MySQL [(none)]> grant replication slave on *.* to 'replication'@'192.168.58.%' identified by '123456';
MySQL [(none)]> change master to master_host='192.168.58.136',master_user='replication',master_passWord='123456',master_log_file='mysql_bin.000002',master_log_pos=107;
MySQL [(none)]> flush privileges;

mysql-m2
MySQL [(none)]> grant replication slave on *.* to 'replication'@'192.168.58.%' identified by '123456';
MySQL [(none)]> change master to master_host='192.168.58.131',master_user='replication',master_password='123456',master_log_file='mysql_bin.000002',master_log_pos=107;
MySQL [(none)]> flush privileges;
最后分别查看mysql-m1、mysql-m2云服务器的主从状态,主要查看
Slave_IO_Running: Yes
Slave_SQL_Running: Yes。
MySQL [(none)]> start slave;
MySQL [(none)]> show slave status\G;
*************************** 1. row ***************************
               Slave_IO_State: Waiting for master to send event
                  Master_Host: 192.168.58.131
                  Master_User: replication
                  Master_Port: 3306
                Connect_Retry: 60
              Master_Log_File: mysql_bin.000002
          Read_Master_Log_Pos: 107
               Relay_Log_File: localhost-relay-bin.000012
                Relay_Log_Pos: 253
        Relay_Master_Log_File: mysql_bin.000002
             Slave_IO_Running: Yes
            Slave_SQL_Running: Yes
说明主主同步配置成功。
测试主主同步,在mysql-m1新建一个库test01
mysql-m1
MySQL [(none)]> create database test01;
MySQL [(none)]> show databases;
+--------------------+
| Database           |
+--------------------+
| information_schema |
| #mysql50#.mozilla  |
| bbs                |
| mysql              |
| performance_schema |
| test               |
| test01             |
+--------------------+
7 rows in set (0.22 sec)

mysql-m2                                #测试成功
MySQL [(none)]> show databases;
+--------------------+
| Database           |
+--------------------+
| information_schema |
| #mysql50#.mozilla  |
| mysql              |
| performance_schema |
| test               |
| test01             |
+--------------------+
7 rows in set (0.22 sec)
5、配置myqsl-m3、mysql-m4作为mysql-m1的从库。
首先将mysql-m1上的/etc/my.cnf文件,复制到myqsl-m3、mysql-m4两台云服务器上。
mysql-m1
[root@localhost ~]# scp /etc/my.cnf root@192.168.58.146:/etc/
[root@localhost ~]# scp /etc/my.cnf root@192.168.58.147:/etc/
查看mysql-m1中数据库的状态值。
MySQL [(none)]> show master status;
+------------------+----------+--------------+--------------------------+
| File             | Position | Binlog_Do_DB | Binlog_Ignore_DB         |
+------------------+----------+--------------+--------------------------+
| mysql_bin.000002 |      107 |              | mysql,information_schema |
+------------------+----------+--------------+--------------------------+
1 row in set (0.00 sec)
在mysql-m3、mysql-m4上分别执行。
mysql-m3
MySQL [(none)]> change master to master_host='192.168.58.131',master_user='replication',master_password='123456',master_log_file='mysql_bin.000002',master_log_pos=107;

mysql-m4
MySQL [(none)]> change master to master_host='192.168.58.131',master_user='replication',master_password='123456',master_log_file='mysql_bin.000002',master_log_pos=107;
分别查看mysql-m3、mysql-m4云服务器的主从状态,如下所示。
MySQL [(none)]> show slave status\G;
*************************** 1. row ***************************
               Slave_IO_State: Waiting for master to send event
                  Master_Host: 192.168.58.131
                  Master_User: replication
                  Master_Port: 3306
                Connect_Retry: 60
              Master_Log_File: mysql_bin.000002
          Read_Master_Log_Pos: 107
               Relay_Log_File: localhost-relay-bin.000012
                Relay_Log_Pos: 253
        Relay_Master_Log_File: mysql_bin.000002
             Slave_IO_Running: Yes
Slave_SQL_Running: YesCentOS默认没有mysql-mmm软件包,由于之前我们epel官方源已经安装好,在五台主机上都要安装MMM
[root@localhost ~]# yum -y install mysql-mmm*安装完后,对MMM进行配置
[root@localhost mongoDB1]# vim /etc/mysql-mmm/mmm_common.conf
<host default>
cluster_interface ens33 #网卡名称
……
replication_user replication
replication_password 123456
agent_user mmm_agent
agent_password 123456
<host db1>
ip 192.168.58.131
mode master
peer db2
</host>
<host db2>
ip 192.168.58.136
mode master
peer db1
</host>
<host db3>
ip 192.168.58.146
mode slave
</host>
<host db4>
ip 192.168.58.147
mode slave
</host>
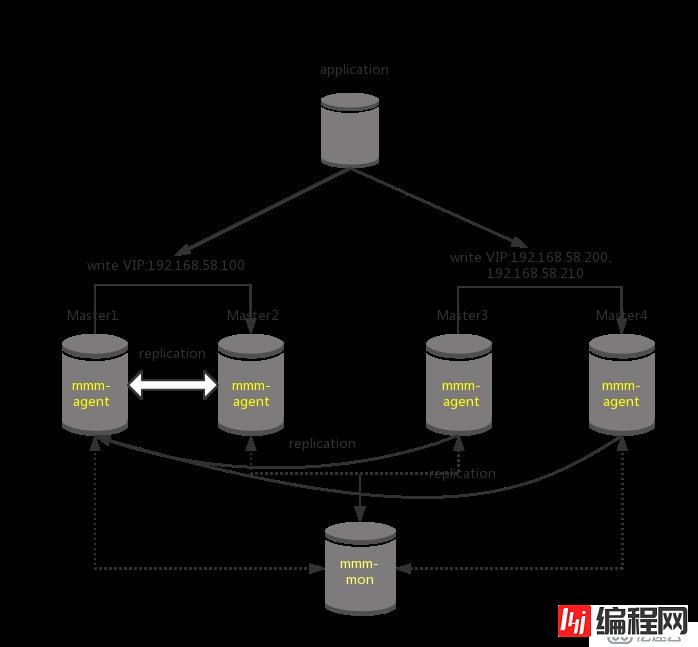
<role writer>
hosts db1, db2
ips 192.168.58.100
mode exclusive
</role>
<role reader>
hosts db3, db4
ips 192.168.58.200, 192.168.58.210
mode balanced
</role> #将配置文件复制到其他几台数据库云服务器对应的目录下
[root@localhost mysql-mmm]# scp mmm_common.conf root@192.168.58.136:/etc/mysql-mmm/
[root@localhost mysql-mmm]# scp mmm_common.conf root@192.168.58.146:/etc/mysql-mmm/
[root@localhost mysql-mmm]# scp mmm_common.conf root@192.168.58.147:/etc/mysql-mmm/
[root@localhost mysql-mmm]# scp mmm_common.conf root@192.168.58.148:/etc/mysql-mmm/在作为monitor云服务器的终端上配置
cd /etc/mysql-mmm/ #改密码
vim mmm_mon.conf

<host default>
    monitor_user        mmm_monitor
    monitor_password    123456
</host>
在所有数据库上为mmm_agent授权
MySQL [(none)]> grant super, replication client, process on *.* to 'mmm_agent'@'192.168.58.%' identified by '123456';
#为mmm_agent授权
在所有数据库上为mmm_moniter授权
MySQL [(none)]> grant replication client on *.* to 'mmm_monitor'@'192.168.58.%' identified by '123456';
#为mmm_monitor授权
MySQL [(none)]> flush privileges
#刷新权限设置
修改所有数据库的mmm_agent.conf
[root@localhost mysql-mmm]# vim /etc/mysql-mmm/mmm_agent.conf
include mmm_common.conf

# The 'this' variable refers to this server.  Proper operation requires
# that 'this' server (db1 by default), as well as all other servers, have the
# proper IP addresses set in mmm_common.conf.
this db1        #分别在四台数据库云服务器上设置为db1,db2,db3,db4
~
在所有数据库云服务器上启动mysql-mmm-agent
[root@localhost mysql-mmm]# systemctl start mysql-mmm-agent.service
#启动mmm-agent服务
[root@localhost mysql-mmm]# systemctl enable mysql-mmm-agent.service
#设置mmm-agent服务开机启动
在monitor云服务器上配置
[root@localhost mysql-mmm]# cd /etc/mysql-mmm/
[root@localhost mysql-mmm]# vim mmm_mon.conf

<monitor>
    ip                  127.0.0.1
    pid_path            /run/mysql-mmm-monitor.pid
    bin_path            /usr/libexec/mysql-mmm
    status_path         /var/lib/mysql-mmm/mmm_mond.status
    ping_ips            192.168.58.131,192.168.58.136,192.168.58.146,192.168.58.147
    #指定监管的云服务器IP地址
    auto_set_online     10

    # The kill_host_bin does not exist by default, though the monitor will
    # throw a warning about it missing.  See the section 5.10 "Kill Host
    # Functionality" in the pdf documentation.
    #
    # kill_host_bin     /usr/libexec/mysql-mmm/monitor/kill_host
    #
</monitor>

<host default>
    monitor_user        mmm_monitor   #设置监管账户
    monitor_password    123456        #设置监管密码
</host>
[root@localhost mysql-mmm]# systemctl start mysql-mmm-monitor.service   #启动mysql-mmm-monitor
[root@localhost mysql-mmm]# mmm_control show   #查看节点运行情况
  db1(192.168.58.131) master/ONLINE. Roles: writer(192.168.58.100)
  db2(192.168.58.136) master/ONLINE. Roles:
  db3(192.168.58.146) slave/ONLINE. Roles: reader(192.168.58.200)
  db4(192.168.58.147) slave/ONLINE. Roles: reader(192.168.58.210)
当我们把mysql-m3的mysql服务停掉以后,对应的VIP会自动绑定到mysql-m4上
[root@localhost mysql-mmm]# mmm_control show
db1(192.168.58.131) master/ONLINE. Roles: writer(192.168.58.100)
db2(192.168.58.136) master/ONLINE. Roles:
db3(192.168.58.146) slave/HARD_OFFLINE. Roles: db4(192.168.58.147) slave/ONLINE. Roles: reader(192.168.58.210)(192.168.58.200)
大家觉得MySQL中MMM高可用架构的安装配置流程这篇文章怎么样,是否有所收获。如果想要了解更多相关,可以继续关注我们的数据库板块。
--结束END--
本文标题: MySQL中MMM高可用架构的安装配置流程
本文链接: https://www.lsjlt.com/news/36200.html(转载时请注明来源链接)
有问题或投稿请发送至: 邮箱/279061341@qq.com QQ/279061341
下载Word文档到电脑,方便收藏和打印~
2024-05-03
2024-05-03
2024-05-03
2024-05-03
2024-05-03
2024-05-03
2024-05-03
2024-05-03
2024-05-03
2024-05-03
回答
回答
回答
回答
回答
回答
回答
回答
回答
回答


官方手机版

微信公众号

商务合作


0