环境: 192.168.205.37: as ProxySQL Server 192.168.205.47: as Master server 192.168.205.57: as Slave ser
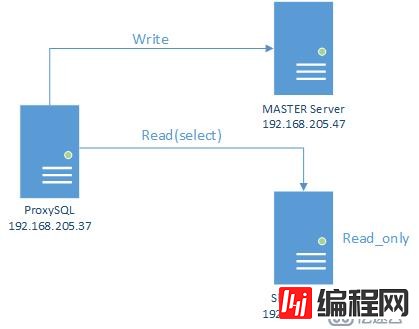
192.168.205.37: as ProxySQL Server
192.168.205.47: as Master server
192.168.205.57: as Slave serverOS: Centos 7 1810 with mini install
mariadb-server 5.5.60
proxysql-1.4.15-1-centos7.x86_64.rpmproxysql可以实现读写分离,它主要读取数据库的read_only变量来判断那些是主从服务器,当创建读写组时它会跟据状态自动将节点划分到相应的组中,如写组10和读组20,并跟据建立好的规则和对应的组名,从而实现读写的分离操作,proxysql是基于一个轻量级的数据库,所有的设置都要在数据库中进行更改,步聚有点繁琐。
[root@master data]#cat maridb_yum.sh
#!/bin/bash
ID=`ip a show dev eth0 | sed -r '3!d;s@(.*inet)(.*)(/.*)@\2@' | cut -d. -f4`
rpm -q mariadb-server ||yum install -y mariadb-server
[ -d /data/Mysql ] || mkdir -p /data/mysql
[ -d /data/logs ] || mkdir -p /data/logs
chown mysql:mysql /data/{mysql,logs}
sed -i 's@datadir=/var/lib/mysql@datadir=/data/mysql@' /etc/my.cnf
grep "log-bin" /etc/my.cnf || sed -i '/\[mysqld\]/a log-bin=/data/logs/bin' /etc/my.cnf
grep "innodb_file_per_table" /etc/my.cnf || sed -i '/\[mysqld\]/a innodb_file_per_table = on' /etc/my.cnf
grep "skip_name_resolve" /etc/my.cnf || sed -i '/\[mysqld\]/a skip_name_resolve = on' /etc/my.cnf
grep "server-id" /etc/my.cnf || sed -i "/\[mysqld\]/a server-id=$ID" /etc/my.cnf
service mariadb restart[root@slave data]#vi /etc/my.cnf
[mysqld]
read-only MariaDB [(none)]> show master logs;
+------------+-----------+
| Log_name | File_size |
+------------+-----------+
| bin.000001 | 245 |
+------------+-----------+
1 row in set (0.00 sec)
[root@master data]#mysql -e "grant replication slave on *.* to repluser@'192.168.205.%' identified by 'centos'" 修改slave的change master to,并启动i/o线程
MariaDB [(none)]> CHANGE MASTER TO
    ->   MASTER_HOST='192.168.205.47',
    ->   MASTER_USER='repluser',
    ->   MASTER_PASSWord='centos',
    ->   MASTER_PORT=3306,
    ->   MASTER_LOG_FILE='bin.000001',
    ->   MASTER_LOG_POS=245;
Query OK, 0 rows affected (0.00 sec)

MariaDB [(none)]> start slave;
Query OK, 0 rows affected (0.00 sec)

MariaDB [(none)]> show slave status\G
*************************** 1. row ***************************
               Slave_IO_State: Waiting for master to send event
                  Master_Host: 192.168.205.47
                  Master_User: repluser
                  Master_Port: 3306
                Connect_Retry: 60
              Master_Log_File: bin.000001
          Read_Master_Log_Pos: 401
               Relay_Log_File: mariadb-relay-bin.000002
                Relay_Log_Pos: 679
        Relay_Master_Log_File: bin.000001
             Slave_IO_Running: Yes
Slave_SQL_Running: Yes[root@master ~]#mysql < hellodb_innodb.sql
MariaDB [(none)]> show databases;
+--------------------+
| Database |
+--------------------+
| infORMation_schema |
| hellodb |
| mysql |
| performance_schema |
| test |
+--------------------+
5 rows in set (0.00 sec)cat <<EOF | tee /etc/yum.repos.d/proxysql.repo
[proxysql_repo]
name= ProxySQL YUM repository
#baseurl=https://repo.proxysql.com/ProxySQL/proxysql-2.0.x/centos/\$releasever
baseurl=Https://repo.proxysql.com/ProxySQL/proxysql-1.4.x/centos/\$releasever
gpGCheck=1
gpgkey=https://repo.proxysql.com/ProxySQL/repo_pub_key
EOF
[root@Proxy ~]#yum install proxysql [root@Proxy ~]#yum install mariadb[root@Proxy ~]#rpm -ql proxysql
/etc/init.d/proxysql
/etc/proxysql.cnf
/usr/bin/proxysql
/usr/share/proxysql/tools/proxysql_galera_checker.sh
/usr/share/proxysql/tools/proxysql_galera_writer.pl[root@Proxy ~]#service proxysql start
Starting ProxySQL: 2019-08-12 17:00:02 [INFO] Using config file /etc/proxysql.cnf
DONE!
[root@Proxy ~]#ss -ntl
State Recv-Q Send-Q Local Address:Port Peer Address:Port
LISTEN 0 128 *:6032 *:*
LISTEN 0 128 *:6033 *:*
LISTEN 0 128 *:6033 *:*
LISTEN 0 128 *:6033 *:*
LISTEN 0 128 *:6033 *:*
[root@Proxy ~]#[root@Proxy ~]#vi /etc/proxysql.cnf
interfaces="0.0.0.0:3306" [root@Proxy ~]#service proxysql restart
Shutting down ProxySQL: DONE!
Starting ProxySQL: 2019-08-12 17:03:54 [INFO] Using config file /etc/proxysql.cnf
DONE!
[root@Proxy ~]#ss -ntl
State Recv-Q Send-Q Local Address:Port Peer Address:Port
LISTEN 0 128 *:6032 *:*
LISTEN 0 128 *:6033 *:*
LISTEN 0 128 *:6033 *:*
LISTEN 0 128 *:6033 *:*
LISTEN 0 128 *:6033 *:* [root@Proxy ~]#mysql -uadmin -padmin -P6032 -h227.0.0.1
MySQL [(none)]> show databases;
+-----+---------------+-------------------------------------+
| seq | name | file |
+-----+---------------+-------------------------------------+
| 0 | main | |
| 2 | disk | /var/lib/proxysql/proxysql.db |
| 3 | stats | |
| 4 | monitor | |
| 5 | stats_history | /var/lib/proxysql/proxysql_stats.db |
+-----+---------------+-------------------------------------+
5 rows in set (0.00 sec)MySQL [(none)]> show tables;
+--------------------------------------------+
| tables |
+--------------------------------------------+
| global_variables |
| mysql_collations |
| mysql_group_replication_hostgroups |
| mysql_query_rules |
| mysql_query_rules_fast_routing |
| mysql_replication_hostgroups |
| mysql_servers |
| mysql_users |
| proxysql_servers |
| runtime_checksums_values |
| runtime_global_variables |
| runtime_mysql_group_replication_hostgroups |
| runtime_mysql_query_rules |
| runtime_mysql_query_rules_fast_routing |
| runtime_mysql_replication_hostgroups |
| runtime_mysql_servers |
| runtime_mysql_users |
| runtime_proxysql_servers |
| runtime_scheduler |
| scheduler |
+--------------------------------------------+
20 rows in set (0.00 sec)MySQL [(none)]> select * from sqlite_master where name='mysql_servers'\G
*************************** 1. row ***************************
type: table
name: mysql_servers
tbl_name: mysql_servers
rootpage: 2
sql: CREATE TABLE mysql_servers (hostgroup_id INT CHECK (hostgroup_id>=0) NOT NULL DEFAULT 0 , hostname VARCHAR NOT NULL , port INT NOT NULL DEFAULT 3306 , status VARCHAR CHECK (UPPER(status) IN ('ONLINE','SHUNNED','OFFLINE_SOFT', 'OFFLINE_HARD')) NOT NULL DEFAULT 'ONLINE' , weight INT CHECK (weight >= 0) NOT NULL DEFAULT 1 , compression INT CHECK (compression >=0 AND compression <= 102400) NOT NULL DEFAULT 0 , max_connections INT CHECK (max_connections >=0) NOT NULL DEFAULT 1000 , max_replication_lag INT CHECK (max_replication_lag >= 0 AND max_replication_lag <= 126144000) NOT NULL DEFAULT 0 , use_ssl INT CHECK (use_ssl IN(0,1)) NOT NULL DEFAULT 0 , max_latency_ms INT UNSIGNED CHECK (max_latency_ms>=0) NOT NULL DEFAULT 0 , comment VARCHAR NOT NULL DEFAULT '' , PRIMARY KEY (hostgroup_id, hostname, port) )
1 row in set (0.00 sec)MySQL [(none)]> insert into mysql_servers(hostgroup_id,hostname,port) values(10,'192.168.205.47',3306);
Query OK, 1 row affected (0.00 sec)
MySQL [(none)]> insert into mysql_servers(hostgroup_id,hostname,port) values(10,'192.168.205.57',3306);
Query OK, 1 row affected (0.00 secMySQL [(none)]> select * from mysql_servers;
+--------------+----------------+------+--------+--------+-------------+-----------------+---------------------+---------+----------------+---------+
| hostgroup_id | hostname | port | status | weight | compression | max_connections | max_replication_lag | use_ssl | max_latency_ms | comment |
+--------------+----------------+------+--------+--------+-------------+-----------------+---------------------+---------+----------------+---------+
| 10 | 192.168.205.47 | 3306 | ONLINE | 1 | 0 | 1000 | 0 | 0 | 0 | |
| 10 | 192.168.205.57 | 3306 | ONLINE | 1 | 0 | 1000 | 0 | 0 | 0 | |
+--------------+----------------+------+--------+--------+-------------+-----------------+---------------------+---------+----------------+---------+
2 rows in set (0.00 sec)MySQL [(none)]> load mysql servers to runtime;
Query OK, 0 rows affected (0.00 sec)MySQL [(none)]> save mysql servers to disk;
Query OK, 0 rows affected (0.01 sec)MariaDB [(none)]> show variables like 'read_only';
+---------------+-------+
| Variable_name | Value |
+---------------+-------+
| read_only | OFF |
+---------------+-------+
1 row in set (0.00 sec)
MariaDB [(none)]> show variables like 'read_only';
+---------------+-------+
| Variable_name | Value |
+---------------+-------+
| read_only | ON |
+---------------+-------+
1 row in set (0.00 sec)
MariaDB [(none)]> grant replication client on *.* to monitor@'192.168.205.%' identified by 'centos';
Query OK, 0 rows affected (0.00 secMySQL [(none)]> set mysql-monitor_username='monitor';
Query OK, 1 row affected (0.00 sec)
MySQL [(none)]> set mysql-monitor_password='centos';
Query OK, 1 row affected (0.00 sec)存盘并生效
MySQL [(none)]> load mysql variables to runtime;
Query OK, 0 rows affected (0.00 sec)
MySQL [(none)]> save mysql variables to disk;
Query OK, 97 rows affected (0.00 sec)查看一下相关的日志,以前出错的原因是因为默认没使用monitor密码是monitor进行连接(在proxysql.cnf中可以看到),所以会出错,当你添加完帐号就成功了,
[root@Proxy ~]#vi /etc/proxysql.cnf
monitor_username="monitor"
monitor_password="monitor"
MySQL [(none)]> select * from mysql_server_connect_log;
+----------------+------+------------------+-------------------------+-------------------------------------------------------------------------+
| hostname | port | time_start_us | connect_success_time_us | connect_error |
+----------------+------+------------------+-------------------------+-------------------------------------------------------------------------+
| 192.168.205.47 | 3306 | 1565603995322153 | 0 | Access denied for user 'monitor'@'192.168.205.37' (using password: YES) |
| 192.168.205.47 | 3306 | 1565604055779260 | 0 | Access denied for user 'monitor'@'192.168.205.37' (using password: YES) |
| 192.168.205.57 | 3306 | 1565604159035893 | 3871 | NULL |
| 192.168.205.47 | 3306 | 1565604159905593 | 3563 | NULL |
+----------------+------+------------------+-------------------------+-------------------------------------------------------------------------+
22 rows in set (0.00 sec)MySQL [(none)]> select * from mysql_server_ping_log;
+----------------+------+------------------+----------------------+-------------------------------------------------------------------------+
| hostname | port | time_start_us | ping_success_time_us | ping_error |
+----------------+------+------------------+----------------------+-------------------------------------------------------------------------+
| 192.168.205.57 | 3306 | 1565604094739272 | 0 | Access denied for user 'monitor'@'192.168.205.37' (using password: YES) |
| 192.168.205.47 | 3306 | 1565604094919486 | 0 | Access denied for user 'monitor'@'192.168.205.37' (using password: YES) |
| 192.168.205.57 | 3306 | 1565604099107658 | 745 | NULL |
| 192.168.205.47 | 3306 | 1565604099295895 | 358 | NULL |
+----------------+------+------------------+----------------------+-------------------------------------------------------------------------+
122 rows in set (0.00 sec)MySQL [(none)]> select * from mysql_server_read_only_log;
Empty set (0.00 sec)MySQL [(none)]> select * from mysql_server_replication_lag_log;
Empty set (0.00 sec)MySQL [(none)]> insert into mysql_replication_hostgroups values(10,20,"test");
Query OK, 1 row affected (0.00 sec)保存生效
MySQL [(none)]> load mysql servers to runtime;
Query OK, 0 rows affected (0.00 sec)
MySQL [(none)]> save mysql servers to disk;
Query OK, 0 rows affected (0.02 sec)MySQL [(none)]> select hostgroup_id,hostname,port,status,weight from mysql_servers;
+--------------+----------------+------+--------+--------+
| hostgroup_id | hostname | port | status | weight |
+--------------+----------------+------+--------+--------+
| 20 | 192.168.205.57 | 3306 | ONLINE | 1 |
| 10 | 192.168.205.47 | 3306 | ONLINE | 1 |
+--------------+----------------+------+--------+--------+
2 rows in set (0.00 sec)
MySQL [(none)]> select * from mysql_server_read_only_log;+----------------+------+------------------+-----------------+-----------+-------+
| hostname | port | time_start_us | success_time_us | read_only | error |
+----------------+------+------------------+-----------------+-----------+-------+
| 192.168.205.57 | 3306 | 1565605365323639 | 565 | 1 | NULL |
| 192.168.205.47 | 3306 | 1565605365353823 | 1595 | 0 | NULL |
| 192.168.205.57 | 3306 | 1565605366824223 | 1275 | 1 | NULL |
| 192.168.205.47 | 3306 | 1565605366844952 | 1607 | 0 | NULL |
+----------------+------+------------------+-----------------+-----------+-------+
280 rows in set (0.02 sec)MariaDB [(none)]> grant all on *.* to sqluser@'192.168.205.%' identified by 'centos';
Query OK, 0 rows affected (0.00 sec)MySQL [(none)]> insert into mysql_users(username,password,default_hostgroup) values('sqluser','centos',10);
Query OK, 1 row affected (0.00 sec)保存生效
MySQL [(none)]> load mysql users to runtime;
Query OK, 0 rows affected (0.00 sec)

MySQL [(none)]> save mysql users to disk;
Query OK, 0 rows affected (0.01 sec)[root@Proxy ~]#mysql -usqluser -pcentos -P6033 -h227.0.0.1 -e 'select @@server_id'
+-------------+
| @@server_id |
+-------------+
| 47 |
+-------------+
[root@Proxy ~]#mysql -usqluser -pcentos -P6033 -h227.0.0.1 -e 'create database testdb'
[root@Proxy ~]#mysql -usqluser -pcentos testdb -P6033 -h227.0.0.1 -e 'create table t(id int)'MariaDB [(none)]> show databases;
+--------------------+
| Database |
+--------------------+
| information_schema |
| hellodb |
| mysql |
| performance_schema |
| test |
| testdb |
+--------------------+
6 rows in set (0.00 sec)
MariaDB [(none)]> select * from testdb.t;
Empty set (0.00 sec)目前proxysql还是不知道什么是读,什么是写,所以所有的操作都会发送到10组中,也就是主服务器上,那么现在我们来建SQL语句规则
#select.* for updata为写向10组里发,而其它的select开头的向20组里发,也就是读,那么没定义的呢?默认会往10上发,
MySQL [(none)]> insert into mysql_query_rules
    -> (rule_id,active,match_digest,destination_hostgroup,apply)VALUES
    -> (1,1,'^SELECT.*FOR UPDATE$',10,1),(2,1,'^SELECT',20,1);
Query OK, 2 rows affected (0.00 sec)

#查看一下你添加的规则
MySQL [(none)]> select rule_id,active,match_digest,destination_hostgroup,apply from mysql_query_rules;
+---------+--------+----------------------+-----------------------+-------+
| rule_id | active | match_digest         | destination_hostgroup | apply |
+---------+--------+----------------------+-----------------------+-------+
| 1       | 1      | ^SELECT.*FOR UPDATE$ | 10                    | 1     |
| 2       | 1      | ^SELECT              | 20                    | 1     |
+---------+--------+----------------------+-----------------------+-------+
2 rows in set (0.00 sec)
保存生效
MySQL [(none)]> load mysql query rules to runtime;
Query OK, 0 rows affected (0.00 sec)

MySQL [(none)]> save mysql query rules to disk;
Query OK, 0 rows affected (0.01 sec)[root@Proxy ~]#mysql -usqluser -pcentos -P6033 -h227.0.0.1 -e 'select @@server_id'
+-------------+
| @@server_id |
+-------------+
| 57 |
+-------------+[root@Proxy ~]#mysql -usqluser -pcentos -P6033 -h227.0.0.1 -e 'begin;select @@server_id;commit'
+-------------+
| @@server_id |
+-------------+
| 47 |
+-------------+[root@Proxy ~]#mysql -usqluser -pcentos testdb -P6033 -h227.0.0.1 -e 'create table t1(id int)'
在主节点上看这个表,发现已经建成
Database changed
MariaDB [testdb]> show tables;
+------------------+
| Tables_in_testdb |
+------------------+
| t |
| t1 |
+------------------+
2 rows in set (0.00 sec)
在从节点上看也复制过去了
MariaDB [testdb]> show tables;
+------------------+
| Tables_in_testdb |
+------------------+
| t |
| t1 |
+------------------+
2 rows in set (0.00 sec)MySQL [(none)]> select hostgroup hg,sum_time,count_star,digest_text from stats_mysql_query_digest order by sum_time desc;
+----+----------+------------+----------------------------------+
| hg | sum_time | count_star | digest_text |
+----+----------+------------+----------------------------------+
| 10 | 18692 | 1 | create table t(id int) |
| 10 | 5704 | 1 | create table t1(id int) |
| 10 | 2002 | 2 | select @@server_id |
| 20 | 1546 | 1 | select @@server_id |
| 10 | 819 | 1 | begin |
| 10 | 717 | 1 | create database testdb |
| 10 | 240 | 1 | commit |
| 10 | 0 | 2 | select @@version_comment limit ? |
| 10 | 0 | 4 | select @@version_comment limit ? |
+----+----------+------------+----------------------------------+--结束END--
本文标题: ProxySQL实现读写分离
本文链接: https://www.lsjlt.com/news/36642.html(转载时请注明来源链接)
有问题或投稿请发送至: 邮箱/279061341@qq.com QQ/279061341
下载Word文档到电脑,方便收藏和打印~
2024-04-29
2024-04-29
2024-04-29
2024-04-29
2024-04-28
2024-04-28
2024-04-28
2024-04-28
2024-04-28
2024-04-28
回答
回答
回答
回答
回答
回答
回答
回答
回答
回答


官方手机版

微信公众号

商务合作


0