协程是一种并发设计模式,您可以在 Android 平台上使用它来简化异步执行的代码。 在 Android 上,协程有助于管理长时间运行的任务,如果管理不当,这些任务可能会阻塞主线程并导致应用无响应。 协程的优点: 轻量 您可以在单个线程上运
协程是一种并发设计模式,您可以在 Android 平台上使用它来简化异步执行的代码。
在 Android 上,协程有助于管理长时间运行的任务,如果管理不当,这些任务可能会阻塞主线程并导致应用无响应。
协程的优点:
协程主要解决的问题:
协程可以类似于RxJava那样,做到异步任务同步化,避免可能出现的回调地狱。同时,通过suspend关键字来标识函数,称为挂起函数,该函数,只能在协程或其他的suspend函数中执行,从而保证主线程的安全。
上面说了很多协程的好处。下面,我们先写个简单协程。
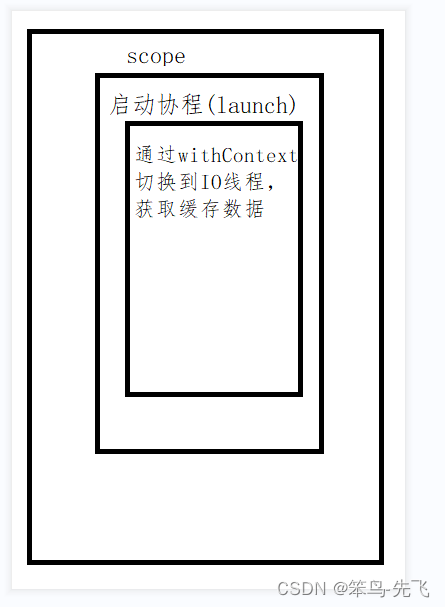
class CoroutineTestActivity : AppCompatActivity(){//也可以通过上面代理的方式实现(当然也可以直接用lifecycleScope) private val scope = MainScope() private val textContent by lazy { findViewById(R.id.tv_corout_name) } override fun onCreate(savedInstanceState: Bundle?) { super.onCreate(savedInstanceState) setContentView(R.layout.activity_corout_one)//通过MainScope,启动一个协程 scope.launch(Dispatchers.Main) {//异步数据同步化,获取数据 val data = obtainCacheData()//数据放到UI上 textContent.text = data }}private suspend fun obtainCacheData(): String {//通过Dispatchers调度器,切换到子线程执行耗时操作 return withContext(Dispatchers.io) { delay(8000) "缓存数据" } }} 该代码执行过程:
这里可以看到相对于一般的函数,协程多了2个状态挂起(suspend)和恢复。
挂起跟阻塞的区别就是,代码阻塞之后,会一直停留在这里。挂起的话,就是到挂起点被挂起后,保存挂起点,主线程继续执行,当挂起函数执行完了,再回复执行操作。
挂起函数,obtainCacheData()被suspend修饰,也被称为挂起函数
挂起函数只能在协程体内或者其它挂起函数内调用
看下图
本文通过协程的作用域、启动,使用以及取消协程,最后,协程的异常处理顺序,进行梳理
协同程序遵循结构化并发原则。这意味着新的协程只能在协程作用域(CoroutineScope)里面启动,从而限定了协程的生命周期。从而避免了,因为某个协程的丢失造成的资源浪费(内存、CPU等)
优势:
创建协程时,必须指定作用域,作用域可以取消,追踪所有有它创建的协程。
CoroutineScope跟runBlocking。
他们都会等内部协程体及所有子协程执行完成。
runBlocking会阻塞线程
fun testRunBlocking() { runBlocking { launch { delay(2000) Log.d("liu", "testRunBlocking 222222") } } Log.d("liu", " testRunBlocking 111111") }//执行结果
testRunBlocking 222222testRunBlocking 111111CoroutineScope不阻塞线程
fun testCoroutineScope() { runBlocking { coroutineScope { launch { delay(2000) Log.d("liu", "testCoroutineScope 222222") } Log.d("liu", "testCoroutineScope 111111") } } }...//打印结果testCoroutineScope 111111testCoroutineScope 222222CoroutineScope。如果内部一个协程失败了,其它的协程也会被取消
fun testCoroutineScope2() { runBlocking { coroutineScope { launch { delay(2000) Log.d("liu", "testCoroutineScope2 222222") } launch { delay(1000) Log.d("liu", "testCoroutineScope2 1111111") val a = 2 val b = 0 val c = a / b } } } }//执行结果
testCoroutineScope2 1111111这里可以看出,第一个启动的协程job1没有打印
coroutineScope一个协程失败,其它协程也被取消
fun testCoroutineScope3() { runBlocking { supervisorScope { launch { delay(2000) Log.d("liu", "testCoroutineScope3 222222") }//这里换成了async。跟异常机制有关,方便测试 async { delay(1000) Log.d("liu", "testCoroutineScope3 111111") val a = 2 val b = 0 //这里会出现除数为0异常 val c = a / b } } } }//执行结果
testCoroutineScope3 111111testCoroutineScope3 222222可以看到,async出异常后,第一个launch的协程继续执行了。
下面,看下常用的协程作用域(CoroutineScope)
全局的作用域。Activity/Fragment销毁时,内部协程依然存在。
在Activity中使用,可以再onDestroy中取消
代码示例
class CoroutineTestActivity : AppCompatActivity(){ private val scope = MainScope() private val textContent by lazy { findViewById(R.id.tv_corout_name) } override fun onCreate(savedInstanceState: Bundle?) { super.onCreate(savedInstanceState) setContentView(R.layout.activity_corout_one) test1() } private fun test1() { scope.launch(Dispatchers.Main) { val data = obtainCacheData() textContent.text = data } } override fun onDestroy() { super.onDestroy() scope.cancel() }} 在ViewModel中使用,绑定ViewModel的生命周期
应用中的每个 ViewModel 都定义了 ViewModelScope。如果 ViewModel 已清除,则在此范围内启动的协程都会自动取消。如果您具有仅在 ViewModel 处于活动状态时才需要完成的工作,此时协程非常有用。例如,如果要为布局计算某些数据,则应将工作范围限定至 ViewModel,以便在 ViewModel 清除后,系统会自动取消工作以避免消耗资源。
您可以通过 ViewModel 的 viewModelScope 属性访问 ViewModel 的 CoroutineScope,如以下示例所示:
class MyViewModel: ViewModel() { init { viewModelScope.launch { // Coroutine that will be canceled when the ViewModel is cleared. } }}在Activty/Fragment中使用。绑定Activity/Fragment生命周期
每个 Lifecycle 对象都定义了 LifecycleScope。在此范围内启动的协程会在 Lifecycle 被销毁时取消。您可以通过 lifecycle.coroutineScope 或 lifecycleOwner.lifecycleScope 属性访问 Lifecycle 的 CoroutineScope。
以下示例演示了如何使用 lifecycleOwner.lifecycleScope 异步创建预计算文本:
class MyFragment: Fragment() { override fun onViewCreated(view: View, savedInstanceState: Bundle?) { super.onViewCreated(view, savedInstanceState) viewLifecycleOwner.lifecycleScope.launch { val params = TextViewCompat.getTextMetricsParams(textView) val precomputedText = withContext(Dispatchers.Default) { PrecomputedTextCompat.create(longTextContent, params) } TextViewCompat.setPrecomputedText(textView, precomputedText) } }}可重启生命周期感知型协程。当Lifecycle处于STARTED状态时,处理数据
class MyFragment : Fragment() { val viewModel: MyViewModel by viewModel() override fun onViewCreated(view: View, savedInstanceState: Bundle?) { super.onViewCreated(view, savedInstanceState) // Create a new coroutine in the lifecycleScope viewLifecycleOwner.lifecycleScope.launch { // repeatOnLifecycle launches the block in a new coroutine every time the // lifecycle is in the STARTED state (or above) and cancels it when it's STOPPED. viewLifecycleOwner.repeatOnLifecycle(Lifecycle.State.STARTED) { // Trigger the flow and start listening for values. // This happens when lifecycle is STARTED and stops // collecting when the lifecycle is STOPPED viewModel.someDataFlow.collect { // Process item } } } }}详情点击,可重启生命周期感知型协程
最开始的例子,我们通过launch启动的协程,下面看看它的源码
public fun CoroutineScope.launch( context: CoroutineContext = EmptyCoroutineContext, start: CoroutineStart = CoroutineStart.DEFAULT, block: suspend CoroutineScope.() -> Unit): Job {这里可以看到,启动协程的时候,会有几个可选参数,我们不传,也会有默认值。
下面,我们就通过创建协程及它需要的几个参数(CoroutineContext,CoroutineStart等)来进行详细说明。
协程主要通过launch、async,这2种常用的构建方式。
通过launch启动的协程,返回的是Job。并且没有返回结果
public fun CoroutineScope.launch( context: CoroutineContext = EmptyCoroutineContext, start: CoroutineStart = CoroutineStart.DEFAULT, block: suspend CoroutineScope.() -> Unit): Job 通过lauch启动的多个协程,可以使用join()函数,让协程按照顺序执行
看下面代码
private fun testJoin() { val job1 = launch { delay(1000) Log.d("liu","----第 1 个任务") } val job2 = launch { delay(2000) Log.d("liu","----第 2 个任务") } Log.d("liu","----第 3个任务") }//打印结果//----第 3 个任务//----第 1 个任务//----第 2 个任务如果,我们想要任务按照1、2、3的顺序执行的话,就需要使用join
代码如下
看下面代码
private fun testJoin2() { launch { val job1 =launch { delay(1000) Log.d("liu", "----第 1 个任务") } job1.join() val job2 = launch { delay(2000) Log.d("liu", "----第 2 个任务") } job2.join()Log.d("liu", "----第 3个任务") } }//打印结果//----第 1 个任务//----第 2 个任务//----第 3 个任务最后,看下join()函数
public suspend fun join()join()函数也是挂起函数,不会产生阻塞。
通过async启动的协程,返回的是Deffered,Job的子类。可以通过await()方法,获取最终的返回结果
public fun CoroutineScope.async( context: CoroutineContext = EmptyCoroutineContext, start: CoroutineStart = CoroutineStart.DEFAULT, block: suspend CoroutineScope.() -> T): Deferred...public interface Deferred : Job 获取返回结果
private fun testAsync() { launch { val job = async { delay(2000) "获取耗时数据" } Log.d("liu", "result: ${job.await()}") } }//打印结果 result: 获取耗时数据上面看到,通过await获取到了async启动协程的结果
async也想串行(按照顺序执行)的话,需要使用await()方法
private fun test4() { launch { val asyncJob1 = async { delay(1000) Log.d("liu", "----先执行的任务") "第 1 个任务完成" } asyncJob1.await() val asyncJob2 = async { delay(2000) Log.d("liu", "----后执行的任务") "第 2 个任务完成" } }...//打印结果----先执行的任务----后执行的任务很多时候,我们需要调用多个接口根据返回值,再调用其他的接口

使用async实现。
private fun test2() { launch { //开始并行执行 val asyncJob1 = async { delay(2000) Log.d("liu","----第 1 个任务") "第 1 个任务完成" } val asyncJob2 = async { delay(2000) Log.d("liu","----第 2 个任务") "第 2 个任务完成" } //这样就是并行执行,不要在上面,添加await(),否则,就成了串行执行//async启动的协程,可以获取返回结果 val resultJob1 = asyncJob1.await() val resultJob2 = asyncJob2.await() withContext(Dispatchers.IO){ Log.d("liu","$resultJob1,$resultJob2,执行完成了----执行最后的任务") } } }...//打印结果----第 1 个任务----第 2 个任务第 1 个任务完成,第 2 个任务完成,执行完成了----执行最后的任务这个函数,最后的打印结果就是*-第 1 个任务,第 2 个任务,执行完成了----执行最后的任务*
通过上面,我们可以看到通过async启动的协程,调用await()函数,可以拿到耗时数据的结果。
测试两种await()耗时情况
fun measureTime() { launch { val time = measureTimeMillis { val asyncJob1 = async { delay(2000) Log.d("liu", "----第 1 个任务") "第 1 个任务完成" } val asyncJob2 = async { delay(1000) Log.d("liu", "----第 2 个任务") "第 2 个任务完成" } asyncJob1.await() asyncJob2.await() } Log.d("liu", "--measureTime耗时情况: $time") } } fun measureTime2() { launch { val time = measureTimeMillis { async { delay(2000) Log.d("liu", "----第 1 个任务") "第 1 个任务完成" }.await() async { delay(1000) Log.d("liu", "----第 2 个任务") "第 2 个任务完成" }.await() } Log.d("liu", "--measureTime2耗时情况: $time") } }//结果--measureTime耗时情况: 2180--measureTime2耗时情况: 3178通过上面结果,可以看出,await()执行的时机很重要
measureTime()方法,就是并行执行的
measureTime2()方法,就是串行执行的
最后看下await()函数
public suspend fun await(): Tawait()函数也是一个挂起函数,不会产生阻塞
大部分时候,我们执行耗时的串行操作的话,会使用WithContext
return withContext(Dispatchers.IO) { delay(8000) "缓存数据" }就想开始的代码一样,异步代码同步化。并且,它也不用开启一个新的协程
调度器主要有3种(类似于RxJava的线程切换(Schedulers.newThread()等)?)
非主线程,默认的调度器
主要是处理:CPU密集型操作(数据解析,数据计算等)
主线程
主要是处理:UI的更新操作,调用suspend挂起函数
非主线程
Dispatchers.Unconfined,newSingleThreadContext(“MyOwnThread”)
详见:官方文档
CoroutineStart定义在协程生成器的开始选项中。
public fun CoroutineScope.launch( context: CoroutineContext = EmptyCoroutineContext, start: CoroutineStart = CoroutineStart.DEFAULT, block: suspend CoroutineScope.() -> Unit): Job CoroutineStart的模式:
开始介绍
创建协程后,立即开始调度。
在调度之前如果协程被取消,那么它就不会执行,而是以抛出异常来结束。
看代码
fun coroutineStartOne() { runBlocking {//启动协程 val job = launch(start = CoroutineStart.DEFAULT) { Log.d("liu", "default start") delay(3000) Log.d("liu", "default end") } delay(1000)//取消 job.cancel() } }这里看到,协程被直接取消了。
创建协程后,根据协程的上下文,立即开始调度。
协程在执行到第一个挂起点(挂起函数)之前,不能取消
fun coroutineStartATOMIC() { runBlocking { val job = launch(start = CoroutineStart.DEFAULT) { //TODO: 这里做一些耗时操作,完成之前,不会被取消 delay(3000) Log.d("liu", "ATOMIC end") } job.cancel() } }只有协程被需要时,包括主动调用协程的start()/join()/await()等函数时,才开始
如果协程在被执行前取消,那么它就不会执行,而是以抛出异常来结束。
fun coroutineStartLAZY() { runBlocking { val job = launch(start = CoroutineStart.LAZY) { Log.d("liu", "LAZY start") } Log.d("liu", "开始一些计算") delay(3000) Log.d("liu", "耗时操作完成") job.start() } }//打印结果开始一些计算耗时操作完成LAZY start这里,可以看到,只有调用了start()后才会打印。
协程创建后,立即在当前函数调用栈执行(在哪个线程创建,在哪个线程执行)。在哪个函数创建,就在哪个线程执行,从名字可以看出,它不接受Dispatchers指定线程的调度
直到遇到第一个挂起点,与Dispatchers.Unconfined类似
与ATOMIC类似,即使被取消了,它也会执行到第一个挂起点?
fun coroutineStartUNDISPATCHED() { runBlocking { val job = async(context = Dispatchers.IO, start = CoroutineStart.UNDISPATCHED) { Log.d("liu", "线程IO:${Thread.currentThread().name}") } val job1 = async(context = Dispatchers.IO, start = CoroutineStart.DEFAULT) { Log.d("liu", "线程:${Thread.currentThread().name}") } } }...//打印结果线程IO:main线程:DefaultDispatcher-worker-1这里可以看到。把启动模式换成DEFAULT后,线程也变成了IO线程。UNDISPATCHED只会在创建该协程指定的线程运行
这些模式特点:
CoroutineContext使用以下元素集定义协程的行为:
对于在作用域内创建的新协程,系统会为新协程分配一个新的 Job 实例(不会继承),其他 CoroutineContext 元素(会被继承)。可以通过向 launch 或 async 函数传递新的 CoroutineContext 替换继承的元素。请注意,将 Job 传递给 launch 或 async 不会产生任何效果,因为系统始终会向新协程分配 Job 的新实例。
private suspend fun testCoroutineContext() { launch(Job() + Dispatchers.Default + CoroutineName("coroutine new Name")) { println(" Thread info: ${Thread.currentThread().name}") } }这里我们看到上下文,都是通过“+”号连接的,对Kotlin不陌生的话,我们知道它应该是重写了"+"操作符,看下吧
public interface CoroutineContext {...public operator fun plus(context: CoroutineContext): CoroutineContext =}private suspend fun testCoroutineContext2() { val exceptionHandler = CoroutineExceptionHandler { _, exception -> Log.d("liu", "exception: $exception") } Log.d("liu", "Top Job exceptionHandler: $exceptionHandler") //创建Job val topJob = Job() //创建一个新的协程作用域 val scope = CoroutineScope(topJob + Dispatchers.Default + CoroutineName("coroutine new Name") + exceptionHandler) //打印顶层Job println("Top Job Info: $topJob") val job = scope.launch() { //打印协程相关信息 Log.d("liu", "Job Info: ${coroutineContext[Job]} ${coroutineContext[CoroutineName]} ${coroutineContext[CoroutineExceptionHandler]} , Thread info: ${Thread.currentThread().name}") val job2 = async { Log.d("liu", "Job Info: ${coroutineContext[Job]} ${coroutineContext[CoroutineName]} ${coroutineContext[CoroutineExceptionHandler]} , Thread info: ${Thread.currentThread().name}") } job2.await() } job.join() }//打印结果//异常HandlerTop Job exceptionHandler: cn.edu.coroutine.CoroutineTestActivity$testCoroutineContext2$$inlined$CoroutineExceptionHandler$1@6c29d69//Job名字Top Job Info: JobImpl{Active}@50933ee//launch打印 job 协程名字 exceptionHandler 线程信息Job Info: StandaloneCoroutine{Active}@ad1d08f CoroutineName(coroutine new Name) cn.edu.coroutine.CoroutineTestActivity$testCoroutineContext2$$inlined$CoroutineExceptionHandler$1@6c29d69 , Thread info: DefaultDispatcher-worker-2//launch打印 job 协程名字 exceptionHandler 线程信息Job Info: DeferredCoroutine{Active}@67b8f1c CoroutineName(coroutine new Name) cn.edu.coroutine.CoroutineTestActivity$testCoroutineContext2$$inlined$CoroutineExceptionHandler$1@6c29d69 , Thread info: DefaultDispatcher-worker-1这里,可以明显的看到exceptionHandler 是同一个(ExceptionHandler$1@6c29d69),Job都是不同的,Name是一样的(coroutine new Name),线程信息都是IO的。
通过这里可以看到 通过launch 或 async启动的协程,系统始终会向新协程分配 Job 的新实例。所以,Job是不会传递到子协程的,但是,其它的属性,都可以被继承下来
传递关系: CoroutineScope—launch—async
协程上下文的继承关系: 1,首先,使用本身传入的参数;2,使用继承过来的参数;3,使用默认参数
Job的状态有:
官方地址:点击这里
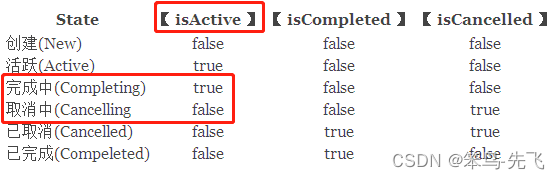
Job的状态上面已经介绍了,虽然无法直接判断这些状态。不过,我们可以根据它的属性isActive、isCompleted、isCancelled,来判断协程的状态。
下面是Job状态跟属性(isActive、isCompleted、isCancelled)的关系图
| State | 【 isActive 】 | 【 isCompleted 】 | 【 isCancelled 】 |
|---|---|---|---|
| 创建(New) | false | false | false |
| 活跃(Active) | true | false | false |
| 完成中(Completing) | true | false | false |
| 取消中(Cancelling | false | false | true |
| 已取消(Cancelled) | false | true | true |
| 已完成(Compeleted) | false | true | false |
比如,协程正常完成的话,isCompleted=true & isCancelled =false;
通常,Job创建的时候处于活跃状态(创建并启动)。但是,当协程构建的启动模式为CoroutineStart.LAZY时,协程的状态就处于创建状态(New),通过调用join或者start让Job处于活跃(Active)状态
官方配图
wait children +-----+ start +--------+ complete +-------------+ finish +-----------+ | New | -----> | Active | ---------> | Completing | -------> | Completed | +-----+ +--------+ +-------------+ +-----------+ | cancel / fail | | +----------------+ | | V V +------------+ finish +-----------+ | Cancelling | --------------------------------> | Cancelled | +------------+ +-----------+取消协程的主要内容有:
取消协程的作用域,会取消它的子协程
fun coroutineScopeCancel() { //等待子协程执行完 runBlocking { //CoroutineScope不会继承runBlocking的属性。需要delay或者join val scope = CoroutineScope(Dispatchers.Default) scope.launch { delay(1000) Log.d("liu","启动 job 1") } scope.launch { delay(1000) Log.d("liu","启动 job 2") } //需要挂起,等待scope执行完 delay(2000) } } 不加delay的话,scope不会执行
fun coroutineScopeCancel() { //等待子协程执行完 runBlocking { //CoroutineScope不会继承runBlocking的属性。需要delay或者join val scope = CoroutineScope(Dispatchers.Default) scope.launch { delay(1000) Log.d("liu","启动 job 1") } scope.launch { delay(1000) Log.d("liu","启动 job 2") } //需要挂起,等待scope执行完 delay(200) scope.cancel() delay(2000) } } 这样什么也不会打印,可以看出通过scope已经取消了其所有子协程
协程的任务被取消后,不会影响兄弟协程的任务
fun coroutineCancel1() { runBlocking { val job1 = launch { delay(1000) Log.d("liu","启动 job 1") } val job2 = launch { delay(1000) Log.d("liu","启动 job 2") } job1.cancel() } }...//打印结果启动 job 2这里可以看出。job1被取消后,job2还是会执行
有2种方法可以取消计算代码的任务。
第一种方法是周期性地调用检查取消的挂起函数(借助Job生命周期,通过ensureActive()函数)。
另外一种就是通过yield()函数,明确检查Job是否处于取消状态.
下面,我们分别来看下
CPU密集型任务(计算量大),通过cancel是无法及时取消的。这个时候,我们可以通过Job的生命周期的辅助来帮助我们取消计算
案例
我们每个一秒,打印一次Log日志。然后,中途取消
看下代码
fun coroutineCancelCPUIntensiveTask1() { runBlocking { val startTime = System.currentTimeMillis() val job = launch { var nextTime = startTime var totalPrintCount = 0 while (totalPrintCount < 5) { if (System.currentTimeMillis() >= nextTime) { nextTime = 1000 totalPrintCount++ Log.d("liu", "+++日志打印: $totalPrintCount") } } } delay(1000) Log.d("liu", "开始执行取消") job.cancel() Log.d("liu", "执行取消完成") } }通过执行结果,可以看到,执行取消后,计算仍然是完成了之后,才会取消
这个时候,我们通过Job的生命周期知道,在执行cancel后,Job的状态State就变成了Cancelling。
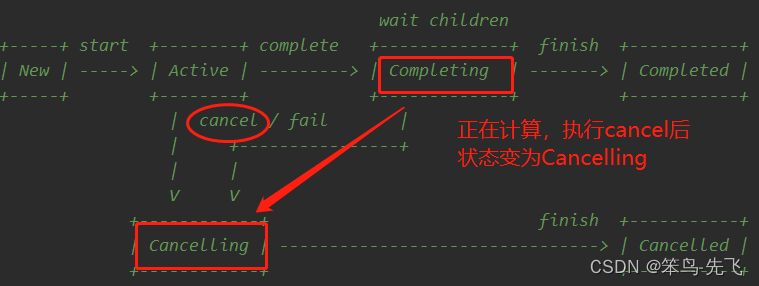
而Cancelling对应的我们可访问的Job属性isActive就变成了false。
这样,我们在while循环中,通过添加isActive是正在计算(是否为true),来辅助我们进行计算,以便在取消(Cancel)后,可以及时退出。
代码示例
fun coroutineCancelCPUIntensiveTask2() { runBlocking { val startTime = System.currentTimeMillis() val job = launch { var nextTime = startTime var totalPrintCount = 0 while (totalPrintCount < 5 && isActive) { if (System.currentTimeMillis() >= nextTime) { nextTime = 1000 totalPrintCount++ Log.d("liu", "+++日志打印: $totalPrintCount") } } } delay(1000) Log.d("liu", "开始执行取消") job.cancel() Log.d("liu", "执行取消完成") } }
在协程执行过程中,我们也可以通过ensureActive()函数,来确认协程是否是活跃状态。如果是非活跃状态的话,它会抛出协程特有的异常来取消协程。
示例代码
fun coroutineCancelCPUIntensiveTask3() { runBlocking { val startTime = System.currentTimeMillis() val job = launch { var nextTime = startTime var totalPrintCount = 0 while (totalPrintCount < 5 ) { ensureActive() if (System.currentTimeMillis() >= nextTime) { nextTime = 1000 totalPrintCount++ Log.d("liu", "+++日志打印: $totalPrintCount") } } } delay(1000) Log.d("liu", "开始执行取消") job.cancel() Log.d("liu", "执行取消完成") } }这段代码也是可以取消的。跟上面代码类似。取消isActive判断,添加ensureActive()判断。
其实ensureActive()函数,内部也是通过抛出异常来处理的,只不过是被静默处理了。后面会详细说明协程的异常处理。
看下ensureActive()函数的代码
public fun CoroutineScope.ensureActive(): Unit = coroutineContext.ensureActive()调用协程上下文的ensureActive()函数
public fun CoroutineContext.ensureActive() { get(Job)?.ensureActive()}调用了Job的ensureActive()函数
public fun Job.ensureActive(): Unit { if (!isActive) throw getCancellationException()}getCancellationException()。估计就是获取,我们Cancel()时的可选异常
public fun getCancellationException(): CancellationException这里可以看到,如果不是isActive活跃状态的话,就抛出了异常CancellationException。
CancellationException这个异常在我们执行Cancel()的时候,是可选参数。
到这里,我们就知道了,当我们想取消而无法取消协程时,我们也是可以通过,主动抛出这个异常来取消的,因为这个异常,协程会静默处理掉(上面普通协程取消时候,已经分析过)。
官方地址:戳一下
yield()函数会检查协程状态(也是通过判断job是否是活跃状态),如果是非活跃状态,也会抛出异常,取消协程。
此外,它还会尝试出让线程的执行权,给其它协程提供执行机会。
首先,我们先看下yield()函数
public suspend fun yield(): Unit = suspendCoroutineUninterceptedOrReturn sc@ { uCont -> val context = uCont.context context.checkCompletion()....}接着看
internal fun CoroutineContext.checkCompletion() { val job = get(Job) if (job != null && !job.isActive) throw job.getCancellationException()}这里,看到如果job不存在或者处于非活跃状态(!isActive)的话,就抛出了job.getCancellationException()异常。这个函数,我们在看ensureActive()时,刚看了,就是CancellationException异常。
所以,yield()函数也会检查协程是否处于活跃状态,不是的话,直接抛异常取消。
代码示例
fun coroutineCancelCPUIntensiveTaskYield() { runBlocking { val startTime = System.currentTimeMillis() val job = launch { var nextTime = startTime var totalPrintCount = 0 while (totalPrintCount < 5 ) { yield() if (System.currentTimeMillis() >= nextTime) { nextTime = 1000 totalPrintCount++ Log.d("liu", "+++日志打印: $totalPrintCount") } } } delay(1000) Log.d("liu", "开始执行取消") job.cancel() Log.d("liu", "执行取消完成") } }在计算量特别大的时候,尽量使用yield()函数
取消协程是通过抛出异常(CancellationException)来取消的。
在cancel的时候,是可以传入我们定义的异常的。但是,没有传入的话,为什么也没有发现异常?
这个是Kotlin内部已经自己处理了。
我们看下Job的cancel()方法
public interface Job : CoroutineContext.Element {...public fun cancel(cause: CancellationException? = null)...}可以看出,当我们cancel的时候,是一个可选型的函数的
我们通过try捕获一下异常
fun coroutineCancelException() { runBlocking { runBlocking { val job1 = launch { try { delay(1000) Log.d("liu", "启动 job 1") } catch (e: CancellationException) { e.printStackTrace() } } val job2 = launch { delay(1000) Log.d("liu", "启动 job 2") } job1.cancel() } } }我们再自定义一个异常看看
fun coroutineCancelException() { runBlocking { runBlocking { val job1 = launch { delay(1000) Log.d("liu","启动 job 1") } val job2 = launch { delay(1000) Log.d("liu","启动 job 2") } job1.cancel(CancellationException("主动抛出异常")) } } }打印结果
主动抛出异常我们的异常信息主动抛出异常,被打印出来了
上面取消协程时,我们讲了,取消协程时通过抛出异常来实现的。
我们可以使用try…catch来捕获这个异常。那么,如果,我们有需要释放的资源,也可以通过try…catch…finally,在finally中来释放我们的资源.
fun coroutineCancelResourceRelease() { runBlocking { runBlocking { val job1 = launch { try { delay(1000) Log.d("liu", "启动 job 1") }finally { Log.d("liu", "finally job 1") } } val job2 = launch { delay(1000) Log.d("liu", "启动 job 2") } job1.cancel() } } }这里,可以看到finally中的代码执行了。如果,我们想释放资源的话,我们可以try挂起点,在finally中释放资源.
该函数只能被实现了Closeable的对象使用,程序结束的时候会自动调用close()方法,适合文件对象
不是use()函数
fun coroutineCancelResourceReleaseByUse() { runBlocking { val buffer = BufferedReader(FileReader("xxx")) with(buffer) { var line: String? try { while (true) { line = readLine() ?: break; Log.d("liu", line) } } finally { close() } }}}需要自己在finally中关闭资源
使用use()函数
fun coroutineCancelResourceReleaseByUse() { runBlocking { BufferedReader(FileReader("xxx")).use { while (true) { val line = readLine() ?: break; Log.d("liu", line) } } } }不需要我们自己关闭。看下use函数
public inline fun T.use(block: (T) -> R): R { var exception: Throwable? = null try { return block(this)... } finally { ... try { close() } catch (closeException: Throwable) { // cause.addSuppressed(closeException) // ignored here }.... }} 该函数已经在finally中实现了,该功能
一个NonCancellable的Job总是处于活跃状态。它是为withContext()函数设计的。以防止取消时,需要在不取消的情况下执行的代码块。
比如,协程任务执行的失败。调用接口通知后台等情况。
NonCancellable该对象不适用于launch、async和其它的协程构建者。如果,你再launch中使用的话,那么当父协程取消的时候,不仅新启动的子协程不会被取消,父级和子级的关系也会被切断。父级不会等着子级执行完成,也不会在子级异常后取消。
官方文档:请戳这里
withContext(NonCancellable) { // 这里执行的代码块,不会被取消}一般情况下,在取消协程时,如果,我们通过try…finally捕获后,在finally中释放资源。
如果,finally中有挂起函数的话,那么该函数是不能执行的(协程处于非活跃状态)
处于取消中状态的协程不能使用挂起函数,当协程被取消后需要调用挂起函数的话,就需要通过NonCancellable来让挂起函数处于活跃状态,这样会挂起运行中的代码。
示例示例代码
fun coroutineUnCancelException() { runBlocking { runBlocking { val job1 = launch { try { repeat(1000) { i ->delay(1000)Log.d("liu", "启动 job 1,index: $i") } } catch (e: CancellationException) { e.printStackTrace() } finally { delay(2000) Log.d("liu", "finally job 1") } } job1.cancel() } } }在取消时,finally中也有挂起函数(就想任务成功/失败,都通知后台一样)
这个时候,finally里面的日志是打印不出来的
我们需要用到NonCancellable
示例
fun coroutineUnCancelException2() { runBlocking { runBlocking { val job1 = launch { try { repeat(1000) { i ->delay(1000)Log.d("liu", "启动 job 1,index: $i") } } finally { //在cancel里,有挂起函数后,需要用到NonCancellable withContext(NonCancellable){delay(2000)Log.d("liu", "finally job 1") } } } job1.cancel() } } }这样的话,finally中的日志就能成功打印了。如果,我们需要在出现异常时候,调用网络请求等挂起函数的话,可以通过这种方式来完成。
取消协程执行的最实际的原因就是它执行时间超时,比如,网络请求等。
虽然,我们可以有其它的方式追踪取消这样的任务,但是,我们可以直接使用withTimeout这个函数,达到同样的效果
官方地址:请戳这里
示例如下:
withTimeout(1300L) { repeat(1000) { i -> println("I'm sleeping $i ...") delay(500L) }}打印结果
I'm sleeping 0 ...I'm sleeping 1 ...I'm sleeping 2 ...Exception in thread "main" kotlinx.coroutines.TimeoutCancellationException: Timed out waiting for 1300 ms之前,我们取消协程也会抛出异常,都会是被静默处理的。
这里,我们可以看到,超时任务会抛出TimeoutCancellationException异常,是没有被静默处理的。
但是,有时候,我们不希望抛出异常,我们希望返回Null或者一个默认值。那么,我们就需要用到withTimeoutOrNull。
示例代码:
fun coroutineTimeOutOrNull() { runBlocking { launch { val result = withTimeoutOrNull(1300L) { repeat(1000) { i -> Log.d("liu", "I'm sleeping $i ...") delay(500L) } "执行完成" } ?: "执行未完成,默认值" Log.d("liu","Result is $result") } } }这里,我们看到,返回的就是一个默认值。
我们知道,取消异常实在挂起点抛出CancellationException异常,协程的机制会忽略/静默处理它。
这里,我们就看下如果协程在取消过程中出现异常或者同一个协程的多个子协程发生异常的处理机制。
主要内容包括:
根据协程构建器的方式,异常有2种方式:自动异常传播(launch/actor)和向用户公开异常(async/produce)。
当这些构建器用于创建根协程时(不是另一个协程的子协程),前者这些构造器(launch/actor)会将异常视为未捕获异常,类似Java的Thread.uncaughtExceptionHandler;而后者(async/produce)则依赖用户来最终处理这些异常。
官方地址:戳一戳
上面介绍的都是跟协程的异常传播方式,下面来看下
private fun handleException() { runBlocking { val job = GlobalScope.launch { try { Log.d("liu", "launch 抛出未捕获异常") throw IndexOutOfBoundsException() } catch (e: java.lang.IndexOutOfBoundsException) { Log.d("liu", "launch 捕获 IndexOutOfBoundsException") } } job.join() val deferred = GlobalScope.async { Log.d("liu", "async 抛出向用户公开的异常") throw ArithmeticException() } try { deferred.await() } catch (e: ArithmeticException) { Log.d("liu", "async 捕获 ArithmeticException") } } }打印结果
launch 抛出未捕获异常launch 捕获 IndexOutOfBoundsExceptionasync 抛出向用户公开的异常async 捕获 ArithmeticException从上面的代码及打印结果,可以看出
launch启动的协程,我们是在异常点捕获的异常(类似java的未捕获异常)
async启动的协程,我们是在await()这里捕获的异常,它是想用户公开的异常。如果,不调用await()函数的话,这个异常是不会抛出来的。
非根协程中的异常,总是会传播的
示例代码
fun handleExceptionByNoteRootCoroutine() { runBlocking { launch { async { Log.d("liu", "async 抛出异常") throw ArithmeticException() } } } }这里执行后,会直接抛出异常。通过这里可以看到,async通过根协程启动的话,不调用await(),是不会抛出异常的;通过非根协程启动的话,不管调不调await()函数,都会抛出异常。
这里,async抛出的异常会直接跑到launch里,抛出未捕获的异常。
当一个协程由于一个异常而执行失败时,它会把异常传递到它的父级。父级会做一下操作:
如果是这样的话,一个子协程失败,跟它有关联的协程都会失败,这样并不符合我们的预期。
如果想要打破这种传播特性的话,我们可以使用supervisorJob
在supervisorScope内运行的子例程不会将异常传播到其父级。所以,如果我们不想让异常不断的向父级传播的话,可以使用supervisorScope或supervisorJob.
官方地址:戳一下
相对于coroutineScope,我们可以使用supervisorScope用于并发。它仅在一个方向上传播取消,并仅在自身失败时取消所有子项(向下传递)。它也会像coroutineScope一样等待所有孩子完成。
Supervision job
val supervisor = SupervisorJob()with(CoroutineScope(coroutineContext + supervisor)) { // launch the first child -- its exception is ignored for this example (don't do this in practice!) val firstChild = launch(CoroutineExceptionHandler { _, _ -> }) { println("The first child is failing") throw AssertionError("The first child is cancelled") } // launch the second child val secondChild = launch { firstChild.join() // Cancellation of the first child is not propagated to the second child println("The first child is cancelled: ${firstChild.isCancelled}, but the second one is still active") try { delay(Long.MAX_VALUE) } finally { // But cancellation of the supervisor is propagated println("The second child is cancelled because the supervisor was cancelled") } } // wait until the first child fails & completes firstChild.join() println("Cancelling the supervisor") supervisor.cancel() secondChild.join()}打印结果
The first child is failingThe first child is cancelled: true, but the second one is still activeCancelling the supervisorThe second child is cancelled because the supervisor was cancelledSupervision scope
try { supervisorScope { val child = launch { try { println("The child is sleeping") delay(Long.MAX_VALUE) } finally { println("The child is cancelled") } } // Give our child a chance to execute and print using yield yield() println("Throwing an exception from the scope") throw AssertionError() }} catch(e: AssertionError) { println("Caught an assertion error")}打印结果
The child is sleepingThrowing an exception from the scopeThe child is cancelledCaught an assertion error普通的Job跟supervisor job的区别就是异常处理。每个孩子都应该通过异常处理机制自行处理其异常,不同之处在于:孩子的失败不会传播到父级(向下传递)。这意味着直接在supervisorScope内启动的协程,在其作用域内使用CoroutineExceptionHandler跟使用根协程一样。
val handler = CoroutineExceptionHandler { _, exception -> println("CoroutineExceptionHandler Got $exception") }supervisorScope { val child = launch(handler) { println("The child throws an exception") throw AssertionError() } println("The scope is completing")}println("The scope is completed")打印结果
The scope is completingThe child throws an exceptionCoroutineExceptionHandler got java.lang.AssertionErrorThe scope is completed在协程上下文中的可选元素,用于异常捕获。协程的异常捕获使用的是CoroutineExceptionHandler来进行异常捕获。
CoroutineExceptionHandler仅在未捕获的异常(未以任何其他方式处理的异常)上调用。特别是,所有子协程(在另一个Job的上下文中创建的协程)都将其异常的处理委托给其父协程,父协程也委托给父协程,依此类推,直到根,因此永远不会使用安装在子协程上下文中的CoroutineExceptionHandler。除此之外,通过asynce构建的协程总是捕获所有异常,并在生成的Deferred对象中表示它们,因此它使用CoroutineExceptionHandler不起作用。
我们知道通过CoroutineExceptionHandler可以捕获异常。但是,不是所有的异常都可以被捕获,需要满足一下条件:
代码示例
fun test() { val handler = CoroutineExceptionHandler { _, exception -> Log.d("liu", "CoroutineExceptionHandler got $exception") } runBlocking { val job1 = GlobalScope.launch(handler) { throw NullPointerException() }//通过async构建的协程无效 val job2 = GlobalScope.async(handler) { throw IndexOutOfBoundsException() } joinAll(job1, job2) } }打印结果
CoroutineExceptionHandler got java.lang.NullPointerExceptionCaused by: java.lang.IndexOutOfBoundsException at cn.edu.coroutine.CoroutineExceptionHandleActivity$test$1$job2$1.invokeSuspend(CoroutineExceptionHandleActivity.kt:83)这里可以看到 ,通过launch启动的协程被捕获了,async启动的,并没有被捕获。
在看下面的例子。在Activity中通过MainScope启动的协程
fun test2() { val handler = CoroutineExceptionHandler { _, exception -> Log.d("liu", "test2 got $exception") } //是否是根协程 //是否是supervisorJob launch(handler) { launch { throw NullPointerException() } } launch { launch(handler) { throw IllegalStateException() } } }打印结果
test2 got java.lang.NullPointerException java.lang.IllegalStateException at cn.edu.coroutine.CoroutineExceptionHandleActivity$test2$2$1.invokeSuspend(CoroutineExceptionHandleActivity.kt:105)我们在跟协程设置了Handler后,NullPointerException异常被捕获。在子协程中设置的Handler并没有捕获IllegalStateException异常。
像系统内置的MainScope,LifecycleScope,ViewModelScope都是使用的SupervisorJob
public fun MainScope(): CoroutineScope = ContextScope(SupervisorJob() + Dispatchers.Main)...val ViewModel.viewModelScope: CoroutineScope get() { val scope: CoroutineScope? = this.getTag(JOB_KEY) if (scope != null) { return scope } return setTagIfAbsent(JOB_KEY, CloseableCoroutineScope(SupervisorJob() + Dispatchers.Main.immediate)) }当协程的多个子协程因为异常而失败时,一般情况下取第一个异常进行处理。在第一个异常之后发生的所有其他异常,都将绑定到第一个异常上。
看代码
fun multiException() { val handler = CoroutineExceptionHandler { _, exception -> Log.d("liu", "test3 got $exception ,${exception.suppressed.contentToString()}") } val scope = CoroutineScope(Job()) val job = scope.launch(handler) { launch { try { delay(Long.MAX_VALUE) } finally { throw IllegalArgumentException() } } launch { delay(100) throw NullPointerException() } } }打印结果
test3 got java.lang.NullPointerException ,[java.lang.IllegalArgumentException]代码流程:第二个子协程执行的时候,会抛出NullPointerException异常;那样异常传递到父级,父级取消所有的子级,第一个子协程也会取消,在取消的时候,会抛出IllegalArgumentException。通过CoroutineExceptionHandler捕获异常并打印。
这里看到exception打印的是第一个捕获的异常,其它的异常都会保存在suppressed数组中。
来源地址:https://blog.csdn.net/android_jianbo/article/details/128190986
--结束END--
本文标题: Android Kotlin之Coroutine(协程)详解
本文链接: https://www.lsjlt.com/news/372109.html(转载时请注明来源链接)
有问题或投稿请发送至: 邮箱/279061341@qq.com QQ/279061341
下载Word文档到电脑,方便收藏和打印~
2024-05-11
2024-05-11
2024-05-11
2024-05-11
2024-05-11
2024-05-11
2024-05-11
2024-05-11
2024-05-11
2024-05-11
回答
回答
回答
回答
回答
回答
回答
回答
回答
回答


官方手机版

微信公众号

商务合作


0