MogileFS的安装与配置================================================================================概述:======
MogileFS的安装与配置
================================================================================
概述:
================================================================================
1.简介:
2.MogileFS特性:
★应用层
运行于用户空间,无需特殊的核心组件;
★无单点
MogStored:存储多个数据副本;
Tracker:多节点;
Database:Mysql(存放元数据);
★自动文件复制
★传输中立,无特殊协议,可通过NFS或Http进行通信
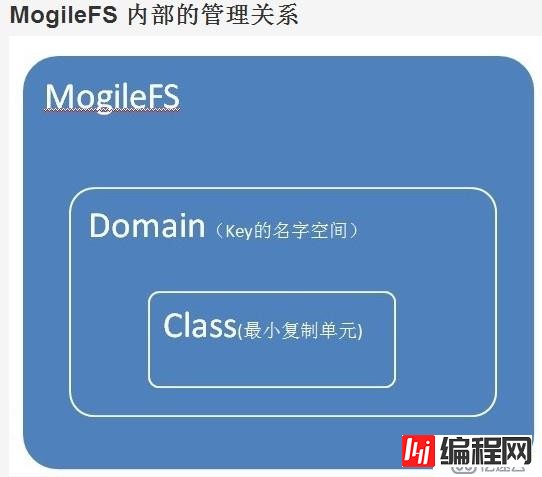
★简单的名称空间
diomain,class,fid(即访问文件的key);
每个文件对应一个key:用于domain定义名称空间;
★不用共享任何数据
元数据:DB
数据:MogStored,副本
★不需要RAID
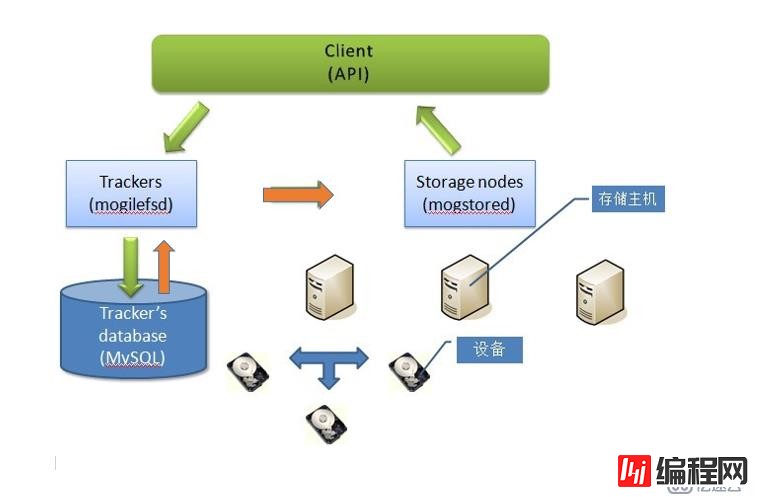
3.MogileFS组件:
★MogileFS组件:
☉Tracker:追踪元数据
MogileFS的核心,是一个调度器;
服务进程为mogilefsd;
职责:删除、复制、监控、查询等;
☉MogStored:存储数据
存储节点需定义“设备dev”用作存储空间;每个设备在当前集群中需通过一个唯一的DevID标识。
☉Database:存储元数据;
用于为tracker存储元数据信息,mogileFS
存储mogilefs的元数据,一般使用mysql,建议使用冗余方案保证可用性(MMM,MHA)
★MogileFS服务进程
mogilfsd (Tracker)
mogstored(MogStored)
4.MogileFS的实现机制和工作原理:
★实现机制
在该文件系统集群中,每一个数据块都会有多个副本,存放于多个Storage node上,不同的文件系统副本的数量各不相同(一般建议为3份),在Tracker Node上会分别单独记录每一个数据块的存储位置(位于哪个Storage及路径)。若某个Storage节点不在线了,客户端向Tracker节点请求获取数据时,Tracker节点会返回用于冗余的副本的存储位置给客户端。这样就保证了整个文件系统中数据的高可用性。当有数据存储至某一storage节点后,各storage节点会根据Tracker的指示通过节点间通信将副本发送至其他节点上。若某一storage下线了,该节点上的副本会由其他节点重新提供,保证副本的个数不少于指定的值。
★工作原理
客户端需要存取数据时,首先与Tracker进行交互,Tracker通过查询数据库来获取客户端存取数据时所需要访问的元数据,然后返回给客户端,客户端利用Tracker返回的结果,与Storage Nodes节点进行交互完成数据存取(一次有可能联系一个也可能联系多个)。
附图:
5.MogileFS中的术语:
☉tracker
借助数据库保存各个节点文件的元数据信息, 便于检索定位数据位置并监控各个节点, 告知客户端存储区的位置并指挥storage节点复制数据副本, 进程为mogilefsd;
☉databases
为tracker节点存储节点文件的元数据信息;
☉storage
将指定域中的键转换为特有的文件名存储于在特定的设备文件中, 转换后文件名为值, storage自动维护键值之间的对应关系, storage节点使用http进行数据传输, 依赖于perbal, 进程为mogstored, perbal;
☉Domain
一个域中的键值是唯一的, 一个MogileFS可以有多个域来存储不同类型的文件,同一个Domain内Key必须唯一,不同的Domain内Key可以相同;
☉Class
一个域中的键值是唯一的, 一个MogileFS可以有多个域来存储不同类型的文件,同一个Domain内Key必须唯一,不同的Domain内Key可以相同;
☉device
一个存储节点, 可以有多个device, 就是用来存放文件的目录, 每个设备都有一个设备ID, 需要在mogstored配置文件中docroot配置, 设备不能删除, 只能将设备的状态置为dead, 置为dead之后数据就无法恢复了, 并且设备ID也无法再使用;
附图:
1.perl模块的安装方式:
★online(在线):
yum -y install make GCc unzip perl-DBD-Mysql perl perl-CPAN perl-YAML perl-Time-HiRes
执行命令 : perl -MCPAN -e shell 进入 perl 依赖包安装模式 (或执行 cpan -i module_name::name)
cpan install App::cpanminus
cpan install MogileFS::Server
cpan install MogileFS::Utils
cpan install IO::AIO
cpan install IO::WrapTie
cpan install Danga::Socket★offline(线下):要大量解决依赖关系
$ perl Makefile.PL
$ make
$ sudo make install
★rpm
☉MogileFS安装:
tracker:
$ yum install MogileFS-Server-VERSION.rpm MogileFS-Server-mogilefsd-VERSION.rpm
mogstored:
$ yum install perl-IO-AIO
$ yum install MogileFS-Server-VERSION.rpm MogileFS-Server-mogstored-VERSION.rpm
实验:MofileFS的安装和配置
环境描述:
两台Centos 7的虚拟主机node1和node2,node1即作为tracker又作为mogstore存储节点,同时还是mysql服务器;node2为tracker和mogstaor节点;
实验步骤:
1.首先在noge1上使用CPAN工具在线安装perl模块及mogilefs
[root@centos7 ~]# yum -y install make gcc unzip perl-DBD-MySQL perl perl-CPAN perl-YAML perl-Time-HiRes
[root@centos7 ~]# perl -MCPAN -e shell
cpan >install App::cpanminus
cpan >install MogileFS::Server
cpan >install MogileFS::Utils
cpan >install IO::AIO
cpan >install IO::WrapTie
cpan >install Danga::Socket

#=========================================================================================
# 安装后各程序版本如下:
[root@centos7 ~]# cpan Sys::Syscall
Reading '/root/.cpan/Metadata'
  Database was generated on Thu, 05 Jan 2017 18:41:02 GMT
Sys::Syscall is up to date (0.25).

[root@centos7 ~]# cpan MogileFS::Server
Reading '/root/.cpan/Metadata'
  Database was generated on Thu, 05 Jan 2017 18:41:02 GMT
MogileFS::Server is up to date (2.72).

[root@centos7 ~]# cpan MogileFS::Utils
Reading '/root/.cpan/Metadata'
  Database was generated on Thu, 05 Jan 2017 18:41:02 GMT
MogileFS::Utils is up to date (2.29).

[root@centos7 ~]# cpan IO::AIO
Reading '/root/.cpan/Metadata'
  Database was generated on Thu, 05 Jan 2017 18:41:02 GMT
IO::AIO is up to date (4.34).

[root@centos7 ~]# cpan IO::WrapTie
Reading '/root/.cpan/Metadata'
  Database was generated on Thu, 05 Jan 2017 18:41:02 GMT
IO::WrapTie is up to date (2.111).

[root@centos7 ~]# cpan Danga::Socket
Reading '/root/.cpan/Metadata'
  Database was generated on Thu, 05 Jan 2017 18:41:02 GMT
Danga::Socket is up to date (1.61).
2.在node1上安装MySQL(略),创建数据库,添加管理用户
[root@centos7 ~]# mysql -ptaoxiu
Welcome to the MariaDB monitor.  Commands end with ; or \g.
Your MariaDB connection id is 11
Server version: 5.5.44-MariaDB MariaDB Server

Copyright (c) 2000, 2015, oracle, MariaDB Corporation Ab and others.

Type 'help;' or '\h' for help. Type '\c' to clear the current input statement.

MariaDB [(none)]> create database mogfsdb; # 创建数据库

MariaDB [(none)]> grant all privileges on mogfsdb.* to 'moguser'@'127.0.0.1' identified by 'mogpass';

MariaDB [(none)]> grant all privileges on mogfsdb.* to 'moguser'@'192.168.1.113' identified by 'mogpass';

MariaDB [(none)]> flush privileges;
3.初始化数据库
[root@centos7 ~]# mogdbsetup --dbhost='127.0.0.1' --dbname=mogfsdb --dbuser=moguser --dbpass=mogpass --type=MySQL

This will attempt to setup or upgrade your MogileFS database.
It won't destroy existing data.
Run with --help for more infORMation. Run with --yes to shut up these prompts.

Continue? [N/y]: y
查看数据库如下:
[root@centos7 ~]# mysql -ptaoxiu
Welcome to the MariaDB monitor.  Commands end with ; or \g.
Your MariaDB connection id is 5
Server version: 5.5.44-MariaDB MariaDB Server

Copyright (c) 2000, 2015, Oracle, MariaDB Corporation Ab and others.

Type 'help;' or '\h' for help. Type '\c' to clear the current input statement.

MariaDB [(none)]> show databases;
+--------------------+
| Database           |
+--------------------+
| information_schema |
| Syslog             |
| hellodb            |
| jingdong           |
| mogfsdb            |
| mysql              |
| ultrax             |
| zabbix             |
+--------------------+
8 rows in set (0.12 sec)

MariaDB [(none)]> use mogfsdb;
Reading table information for completion of table and column names
You can turn off this feature to get a quicker startup with -A

Database changed
MariaDB [mogfsdb]> show tables; # 生成的表
+----------------------+
| Tables_in_mogfsdb    |
+----------------------+
| checksum             |
| class                |
| device               |
| domain               |
| file                 |
| file_on              |
| file_on_corrupt      |
| file_to_delete       |
| file_to_delete2      |
| file_to_delete_later |
| file_to_queue        |
| file_to_replicate    |
| fsck_log             |
| host                 |
| server_settings      |
| tempfile             |
| unreachable_fids     |
+----------------------+
17 rows in set (0.00 sec)

MariaDB [mogfsdb]> exit
配置tracker节点,
1.在/etc目录下创建mogilefs目录,并提供配置文件mogilefsd.conf,如下:
[root@centos7 ~]# mkdir /etc/mogilefs
[root@centos7 ~]# vim /etc/mogilefs/mogilefsd.conf
 # Enable daemon mode to work in background and use syslog
 daemonize = 1
 # Where to store the pid of the daemon (must be the same in the init script)
 pidfile = /var/run/mogilefsd/mogilefsd.pid  # 指定pid文件位置
 # Database connection information
 db_dsn = DBI:mysql:mogfsdb:host=127.0.0.1  # 修改为上面授权的账号和密码
 db_user = moguser                           # mysql用户
 db_pass = mogpass                          # mysql密码
 # IP:PORT to listen on for mogilefs client requests
 listen = 0.0.0.0:7001                     # 监听的地址和端口(所有地址的7001端口)
 # Optional, if you don't define the port above.
 conf_port = 7001
 # Number of query workers to start by default.
 query_jobs = 10                             # 用于查询的进程数
 # Number of delete workers to start by default.
 delete_jobs = 1                             # 用于删除操作的进程数
 # Number of replicate workers to start by default.
 replicate_jobs = 5                          # 用于复制的进程数
 # Number of reaper workers to start by default.
 # (you don't usually need to increase this)
 reaper_jobs = 1                             # 用于回收资源的进程数
 # Number of fsck workers to start by default.
 # (these can cause a lot of load when fsck'ing)
 #fsck_jobs = 1
 # Minimum amount of space to reserve in megabytes
 # default: 100
 # Consider setting this to be larger than the largest file you
 # would normally be uploading.
 #min_free_space = 200
 # Number of seconds to wait for a storage node to respond.
 # default: 2
 # Keep this low, so busy storage nodes are quickly ignored.
 #node_timeout = 2
 # Number of seconds to wait to connect to a storage node.
 # default: 2
 # Keep this low so overloaded nodes get skipped.
 #conn_timeout = 2
 # Allow replication to use the secondary node get port,
 # if you have apache or similar configured for GET's
 #repl_use_get_port = 1
2.创建pid文件目录并赋予权限,然后启动服务。
# mogilefsd不能以root身份运行,必须用其他用户运行,为此添加mogilefs用户,然后启动服务
[root@centos7 ~]# useradd -r mogilefs

# 创建pid文件目录并修改属主属组为mogilefs
[root@centos7 ~]# mkdir /var/run/mogilefsd/ -p
[root@centos7 ~]# chown -R mogilefs.mogilefs  /var/run/mogilefsd/

# 启动服务
[root@centos7 mogilefs]# su - mogilefs -c "mogilefsd -c /etc/mogilefs/mogilefsd.conf --daemon"
su: warning: cannot change directory to /home/mogilefs: No such file or directory

# 查看端口7001
[root@centos7 mogilefs]# ss -tnl
State       Recv-Q Send-Q                                      Local Address:Port                                                     Peer Address:Port
LISTEN      0      25                                                      *:514                                                                 *:*
LISTEN      0      50                                                      *:3306                                                                *:*
LISTEN      0      128                                                     *:22                                                                  *:*
LISTEN      0      128                                             127.0.0.1:631                                                                 *:*
LISTEN      0      128                                                     *:7001                                                                *:*
LISTEN      0      100                                             127.0.0.1:25                                                                  *:*
LISTEN      0      128                                             127.0.0.1:6010                                                                *:*
LISTEN      0      25                                                     :::514                                                                :::*
LISTEN      0      128                                                    :::22                                                                 :::*
LISTEN      0      128                                                   ::1:631                                                                :::*
LISTEN      0      100                                                   ::1:25                                                                 :::*
LISTEN      0      128                                                   ::1:6010                                                               :::*
接下来配置 mogstore节点,
1.编辑配置文件 vim /etc/mogilefs/mogstored.conf如下:
  [root@centos7 ~]# vim /etc/mogilefs/mogstored.conf
    maxconns = 10000       # 最大并发连接数
    httplisten = 0.0.0.0:7500  # 监听端口
    mgmtlisten = 0.0.0.0:7501  # 管理端口,探测mogstore的健康状态
    docroot = /data/mogstored  # 数据存放位置
2.提供数据存放目录/data/mogstored,分区,格式化,挂载设备,并修改属主属组为mogilefs
[root@centos7 ~]# mkdir -pv /data/mogstored

# 添加磁盘dev(生产环境中要把磁盘设备分区,创建文件系统,挂载到此目录下,这里为了测试创建目录dev)
[root@centos7 ~]# mkdir /data/mogstored/dev{1,2}

# 修改属主属组为mogilefs
[root@centos7 ~]# chown -R mogilefs:mogilefs /data/mogstored/
[root@centos7 mogstored]# ll
total 0
drwxr-xr-x 2 mogilefs mogilefs 6 Jan  5 15:52 dev1
drwxr-xr-x 2 mogilefs mogilefs 6 Jan  5 15:52 dev2

# 生产环境中分区,格式化,挂载文件系统,并授权
# fdisk /dev/sdb
# mkfs.ext4 /dev/sdb1
# mkdir /mystore/dev1 -pv
# mount /dev/sdb1 /mystore/dev1
# chown -R mogilefs.mogilefs /data/mogstored/dev1
3.启动服务,并查看端口7500,7501
[root@centos7 mogstored]# su - mogilefs -c "mogstored -c /etc/mogilefs/mogstored.conf --daemon"
su: warning: cannot change directory to /home/mogilefs: No such file or directory
[root@centos7 mogstored]# ss -tnl
State       Recv-Q Send-Q                                      Local Address:Port                                                     Peer Address:Port
LISTEN      0      25                                                      *:514                                                                 *:*
LISTEN      0      50                                                      *:3306                                                                *:*
LISTEN      0      128                                                     *:7500                                                                *:*
LISTEN      0      128                                                     *:7501                                                                *:*
LISTEN      0      128                                                     *:22                                                                  *:*
LISTEN      0      128                                             127.0.0.1:631                                                                 *:*
LISTEN      0      128                                                     *:7001                                                                *:*
LISTEN      0      100                                             127.0.0.1:25                                                                  *:*
LISTEN      0      128                                             127.0.0.1:6010                                                                *:*
LISTEN      0      25                                                     :::514                                                                :::*
LISTEN      0      128                                                    :::22                                                                 :::*
LISTEN      0      128                                                   ::1:631                                                                :::*
LISTEN      0      100                                                   ::1:25                                                                 :::*
LISTEN      0      128                                                   ::1:6010                                                               :::*
在节点node2上同样配置mogstore存储节点,如下:
1.同样适用CPAN在线安装perl相关模块和mogilefs,存储节点要解决依赖关系,安装perl-IO-AIO
[root@centos7 ~]# yum -y install make gcc unzip perl-DBD-MySQL perl perl-CPAN perl-YAML perl-Time-HiRes perl-IO-AIO
[root@centos7 ~]# perl -MCPAN -e shell
cpan >install App::cpanminus
cpan >install MogileFS::Server
cpan >install MogileFS::Utils
cpan >install IO::AIO
cpan >install IO::WrapTie
cpan >install Danga::Socket
2.在/etc下创建目录,并提供mogstore的配置文件mogstored.conf
[root@centos7 ~]# mkdir /etc/mogilefs
[root@centos7 ~]#  vim /etc/mogilefs/mogstored.conf
  maxconns = 10000
  httplisten = 0.0.0.0:7500
  mgmtlisten = 0.0.0.0:7501
  docroot = /data/mogstored
3.创建mogilefs用户,提供数据存放目录/data/mogstored,分区,格式化,挂载设备,并修改属主属组为mogilefs
[root@centos7 ~]# useradd -r mogilefs

[root@centos7 ~]# mkdir -pv /data/mogstored/dev{3,4} # 两个节点设备不能相同,且为小写
mkdir: created directory ‘/data/mogstored’
mkdir: created directory ‘/data/mogstored/dev3’
mkdir: created directory ‘/data/mogstored/dev4’

[root@centos7 ~]# chown -R mogilefs:mogilefs /data/mogstored/
[root@centos7 ~]# cd /data/mogstored/
[root@centos7 mogstored]# ll
total 0
drwxr-xr-x 2 mogilefs mogilefs 6 Jan  5 15:22 dev3
drwxr-xr-x 2 mogilefs mogilefs 6 Jan  5 15:22 dev4
4.启动服务,查看端口
[root@centos7 ~]# su - mogilefs -c "mogstored -c /etc/mogilefs/mogstored.conf --daemon"
su: warning: cannot change directory to /home/mogilefs: No such file or directory
[root@centos7 ~]# ss -tnl
State       Recv-Q Send-Q                                      Local Address:Port                                                     Peer Address:Port
LISTEN      0      50                                                      *:3306                                                                *:*
LISTEN      0      128                                                     *:7500                                                                *:*
LISTEN      0      128                                                     *:7501                                                                *:*
LISTEN      0      128                                                     *:22                                                                  *:*
LISTEN      0      128                                             127.0.0.1:631                                                                 *:*
LISTEN      0      100                                             127.0.0.1:25                                                                  *:*
LISTEN      0      128                                             127.0.0.1:6011                                                                *:*
LISTEN      0      128                                                    :::22                                                                 :::*
LISTEN      0      128                                                   ::1:631                                                                :::*
LISTEN      0      100                                                   ::1:25                                                                 :::*
LISTEN      0      128                                                   ::1:6011                                                               :::*
如上,我们就有了一个tracker和两个mogstore,接下来我们可以在控制节点上使用MogileFS-Utils,进行添加host,device,domain,class等管理操作。
1.使用mogadm命令添加存储节点mogstore
[root@centos7 ~]# mogadm host add node1 --ip=192.168.1.112 --status=alive --port=7500
[root@centos7 ~]# mogadm host add node2 --ip=192.168.1.113 --status=alive --port=7500
[root@centos7 ~]# mogadm host list
node1 [1]: alive
  IP:       192.168.1.112:7500

node2 [2]: alive
  IP:       192.168.1.113:7500
2.使用mogadm命令添加存储节点device,注意,前面挂载的设备必须为小写dev且个存储节点名称不能相同
[root@centos7 ~]# mogadm device add node1 1 --status=alive
[root@centos7 ~]# mogadm device add node2 3 --status=alive
[root@centos7 ~]# mogadm device add node2 4 --status=alive
[root@centos7 ~]# mogadm device list
node1 [1]: alive
                    used(G)    free(G)   total(G)  weight(%)
   dev1:   alive      3.674     36.307     39.980        100

node2 [2]: alive
                    used(G)    free(G)   total(G)  weight(%)
   dev3:   alive      0.398     39.582     39.980        100
   dev4:   alive      0.398     39.582     39.980        100
3.添加domain域或者类class
[root@centos7 ~]# mogadm domain list
 domain               class                mindevcount   replpolicy   hashtype
-------------------- -------------------- ------------- ------------ -------

[root@centos7 ~]# mogadm domain add files
[root@centos7 ~]# mogadm domain add p_w_picpaths
[root@centos7 ~]# mogadm domain list
 domain               class                mindevcount   replpolicy   hashtype
-------------------- -------------------- ------------- ------------ -------
 files                default                   2        MultipleHosts() NONE

 p_w_picpaths                 default                   2        MultipleHosts() NONE

 # mindevcount:默认最小设备数为2,即默认创建了两个副本
 # replpolicy:复制策略为多主机复制
 # hashtype:哈希类型,NOME表示不自定义,使用默认值

 [root@centos7 ~]# mogadm class list
 domain               class                mindevcount   replpolicy   hashtype
-------------------- -------------------- ------------- ------------ -------
 files                default                   2        MultipleHosts() NONE

 p_w_picpaths                 default                   2        MultipleHosts() NONE
4.查看检测状态
[root@centos7 ~]# mogadm check
Checking trackers...    # tracker识别OK
  127.0.0.1:7001 ... OK

Checking hosts...       # 主机识别OK
  [ 1] node1 ... OK
  [ 2] node2 ... OK

Checking devices...     # 设备识别OK
  host device         size(G)    used(G)    free(G)   use%   ob state   I/O%
  ---- ------------ ---------- ---------- ---------- ------ ---------- -----
  [ 1] dev1            39.980      3.734     36.247   9.34%  writeable   0.1
  [ 2] dev3            39.980      0.432     39.549   1.08%  writeable   0.0
  [ 2] dev4            39.980      0.432     39.549   1.08%  writeable   0.0
  ---- ------------ ---------- ---------- ---------- ------
             total:   119.941      4.597    115.345   3.83%
5.使用mogupload命令上传文件
[root@centos7 ~]# mogupload --help # 上传文件
Usage: /usr/local/bin/mogupload --trackers=host --domain=foo --key='/hello.jpg' --file='./hello.jpg'
[root@centos7 ~]# mogupload --trackers=192.168.1.112 --domain=files --key='/fstab.txt' --file='/etc/fstab'
[root@centos7 ~]# mogupload --trackers=192.168.1.112 --domain=p_w_picpaths --key='/2.jpg' --file='/root/man.jpg'

[root@centos7 ~]# moglisTKEys --help # 列出文件
Usage: /usr/local/bin/moglistkeys --trackers=host --domain=foo --key_prefix='bar/'
[root@centos7 ~]# moglistkeys --trackers=192.168.1.112 --domain=files
/fstab.txt
[root@centos7 ~]# moglistkeys --trackers=192.168.1.112 --domain=p_w_picpaths
/2.jpg
6.使用mogfileinfo查看文件信息,如下:
[root@centos7 ~]# mogfileinfo --trackers=192.168.1.112 --domain=files --key='/fstab.txt'
- file: /fstab.txt
class: default
devcount: 1
domain: files
fid: 2
key: /fstab.txt
length: 690
-- http://192.168.1.112:7500/dev1/0/000/000/0000000002.fid #可通过此URL访问到相应的资源
[root@centos7 ~]# mogfileinfo --trackers=192.168.1.112 --domain=p_w_picpaths --key='/2.jpg'
- file: /man.jpg
class: default
devcount: 1
domain: imgs
fid: 3
key: /man.jpg
length: 3401017
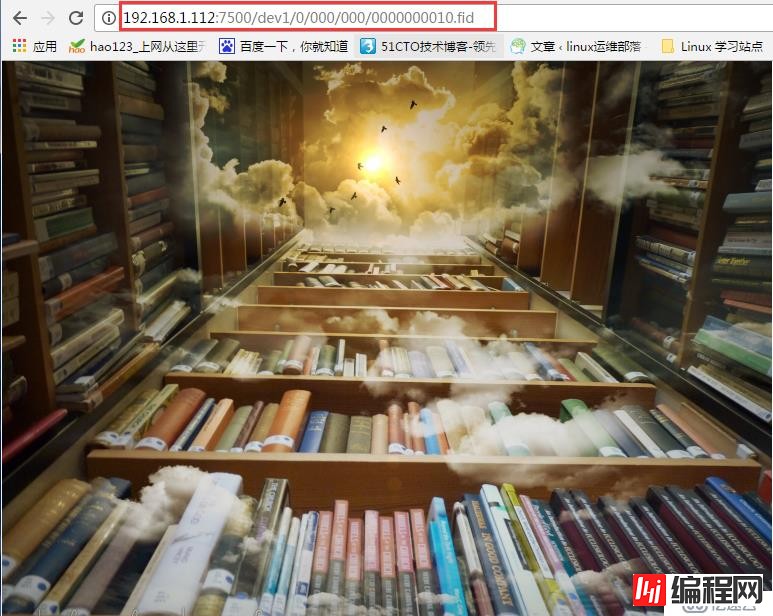
- http://192.168.1.112:7500/dev1/0/000/000/0000000010.fid通过URL访问其资源如下:
注意:
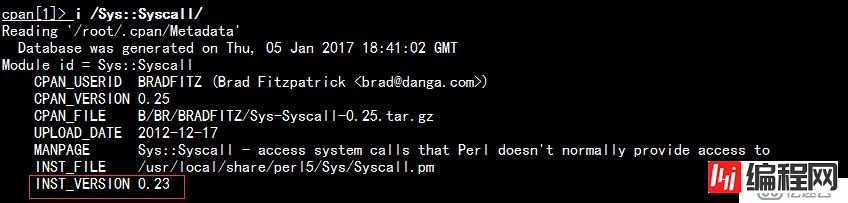
上面实验可以看到,上传的文件仅在一个主机设备上存放,实际上应该是两个节点都存放才对。我从网上查到出错的原因可能是由于Sys::Syscall这个模块造成的。我们看到现在此模块的版本为0.25。我上网搜索其解决办法,发现如果将此软件降为0.23版本可能会修复此问题,咱们试试看:
# 编译之前安装的版本为 0.25
[root@centos7 Sys-Syscall-0.23]# perl -MSys::Syscall -e 'print $Sys::Syscall::VERSION'
0.25
# 下载源码包并编译安装
wget http://search.cpan.org/CPAN/authors/id/B/BR/BRADFITZ/Sys-Syscall-0.23.tar.gz
tar xf Sys-Syscall-0.23.tar.gz
cd Sys-Syscall-0.23
perl Makefile.PL
make
make test
make install
重启mogilefsd进程,然后再上传一个文件,成功解决问题,如下:
[root@centos7 ~]# mogupload --trackers=192.168.1.112 --domain=p_w_picpaths --key='/1.jpg' --file='/root/1.jpg'
[root@centos7 ~]# mogfileinfo --trackers=192.168.1.112 --domain=p_w_picpaths --key='/1.jpg'
- file: /1.jpg
     class:              default
  devcount:                    2
    domain:               p_w_picpaths
       fid:                    9
       key:               /1.jpg
    length:             31249077
 - http://192.168.1.112:7500/dev1/0/000/000/0000000009.fid
 - http://192.168.1.113:7500/dev3/0/000/000/0000000009.fid
7.使用mogstats指明连接的数据库,用户和密码,查看状态,如下:
[root@centos7 ~]# mogstats --db_dsn="DBI:mysql:mogdb:host=127.0.0.1" --db_user="moguser" --db_pass="mogpass" --stats="all"
Fetching statistics... (all)

Statistics for devices...
  device     host                   files     status
  ---------- ---------------- ------------ ----------
  dev1       node1               5      alive
  dev3       node2               4      alive
  dev4       node2               1      alive
  ---------- ---------------- ------------ ----------

Statistics for file ids...
  Max file id: 9

Statistics for files...
  domain               class           files    size (m)  fullsize (m)
  -------------------- ----------- ---------- ----------- -------------
  files                default             2           0             0
  p_w_picpaths               default             3          32            64
  -------------------- ----------- ---------- ----------- -------------

Statistics for replication...
  domain               class        devcount      files
  -------------------- ----------- ---------- ----------
  files                default             2          2
  p_w_picpaths               default             2          3
  -------------------- ----------- ---------- ----------

Statistics for replication queue...
  status                      count
  -------------------- ------------
  -------------------- ------------

Statistics for delete queue...
  status                      count
  -------------------- ------------
  -------------------- ------------

Statistics for general queues...
  queue           status                      count
  --------------- -------------------- ------------
  --------------- -------------------- ------------

done
如上,为node1为tracker、mogstore和mysql节点,node2仅为mogstore节点,现在添加node2也为tracker节点,如下:
1.复制node1节点tracker的配置文件/etc/mogilefs/mogilefsd.conf到node2下
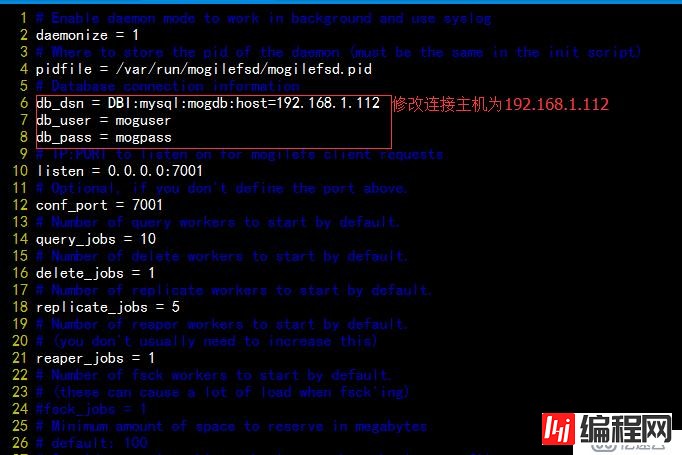
[root@centos7 ~]# scp /etc/mogilefs/mogilefsd.conf node2:/etc/mogilefs/mogilefsd.conf2.在node2节点上编辑配置文件mogilefsd.conf,修改连接数据库的信息,如下:
3.创建pid文件目录并赋予权限,然后启动服务。
[root@centos7 ~]# mkdir /var/run/mogilefsd/ -p
[root@centos7 ~]# chown -R mogilefs.mogilefs  /var/run/mogilefsd/

[root@centos7 ~]# su - mogilefs -c "mogilefsd -c /etc/mogilefs/mogilefsd.conf --daemon"

# 查看端口7001
[root@centos7 ~]# ss -tnl
State       Recv-Q Send-Q                                      Local Address:Port                                                     Peer Address:Port
LISTEN      0      128                                                     *:7500                                                                *:*
LISTEN      0      128                                                     *:7501                                                                *:*
LISTEN      0      128                                                     *:22                                                                  *:*
LISTEN      0      128                                             127.0.0.1:631                                                                 *:*
LISTEN      0      128                                                     *:7001                                                                *:*
LISTEN      0      100                                             127.0.0.1:25                                                                  *:*
LISTEN      0      128                                             127.0.0.1:6010                                                                *:*
LISTEN      0      128                                             127.0.0.1:6011                                                                *:*
LISTEN      0      128                                                    :::22                                                                 :::*
LISTEN      0      128                                                   ::1:631                                                                :::*
LISTEN      0      100                                                   ::1:25                                                                 :::*
LISTEN      0      128                                                   ::1:6010                                                               :::*
LISTEN      0      128                                                   ::1:6011                                                               :::*
4.使用mogadm查看host,device,domain,并上传文件,如下:
[root@centos7 ~]# mogadm host list # 查看host
node1 [1]: alive
  IP:       192.168.1.112:7500

node2 [2]: alive
  IP:       192.168.1.113:7500

[root@centos7 ~]# mogadm device list
node1 [1]: alive
                    used(G)    free(G)   total(G)  weight(%)
   dev1:   alive      3.673     36.308     39.980        100

node2 [2]: alive
                    used(G)    free(G)   total(G)  weight(%)
   dev3:   alive      0.399     39.581     39.980        100
   dev4:   alive      0.399     39.581     39.980        100

[root@centos7 ~]# mogadm domain list
 domain               class                mindevcount   replpolicy   hashtype
-------------------- -------------------- ------------- ------------ -------
 files                default                   2        MultipleHosts() NONE

 p_w_picpaths               default                   2        MultipleHosts() NONE

# 上传文件
[root@centos7 ~]# mogupload --trackers=192.168.1.113 --domain=p_w_picpaths --key='/2.jpg' --file='/root/2.jpg'

[root@centos7 ~]# mogfileinfo --trackers=192.168.1.113 --domain=p_w_picpaths --key='/2.jpg'
- file: /2.jpg
     class:              default
  devcount:                    2
    domain:               p_w_picpaths
       fid:                   10
       key:               /2.jpg
    length:              1247365
 - http://192.168.1.112:7500/dev1/0/000/000/0000000010.fid
 - http://192.168.1.113:7500/dev4/0/000/000/0000000010.fid
如上,就是整个分布式文件系统MogileFS安装部署的整个过程。。。
--结束END--
本文标题: MogileFS的安装与配置
本文链接: https://www.lsjlt.com/news/38802.html(转载时请注明来源链接)
有问题或投稿请发送至: 邮箱/279061341@qq.com QQ/279061341
下载Word文档到电脑,方便收藏和打印~
2024-05-03
2024-05-03
2024-05-03
2024-05-03
2024-05-03
2024-05-03
2024-05-03
2024-05-03
2024-05-03
2024-05-03
回答
回答
回答
回答
回答
回答
回答
回答
回答
回答


官方手机版

微信公众号

商务合作


0