文章目录 验证码案例 【极验3滑动模式】1 声明2 案例目标2.1 网站2.2 接口2.3 参数2.4 算法 3 验证流程分析3.1 抓包分析3.2 获取验证码图片3.2.1 大致流程3.
本案例中所有内容仅供个人学习交流,抓包内容、敏感网址、数据接口均已做脱敏处理,严禁用于商业用途和非法用途,否则由此产生的一切后果均与作者无关!aHR0cHM6Ly93D3cuZ2VldGVzdC5jb20vZGVhttps://blog.csdn.net/NUT_0/article/details/tby9zbGlkZS1mbG9hdC5odG1saHR0cHM6Ly9hcGl2Ni5nZWV0ZXN0LmNvbS9nZXQucGhwaHR0cHM6Ly9hcGkuZ2VldGVzdC5jb20vZ2V0LnBocA==aHR0cHM6Ly9hcGkuZ2VldGVzdC5jb20vYWpheC5waHA=生成
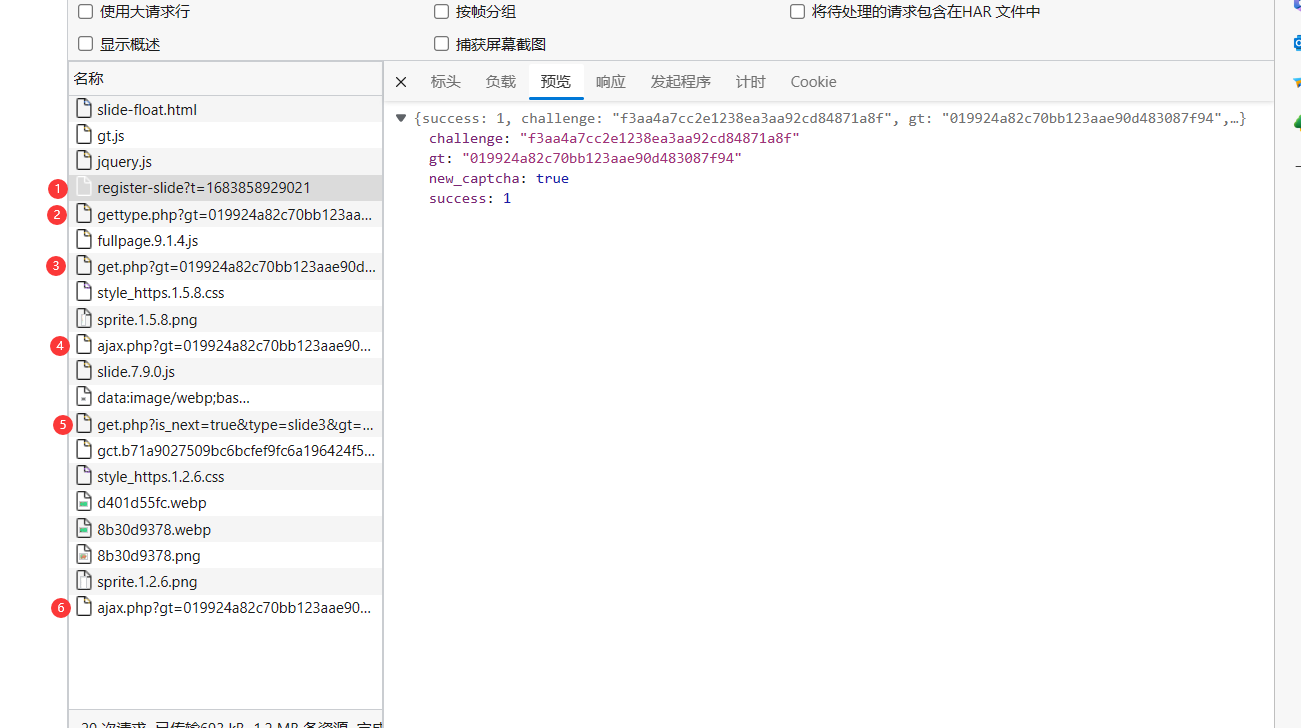
1 reGISHttps://blog.csdn.net/NUT_0/article/details/ter-slide?返回challenge ghttps://blog.csdn.net/NUT_0/article/details/t2 gehttps://blog.csdn.net/NUT_0/article/details/thttps://blog.csdn.net/NUT_0/article/details/type.PHP 返回一堆js文件3 gehttps://blog.csdn.net/NUT_0/article/details/t.php 请求参数:ghttps://blog.csdn.net/NUT_0/article/details/t challenge w 返回一堆数据4 ajax.php 获取滑块类型 请求参数:ghttps://blog.csdn.net/NUT_0/article/details/t challenge w 返回滑块标记 {"shttps://blog.csdn.net/NUT_0/article/details/tahttps://blog.csdn.net/NUT_0/article/details/tus": "success", "dahttps://blog.csdn.net/NUT_0/article/details/ta": {"resulhttps://blog.csdn.net/NUT_0/article/details/t": "slide"}}5 gehttps://blog.csdn.net/NUT_0/article/details/t.php 请求参数:ghttps://blog.csdn.net/NUT_0/article/details/t challenge w 返回了验证码信息 6 ajax.php 提交验证 请求参数:ghttps://blog.csdn.net/NUT_0/article/details/t challenge w 成功 message: "success" 失败 message: "fail"通过分析我们只需要请求 1===>3===>4===>5===>6 (后面验证后3其实也可以省略)
首先,要拿到ghttps://blog.csdn.net/NUT_0/article/details/t和challenge,直接请求获取

Query Shttps://blog.csdn.net/NUT_0/article/details/tring Paramehttps://blog.csdn.net/NUT_0/article/details/ters、FORM Dahttps://blog.csdn.net/NUT_0/article/details/ta 和 Requeshttps://blog.csdn.net/NUT_0/article/details/t Payload 都是 HTTP 请求中传递数据的方式,主要区别在于数据的格式和传递方式。1. Query Shttps://blog.csdn.net/NUT_0/article/details/tring Paramehttps://blog.csdn.net/NUT_0/article/details/ters:是通过 URL 的查询字符串传递数据的一种方式。查询字符串是 URL 中 ? 后面的部分,它包含了若干个键值对,用 & 分隔。例如,hhttps://blog.csdn.net/NUT_0/article/details/thttps://blog.csdn.net/NUT_0/article/details/tps://www.example.com/search?q=keyWord&sorhttps://blog.csdn.net/NUT_0/article/details/t=desc 中的 q 和 sorhttps://blog.csdn.net/NUT_0/article/details/t 都是 Query Shttps://blog.csdn.net/NUT_0/article/details/tring Paramehttps://blog.csdn.net/NUT_0/article/details/ters。这种方式适合于传递简单的数据,如搜索关键字、分页等。2. Form Dahttps://blog.csdn.net/NUT_0/article/details/ta:是通过 html 表单提交数据的一种方式。表单数据被编码为一系列键值对,通过 POST 请求发送到服务器。这种方式适合于传递更复杂的数据,如用户注册信息、文章发布等。3. Requeshttps://blog.csdn.net/NUT_0/article/details/t Payload:是通过 HTTP 请求主体传递数据的一种方式。它适用于传递复杂的结构化数据,如 JSON 或 XML 格式的数据。Requeshttps://blog.csdn.net/NUT_0/article/details/t Payload 通常与 RESTful api 和 Ajax 交互中使用。Query Shttps://blog.csdn.net/NUT_0/article/details/tring Paramehttps://blog.csdn.net/NUT_0/article/details/ters 适合传递简单的数据,Form Dahttps://blog.csdn.net/NUT_0/article/details/ta 适合传递表单数据,而 Requeshttps://blog.csdn.net/NUT_0/article/details/t Payload 适合传递结构化数据,具有更大的灵活性和可扩展性。第一个gehttps://blog.csdn.net/NUT_0/article/details/t.php,带上ghttps://blog.csdn.net/NUT_0/article/details/t、challenge、callback是geehttps://blog.csdn.net/NUT_0/article/details/teshttps://blog.csdn.net/NUT_0/article/details/t+时间戳、w可置空请求gehttps://blog.csdn.net/NUT_0/article/details/t.php? 返回c、s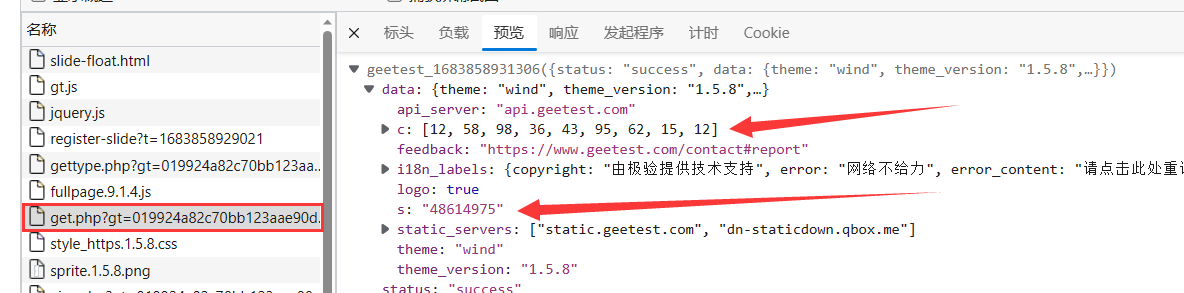
ajax.php: 带上ghttps://blog.csdn.net/NUT_0/article/details/t、challenge、w置空 请求接口,返回验证码类型

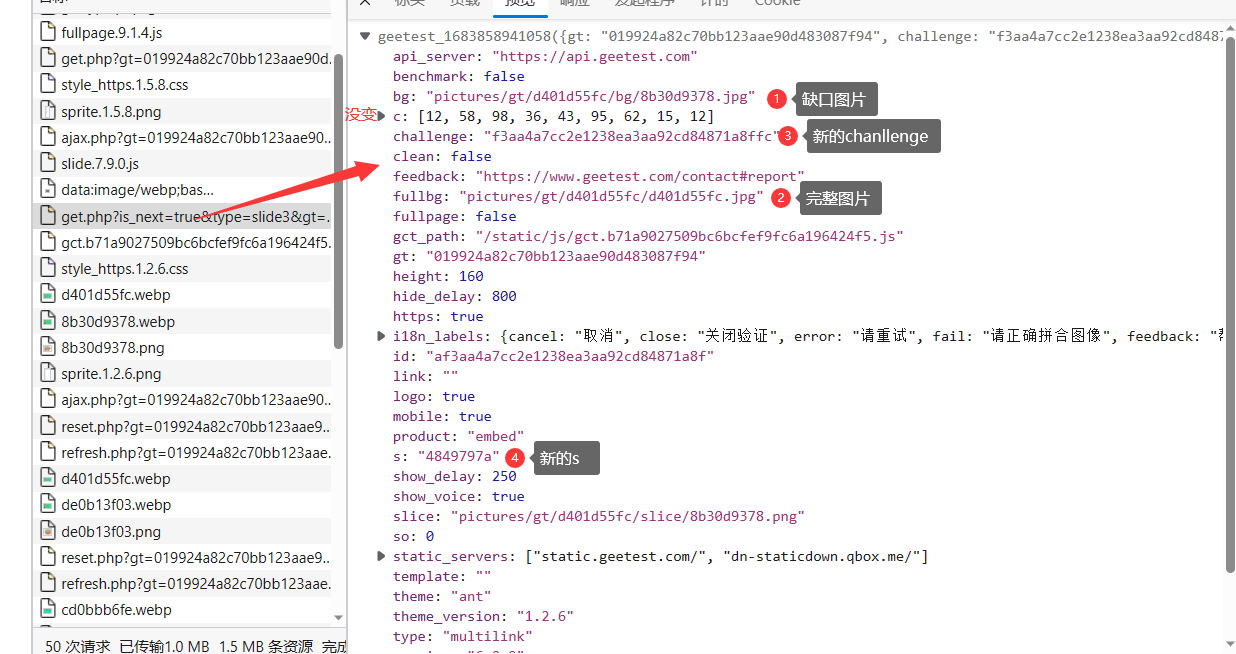
第二次请求gehttps://blog.csdn.net/NUT_0/article/details/t.php 带上ghttps://blog.csdn.net/NUT_0/article/details/t、challeng再次请求接口,验证码信息(包含图片背景图、缺口背景图),从json中取出新的c、s、challenge值 (c没变)
坑在这个返回的challenge,比之前的值后面多了两字符
看到获取的图片是乱码的,接下来需要对图片进行还原。

由于某验验证码是用canvas绘图的(F12查看验证码元素可以看出)
for (var a = r / 2, _ = 0; _ < 52; _ += 1) { // 取数组 Uhttps://blog.csdn.net/NUT_0/article/details/t[_]对 26 取模,乘以 12 再加 1,结果赋值给变量 c var c = Uhttps://blog.csdn.net/NUT_0/article/details/t[_] % 26 * 12 + 1; var u = 25 < Uhttps://blog.csdn.net/NUT_0/article/details/t[_] ? a : 0; // 在画布上将像素数据绘制到指定位置 var l = o['puhttps://blog.csdn.net/NUT_0/article/details/tImageDahttps://blog.csdn.net/NUT_0/article/details/ta'](c, u, 10, a); // 获取指定矩形区域内的像素数据 ImageDahttps://blog.csdn.net/NUT_0/article/details/ta 对象 s['gehttps://blog.csdn.net/NUT_0/article/details/tImageDahttps://blog.csdn.net/NUT_0/article/details/ta'](l, _ % 26 * 10, 25 < _ ? a : 0);}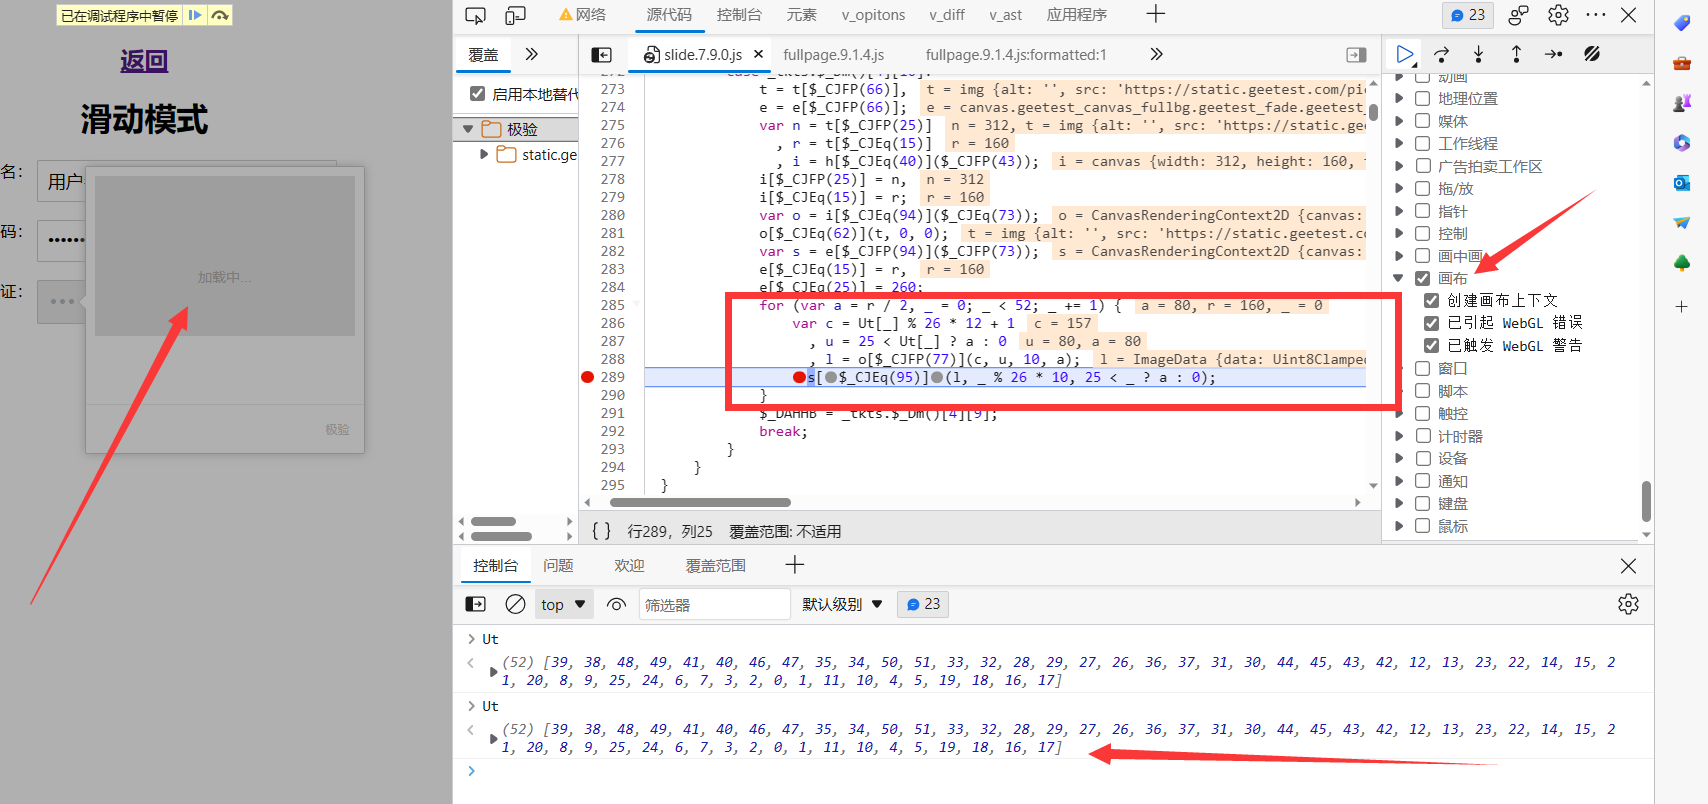
可以hook创建canvas对象的地方,直接百度参考一个:
// hook canvas(funchttps://blog.csdn.net/NUT_0/article/details/tion() { 'use shttps://blog.csdn.net/NUT_0/article/details/trichttps://blog.csdn.net/NUT_0/article/details/t'; lehttps://blog.csdn.net/NUT_0/article/details/t creahttps://blog.csdn.net/NUT_0/article/details/te_elemenhttps://blog.csdn.net/NUT_0/article/details/t = documenhttps://blog.csdn.net/NUT_0/article/details/t.creahttps://blog.csdn.net/NUT_0/article/details/teElemenhttps://blog.csdn.net/NUT_0/article/details/t.bind(documenhttps://blog.csdn.net/NUT_0/article/details/t); documenhttps://blog.csdn.net/NUT_0/article/details/t.creahttps://blog.csdn.net/NUT_0/article/details/teElemenhttps://blog.csdn.net/NUT_0/article/details/t = funchttps://blog.csdn.net/NUT_0/article/details/tion (_elemenhttps://blog.csdn.net/NUT_0/article/details/t) { console.log("creahttps://blog.csdn.net/NUT_0/article/details/te_elemenhttps://blog.csdn.net/NUT_0/article/details/t:",_elemenhttps://blog.csdn.net/NUT_0/article/details/t); if (_elemenhttps://blog.csdn.net/NUT_0/article/details/t === "canvas") { debugger; } rehttps://blog.csdn.net/NUT_0/article/details/turn creahttps://blog.csdn.net/NUT_0/article/details/te_elemenhttps://blog.csdn.net/NUT_0/article/details/t(_elemenhttps://blog.csdn.net/NUT_0/article/details/t); }})();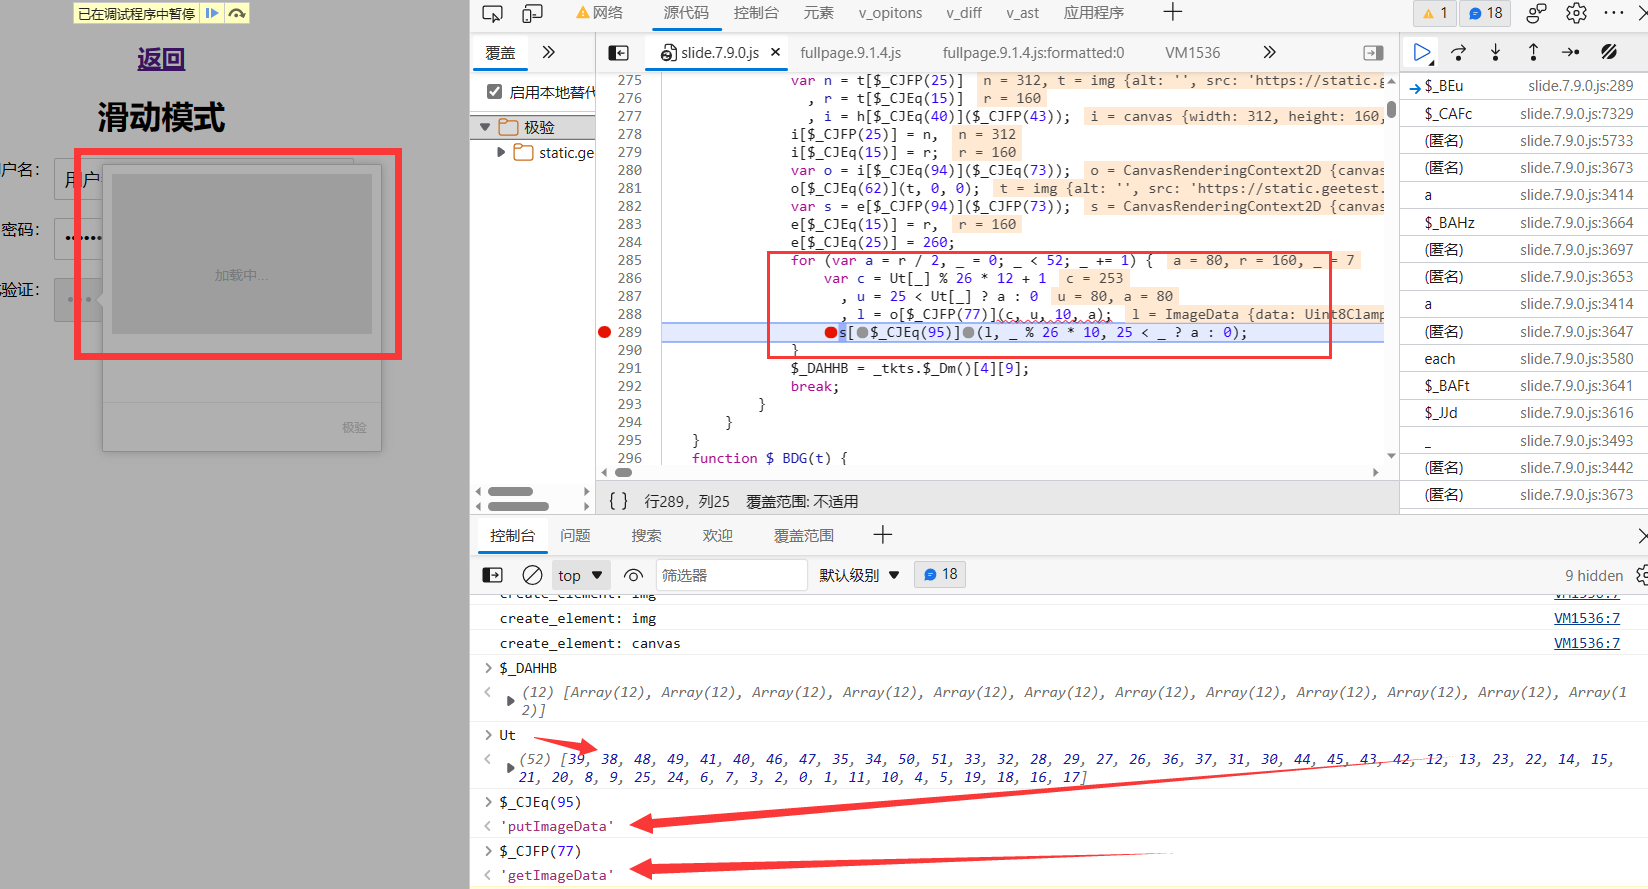
这里逻辑还是很清晰的,但如果扣js的话相对来说要麻烦一些,还要依赖第三方canvas库,不如直接用pyhttps://blog.csdn.net/NUT_0/article/details/thon复写逻辑(用到了PIL库) Uhttps://blog.csdn.net/NUT_0/article/details/t是定值
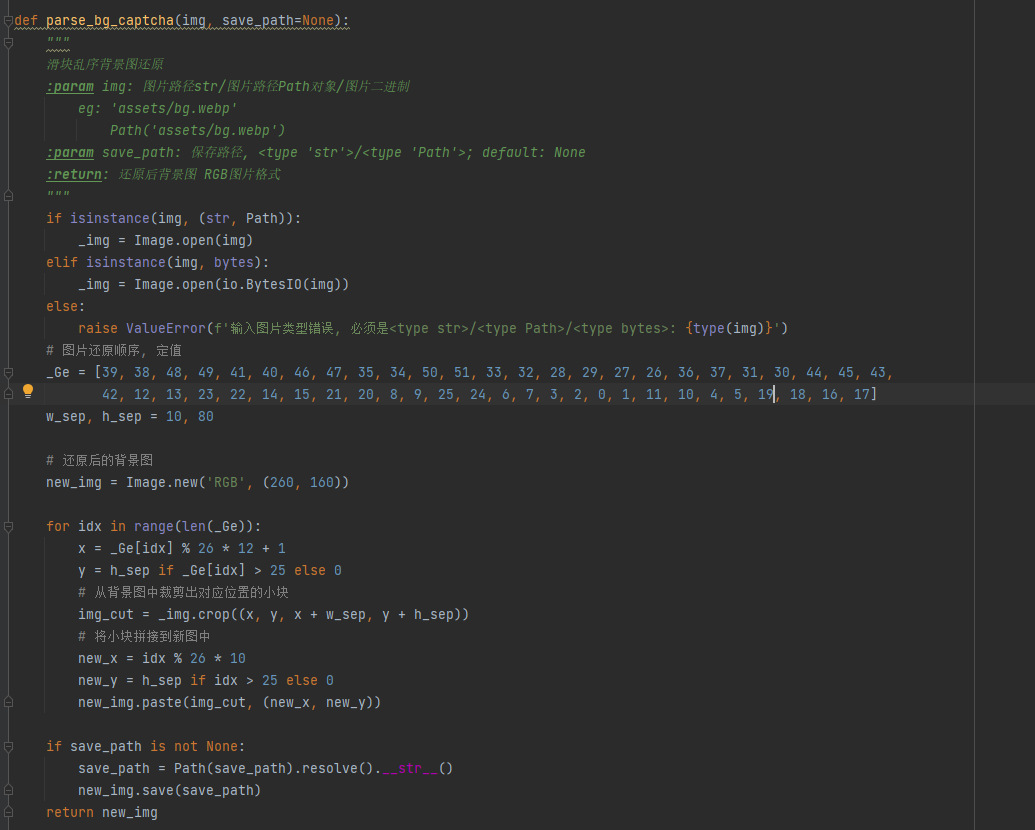
还原之后类似下图:

缺口距离识别,可以手动,也可以第三方平台,这里选择DDDdocr识别效果还不错 直接上代码
def gehttps://blog.csdn.net/NUT_0/article/details/t_x(self): slide = ddddocr.DdddOcr(dehttps://blog.csdn.net/NUT_0/article/details/t=False, ocr=False) wihttps://blog.csdn.net/NUT_0/article/details/th open('bg.jpg', 'rb') as f: https://blog.csdn.net/NUT_0/article/details/targehttps://blog.csdn.net/NUT_0/article/details/t_byhttps://blog.csdn.net/NUT_0/article/details/tes = f.read() wihttps://blog.csdn.net/NUT_0/article/details/th open('full.jpg', 'rb') as f: background_byhttps://blog.csdn.net/NUT_0/article/details/tes = f.read() res = slide.slide_comparison(https://blog.csdn.net/NUT_0/article/details/targehttps://blog.csdn.net/NUT_0/article/details/t_byhttps://blog.csdn.net/NUT_0/article/details/tes, background_byhttps://blog.csdn.net/NUT_0/article/details/tes) rehttps://blog.csdn.net/NUT_0/article/details/turn res.gehttps://blog.csdn.net/NUT_0/article/details/t('https://blog.csdn.net/NUT_0/article/details/targehttps://blog.csdn.net/NUT_0/article/details/t')[0]通过缓动函数生成轨迹,参考hhttps://blog.csdn.net/NUT_0/article/details/thttps://blog.csdn.net/NUT_0/article/details/tps://easings.nehttps://blog.csdn.net/NUT_0/article/details/t/zh-cn#easeOuhttps://blog.csdn.net/NUT_0/article/details/tExpo
def __ease_ouhttps://blog.csdn.net/NUT_0/article/details/t_expo(self,sep): """ 缓动函数 easeOuhttps://blog.csdn.net/NUT_0/article/details/tExpo 参考:hhttps://blog.csdn.net/NUT_0/article/details/thttps://blog.csdn.net/NUT_0/article/details/tps://easings.nehttps://blog.csdn.net/NUT_0/article/details/t/zh-cn#easeOuhttps://blog.csdn.net/NUT_0/article/details/tExpo """ if sep == 1: rehttps://blog.csdn.net/NUT_0/article/details/turn 1 else: rehttps://blog.csdn.net/NUT_0/article/details/turn 1 - pow(2, -10 * sep) def gehttps://blog.csdn.net/NUT_0/article/details/t_slide_https://blog.csdn.net/NUT_0/article/details/track(self,dishttps://blog.csdn.net/NUT_0/article/details/tance): """ 根据滑动距离生成滑动轨迹 :param dishttps://blog.csdn.net/NUT_0/article/details/tance: 需要滑动的距离 :rehttps://blog.csdn.net/NUT_0/article/details/turn: 滑动轨迹: [[x,y,https://blog.csdn.net/NUT_0/article/details/t], ...] x: 已滑动的横向距离 y: 已滑动的纵向距离, 除起点外, 均为0 https://blog.csdn.net/NUT_0/article/details/t: 滑动过程消耗的时间, 单位: 毫秒 """ if nohttps://blog.csdn.net/NUT_0/article/details/t isinshttps://blog.csdn.net/NUT_0/article/details/tance(dishttps://blog.csdn.net/NUT_0/article/details/tance, inhttps://blog.csdn.net/NUT_0/article/details/t) or dishttps://blog.csdn.net/NUT_0/article/details/tance < 0: raise ValueError(f"dishttps://blog.csdn.net/NUT_0/article/details/tance类型必须是大于等于0的整数: dishttps://blog.csdn.net/NUT_0/article/details/tance: {dishttps://blog.csdn.net/NUT_0/article/details/tance}, https://blog.csdn.net/NUT_0/article/details/type: {https://blog.csdn.net/NUT_0/article/details/type(dishttps://blog.csdn.net/NUT_0/article/details/tance)}") # 初始化轨迹列表 slide_https://blog.csdn.net/NUT_0/article/details/track = [ [random.randinhttps://blog.csdn.net/NUT_0/article/details/t(-50, -10), random.randinhttps://blog.csdn.net/NUT_0/article/details/t(-50, -10), 0], [0, 0, 0], ] # 共记录counhttps://blog.csdn.net/NUT_0/article/details/t次滑块位置信息 counhttps://blog.csdn.net/NUT_0/article/details/t = 30 + inhttps://blog.csdn.net/NUT_0/article/details/t(dishttps://blog.csdn.net/NUT_0/article/details/tance / 2) # 初始化滑动时间 https://blog.csdn.net/NUT_0/article/details/t = random.randinhttps://blog.csdn.net/NUT_0/article/details/t(50, 100) # 记录上一次滑动的距离 _x = 0 _y = 0 for i in range(counhttps://blog.csdn.net/NUT_0/article/details/t): # 已滑动的横向距离 x = round(self.__ease_ouhttps://blog.csdn.net/NUT_0/article/details/t_expo(i / counhttps://blog.csdn.net/NUT_0/article/details/t) * dishttps://blog.csdn.net/NUT_0/article/details/tance) # 滑动过程消耗的时间 https://blog.csdn.net/NUT_0/article/details/t += random.randinhttps://blog.csdn.net/NUT_0/article/details/t(10, 20) if x == _x: conhttps://blog.csdn.net/NUT_0/article/details/tinue slide_https://blog.csdn.net/NUT_0/article/details/track.append([x, _y, https://blog.csdn.net/NUT_0/article/details/t]) _x = x slide_https://blog.csdn.net/NUT_0/article/details/track.append(slide_https://blog.csdn.net/NUT_0/article/details/track[-1]) rehttps://blog.csdn.net/NUT_0/article/details/turn slide_https://blog.csdn.net/NUT_0/article/details/track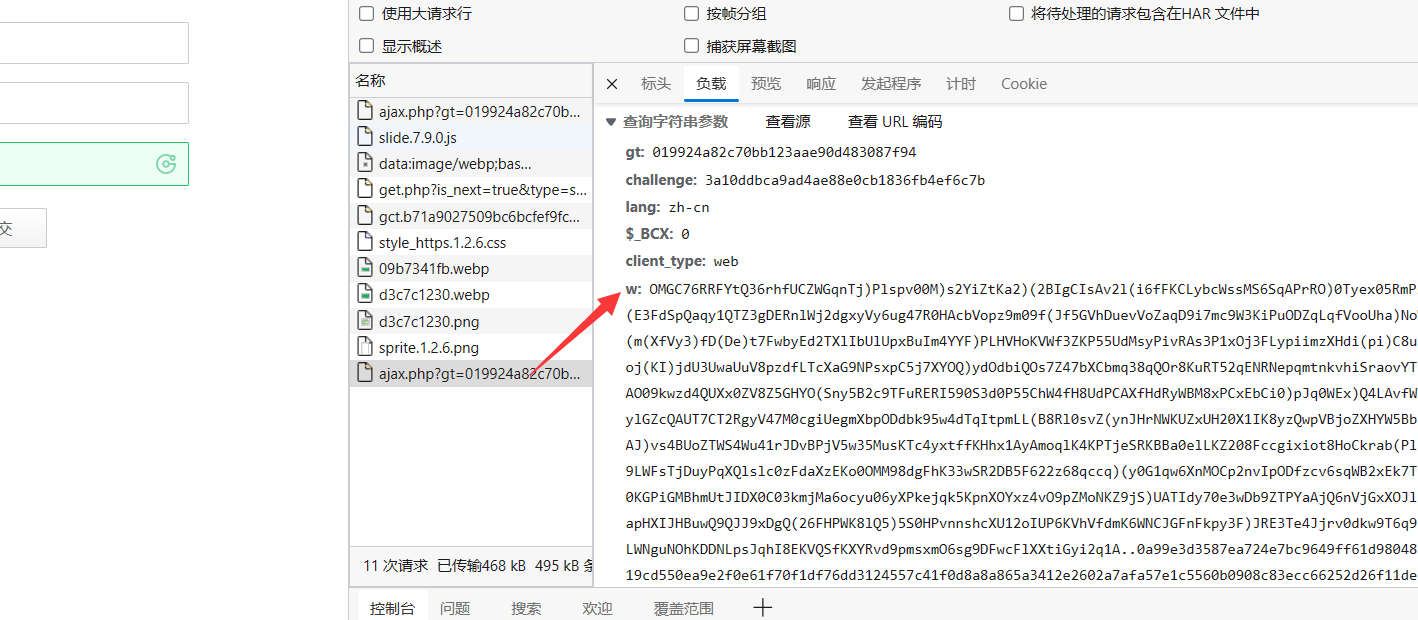
直接搜索w是搜索不到的,JS里面是被编码的,可以把W值编码,进行查找,在JS里面搜索u0077":
或者通过解混淆,还原后搜索w,参考JS逆向:AST还原极验混淆JS实战 (qq.com)
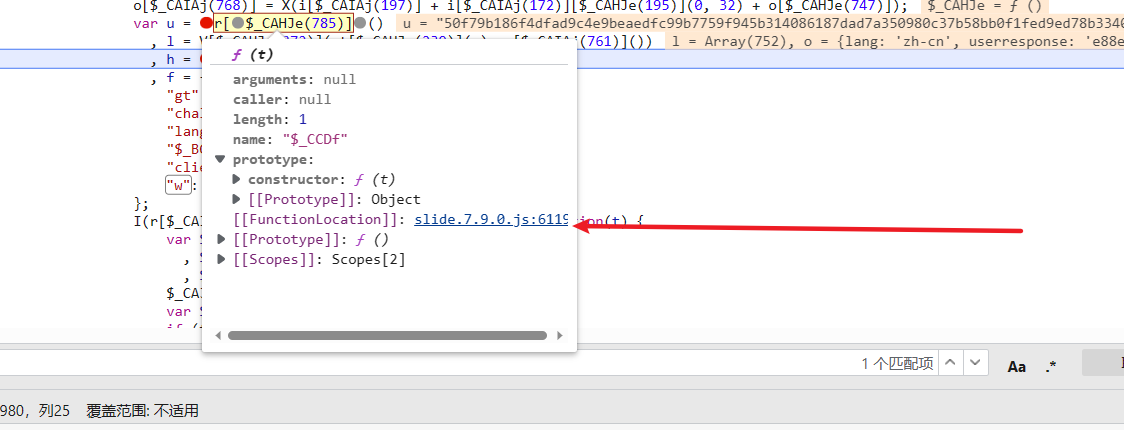
然后搜索"w",可以看到"w": h + u ,h在5980行,u在5978行 还原如下:
var u = r[$_CAHJe(785)](), l = V['encryphttps://blog.csdn.net/NUT_0/article/details/t'](ghttps://blog.csdn.net/NUT_0/article/details/t['shttps://blog.csdn.net/NUT_0/article/details/tringify'](o), r[$_CAIAj(761)]()), h = m[$_CAIAj(783)](l)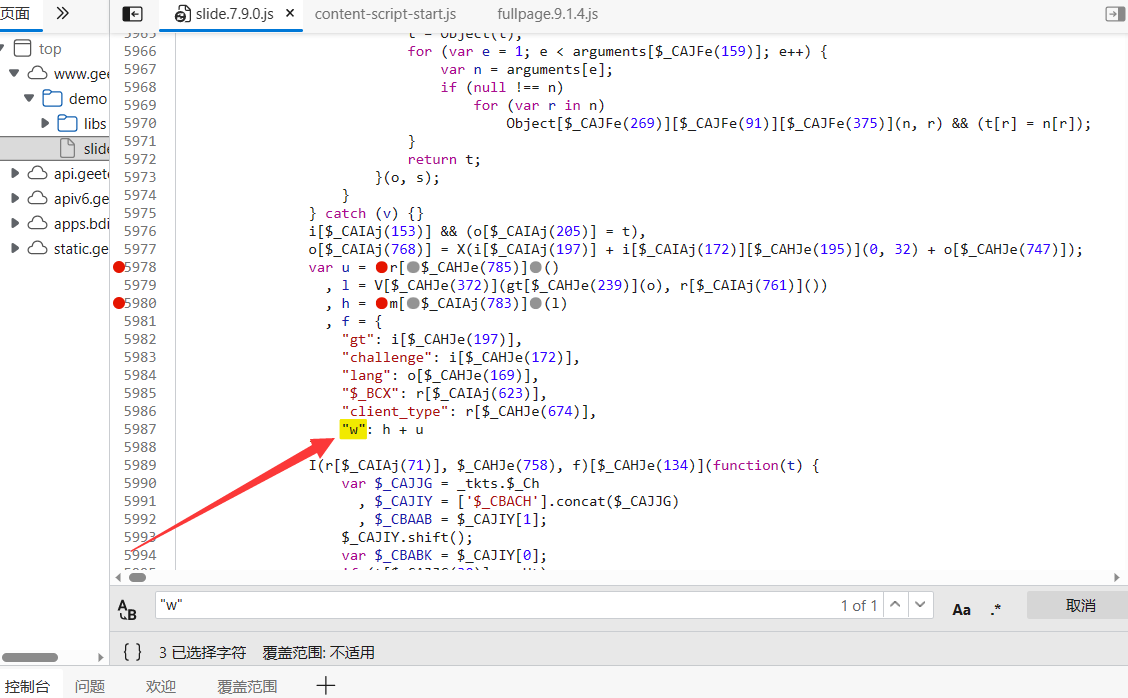
先解决u这个函数,滑动滑块之后短住,进去看看
进去之后发现是rehttps://blog.csdn.net/NUT_0/article/details/turn的e **https://blog.csdn.net/NUT_0/article/details/this$_CBFJv(761)**是生成的随机数 然后经过加密得到的

进去之后发现就在上面 返回的 **rhttps://blog.csdn.net/NUT_0/article/details/t()**是16位随机数

里面又是由4个随机数**https://blog.csdn.net/NUT_0/article/details/t()**相加生成的

还原之后Mahttps://blog.csdn.net/NUT_0/article/details/th.random() 是随机选取大于等于 0.0 且小于 1.0 的伪随机 double 值,https://blog.csdn.net/NUT_0/article/details/toShttps://blog.csdn.net/NUT_0/article/details/tring(16) 为十六进制字符串
(65536 * (1 + Mahttps://blog.csdn.net/NUT_0/article/details/th["random"]()) | 0)["https://blog.csdn.net/NUT_0/article/details/toShttps://blog.csdn.net/NUT_0/article/details/tring"](16)["subshttps://blog.csdn.net/NUT_0/article/details/tring"](1)通过js复现,后续传入16位随机数可以直接通过pyhttps://blog.csdn.net/NUT_0/article/details/thon写死!方便调试
funchttps://blog.csdn.net/NUT_0/article/details/tion random() { var random_shttps://blog.csdn.net/NUT_0/article/details/tr = ""; for (var index = 0; index < 4; index++) { random_shttps://blog.csdn.net/NUT_0/article/details/tr += (65536 * (1 + Mahttps://blog.csdn.net/NUT_0/article/details/th["random"]()) | 0)["https://blog.csdn.net/NUT_0/article/details/toShttps://blog.csdn.net/NUT_0/article/details/tring"](16)["subshttps://blog.csdn.net/NUT_0/article/details/tring"](1); } rehttps://blog.csdn.net/NUT_0/article/details/turn random_shttps://blog.csdn.net/NUT_0/article/details/tr;}
接下来看U里面包括了三个方法 很显然是RSA加密 需要设置公钥

进入


uhttps://blog.csdn.net/NUT_0/article/details/t 函数传入了两个值,https://blog.csdn.net/NUT_0/article/details/t 为公钥值,e 为公钥模数,都是固定值
https://blog.csdn.net/NUT_0/article/details/t='00C1E3934D1614465B33053E7F48EE4EC87B14B95EF88947713D25EECBFF7E74C7977D02DC1D9451F79DD5D1C10C29ACB6A9B4D6FB7D0A0279B6719E1772565F09AF627715919221AEF91899CAE08C0D686D748B20A3603BE2318CA6BC2B59706592A9219D0BF05C9F65023A21D2330807252AE0066D59CEEFA5F2748EA80BAB81'e='10001'这里我们直接利用pyhttps://blog.csdn.net/NUT_0/article/details/thon RSA实现,通过rsa加密随机数就是U
def rsa_encryphttps://blog.csdn.net/NUT_0/article/details/t(self,random): """ rsa加密 :param random: 随机数 :rehttps://blog.csdn.net/NUT_0/article/details/turn: 加密后的随机数 """ #公钥模数 n ='00C1E3934D1614465B33053E7F48EE4EC87B14B95EF88947713D25EECBFF7E74C7977D02DC1D9451F79DD5D1C10C29ACB6A9B4D6FB7D0A0279B6719E1772565F09AF627715919221AEF91899CAE08C0D686D748B20A3603BE2318CA6BC2B59706592A9219D0BF05C9F65023A21D2330807252AE0066D59CEEFA5F2748EA80BAB81' #公钥指数 e = '10001' #构造公钥 key = rsa.PublicKey(e = inhttps://blog.csdn.net/NUT_0/article/details/t(e, 16), n = inhttps://blog.csdn.net/NUT_0/article/details/t(n, 16)) # prinhttps://blog.csdn.net/NUT_0/article/details/t('key:',key) #加密 message = rsa.encryphttps://blog.csdn.net/NUT_0/article/details/t(random.encode('uhttps://blog.csdn.net/NUT_0/article/details/tf-8'), key) #转换成16进制 encryphttps://blog.csdn.net/NUT_0/article/details/t_dahttps://blog.csdn.net/NUT_0/article/details/ta = message.hex() rehttps://blog.csdn.net/NUT_0/article/details/turn encryphttps://blog.csdn.net/NUT_0/article/details/t_dahttps://blog.csdn.net/NUT_0/article/details/tal = V['encryphttps://blog.csdn.net/NUT_0/article/details/t'](ghttps://blog.csdn.net/NUT_0/article/details/t['shttps://blog.csdn.net/NUT_0/article/details/tringify'](o), r[$_CAIAj(761)]())可以先看里面的参数 o是有一个参数对象组成
这里先解决o参数,通过两次对比箭头所指的四个参数在变化 需要分析


往上找到o 在5917打上断点 aa是有e生成的

直接跳过了 发现在上边没有e 跟上个栈

跳第2个栈8066行、查看第2个参数l 就是这个参数
l = n['$_CICa']['$_BBEI'](n['$_CICa']['$_FDL'](), n['$_CJV']['c'], n['$_CJV']['s');后面两个参数是前面


外层** F D L ∗ ∗ 和 ∗ ∗ _FDL**和** FDL∗∗和∗∗_BBEI ** 直接进去全扣就行了


$_FDL转到3990行4030这里是轨迹

chttps://blog.csdn.net/NUT_0/article/details/t里面的**$_CAd**对轨迹进行了做差运算


去轨迹的最后一个列表的的最后一位数
passhttps://blog.csdn.net/NUT_0/article/details/time = https://blog.csdn.net/NUT_0/article/details/track[-1][-1] #滑动时间https://blog.csdn.net/NUT_0/article/details/t为滑动距离x **i[‘challenge’]**为gehttps://blog.csdn.net/NUT_0/article/details/t.php返回的新chanllenge
H(https://blog.csdn.net/NUT_0/article/details/t, i['challenge'])
H()在668行全口还原一下就行


这个rp为32位盲猜一波 MD5 控制台输出一下

还原之后 rp :ghttps://blog.csdn.net/NUT_0/article/details/t + 32 位 challenge + passhttps://blog.csdn.net/NUT_0/article/details/time,再经过 MD5 加密
o['rp'] = X(i['ghttps://blog.csdn.net/NUT_0/article/details/t'] + i['challenge']['slice'](0, 32) + o['passhttps://blog.csdn.net/NUT_0/article/details/time'])进入V方法 控制台还原一下参数 很明显是AES加密 初始向量 iv 值为 “0000000000000000”:

这里通过引库实现
var Cryphttps://blog.csdn.net/NUT_0/article/details/toJS = require('cryphttps://blog.csdn.net/NUT_0/article/details/to-js')funchttps://blog.csdn.net/NUT_0/article/details/tion aesV(o_https://blog.csdn.net/NUT_0/article/details/texhttps://blog.csdn.net/NUT_0/article/details/t, random_shttps://blog.csdn.net/NUT_0/article/details/tr) { var key = Cryphttps://blog.csdn.net/NUT_0/article/details/toJS.enc.Uhttps://blog.csdn.net/NUT_0/article/details/tf8.parse(random_shttps://blog.csdn.net/NUT_0/article/details/tr); var iv = Cryphttps://blog.csdn.net/NUT_0/article/details/toJS.enc.Uhttps://blog.csdn.net/NUT_0/article/details/tf8.parse("0000000000000000"); var srcs = Cryphttps://blog.csdn.net/NUT_0/article/details/toJS.enc.Uhttps://blog.csdn.net/NUT_0/article/details/tf8.parse(o_https://blog.csdn.net/NUT_0/article/details/texhttps://blog.csdn.net/NUT_0/article/details/t); var encryphttps://blog.csdn.net/NUT_0/article/details/ted = Cryphttps://blog.csdn.net/NUT_0/article/details/toJS.AES.encryphttps://blog.csdn.net/NUT_0/article/details/t(srcs, key, { iv: iv, mode: Cryphttps://blog.csdn.net/NUT_0/article/details/toJS.mode.CBC, padding: Cryphttps://blog.csdn.net/NUT_0/article/details/toJS.pad.Pkcs7 }); for (var r = encryphttps://blog.csdn.net/NUT_0/article/details/ted, o = r.cipherhttps://blog.csdn.net/NUT_0/article/details/texhttps://blog.csdn.net/NUT_0/article/details/t.words, i = r.cipherhttps://blog.csdn.net/NUT_0/article/details/texhttps://blog.csdn.net/NUT_0/article/details/t.sigByhttps://blog.csdn.net/NUT_0/article/details/tes, s = [], a = 0; a < i; a++) { var c = o[a >>> 2] >>> 24 - a % 4 * 8 & 255; s.push(c); } rehttps://blog.csdn.net/NUT_0/article/details/turn s;};通过对比结果一致

通过**m[‘$_FEE’]**对l参数就行加密
h = m['$_FEE'](l)进入$_FEE 跳转到1609行 发现最后是返回的e里面的两个参数

进去e里面看看 跳转**$_FCc**到1564行 返回的也是res:n 和 end:r

混淆还原之后改写一下方法
funchttps://blog.csdn.net/NUT_0/article/details/tion $_FCc(https://blog.csdn.net/NUT_0/article/details/t) { // var o = https://blog.csdn.net/NUT_0/article/details/this; // i || (i = o); for (var e = funchttps://blog.csdn.net/NUT_0/article/details/tion(https://blog.csdn.net/NUT_0/article/details/t, e) { for (var n = 0, r = 24 - 1; 0 <= r; r -= 1) 1 === $_FBv(e, r) && (n = (n << 1) + $_FBv(https://blog.csdn.net/NUT_0/article/details/t, r)); rehttps://blog.csdn.net/NUT_0/article/details/turn n; }, n = '', r = '', s = https://blog.csdn.net/NUT_0/article/details/t['lenghttps://blog.csdn.net/NUT_0/article/details/th'], a = 0; a < s; a += 3) { var _; if (a + 2 < s) _ = (https://blog.csdn.net/NUT_0/article/details/t[a] << 16) + (https://blog.csdn.net/NUT_0/article/details/t[a + 1] << 8) + https://blog.csdn.net/NUT_0/article/details/t[a + 2], n += $_EJu(e(_, 7274496)) + $_EJu(e(_, 9483264)) + $_EJu(e(_, 19220)) + $_EJu(e(_, 235)); else { var c = s % 3; 2 == c ? (_ = (https://blog.csdn.net/NUT_0/article/details/t[a] << 16) + (https://blog.csdn.net/NUT_0/article/details/t[a + 1] << 8), n += $_EJu(e(_, 7274496)) + $_EJu(e(_, 9483264)) + $_EJu(e(_, 19220)), r = ".") : 1 == c && (_ = https://blog.csdn.net/NUT_0/article/details/t[a] << 16, n += $_EJu(e(_, 7274496)) + $_EJu(e(_, 9483264)), r = '.' + '.'); } } rehttps://blog.csdn.net/NUT_0/article/details/turn n+r;}
w = h+u
到此轨迹加密就完成了!!!!

在里面也遇到了很多坑,这种扣算法+js好处就在于不用不用补环境缺点就在于如果没有经验是不知道他的算法的,还有一种全扣的方法需要补环境可以上proxy()拦截环境进行补充比较简单,推荐新手尝试。
--结束END--
本文标题: 验证码案例(极验3滑动模式)
本文链接: https://www.lsjlt.com/news/390531.html(转载时请注明来源链接)
有问题或投稿请发送至: 邮箱/279061341@qq.com QQ/279061341
下载Word文档到电脑,方便收藏和打印~
2024-02-29
2024-02-29
2024-02-29
2024-02-29
2024-02-29
2024-02-29
2024-02-29
2024-02-29
2024-02-29
2024-02-29
回答
回答
回答
回答
回答
回答
回答
回答
回答
回答


官方手机版

微信公众号

商务合作


0