Python 官方文档:入门教程 => 点击学习
YOLO v5 引入解耦头部 最近想开个 深度学习模型搭建, OpenCV方面的训练营,有兴趣可以私聊我 文章目录 YOLO v5 引入解耦头部前言一、解耦头部示意图二、在YOLO v
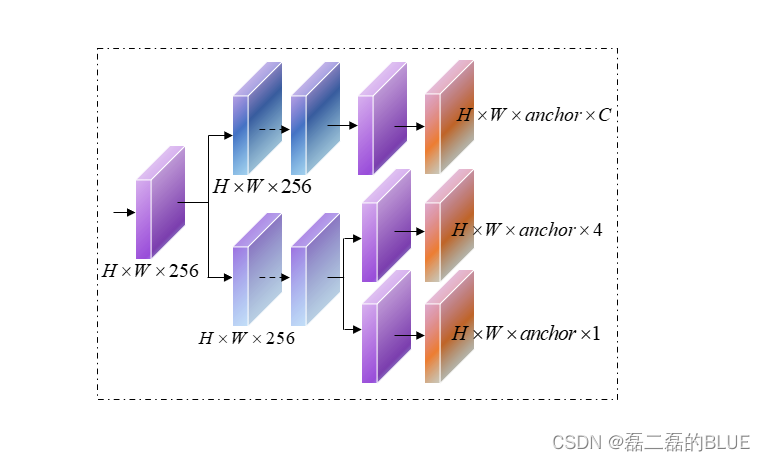
在 YOLO x中,使用了解耦头部的方法,从而加快网络收敛速度和提高精度,因此解耦头被广泛应用于目标检测算法任务中。因此也想在YOLO v5的检测头部引入了解耦头部的方法,从而来提高检测精度和加快网络收敛,但这里与 YOLO x 解耦头部使用的检测方法稍微不同,在YOLO v5中引入的解耦头部依旧还是基于 anchor 检测的方法。
在YOLO x中,使用了解耦头部的方法,具体论文请参考:https://arxiv.org/pdf/2107.08430.pdf
于是按照论文中的介绍就可以简单的画出解耦头部,在YOLO v5中引入的解耦头部最终还是基于 anchor 检测的方法。
在common.py文件中加入以下代码。
class DecoupledHead(nn.Module): def __init__(self, ch=256, nc=80, anchors=()): super().__init__() self.nc = nc # number of classes self.nl = len(anchors) # number of detection layers self.na = len(anchors[0]) // 2 # number of anchors self.merge = Conv(ch, 256, 1, 1) self.cls_convs1 = Conv(256, 256, 3, 1, 1) self.cls_convs2 = Conv(256, 256, 3, 1, 1) self.reg_convs1 = Conv(256, 256, 3, 1, 1) self.reg_convs2 = Conv(256, 256, 3, 1, 1) self.cls_preds = nn.Conv2d(256, self.nc * self.na, 1) self.reg_preds = nn.Conv2d(256, 4 * self.na, 1) self.obj_preds = nn.Conv2d(256, 1 * self.na, 1) def forward(self, x): x = self.merge(x) x1 = self.cls_convs1(x) x1 = self.cls_convs2(x1) x1 = self.cls_preds(x1) x2 = self.reg_convs1(x) x2 = self.reg_convs2(x2) x21 = self.reg_preds(x2) x22 = self.obj_preds(x2) out = torch.cat([x21, x22, x1], 1) return out修改后common.py文件后,需要修改yolo.py文件,主要修改两个部分:
1.在model函数,只需修改一句代码,修改后如下:
if isinstance(m, Detect) or isinstance(m, Decoupled_Detect):在parse_model函数中,修改后代码如下:
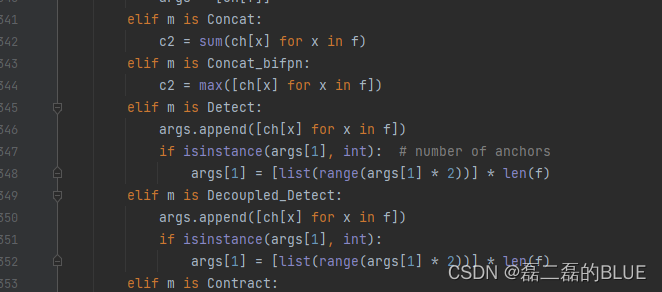
3.在yolo.py增加Decoupled_Detect代码
class Decoupled_Detect(nn.Module): stride = None # strides computed during build onnx_dynamic = False # ONNX export parameter export = False # export mode def __init__(self, nc=80, anchors=(), ch=(), inplace=True): # detection layer super().__init__() self.nc = nc # number of classes self.no = nc + 5 # number of outputs per anchor self.nl = len(anchors) # number of detection layers self.na = len(anchors[0]) // 2 # number of anchors self.grid = [torch.zeros(1)] * self.nl # init grid self.anchor_grid = [torch.zeros(1)] * self.nl # init anchor grid self.reGISter_buffer('anchors', torch.tensor(anchors).float().view(self.nl, -1, 2)) # shape(nl,na,2) self.m = nn.ModuleList(DecoupledHead(x, nc, anchors) for x in ch) self.inplace = inplace # use in-place ops (e.g. slice assignment) def forward(self, x): z = [] # inference output for i in range(self.nl): x[i] = self.m[i](x[i]) # conv bs, _, ny, nx = x[i].shape # x(bs,255,20,20) to x(bs,3,20,20,85) x[i] = x[i].view(bs, self.na, self.no, ny, nx).permute(0, 1, 3, 4, 2).contiguous() if not self.training: # inference if self.onnx_dynamic or self.grid[i].shape[2:4] != x[i].shape[2:4]: self.grid[i], self.anchor_grid[i] = self._make_grid(nx, ny, i) y = x[i].sigmoid() if self.inplace: y[..., 0:2] = (y[..., 0:2] * 2 + self.grid[i]) * self.stride[i] # xy y[..., 2:4] = (y[..., 2:4] * 2) ** 2 * self.anchor_grid[i] # wh else: # for YOLOv5 on AWS Inferentia Https://GitHub.com/ultralytics/yolov5/pull/2953 xy, wh, conf = y.split((2, 2, self.nc + 1), 4) # y.tensor_split((2, 4, 5), 4) # torch 1.8.0 xy = (xy * 2 + self.grid[i]) * self.stride[i] # xy wh = (wh * 2) ** 2 * self.anchor_grid[i] # wh y = torch.cat((xy, wh, conf), 4) z.append(y.view(bs, -1, self.no)) return x if self.training else (torch.cat(z, 1),) if self.export else (torch.cat(z, 1), x) def _make_grid(self, nx=20, ny=20, i=0): d = self.anchors[i].device t = self.anchors[i].dtype shape = 1, self.na, ny, nx, 2 # grid shape y, x = torch.arange(ny, device=d, dtype=t), torch.arange(nx, device=d, dtype=t) if check_version(torch.__version__, '1.10.0'): # torch>=1.10.0 meshgrid workaround for torch>=0.7 compatibility yv, xv = torch.meshgrid(y, x, indexing='ij') else: yv, xv = torch.meshgrid(y, x) grid = torch.stack((xv, yv), 2).expand(shape) - 0.5 # add grid offset, i.e. y = 2.0 * x - 0.5 anchor_grid = (self.anchors[i] * self.stride[i]).view((1, self.na, 1, 1, 2)).expand(shape) return grid, anchor_grid在model函数中,修改Build strides, anchors部分代码,修改后代码如下:
# Build strides, anchors m = self.model[-1] # Detect() if isinstance(m, Detect) or isinstance(m, Decoupled_Detect): s = 256 # 2x min stride m.inplace = self.inplace m.stride = torch.tensor([s / x.shape[-2] for x in self.forward(torch.zeros(1, ch, s, s))]) # forward check_anchor_order(m) # must be in pixel-space (not grid-space) m.anchors /= m.stride.view(-1, 1, 1) self.stride = m.stride # self._initialize_biases() # only run once try : self._initialize_biases() # only run once LOGGER.info('initialize_biases done') except : LOGGER.info('decoupled no biase ') initialize_weights(self) self.info() LOGGER.info('')在模型的yaml文件中,修改最后一层检测的头的结构,我修改yolo v5s模型的最后一层检测结构如下:
[[17, 20, 23], 1, Decoupled_Detect, [nc, anchors]], # Detect(P3, P4, P5)至于单独的增加解耦头部,我还没有对自己的数据集进行单独的训练,一般都是解耦头部和其他模型结合在一起进行训练,如果后期在训练的时候map有提升的话,我在把实验结果放在上面,最近也在跑实验结果对比。
来源地址:https://blog.csdn.net/m0_60890175/article/details/126532372
--结束END--
本文标题: YOLO v5 引入解耦头部
本文链接: https://www.lsjlt.com/news/394756.html(转载时请注明来源链接)
有问题或投稿请发送至: 邮箱/279061341@qq.com QQ/279061341
下载Word文档到电脑,方便收藏和打印~
2024-03-01
2024-03-01
2024-03-01
2024-02-29
2024-02-29
2024-02-29
2024-02-29
2024-02-29
2024-02-29
2024-02-29
回答
回答
回答
回答
回答
回答
回答
回答
回答
回答


官方手机版

微信公众号

商务合作


0