Author:think 一、部署Nginx 若读者没有部署安装Nginx,则可以参考下面这篇文章进行安装。 CentOS 7非编译安装Nginx_think_mzs的博客-CSDN博客
Author:think
若读者没有部署安装Nginx,则可以参考下面这篇文章进行安装。
通过上面的方法安装的Nginx,其配置文件在/etc/nginx/目录下,如下图所示。

其中nginx.conf为Nginx的主要配置文件,在conf.d文件夹中还存在着其他配置文件,通过nginx.conf文件中的include语句导入至Nginx中。
nginx.conf文件内容如下所示。
user nginx;worker_processes 1;error_log /var/log/nginx/error.log warn;pid /var/run/nginx.pid;events { worker_connections 1024;}Http { include /etc/nginx/mime.types; default_type application/octet-stream; log_fORMat main '$remote_addr - $remote_user [$time_local] "$request" ' '$status $body_bytes_sent "$http_referer" ' '"$http_user_agent" "$http_x_forwarded_for"'; access_log /var/log/nginx/access.log main; sendfile on; #tcp_nopush on; keepalive_timeout 65; #gzip on; include /etc/nginx/conf.d/*.conf;}第31行语句表示将
/etc/nginx/conf.d/目录下的所有.conf文件包含至配置文件中。因此我们可以在conf.d目录下创建我们项目的配置文件。
在conf.d目录下默认拥有一份配置文件:default.conf,其内容如下:
server { listen 80; server_name localhost; #charset koi8-r; #access_log /var/log/nginx/host.access.log main; location / { root /usr/share/nginx/html; index index.html index.htm; } #error_page 404 /404.html; # redirect server error pages to the static page /50x.html # error_page 500 502 503 504 /50x.html; location = /50x.html { root /usr/share/nginx/html; } # proxy the PHP scripts to Apache listening on 127.0.0.1:80 # #location ~ \.php$ { # proxy_pass http://127.0.0.1; #} # pass the PHP scripts to FastCGI server listening on 127.0.0.1:9000 # #location ~ \.php$ { # root html; # fastcgi_pass 127.0.0.1:9000; # fastcgi_index index.php; # fastcgi_param SCRIPT_FILENAME /scripts$fastcgi_script_name; # include fastcgi_params; #} # deny access to .htaccess files, if Apache's document root # concurs with nginx's one # #location ~ /\.ht { # deny all; #}}这一整个配置文件代表着一个服务,其中第
2行listen 80表示该服务监听80端口。服务的根目录配置位于第
8至第11行,其中root /usr/share/nginx/html;表示服务所在的目录。第10行的index index.html index.htm;代表支持的首页文件。
项目1的index.html文件内容如下。
DOCTYPE html><html><head><meta charset="utf-8"><title>thinktitle>head><body><h1>这是项目1首页h1>body>html>项目2的index.html文件内容如下。
DOCTYPE html><html><head><meta charset="utf-8"><title>thinktitle>head><body><h1>这是项目2首页h1>body>html>以上两个index.html文件分别代表两个WEB项目作为演示。
使用Xftp将两个项目上传至Nginx的web目录下。
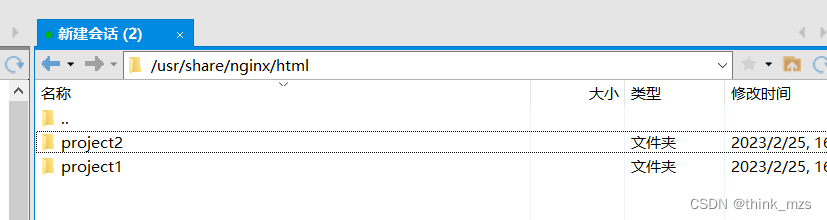
两个index.html页面分别存放在project1和project2文件夹中。
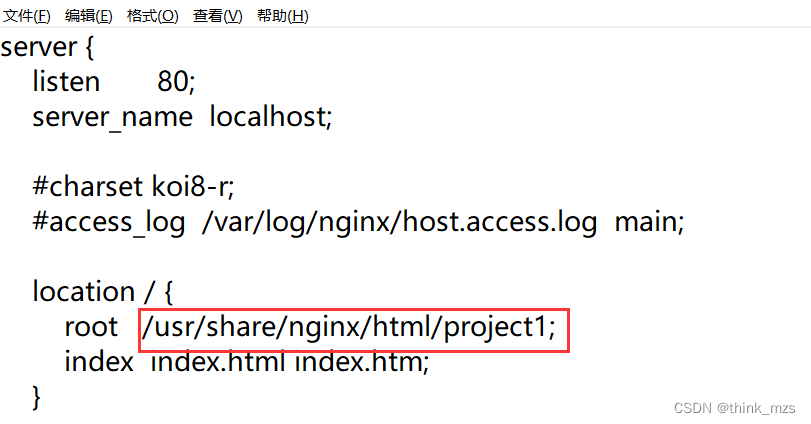
项目1我们使用80端口进行发布,因此我们需要修改default.conf文件中的web目录为/usr/share/nginx/html/project1,如下图所示。
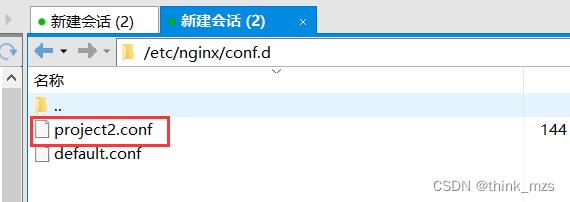
项目2我们使用8080端口进行发布,因此我们需要在conf.d目录中新建一个配置文件:project2.conf。
配置文件名称可以自己定义,但必须是
.conf文件!
project2.conf文件内容如下所示。
server { listen 8080; location / { root /usr/share/nginx/html/project2; index index.html index.htm; }}使用命令nginx -s reload使得配置文件生效。
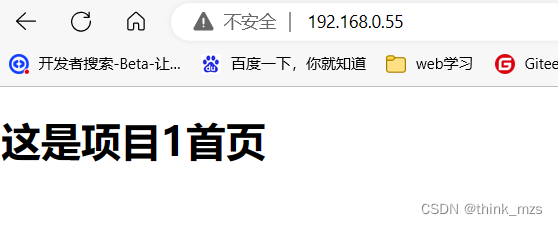
我的服务器ip为:192.168.0.55,因此我访问http://192.168.0.55即可访问到项目1。
访问http://192.168.0.55:8080即可访问到项目2首页。

注意:如果服务器没有开启
8080端口,那么直接访问8080防火墙将会被服务器的防火墙所拦截。因此,当发现访问项目2时出现无法访问,则依次执行以下命令开启8080端口。
防火墙开启
8080端口firewall-cmd --zone=public --add-port=5672/tcp --permanent使防火墙配置立即生效。
firewall-cmd --reload
若是需要进行反向代理,则是需要使用如下配置。
server { listen 80; server_name localhost; #charset koi8-r; #access_log /var/log/nginx/host.access.log main; location / { #开启代理功能,因为.net core的默认端口为5000,因此这里设置成5000,如遇变化则该处端口配置也要变化 proxy_pass http://localhost:5000; } error_page 404 /404.html; # redirect server error pages to the static page /50x.html # error_page 500 502 503 504 /50x.html; location = /50x.html { root /usr/share/nginx/html; }}方向代理配置完成之后,通过
80端口访问服务器,该请求将会被重定向至服务器中的监听5000端口的服务。
至此,使用Nginx发布两个或者多个项目的教程已经结束。若还有其他项目,则可以按照project2的配置方式新建配置文件进行发布即可。
来源地址:https://blog.csdn.net/MZS2254399401/article/details/129217794
--结束END--
本文标题: Nginx分端口部署两个或多个项目(包含反向代理配置)
本文链接: https://www.lsjlt.com/news/402585.html(转载时请注明来源链接)
有问题或投稿请发送至: 邮箱/279061341@qq.com QQ/279061341
下载Word文档到电脑,方便收藏和打印~
2024-04-29
2024-04-18
2024-04-17
2024-04-11
2024-04-08
2024-04-08
2024-04-03
2024-03-15
2024-03-15
2024-03-11
回答
回答
回答
回答
回答
回答
回答
回答
回答
回答


官方手机版

微信公众号

商务合作


0