文章目录 一、环境准备二、下载Android源码(1) 安装python(2)安装Git & 配置Git信息(3)安装curl(4) 下载repo(5)创建源码存放目录(6)初始化仓库(7)
ubuntu18.04
内存至少12G RAM
硬盘空间至少200GB
apt-get install Python (Repo 是基于 Python 2.x 中的特定功能构建的,与 Python 3 不兼容。要使用 Repo,请安装 Python 2.x:)sudo apt-get install git git config --global user.name (Your Name)git config --global user.email (you@example.com)sudo apt-get install curlcurl https://mirrors.tuna.tsinghua.edu.cn/git/git-repo > ~/bin/repochmod a+x ~/bin/repoexport PATH=~/bin:$PATH mkdir /home/ubuntu/aosp (根据实际情况来新建目录) cd /home/ubuntu/aosprepo init -u https://aosp.tuna.tsinghua.edu.cn/platfORM/manifestrepo init -u Https://aosp.tuna.tsinghua.edu.cn/platform/manifest -b android-9.0.0_r46repo sync (等待源代码下载完成,长时间等待,若失败请检查网络等情况)sudo apt-get install openjdk-8-jdk (安装不成功检查ubuntu是否换源、是否有更新软件包列表)sudo apt-get install -y git flex bison gperf build-essential libncurses5-dev:i386 sudo apt-get install libx11-dev:i386 libreadline6-dev:i386 libgl1-mesa-dev g++-multilib sudo apt-get install tofrodos python-markdown libxml2-utils xsltproc zlib1g-dev:i386 sudo apt-get install dpkg-dev libsdl1.2-dev libesd0-devsudo apt-get install git-core gnupg flex bison gperf build-essentialsudo apt-get install zip curl zlib1g-dev GCc-multilib g++-multilib sudo apt-get install libc6-dev-i386 sudo apt-get install lib32ncurses5-dev x11proto-core-dev libx11-dev sudo apt-get install lib32z-dev ccachesudo apt-get install libgl1-mesa-dev libxml2-utils xsltproc unzip m4sudo apt install vimexport USE_CCACHE=1 (在你home主目录的.bashrc中加入)export CCACHE_DIR=/home/ubuntu/.ccache (指定一个缓存目录,也可以不指定,默认目录为你当前用户目录下的.ccache)aosp/prebuilts/misc/linux-x86/ccache/ccache -M 50G (这个命令在Android源码中,缓存大小按照自己的硬盘来适当调整)source ~/.bashrc (source命令使修改立即生效)a. 查看源代码标记和 build版本,用于查看下载适合的驱动版本。
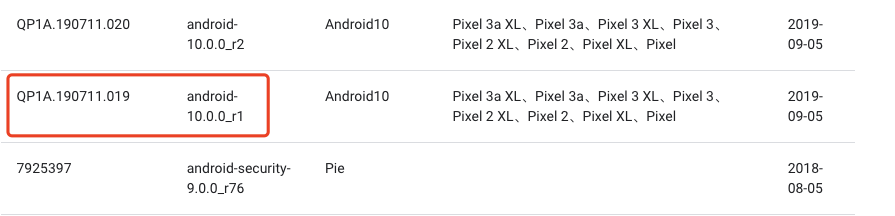
b. 从上图可知要下载QP1A.190711.019的驱动(这里以piexl 2、android10.0.0_r1为例,请按照实际情况下载),查找驱动并下载。
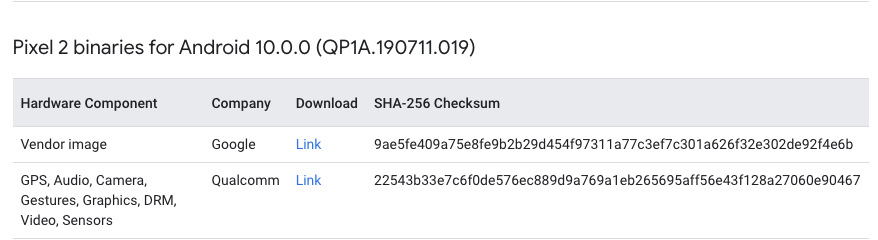
c. 将下载的文件解压放在源码根目录,授权执行sh文件,运行后,会提示你查看证书,按Enter键一行行的查看,出现输入提示时,输入 I ACCEPT,解压到了vendor 目录下
./extract-Google_devices-sailfish.sh./extract-qcom-sailfish.shsource build/envsetup.shlunchlunch 47 (lunch选定的版本按照实际情况来)make -j16 (和cpu有关,适当调整数字)#### build completed successfully (01:35:28 (hh:mm:ss)) ####当给真机编译好系统后,可以在/aosp/out/host/linux-x86/bin目录下找到fastboot工具
编译出的系统镜像所在目录
export Android_PRODUCT_OUT=/home/jhan/aosp/out/target/product/sailfishfastboot flashall -w (手机要解BL锁且进入bootloader后执行此命令)报错点往上找“/bin/bash”
https://www.yisu.com/zixun/366049.html
来源地址:https://blog.csdn.net/u010671061/article/details/132843269
--结束END--
本文标题: Android 系统源码编译
本文链接: https://www.lsjlt.com/news/406860.html(转载时请注明来源链接)
有问题或投稿请发送至: 邮箱/279061341@qq.com QQ/279061341
下载Word文档到电脑,方便收藏和打印~
2024-01-21
2023-10-28
2023-10-28
2023-10-27
2023-10-27
2023-10-27
2023-10-27
回答
回答
回答
回答
回答
回答
回答
回答
回答
回答


官方手机版

微信公众号

商务合作


0