项目中,在列表向上滚动时,有时需要将某个控件置顶,这就是我们常见的吸顶效果。 1. UITableView 吸顶效果 UITableView是自带吸顶效果,我们把需要置顶的控件设置为SectionHe
项目中,在列表向上滚动时,有时需要将某个控件置顶,这就是我们常见的吸顶效果。
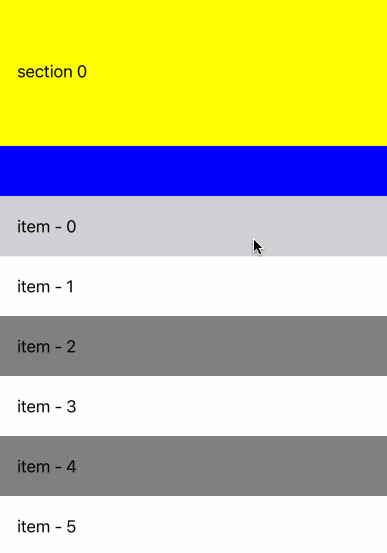
UITableView是自带吸顶效果,我们把需要置顶的控件设置为SectionHeaderView,这样在滚动时,该控件会自动置顶。
- (UITableView *)tableView { if (!_tableView) { _tableView = [[UKNestedTableView alloc] init]; _tableView.bounces = NO; _tableView.showsVerticalScrollIndicator = NO; _tableView.delegate = self; _tableView.dataSource = self; [_tableView reGISterClass:[UITableViewCell class] forCellReuseIdentifier:@"CellId"]; } return _tableView;}#pragma mark - UITableViewDataSource -- (NSInteger)numberOfSectionsInTableView:(UITableView *)tableView { return 2;}- (NSInteger)tableView:(UITableView *)tableView numberOfRowsInSection:(NSInteger)section { if (section == 0) { return 1; } return 20;}- (CGFloat)tableView:(UITableView *)tableView heightForRowAtIndexPath:(NSIndexPath *)indexPath { if (indexPath.section == 0) { return 150; } return 60;}- (UIView *)tableView:(UITableView *)tableView viewForHeaderInSection:(NSInteger)section { if (section == 1) { UIView *headerView = [[UIView alloc] initWithFrame:CGRectMake(0, 0, kScreenWidth, 50)]; headerView.backgroundColor = [UIColor blueColor]; return headerView; } return nil;}- (CGFloat)tableView:(UITableView *)tableView heightForHeaderInSection:(NSInteger)section { if (section == 1) { return 50; } return 0;}- (UITableViewCell *)tableView:(UITableView *)tableView cellForRowAtIndexPath:(NSIndexPath *)indexPath { UITableViewCell *cell = [tableView dequeueReusableCellWithIdentifier:@"CellId" forIndexPath:indexPath]; if (indexPath.section == 0) { cell.backgroundColor = [UIColor yellowColor]; cell.textLabel.text = @"section 0"; } else { if (indexPath.row % 2 == 0) { cell.backgroundColor = [UIColor grayColor]; } else { cell.backgroundColor = [UIColor whiteColor]; } cell.textLabel.text = [NSString stringWithFORMat:@"item - %ld", indexPath.row]; } return cell;}自定义UKNestedTableView
@implementation UKNestedTableView- (instancetype)init { self = [super initWithFrame:CGRectZero style:UITableViewStylePlain]; if (self) { self.backgroundColor = [UIColor whiteColor]; self.separatorColor = [UIColor clearColor]; self.separatorStyle = UITableViewCellSeparatorStyleNone; if (@available(iOS 11.0, *)) { self.contentInsetAdjustmentBehavior = UIScrollViewContentInsetAdjustmentNever; } self.estimatedRowHeight = 0.000; self.estimatedSectionHeaderHeight = 0.000; self.estimatedSectionFooterHeight = 0.000; if (@available(iOS 13.0,*)) { self.automaticallyAdjustsScrollIndicatorInsets = NO; } if (@available(iOS 15.0,*)) { // 去除表格头留白 self.sectionHeaderTopPadding = YES; } } return self;}@end效果如下
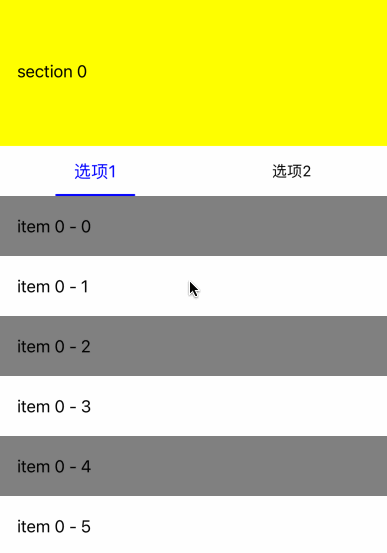
UITableView的吸顶效果能满足部分的要求,但在实际应用中,需要置顶的往往是一些标签页,对应的也是多个列表。
我们用UKTabView作为置顶的控件,并对应多个内容。
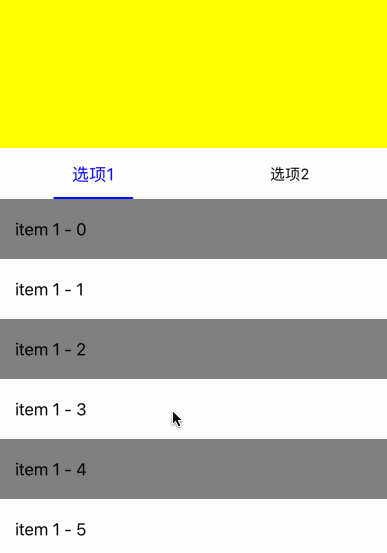
- (UKTabView *)tabView { if (!_tabView) { _tabView = [[UKTabView alloc] initWithFrame:CGRectMake(0, 0, kScreenWidth, 50)]; [_tabView setIndicatorWidth:80 height:2 radius:1 color:[UIColor blueColor]]; UKCustomTabItemView *tabItemView1 = [[UKCustomTabItemView alloc] init]; [tabItemView1 setText:@"选项1"]; [_tabView addItemView:tabItemView1]; UKCustomTabItemView *tabItemView2 = [[UKCustomTabItemView alloc] init]; [tabItemView2 setText:@"选项2"]; [_tabView addItemView:tabItemView2]; _tabView.delegate = self; [_tabView setSelection:0]; } return _tabView;}- (UIView *)tableView:(UITableView *)tableView viewForHeaderInSection:(NSInteger)section { if (section == 1) { return self.tabView; } return nil;}- (UITableViewCell *)tableView:(UITableView *)tableView cellForRowAtIndexPath:(NSIndexPath *)indexPath { UITableViewCell *cell = [tableView dequeueReusableCellWithIdentifier:@"CellId" forIndexPath:indexPath]; if (indexPath.section == 0) { cell.backgroundColor = [UIColor yellowColor]; cell.textLabel.text = @"section 0"; } else { if (indexPath.row % 2 == 0) { if (self.selection == 0) { cell.backgroundColor = [UIColor grayColor]; } else { cell.backgroundColor = [UIColor darkGrayColor]; } } else { cell.backgroundColor = [UIColor whiteColor]; } cell.textLabel.text = [NSString stringWithFormat:@"item %ld - %ld", self.selection, indexPath.row]; } return cell;}#pragma mark - UKTabViewDelegate -- (void)onTabViewSelected:(UKTabView *)tabView position:(NSInteger)position { self.selection = position; [self.tableView reloadData];}效果如下
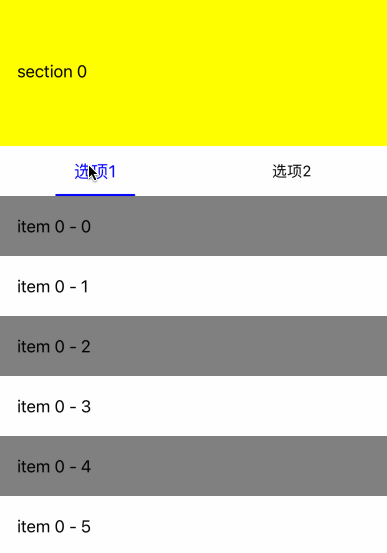
上述的方法简单地实现了标签页置顶和选项卡切换功能,但由于我们只能共用一个列表,所以会发生两个标签页都滚动的现象。
为此,我们需要优化滚动的偏移,首先在滚动结束时记录偏移量,然后在切换标签页时设置原有的偏移量。
@property(nonatomic, assign) NSInteger selection;@property(nonatomic, assign) CGFloat tab1Offset;@property(nonatomic, assign) CGFloat tab2Offset;// 拖动结束- (void)scrollViewDidEndDragging:(UIScrollView *)scrollView willDecelerate:(BOOL)decelerate { NSLog(@"scrollViewDidEndDragging"); [self recordOffset:scrollView];}// 滚动结束- (void)scrollViewDidEndDecelerating:(UIScrollView *)scrollView { NSLog(@"scrollViewDidEndDecelerating"); [self recordOffset:scrollView];}- (void)recordOffset:(UIScrollView *)scrollView { if (self.selection == 0) { self.tab1Offset = scrollView.contentOffset.y; NSLog(@"tab1Offset = %.2f", self.tab1Offset); } else if (self.selection == 1) { self.tab2Offset = scrollView.contentOffset.y; NSLog(@"tab2Offset = %.2f", self.tab2Offset); }}在切换标签页时,设置实际的偏移量
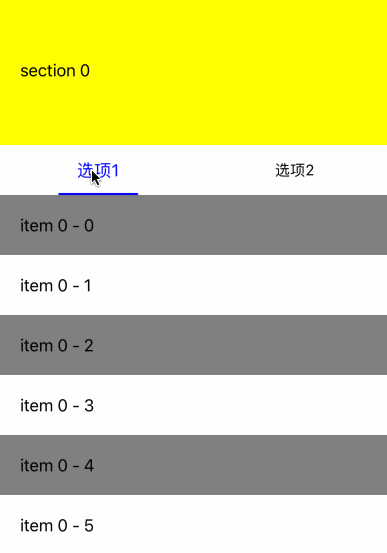
- (void)onTabViewSelected:(UKTabView *)tabView position:(NSInteger)position { self.selection = position; [self.tableView reloadData]; // 有时设置tableView.contentOffset无效,需要提前刷新 [self.tableView layoutIfNeeded]; if (position == 0) { self.tableView.contentOffset = CGPointMake(0, self.tab1Offset); } else if (position == 1) { self.tableView.contentOffset = CGPointMake(0, self.tab2Offset); }}效果如下
虽然我们记录了原有的偏移量,但从实际的效果来看,切换时TabView会在同样的位置,闪烁比较严重。为此,我们需要尽量保持TabView的位置。
- (void)onTabViewSelected:(UKTabView *)tabView position:(NSInteger)position { self.selection = position; [self.tableView reloadData]; [self.tableView layoutIfNeeded]; if (position == 0) { self.tab1Offset = [self getDestOffset:self.tab1Offset originOffset:self.tab2Offset]; self.tableView.contentOffset = CGPointMake(0, self.tab1Offset); } else if (position == 1) { self.tab2Offset = [self getDestOffset:self.tab2Offset originOffset:self.tab1Offset]; self.tableView.contentOffset = CGPointMake(0, self.tab2Offset); }}// 如果TabView已经置顶,切换时保持置顶。// 1、如果切换后的内容已经置顶,保持原有效果// 2、如果切换后的内容没有置顶,修改切换后的内容为置顶// 如果TabView没有制度,切换后保持一致- (CGFloat)getDestOffset:(CGFloat)destOffset originOffset:(CGFloat)originOffset { if (originOffset >= 150) { if (destOffset >= 150) { return destOffset; } else { return 150; } } else { return originOffset; }}效果如下
虽然现在的方案已经解决了大部分的需求,但还是留下了一点瑕疵,
UIScrollView显示UKTableView保持位置不变,不能完全保证内容的偏移位置。为了尽可能的完善我们的吸顶效果,我们尝试用UITableView+UICollectionView的组合来实现吸顶和左右滑动二种效果。
我们自定义UKNestedScrollView
@interface UKNestedScrollView()@property(nonatomic, strong) NSMutableArray <UITableView *> *contentViewArray;@property(nonatomic, assign) BOOL dragging;@end@implementation UKNestedScrollView- (instancetype)initWithFrame:(CGRect)frame { self = [super initWithFrame:frame]; if (self) { [self setupInitialUI]; } return self;}// 设置表头- (void)setHeaderView:(UIView *)headerView { self.tableView.tableHeaderView = headerView; self.headerHeight = headerView.frame.size.height;}// 添加标签页和内容- (void)addTabView:(UKTabItemView *)itemView contentView:(UITableView *)contentView { [self.tabView addItemView:itemView]; [self.contentViewArray addObject:contentView]; [self.collectionView reloadData];}- (void)setupInitialUI { // UKNestedScrollView包含一个UITableView [self addSubview:self.tableView]; [self.tableView mas_makeConstraints:^(MASConstraintMaker *make) { make.left.right.top.bottom.equalTo(self); }];}- (UITableView *)tableView { if (!_tableView) { _tableView = [[UKNestedTableView alloc] init]; _tableView.bounces = NO; _tableView.showsVerticalScrollIndicator = NO; _tableView.delegate = self; _tableView.dataSource = self; [_tableView registerClass:[UITableViewCell class] forCellReuseIdentifier:@"CellId"]; } return _tableView;}- (UITableView *)tableView { if (!_tableView) { _tableView = [[UKNestedTableView alloc] init]; _tableView.bounces = NO; _tableView.showsVerticalScrollIndicator = NO; _tableView.delegate = self; _tableView.dataSource = self; [_tableView registerClass:[UITableViewCell class] forCellReuseIdentifier:@"CellId"]; } return _tableView;}// SectionHeaderView包含UKTabView和UICollectionView- (UIView *)sectionHeaderView { if (!_sectionHeaderView) { _sectionHeaderView = [[UIView alloc] initWithFrame:self.frame]; [_sectionHeaderView addSubview:self.tabView]; [_sectionHeaderView addSubview:self.collectionView]; } return _sectionHeaderView;}- (UKTabView *)tabView { if (!_tabView) { _tabView = [[UKTabView alloc] initWithFrame:CGRectMake(0, 0, self.frame.size.width, 50)]; [_tabView setIndicatorWidth:80 height:2 radius:1 color:[UIColor blueColor]]; _tabView.delegate = self; } return _tabView;}- (UICollectionView *)collectionView { if (!_collectionView) { UICollectionViewFlowLayout *layout = [[UICollectionViewFlowLayout alloc] init]; layout.scrollDirection = UICollectionViewScrollDirectionHorizontal; layout.itemSize = CGSizeMake(self.frame.size.width, self.frame.size.height - 50); layout.minimumLineSpacing = CGFLOAT_MIN; layout.minimumInteritemSpacing = CGFLOAT_MIN; _collectionView = [[UICollectionView alloc] initWithFrame:CGRectMake(0, 50, self.frame.size.width, self.frame.size.height - 50) collectionViewLayout:layout]; _collectionView.pagingEnabled = YES; _collectionView.bounces = NO; _collectionView.showsHorizontalScrollIndicator = NO; _collectionView.dataSource = self; _collectionView.delegate = self; [_collectionView registerClass:[UICollectionViewCell class] forCellWithReuseIdentifier:@"CellId"]; } return _collectionView;}#pragma mark - UITableViewDataSource -- (CGFloat)tableView:(UITableView *)tableView heightForHeaderInSection:(NSInteger)section { return self.frame.size.height;}- (UIView *)tableView:(UITableView *)tableView viewForHeaderInSection:(NSInteger)section { return self.sectionHeaderView;}- (NSInteger)tableView:(UITableView *)tableView numberOfRowsInSection:(NSInteger)section { return 0;}- (UITableViewCell *)tableView:(UITableView *)tableView cellForRowAtIndexPath:(NSIndexPath *)indexPath { return [[UITableViewCell alloc] init];}#pragma mark - UICollectionViewDataSource -- (NSInteger)collectionView:(UICollectionView *)collectionView numberOfItemsInSection:(NSInteger)section { return self.contentViewArray.count;}- (__kindof UICollectionViewCell *)collectionView:(UICollectionView *)collectionView cellForItemAtIndexPath:(NSIndexPath *)indexPath { UICollectionViewCell *cell = [collectionView dequeueReusableCellWithReuseIdentifier:@"CellId" forIndexPath:indexPath]; UITableView *contentView = self.contentViewArray[indexPath.row]; [contentView removeFromSuperview]; [cell.contentView addSubview:contentView]; [contentView mas_makeConstraints:^(MASConstraintMaker *make) { make.left.right.top.bottom.equalTo(cell.contentView); }]; return cell;}#pragma mark - UIScrollViewDelegate -- (void)scrollViewWillBeginDragging:(UIScrollView *)scrollView { if (scrollView == self.collectionView) { self.dragging = YES; }}- (void)scrollViewDidScroll:(UIScrollView *)scrollView { if (scrollView == self.collectionView) { if (self.dragging) { CGFloat width = scrollView.contentOffset.x; NSInteger page = width/self.frame.size.width + 0.5; [self.tabView setSelection:page offsetRatio:(width/self.frame.size.width - page)]; } }}- (void)scrollViewDidEndDecelerating:(UIScrollView *)scrollView { if (scrollView == self.collectionView) { CGFloat width = scrollView.contentOffset.x; NSInteger page = width/self.frame.size.width + 0.5; [self.tabView setSelection:page]; self.dragging = NO; }}- (void)scrollViewDidEndDragging:(UIScrollView *)scrollView willDecelerate:(BOOL)decelerate { if (scrollView == self.collectionView && !decelerate) { CGFloat width = scrollView.contentOffset.x; NSInteger page = width/self.frame.size.width + 0.5; [self.tabView setSelection:page]; self.dragging = NO; }} #pragma mark - UKTabViewDelegate -- (void)onTabViewSelected:(UKTabView *)tabView position:(NSInteger)position { [self collectionViewScrollToPosition:position];}为了让UICollectionView内的手势能被UITableView接收,需要在UKNestedTableView里面加上
- (BOOL)gestureRecognizer:(UIGestureRecognizer *)gestureRecognizer shouldRecognizeSimultaneouslyWithGestureRecognizer:(UIGestureRecognizer *)otherGestureRecognizer { return YES;}显示如下

我们可以看到当列表滑动时,两个列表都在滑动,而且里面的内容的滑动更快。这主要是因为例外两个列表都在滑动,所以里面的列表其实是两个滑动距离相加,所有我们需要在外面列表滑动时,禁止里面列表的滑动。
if (scrollView == self.tableView) { self.offset = self.tableView.contentOffset.y; // changed表示外面列表在滑动 self.changed = YES;} else { NSInteger position = 0; for (UIScrollView *contentView in self.contentViewArray) { if (contentView == scrollView) { // 如果外面列表滑动,禁止里面列表滑动事件 if (self.changed) { scrollView.contentOffset = CGPointMake(0, [self.offsetArray[position] floatValue]); self.changed = NO; } else { // 记录当前页面偏移量,方便后面禁止事件 self.offsetArray[position] = [NSNumber numberWithFloat:scrollView.contentOffset.y]; } break; } position++; }}效果如下
现在的效果已经基本满足了我们的需求,有吸顶效果、能左右滑动、能记录列表偏移量,内容滑动时也比较平顺了。
最后我们尝试了一下下拉时控制内容先下拉,也许后面有用
if (scrollView == self.tableView) { self.originOffset = self.offset; self.offset = self.tableView.contentOffset.y; self.changed = YES;} else { NSInteger position = 0; for (UIScrollView *contentView in self.contentViewArray) { if (contentView == scrollView) {CGFloat scrollViewOffset = scrollView.contentOffset.y - [self.offsetArray[position] floatValue]; if (scrollViewOffset > 0) { if (self.changed) { scrollView.contentOffset = CGPointMake(0, [self.offsetArray[position] floatValue]); self.changed = NO; } else { self.offsetArray[position] = [NSNumber numberWithFloat:scrollView.contentOffset.y]; } } else if (scrollViewOffset < 0) { if (self.changed) { self.offset = self.originOffset; self.tableView.delegate = nil; self.tableView.contentOffset = CGPointMake(0, self.offset); self.tableView.delegate = self; self.changed = NO; } self.offsetArray[position] = [NSNumber numberWithFloat:scrollView.contentOffset.y]; } break; } position++; }}来源地址:https://blog.csdn.net/chennai1101/article/details/130131507
--结束END--
本文标题: iOS 吸顶效果
本文链接: https://www.lsjlt.com/news/411287.html(转载时请注明来源链接)
有问题或投稿请发送至: 邮箱/279061341@qq.com QQ/279061341
下载Word文档到电脑,方便收藏和打印~
2024-06-03
2024-06-03
2024-06-04
2024-06-03
2024-06-03
2024-06-03
2024-06-03
2024-06-04
2024-06-03
2024-06-03
回答
回答
回答
回答
回答
回答
回答
回答
回答
回答


官方手机版

微信公众号

商务合作


0