广告
返回顶部
首页 > 资讯 > 后端开发 > Python >【Python】Python项目打包发布(四)(基于Nuitka打包PySide6项目)
  • 781
分享到

【Python】Python项目打包发布(四)(基于Nuitka打包PySide6项目)

pythonlinux开发语言 2023-10-06 08:10:34 781人浏览 泡泡鱼

Python 官方文档:入门教程 => 点击学习

摘要

python项目打包发布汇总 【Python】Python项目打包发布(一)(基于Pyinstaller打包多目录项目) 【Python】Python项目打包发布(二)(基于Pyinstaller打包

python项目打包发布汇总

【Python】Python项目打包发布(一)(基于Pyinstaller打包多目录项目)
【Python】Python项目打包发布(二)(基于Pyinstaller打包PyWebIO项目)
【Python】Python项目打包发布(三)(基于Aardio打包多目录项目)
【Python】Python项目打包发布(四)(基于Nuitka打包PySide6项目)
【Python】Python项目打包发布(五)(制作Windows安装包)

说明

nuitka是一个可以将Python代码转换为c++代码并编译为可执行文件或扩展模块的工具
Nuitka官网
Nuitka官网中文
Nuitka中文

python环境准备

python venv

python venv是一个用于创建和管理虚拟环境的模块。虚拟环境是一种可以在系统中隔离安装Python包的方法,避免与其他项目或系统级别的包发生冲突。

使用python venv的基本步骤如下:

  • 创建虚拟环境:使用python -m venv 命令,在指定的目录下创建一个虚拟环境,该目录会包含一个Python解释器和一些支持文件。通常,可以将虚拟环境命名为 .venv ,这样可以在终端中隐藏它,并且表明它的用途。
  • 激活虚拟环境:使用source /bin/activate命令(linuxMacOS)或call \Scripts\activate.bat命令(windows)来激活虚拟环境。这样,就可以在虚拟环境中使用 pip 安装或卸载所需的包了。
  • 退出虚拟环境:使用deactivate命令来退出虚拟环境。这样,就可以恢复到系统级别的Python解释器和包了。
  • 删除虚拟环境:如果不再需要某个虚拟环境,可以直接删除它所在的目录即可。

python requirements

激活虚拟环境后,可以创建或使用requirements文件

  • pip freeze > requirements.txt自动生成requirement.txt,执行成功后,会自动生成requirement.txt文件。
  • 更换环境,分享项目的同时,带上requirement.txt文件!方便其他人配置。
  • 安装requirement.txt,执行命令即可一键安装完所需要的第三方库。命令:pip install -r requirements.txt

安装

nutika

python -m pip install -U nuitka

ordered-set

安装“ordered-set’”PyPI包以获得最佳的Python编译性能。
python -m pip install -U ordered-set

GCC 12.2.0 + MinGW64 安装

创建名为 hello.py 的 Python 文件

def talk(message):    return "Talk " + messagedef main():    print(talk("Hello World"))if __name__ == "__main__":    main()

采用python -m nuitka hello.py方式构建,第一次使用会提示下载一个 C 语言缓存工具GCC(以加速重复编译生成的 C 代码)和一个基于 MinGW64 的 C 语言编译器。选择yes,会自动下载,也可以自己下载。
MinGW64 10.0.0 64位下载
MinGW环境配置,请自行百度

nutika参数

nuitka参数有很多,可以使用nuitka --help命令查看
可以分为以下几类:
一般选项:用于指定输入文件、输出文件、日志级别、帮助信息等。
编译选项:用于指定编译器、优化级别、调试信息等。
控制结果中包含的模块和包:用于指定要包含或排除的模块和包,以及是否使用标准库等。
控制结果中包含的数据文件:用于指定要包含或排除的数据文件,以及是否使用资源压缩等。
插件选项:用于启用或禁用一些特定功能的插件,例如Qt、Tkinter、multiprocessing等。
其他选项:用于指定一些其他功能,例如图形界面、生成依赖关系图、检查更新等。
您可以使用 nuitka --help 命令查看所有参数的详细说明。

以下是之前版本参数的参考,最新请自行官网学习

--mingw64 #默认为已经安装的vs2017去编译,否则就按指定的比如mingw(官方建议)--standalone 独立环境,这是必须的(否则拷给别人无法使用)--windows-disable-console 没有CMD控制窗口--output-dir=out 生成exe到out文件夹下面去--show-progress 显示编译的进度,很直观--show-memory 显示内存的占用--include-qt-plugins=sensible,styles 打包后PyQt的样式就不会变了--plugin-enable=qt-plugins 需要加载的PyQt插件--plugin-enable=tk-inter 打包tkinter模块的刚需--plugin-enable=numpy 打包numpy,pandas,matplotlib模块的刚需--plugin-enable=torch 打包PyTorch的刚需--plugin-enable=Tensorflow 打包tensorflow的刚需--windows-icon-from-ico=你的.ico 软件的图标--windows-company-name=Windows下软件公司信息--windows-product-name=Windows下软件名称--windows-file-version=Windows下软件的信息--windows-product-version=Windows下软件的产品信息--windows-file-description=Windows下软件的作用描述--windows-uac-admin=Windows下用户可以使用管理员权限来安装--linux-onefile-icon=Linux下的图标位置--onefile 像pyinstaller一样打包成单个exe文件--include-package=复制比如numpy,PyQt5 这些带文件夹的叫包或者轮子--include-module=复制比如when.py 这些以.py结尾的叫模块

Nuitka打包PySide6

项目结构

项目requirements.txt

beautifulsoup4==4.11.2bs4==0.0.1certifi==2022.12.7charset-nORMalizer==3.0.1idna==3.4Nuitka==1.4.8numpy==1.24.2ordered-set==4.1.0PySide6==6.4.2PySide6-Addons==6.4.2PySide6-Essentials==6.4.2requests==2.28.2shiboken6==6.4.2soupsieve==2.4urllib3==1.26.14

项目结构

  • main.py
  • my_signal.py
  • spyder.py
  • model.py
  • ui_main_window.py
  • 其他配置及数据文件

步骤

set pythonpath=venv\Lib\site-packages
执行命令
nuitka --mingw64 --standalone --windows-disable-console --show-memory --show-progress --plugin-enable=pyside6 --nofollow-import-to=tkinter,mpl_toolkits --plugin-enable=tk-inter --windows-icon-from-ico=loGo.ico --output-dir=o main.py

报错

nuitka.utils.Execution.NuitkaCalledProcessError: Command ‘[‘venv\Scripts\python.exe’, ‘-c’, ‘\\nfrom future import print_function\nfrom future import absolute_import\n\ntry:\n import os, sys\n library_path = os.path.join(“Library”, “bin”) if os.name == “nt” else “lib”\n library_prefix = “mkl_” if os.name == “nt” else “libmkl_”\nexcept ImportError:\n import sys\n sys.exit(38)\nprint(repr([os.path.join(sys.prefix, library_path, filename)\n for filename in os.listdir(os.path.join(sys.prefix, library_path))\n if filename.startswith(library_prefix)]\n))\nprint(“-” * 27)\n’]’ returned non-zero exit status 1. Error was b’Traceback (most recent call last):\r\n File “”, line 13, in \r\nFileNotFoundError: [WinError 3] \xcf\xb5\xcd\xb3\xd5\xd2\xb2\xbb\xb5\xbd\xd6\xb8\xb6\xa8\xb5\xc4\xc2\xb7\xbe\xb6\xa1\xa3: ‘zssw\\venv\\Library\\bin’'.

根据您提供的错误信息,问题似乎出在 FileNotFoundError: [WinError 3]。这意味着程序在尝试访问一个不存在的文件或目录。在这种情况下,它似乎是在寻找 \venv\Library\bin 这个目录,但没有找到。

解决方法:
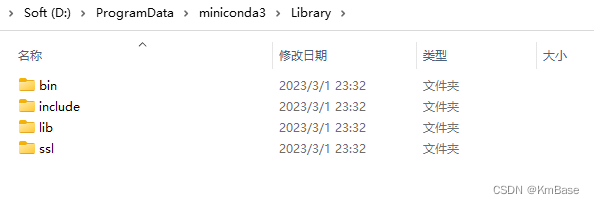
将conda目录下的libary复制到venv下
在这里插入图片描述

QT中icon不显示

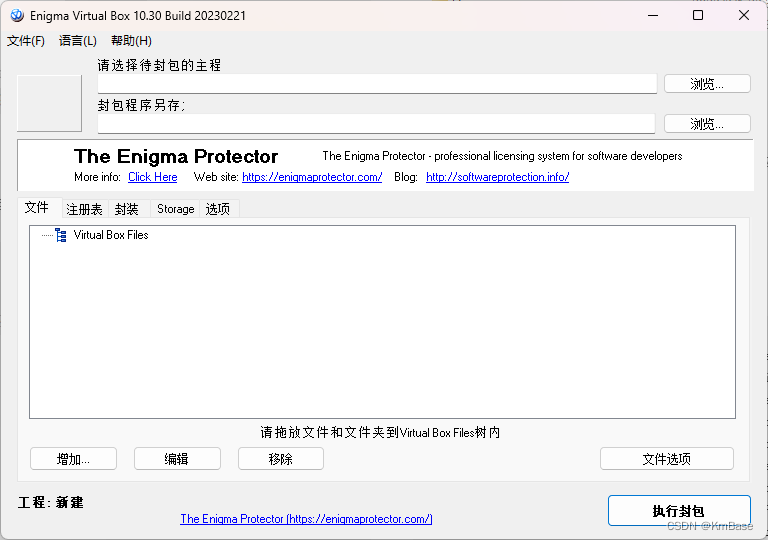
可以在dist文件夹生成之后,将icon文件复制进去,使用EVB封包
在这里插入图片描述

附录

Nuitka中文参数说明

Option:

–help
显⽰此帮助信息并退出
–version
显⽰版本信息和提交 bug 报告所需的重要细节,然后退出。默认关闭。
–module
创建⼀个扩展模块可执⾏⽂件,⽽不是⼀个程序。默认关闭。
–standalone
启⽤独⽴模式输出。这允许您将创建的⼆进制⽂件转移到其他机器上,⽽不需要现有的 Pyth
on 安装。这也意味着它会变⼤。它隐含了这些选项: - follow-imports 和 - python-fla
g=no_site 。默认关闭。
–onefile
在独⽴模式的基础上,启⽤ onefile 模式。这意味着创建并使⽤的不是⼀个⽂件夹,⽽是
⼀个压缩的可执⾏⽂件。默认关闭。
–python-debug
是否使⽤ debug 版本。默认使⽤您⽤来运⾏ Nuitka 的版本,很可能是⾮ debug 版本。
–python-flag=FLAG
要使⽤的 Python 标志。默认是您⽤来运⾏ Nuitka 的标志,这强制执⾏⼀个特定的模式。这些
选 项 也 存 在 于 标 准 Python 可 执 ⾏ ⽂ 件 中 。 当 前 ⽀ 持 的 有 : “-S” ( alias
“no_site”),“static_hashes”(不使⽤散列随机化),“no_warnings”(不给出 Python 运⾏时警
告),“-O” (alias “no_asserts” ),“no_docstrings” (不使⽤⽂档字符串),“-u” (alias
“unbuffered”)和"-m"。默认为空。
–python-for-scons=PATH
如果使⽤ python3.3 或 Python3.4,提供⼀个 Python ⼆进制⽂件的路径供 Scons 使⽤。否则
Nuitka 可以使⽤您⽤来运⾏ Nuitka 的⼆进制⽂件或从 Windows 注册表中获取⼀个 Python 安
装。在 Windows 上需要 Python 3.5或更⾼版本。在⾮ Windows 上,Python 2.6 或 2.7 也可以。

控制结果中包含的模块和包:

–include-package=PACKAGE
包含⼀个完整的包。提供为⼀个 Python 命名空间,例如 " some_package.sub_packag
e “,然后 Nuitka 会找到它,并将其及其下⾯找到的所有模块包含在它创建的⼆进制⽂件或扩
展模块中,并使代码可以导⼊它。为了避免不需要的⼦包,例如测试,您可以这样做” - nofoll
ow-import-to=*.tests "。默认为空。
使⽤这个选项后,所有在 PACKAGE 中被列出来的包,例如 - include-package=av,PySi
de6,faster_whisper,transformers,ctranslate2 ,所有这些包都 将会被完整编译,这将
增加编译时间,同时可能解决⼀部分编译后出现模块或者⼦模块⽆法找到的错误,例如: Model
FoundError 、 importError 、 No model Named XXXX 。
–include-module=MODULE
包含⼀个单⼀的模块。提供为⼀个 Python 命名空间,例如 " some_package.some_modul
e ",然后 Nuitka 会找到它,并将其包含在它创建的⼆进制⽂件或扩展模块中,并使代码可以导
⼊它。默认为空。
–include-plugin-directory=MODULE/PACKAGE
在该⽬录中找到的代码也将被包含,就像它们每个都作为主⽂件给出⼀样。覆盖所有其他包
含选项。您应该更喜欢按名称⽽不是⽂件名的其他包含选项,因为它们通过在“sys.path”中来查
找东西。这个选项仅⽤于⾮常特殊的使⽤案例。可以多次给定。默认为空。
–include-plugin-files=PATTERN
包含匹配 PATTERN 的⽂件。覆盖所有其他 follow 选项。可以多次给出。默认为空。
–prefer-source-code
对于已经编译的扩展模块,如果同时存在源⽂件和扩展模块,通常使⽤扩展模块,但从可⽤
的源代码编译模块性能最佳。如果不需要,使⽤ - no-prefer-source-code 来禁⽤关于此的
警告。默认关闭。

对导⼊模块的跟踪控制:

–follow-imports
递归到所有导⼊的模块。在 - standalone 模式下默认开启,否则关闭。
–follow-import-to=MODULE/PACKAGE
如果使⽤了这个模块,或者如果是⼀个包,跟踪到整个包。可以多次给出。默认为空。
–nofollow-import-to=MODULE/PACKAGE
即使使⽤了也不跟踪这个模块,或者如果是⼀个包,在任何情况下也不跟踪整个包,覆盖所有
其他选项。可以多次给出。默认为空。
–nofollow-imports
完全不递归到任何导⼊的模块,覆盖所有其他包含选项,不能⽤于独⽴模式。默认关闭。
–follow-stdlib
递归到标准库中导⼊的模块。这将极⼤地增加编译时间,⽬前也没有很好地测试过,有时也不
起作⽤。默认关闭。

Onefile 选项:

–onefile-tempdir-spec=ONEFILE_TEMPDIR_SPEC
在 onefile 模式下解压缩到此⽂件夹。默认 ‘%TEMP%/onefile_%PID%_%TIME% ,即⽤
⼾临时⽬录,由于不是静态的,退出时会被删除。例如,使⽤类似’ CACHE_DIR%/%COMPANY%/%
PRODUCT%/%VERSION% 的字符串,这是⼀个很好的静态缓存路径,因此不会被删除。
–onefile-child-grace-time=GRACE_TIME_MS
当停⽌⼦进程时,例如由于 CTRL-C 或关闭等, Python 代码会收到⼀个 KeyboardInte
rrupt ,它可以处理,例如刷新数据。这是在硬关闭⼦进程前的宽限时间(单位毫秒)。默认值
为 。

数据⽂件:

–include-package-data=PACKAGE
包含给定包名的数据⽂件。 DLL 和扩展模块不是数据⽂件,不会像这样包含。可以像下⾯
指⽰的那样使⽤通配符。默认情况下不包含包的数据⽂件,但包配置可以做到这⼀点。这只会包
含⾮ DLL 、⾮扩展模块的实际数据⽂件。冒号后可选地可以给出⼀个⽂件名模式,仅选择匹配
的⽂件。例⼦:
include-package-data=package_name (所有⽂件)
include-package-data=package_name=.txt (仅某种类型)
-include-package-data=package_name=some_filename.dat ( 具 体 ⽂ 件 ) 默 认 为
空。
–include-data-files=DESC
通过发⾏版中的⽂件名包含数据⽂件。有许多允许的形式。
使⽤ - include-data-files=/path/to/file/
.txt=folder_name/some.txt 它会复
制⼀个单⼀⽂件,如果是多个会抱怨。
使⽤ - include-data-files=/path/to/files/.txt=folder_name/ 它会把所有匹配
的⽂件放⼊那个⽂件夹。
要进⾏递归复制,有⼀个带 个值的表单,即 - include-data-files=/path/to/scan=f
older_name=**/
.txt 这会保留⽬录结构。默认为空。
–include-data-dir=DIRECTORY
从发⾏版中包含完整的⽬录中的数据⽂件。这是递归的。如果您想要⾮递归包含,请使⽤带
通配符的 - include-data-files 。⼀个例⼦是 - include-data-dir=/path/some_dir=d
ata/some_dir ,⽤于简单复制整个⽬录。所有⽂件都将被复制,如果您想排除⽂件,您需要事
先将其删除,或使⽤ - noinclude-data-files 选项将其删除。默认为空。
–noinclude-data-files=PATTERN
不要包含匹配给定的⽂件名模式的数据⽂件。这是针对⽬标⽂件名,⽽不是源路径。因此,
要忽略来⾃ package_name 的数据⽂件的⽂件模式,应匹配为 package_name*.txt' that will preserve directory structure. Default empty. --include-data-dir=DIRECTORY Include data files from complete directory in the distribution. This is recursive. Check '--include- data-files' with patterns if you want non-recursive inclusion. An example would be '--include-data- dir=/path/some_dir=data/some_dir' for plain copy, of the whole directory. All files are copied, if you want to exclude files you need to remove them beforehand, or use '--noinclude-data-files' option to remove them. Default empty. --noinclude-data-files=PATTERN Do not include data files matching the filename pattern given. This is against the target filename, not source paths. So to ignore a file pattern from package data for "package_name" should be matched as "package_name/*.txt". Or for the whole directory simply use "package_name". Default empty. --list-package-data=LIST_PACKAGE_DATA Output the data files found for a given package name. Default not done. DLL files: --noinclude-dlls=PATTERN Do not include DLL files matching the filename pattern given. This is against the target filename, not source paths. So ignore a DLL "someDLL" contained in the package "package_name" it should be matched as "package_name/someDLL.*". Default empty. --list-package-dlls=LIST_PACKAGE_DLLS Output the DLLs found for a given package name. Default not done. Control the warnings to be given by Nuitka: --warn-implicit-exceptions Enable warnings for implicit exceptions detected at compile time. --warn-unusual-code Enable warnings for unusual code detected at compile time. --assume-yes-for-downloads Allow Nuitka to download external code if necessary, e.g. dependency walker, ccache, and even gcc on Windows. To disable, redirect input from nul device, e.g. "WEBsite. The mnemonic is the part of the URL at the end, without the html suffix. Can be given multiple times and accepts shell pattern. Default empty. Immediate execution after compilation: --run Execute immediately the created binary (or import the compiled module). Defaults to off. --debugger Execute inside a debugger, e.g. "gdb" or "lldb" to automatically get a stack trace. Defaults to off. --execute-with-pythonpath When immediately executing the created binary or module using '--run', don't reset 'PYTHONPATH' environment. When all modules are successfully included, you ought to not need PYTHONPATH anymore, and definitely not for standalone mode. Compilation choices: --user-package-configuration-file=YAML_FILENAME User provided Yaml file with package configuration. You can include DLLs, remove bloat, add hidden dependencies. Check User Manual for a complete description of the format to use. Can be given multiple times. Defaults to empty. --full-compat Enforce absolute compatibility with CPython. Do not even allow minor deviations from CPython behavior, e.g. not having better tracebacks or exception messages which are not really incompatible, but only different or worse. This is intended for tests only and should *not* be used. --file-reference-choice=MODE Select what value "__file__" is going to be. With "runtime" (default for standalone binary mode and module mode), the created binaries and modules, use the location of themselves to deduct the value of "__file__". Included packages pretend to be in directories below that location. This allows you to include data files in deployments. If you merely seek acceleration, it's better for you to use the "original" value, where the source files location will be used. With "frozen" a notation "" is used. For compatibility reasons, the "__file__" value will always have ".py" suffix independent of what it really is. --module-name-choice=MODE Select what value "__name__" and "__package__" are going to be. With "runtime" (default for module mode), the created module uses the parent package to deduce the value of "__package__", to be fully compatible. The value "original" (default for other modes) allows for more static optimization to happen, but is incompatible for modules that normally can be loaded into any package. Output choices: --output-filename=FILENAME Specify how the executable should be named. For extension modules there is no choice, also not for standalone mode and using it will be an error. This may include path information that needs to exist though. Defaults to '' on this platform. .exe --output-dir=DIRECTORY Specify where intermediate and final output files should be put. The DIRECTORY will be populated with build folder, dist folder, binaries, etc. Defaults to current directory. --remove-output Removes the build directory after producing the module or exe file. Defaults to off. --no-pyi-file Do not create a ".pyi" file for extension modules created by Nuitka. This is used to detect implicit imports. Defaults to off. Debug features: --debug Executing all self checks possible to find errors in Nuitka, do not use for production. Defaults to off. --unstripped Keep debug info in the resulting object file for better debugger interaction. Defaults to off. --profile Enable vmprof based profiling of time spent. Not working currently. Defaults to off. --internal-graph Create graph of optimization process internals, do not use for whole programs, but only for small test cases. Defaults to off. --trace-execution Traced execution output, output the line of code before executing it. Defaults to off. --recompile-c-only This is not incremental compilation, but for Nuitka development only. Takes existing files and simply compile them as C again. Allows compiling edited C files for quick debugging changes to the generated source, e.g. to see if code is passed by, values output, etc, Defaults to off. Depends on compiling Python source to determine which files it should look at. --xml=XML_FILENAME Write the internal program structure, result of optimization in XML form to given filename. --generate-c-only Generate only C source code, and do not compile it to binary or module. This is for debugging and code coverage analysis that doesn't waste CPU. Defaults to off. Do not think you can use this directly. --experimental=FLAG Use features declared as 'experimental'. May have no effect if no experimental features are present in the code. Uses secret tags (check source) per experimented feature. --low-memory Attempt to use less memory, by forking less C compilation jobs and using options that use less memory. For use on embedded machines. Use this in case of out of memory problems. Defaults to off. --create-environment-from-report=CREATE_ENVIRONMENT_FROM_REPORT Create a new virtualenv in that non-existing path from the report file given with e.g. '--report=compilation- report.xml'. Default not done. Backend C compiler choice: --clang Enforce the use of clang. On Windows this requires a working Visual Studio version to piggy back on. Defaults to off. --mingw64 Enforce the use of MinGW64 on Windows. Defaults to off unless MSYS2 with MinGW Python is used. --msvc=MSVC_VERSION Enforce the use of specific MSVC version on Windows. Allowed values are e.g. "14.3" (MSVC 2022) and other MSVC version numbers, specify "list" for a list of installed compilers, or use "latest". Defaults to latest MSVC being used if installed, otherwise MinGW64 is used. --jobs=N Specify the allowed number of parallel C compiler jobs. Defaults to the system CPU count. --lto=choice Use link time optimizations (MSVC, gcc, clang). Allowed values are "yes", "no", and "auto" (when it's known to work). Defaults to "auto". --static-libpython=choice Use static link library of Python. Allowed values are "yes", "no", and "auto" (when it's known to work). Defaults to "auto". Cache Control: --disable-cache=DISABLED_CACHES Disable selected caches, specify "all" for all cached. Currently allowed values are: "all","ccache","bytecode","dll-dependencies". can be given multiple times or with comma separated values. Default none. --clean-cache=CLEAN_CACHES Clean the given caches before executing, specify "all" for all cached. Currently allowed values are: "all","ccache","bytecode","dll-dependencies". can be given multiple times or with comma separated values. Default none. --disable-bytecode-cache Do not reuse dependency analysis results for modules, esp. from standard library, that are included as bytecode. Same as --disable-cache=bytecode. --disable-ccache Do not attempt to use ccache (gcc, clang, etc.) or clcache (MSVC, clangcl). Same as --disable- cache=ccache. --disable-dll-dependency-cache Disable the dependency walker cache. Will result in much longer times to create the distribution folder, but might be used in case the cache is suspect to cause errors. Same as --disable-cache=dll- dependencies. --force-dll-dependency-cache-update For an update of the dependency walker cache. Will result in much longer times to create the distribution folder, but might be used in case the cache is suspect to cause errors or known to need an update. PGO compilation choices: --pgo Enables C level profile guided optimization (PGO), by executing a dedicated build first for a profiling run, and then using the result to feedback into the C compilation. Note: This is experimental and not working with standalone modes of Nuitka yet. Defaults to off. --pgo-args=PGO_ARGS Arguments to be passed in case of profile guided optimization. These are passed to the special built executable during the PGO profiling run. Default empty. --pgo-executable=PGO_EXECUTABLE Command to execute when collecting profile information. Use this only, if you need to launch it through a script that prepares it to run. Default use created program. Tracing features: --report=REPORT_FILENAME Report module, data files, compilation, plugin, etc. details in an XML output file. This is also super useful for issue reporting. These reports can e.g. be used to re-create the environment easily using it with '--create-environment-from-report', but contain a lot of information. Default is off. --report-template=REPORT_DESC Report via template. Provide template and output filename "template.rst.j2:output.rst". For built-in templates, check the User Manual for what these are. Can be given multiple times. Default is empty. --quiet Disable all information outputs, but show warnings. Defaults to off. --show-scons Run the C building backend Scons with verbose information, showing the executed commands, detected compilers. Defaults to off. --no-progressbar Disable progress bars. Defaults to off. --show-progress Obsolete: Provide progress information and statistics. Disables normal progress bar. Defaults to off. --show-memory Provide memory information and statistics. Defaults to off. --show-modules Provide information for included modules and DLLs Obsolete: You should use '--report' file instead. Defaults to off. --show-modules-output=PATH Where to output '--show-modules', should be a filename. Default is standard output. --verbose Output details of actions taken, esp. in optimizations. Can become a lot. Defaults to off. --verbose-output=PATH Where to output from '--verbose', should be a filename. Default is standard output. General OS controls: --disable-console When compiling for Windows or macOS, disable the console window and create a GUI application. Defaults to off. --enable-console When compiling for Windows or macOS, enable the console window and create a console application. This disables hints from certain modules, e.g. "PySide" that suggest to disable it. Defaults to true. --force-stdout-spec=FORCE_STDOUT_SPEC Force standard output of the program to go to this location. Useful for programs with disabled console and programs using the Windows Services Plugin of Nuitka commercial. Defaults to not active, use e.g. '%PROGRAM%.out.txt', i.e. file near your program. --force-stderr-spec=FORCE_STDERR_SPEC Force standard error of the program to go to this location. Useful for programs with disabled console and programs using the Windows Services Plugin of Nuitka commercial. Defaults to not active, use e.g. '%PROGRAM%.err.txt', i.e. file near your program. Windows specific controls: --windows-icon-from-ico=ICON_PATH Add executable icon. Can be given multiple times for different resolutions or files with multiple icons inside. In the later case, you may also suffix with # where n is an integer index starting from 1, specifying a specific icon to be included, and all others to be ignored. --windows-icon-from-exe=ICON_EXE_PATH Copy executable icons from this existing executable (Windows only). --onefile-windows-splash-screen-image=SPLASH_SCREEN_IMAGE When compiling for Windows and onefile, show this while loading the application. Defaults to off. --windows-uac-admin Request Windows User Control, to grant admin rights on execution. (Windows only). Defaults to off. --windows-uac-uiaccess Request Windows User Control, to enforce running from a few folders only, remote desktop access. (Windows only). Defaults to off. macOS specific controls: --macos-target-arch=MACOS_TARGET_ARCH What architectures is this to supposed to run on. Default and limit is what the running Python allows for. Default is "native" which is the architecture the Python is run with. --macos-create-app-bundle When compiling for macOS, create a bundle rather than a plain binary application. Currently experimental and incomplete. Currently this is the only way to unlock disabling of console.Defaults to off. --macos-app-icon=ICON_PATH Add icon for the application bundle to use. Can be given only one time. Defaults to Python icon if available. --macos-signed-app-name=MACOS_SIGNED_APP_NAME Name of the application to use for macOS signing. Follow "com.YourCompany.AppName" naming results for best results, as these have to be globally unique, and will potentially grant protected api accesses. --macos-app-name=MACOS_APP_NAME Name of the product to use in macOS bundle information. Defaults to base filename of the binary. --macos-app-mode=MODE Mode of application for the application bundle. When launching a Window, and appearing in Docker is desired, default value "gui" is a good fit. Without a Window ever, the application is a "background" application. For UI elements that get to display later, "ui-element" is in-between. The application will not appear in dock, but get full access to desktop when it does open a Window later. --macos-sign-identity=MACOS_APP_VERSION When signing on macOS, by default an ad-hoc identify will be used, but with this option your get to specify another identity to use. The signing of code is now mandatory on macOS and cannot be disabled. Default "ad-hoc" if not given. --macos-sign-notarization When signing for notarization, using a proper TeamID identity from Apple, use the required runtime signing option, such that it can be accepted. --macos-app-version=MACOS_APP_VERSION Product version to use in macOS bundle information. Defaults to "1.0" if not given. --macos-app-protected-resource=RESOURCE_DESC Request an entitlement for access to a macOS protected resources, e.g. "NSMicrophoneUsageDescription:Microphone access for recording audio." requests access to the microphone and provides an informative text for the user, why that is needed. Before the colon, is an OS identifier for an access right, then the informative text. Legal values can be found on https://developer.apple.com/doc umentation/bundleresources/information_property_list/p rotected_resources and the option can be specified multiple times. Default empty. Linux specific controls: --linux-icon=ICON_PATH Add executable icon for onefile binary to use. Can be given only one time. Defaults to Python icon if available. Binary Version Information: --company-name=COMPANY_NAME Name of the company to use in version information. Defaults to unused. --product-name=PRODUCT_NAME Name of the product to use in version information. Defaults to base filename of the binary. --file-version=FILE_VERSION File version to use in version information. Must be a sequence of up to 4 numbers, e.g. 1.0 or 1.0.0.0, no more digits are allowed, no strings are allowed. Defaults to unused. --product-version=PRODUCT_VERSION Product version to use in version information. Same rules as for file version. Defaults to unused. --file-description=FILE_DESCRIPTION Description of the file used in version information. Windows only at this time. Defaults to binary filename. --copyright=COPYRIGHT_TEXT Copyright used in version information. Windows only at this time. Defaults to not present. --trademarks=TRADEMARK_TEXT Copyright used in version information. Windows only at this time. Defaults to not present. Plugin control: --enable-plugin=PLUGIN_NAME Enabled plugins. Must be plug-in names. Use '--plugin- list' to query the full list and exit. Default empty. --disable-plugin=PLUGIN_NAME Disabled plugins. Must be plug-in names. Use '-- plugin-list' to query the full list and exit. Most standard plugins are not a good idea to disable. Default empty. --plugin-no-detection Plugins can detect if they might be used, and the you can disable the warning via "--disable-plugin=plugin- that-warned", or you can use this option to disable the mechanism entirely, which also speeds up compilation slightly of course as this detection code is run in vain once you are certain of which plugins to use. Defaults to off. --plugin-list Show list of all available plugins and exit. Defaults to off. --user-plugin=PATH The file name of user plugin. Can be given multiple times. Default empty. --show-source-changes Show source changes to original Python file content before compilation. Mostly intended for developing plugins. Default False. Plugin options of 'anti-bloat': --show-anti-bloat-changes Annotate what changes are by the plugin done. --noinclude-setuptools-mode=NOINCLUDE_SETUPTOOLS_MODE What to do if a 'setuptools' or import is encountered. This package can be big with dependencies, and should definitely be avoided. Also handles 'setuptools_scm'. --noinclude-pytest-mode=NOINCLUDE_PYTEST_MODE What to do if a 'pytest' import is encountered. This package can be big with dependencies, and should definitely be avoided. Also handles 'nose' imports. on. --noinclude-custom-mode=CUSTOM_CHOICES What to do if a specific import is encountered. Format is module name, which can and should be a top level package and then one choice, "error", "warning", "nofollow", e.g. PyQt5:error.

来源地址:https://blog.csdn.net/qq_25262697/article/details/129302819

--结束END--

本文标题: 【Python】Python项目打包发布(四)(基于Nuitka打包PySide6项目)

本文链接: https://www.lsjlt.com/news/424005.html(转载时请注明来源链接)

有问题或投稿请发送至: 邮箱/279061341@qq.com    QQ/279061341

本篇文章演示代码以及资料文档资料下载

下载Word文档到电脑,方便收藏和打印~

下载Word文档
猜你喜欢
  • 【Python】Python项目打包发布(四)(基于Nuitka打包PySide6项目)
    Python项目打包发布汇总 【Python】Python项目打包发布(一)(基于Pyinstaller打包多目录项目) 【Python】Python项目打包发布(二)(基于Pyinstaller打包...
    99+
    2023-10-06
    python linux 开发语言
  • 【python】项目打包发布
    概览 这里主要收集python项目的打包、发布和部署的常用方法,只是入门级别,深入的流程还是以官方文档为准(链接每节都已经给出)。 distutils,setuptools,pip,virtualenv 官网资料(Python Pack...
    99+
    2023-01-31
    项目 python
  • python项目打包发布总结
    概览 这里主要收集python项目的打包、发布和部署的常用方法,只是入门级别,深入的流程还是以官方文档为准(链接每节都已经给出)。 distutils,setuptools,pip,virtualenv 官网资料(Python...
    99+
    2023-01-31
    项目 python
  • Unity3d发布android项目,打包apk包流程(unity2021.3.10)
    一、确保已正确安装SDK 1、如下图,在安装版本设置里,点击添加模块。如果没有添加模块,证明你安装路径不是目前版本的安装路径,先去设置回来。 2、框选Android Build Suppor...
    99+
    2023-09-03
    android unity c# Powered by 金山文档
  • Python项目打包成exe文件
    目录前言环境依赖项目打包总结前言 之前有人私信我,他写了一个在终端交互的小程序,希望可以不在IDE的终端显示,而是独立一个窗口进行交互。其实只要把项目打包成exe执行文件,就可以在执...
    99+
    2022-11-12
  • vue项目如何打包发布上线
    这篇文章将为大家详细讲解有关vue项目如何打包发布上线,小编觉得挺实用的,因此分享给大家做个参考,希望大家阅读完这篇文章后可以有所收获。一、开发环境到生产环境的转变项目开发结束之后,首先我们需要通知后端,获取一个线上的路径,之后将之前的开发...
    99+
    2023-06-25
  • python flask项目打包成docker镜像发布的过程
    1.编写python flask代码,简单写一个加法的接口,命名为sum.py import json from flask import Flask,request,render_...
    99+
    2023-03-19
    python 打包docker镜像 python flask docker镜像 python 打包 flask项目
  • 【Python】项目打包:如何使用PyInstaller打包python程序(exe)
    文章目录 前言一、PyInstaller二、安装PyInstaller库三、PyInstaller的使用1.命令行+参数2.py文件+参数2.1配置文件config.py2.2打包文件pyTe...
    99+
    2023-09-02
    python 开发语言 qt5
  • 使用Docker部署打包发布springboot项目
    目录前言第一:环境第二:开始描述从搞项目到docker发布:第四:各种错误教训集合。前言 从安装docker到多种方式打包发布,编译,镜像,容器等问题,遇到种种问题,终于不负所望,一...
    99+
    2022-11-13
  • Python 打包 Spring 项目,如何实现高并发?
    在当今互联网时代,高并发已经成为了一个常见的问题,特别是在Web应用程序中。为了应对高并发的挑战,开发人员通常会将应用程序打包在一起,以实现更高的性能和可靠性。在本文中,我们将探讨如何使用Python打包Spring项目,并实现高并发。 ...
    99+
    2023-09-07
    打包 spring 并发
  • python项目如何打包成exe和安装包
    这篇文章主要介绍了python项目如何打包成exe和安装包的相关知识,内容详细易懂,操作简单快捷,具有一定借鉴价值,相信大家阅读完这篇python项目如何打包成exe和安装包文章都会有所收获,下面我们一起来看看吧。一.打包Flask项目1自...
    99+
    2023-07-05
  • python项目依赖包打包的方法是什么
    在Python项目中,可以使用pip工具来管理和打包项目依赖包。以下是一些常见的方法:1. 使用requirements.txt文件...
    99+
    2023-09-23
    python
  • 怎么将python项目打包成exe与安装包
    这篇文章主要介绍“怎么将python项目打包成exe与安装包”,在日常操作中,相信很多人在怎么将python项目打包成exe与安装包问题上存在疑惑,小编查阅了各式资料,整理出简单好用的操作方法,希望对大家解答”怎么将python项目打包成e...
    99+
    2023-06-25
  • Python 打包 Spring 项目,如何避免并发问题?
    在实际的开发中,我们经常会遇到需要将Spring项目打包成可执行的jar包来部署到生产环境中。这种方式虽然方便,但也会带来一些并发问题。本文将介绍如何使用Python打包Spring项目,并避免并发问题的发生。 一、使用Python打包S...
    99+
    2023-09-07
    打包 spring 并发
  • python flask项目打包成docker镜像发布的方法是什么
    这篇文章主要介绍了python flask项目打包成docker镜像发布的方法是什么的相关知识,内容详细易懂,操作简单快捷,具有一定借鉴价值,相信大家阅读完这篇python flask项目打包成docker镜像发布的方法...
    99+
    2023-07-05
  • SpringBoot项目如何引入外部jar及将外部jar打包到项目发布jar包
    1、创建一个SpringBoot项目 下载项目之后将项目导入IDEA 2、如何添加外部jar包 准备一个外部的jar包, 我这里使用的是guava-31.1-jre.jar作为演示 下载地址:htt...
    99+
    2023-10-25
    spring boot jar java
  • vue项目打包发布上线的方法步骤
    目录一、开发环境到生产环境的转变二、设置统一的请求路径 三、运行打包命令vue项目开发完成后,我们需要将项目打包上线,同时我们希望可以在本地预览生产环境项目 (以vue-c...
    99+
    2022-11-12
  • 如何使用Docker部署打包发布springboot项目
    这篇文章将为大家详细讲解有关如何使用Docker部署打包发布springboot项目,小编觉得挺实用的,因此分享给大家做个参考,希望大家阅读完这篇文章后可以有所收获。前言从安装docker到多种方式打包发布,编译,镜像,容器等问题,遇到种种...
    99+
    2023-06-29
  • 如何使用jenkins一键打包发布vue项目
    这篇文章主要介绍如何使用jenkins一键打包发布vue项目,文中介绍的非常详细,具有一定的参考价值,感兴趣的小伙伴们一定要看完!jenkins的安装Jenkins是一款开源 CI&CD 软件,用于自动化各种任务,包括构建、测试和部...
    99+
    2023-06-15
  • python项目打包部署的方法是什么
    Python项目打包部署的方法有多种,以下是一种常见的方法:1. 使用虚拟环境(可选):在项目目录下创建一个虚拟环境,用于隔离项目所...
    99+
    2023-08-12
    python
软考高级职称资格查询
编程网,编程工程师的家园,是目前国内优秀的开源技术社区之一,形成了由开源软件库、代码分享、资讯、协作翻译、讨论区和博客等几大频道内容,为IT开发者提供了一个发现、使用、并交流开源技术的平台。
  • 官方手机版

  • 微信公众号

  • 商务合作